Monitoring Leaching Fraction for Irrigation Scheduling in Container Nurseries1
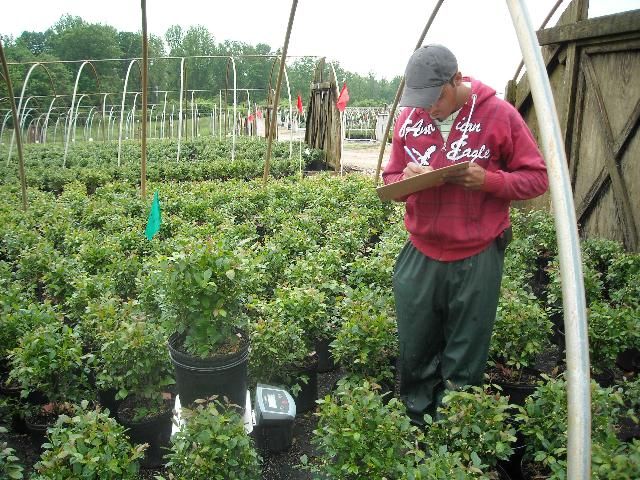
Credit: Jeff Million, UF/IFAS (Saunders Brothers Nursery, Piney River, VA)
Scheduling irrigation in container nurseries can be a daunting task for producers. The finite rooting volume imposed by the container provides little buffer against under- or overwatering. The leaching fraction (LF) test described in this publication is a valuable tool for monitoring the effectiveness of the irrigation program, and when performed routinely, it can be used to schedule irrigation efficiently. We will describe how to perform the test, give example calculations, and provide some suggestions on how to utilize LF testing when managing irrigation.
Measuring LF and Adjusting Irrigation
The measurement of LF during an irrigation event requires the measurement of two separate components: (1) the amount of leachate and (2) the amount of water applied to the container substrate. The following assumes the same units of measurement for both components:

For microirrigation systems (e.g., spray stakes) the amount of water entering the container is not affected by the plant canopy and can be determined by directly collecting output from an emitter. For sprinkler irrigation, on the other hand, the amount of water entering the container substrate is affected by the plant canopy, so collecting irrigation in an empty container will not always give a true value. For sprinkler irrigation, the amount of water applied to the container is determined by placing the container in another holeless container and weighing this pair before and after irrigation. Then, the container is removed and the amount of leachate in the holeless container determined by weighing.
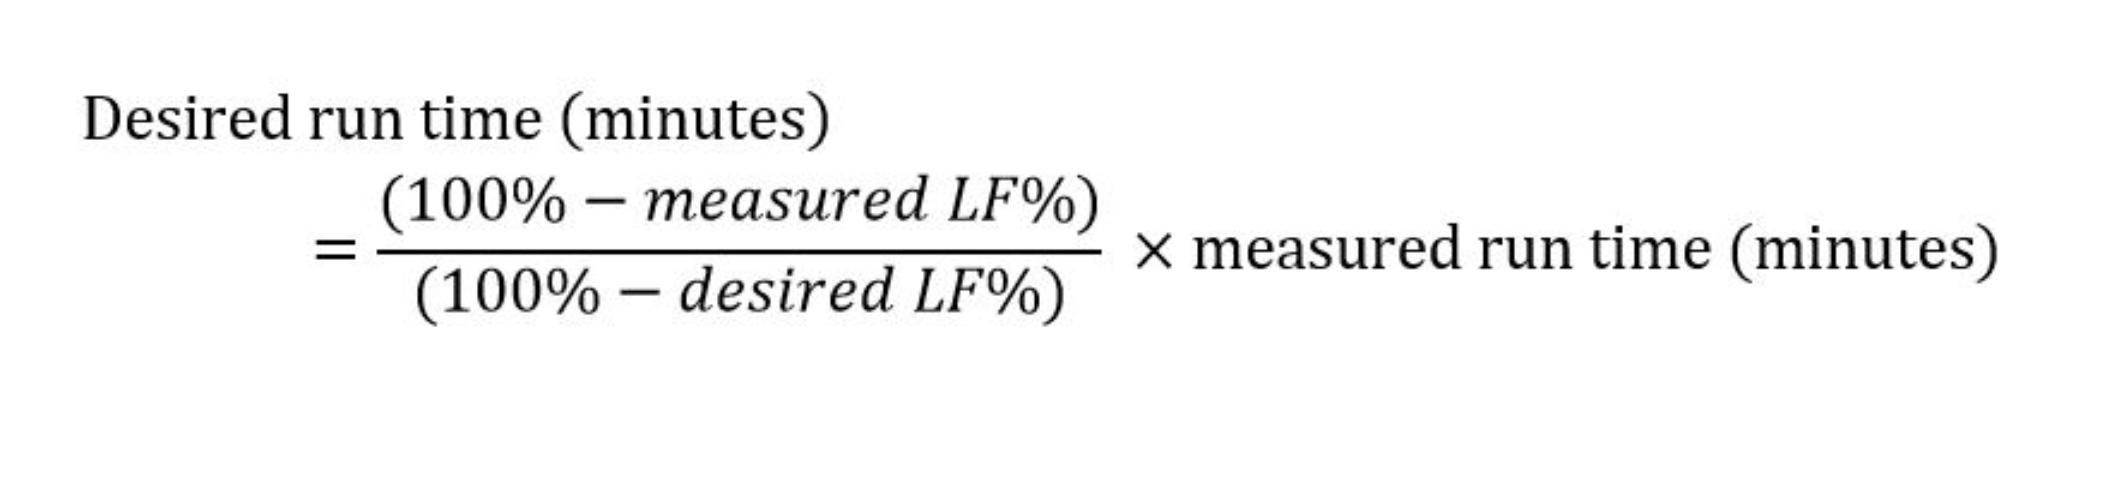
Once LF is determined, adjustments to the irrigation run time can be made with the following formula:
Step-by-Step Procedures
A. Sprinkler Irrigation
-
Select and label representative containers.
-
Place each container in a holeless version of the same container (container manufacturers should be able to supply these if asked). Place an inverted saucer, a 1-inch ring cut from PVC pipe, or other object at the bottom of the collection container to raise the plant container off the bottom of the leachate collection container to prevent reabsorption of drainage water (Figure 2). Alternatively, find a pail into which the container will fit snugly enough to prevent irrigation water from directly entering the leachate collector (pail), but provide enough volume under the plant container to store leachate without reabsorption by the plant. In the latter case, the collector should not elevate the plant container so high that its capture of irrigation water will be greatly affected.

Credit: Jeff Million, UF/IFAS
3. Weigh the planted container and leachate collector together and record the pre-irrigation weight to the nearest 0.01 kg.
4. Put the containers back in the production area in their prior arrangement and irrigate normally. Record the irrigation run time in minutes.
5. After irrigation, allow 30 minutes for drainage, and reweigh the planted container along with the collection container and record the post-irrigation weight to the nearest 0.01 kg.
6. Remove the collection container and weigh to the nearest 0.01 kg. Subtract the tare weight of the collector to determine the amount of leachate. Alternatively, pour leachate into a separate, pre-tared container and weigh to the nearest 0.01 kg.
B. Microirrigation (Water Applied Directly to Container, e.g., Spray-Stake)
-
Select and label representative containers.
-
Place each container on an aluminum pizza pan (with a slightly larger diameter than the container) raised several inches above the ground by sections of 4 inch × 4 inch lumber (Figure 3). A drainage hole in the pizza pan can be created with a hole-punch and a drill press. The drainage hole should be ½-inch wide or greater to limit clogging. This setup can be left in the field for routine LF testing. Place a tray under the hole of the pizza pan to collect leachate during LF test.
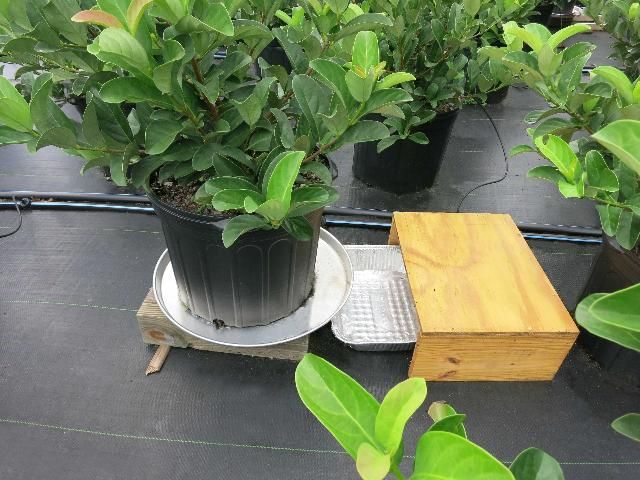
Credit: Jeff Million, UF/IFAS
3. To determine the amount of water applied during the LF test, place an adjacent emitter inside a pail with a lid (Figure 4). A notch cut into the upper lip of the pail prevents the tube from crimping with the lid on. After irrigation, determine the volume of water collected by weighing to the nearest 0.01 kg.
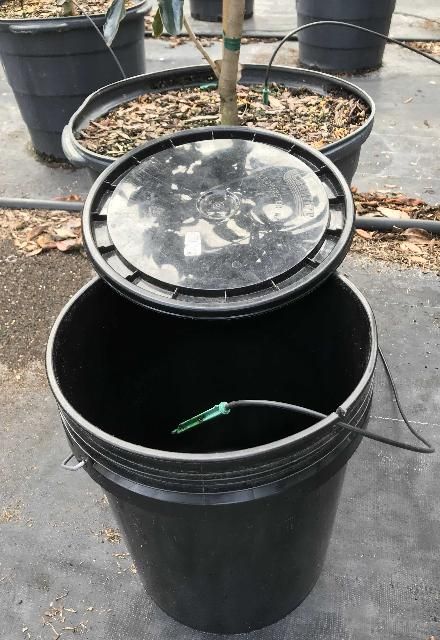
Credit: Jeff Million, UF/IFAS
4. After allowing time for drainage (60 minutes in most cases), measure the volume of leachate collected in the tray by weighing leachate to the nearest 0.01 kg. Use of the same collection trays makes accounting for tare weights more efficient.
Note for cyclic irrigation: When irrigation entails two or more cycles (or pulses), you can collect leachate and emitter output and sum over all cycles if you prevent evaporation between cycles. For research, we often use a substantial wood cover (Figure 3) but any cover that can prevent the tray from moving should work.
Step-by-Step Calculations
A. Sprinkler System
Example Data
Pre-irrigation weight = 7.34 kg
Post-irrigation weight = 8.16 kg
Leachate weight = 0.32 kg
Measured irrigation run time = 50 minutes
Calculate LF
-
Amount of water entering the container substrate = 8.16 - 7.34 = 0.82 kg
-
LF% = amount of leachate ÷ amount of water entering the substrate × 100% = 0.32 kg ÷ 0.82 kg × 100% = 39%
Calculate adjustment in irrigation to achieve desired LF of 15%
a. Desired irrigation time = (100-measured LF) ÷ (100-desired LF) × measured irrigation time = (100-39) ÷ (100-15) × 50 minutes = 0.72 × 50 min = 36 minutes
Conclusion
Adjusting the irrigation run time from 50 minutes to 36 minutes will reduce LF from 39% to 15% under similar environmental conditions.
B. Microirrigation System
Example Data
Irrigation from adjacent emitter = 4.45 kg
Leachate weight = 1.60 kg
Measured irrigation run time = 12 minutes
Calculate LF
LF = amount of leachate ÷ amount of water applied × 100% = 1.60 kg ÷ 4.45 kg × 100% = 36%
Calculate Adjustment in Irrigation to Achieve Target LF of 20%
Desired irrigation run time = (100%-measured LF%) ÷ (100%-desired LF%) × measured irrigation time = (100-36) ÷ (100-20) × 12 min = 0.80 × 12 min = 9.6 min
Conclusion
Adjusting the irrigation run time from 12 minutes to 9.6 minutes will reduce LF from 36% to 20% under similar environmental conditions.
Using LF in an Irrigation Program
LF testing can be used in several ways to help guide irrigation scheduling. It is important to note that any given LF test is only a "snapshot" of irrigation efficiency and, like most tests, methods used and results obtained are only useful when considered in light of other variables that come into play. For example, plant selection for LF tests is critical because plant size and plant position (e.g., border plants) can affect water loss and thus pre-irrigation water status. Also, plant selection should consider location because application of water may not be uniform throughout the irrigation zone. With that in mind, here are a few suggestions on using LF tests.
-
Select 3–5 containers per irrigation zone. The more plants selected, the better the results and interpretations. Large plants are more water demanding than small plants. So, for irrigation zones with several distinct plant sizes, select large plants for LF testing even though the small plants will likely receive more irrigation than needed. Grouping plants by size within an irrigation zone will help match LF results with plant water demand throughout the zone.
-
Select plants that represent the variation in conditions within the zone. For example, include an average plant, a border plant, a larger-sized plant, and a plant in an area known to have or suspected of having a lower irrigation application rate. By selecting plants for LF tests that represent a range of conditions in the irrigation zone, you will learn a great deal about the variability that exists between conditions and can make better decisions regarding the irrigation rates that would be most efficient for a given irrigation area.
-
Conduct LF tests following days where water loss is typical for that period. Avoid conducting LF tests for cloudy days when evapotranspiration rates are low. Conducting LF tests on typical sunny or partly sunny days when ET rates are normal will ensure adequate water is applied. However, information from LF tests made on low versus high ET days does provide valuable information for day-to-day adjustments that could be made based on weather.
-
Establish a routine for periodically retesting LF during the season (e.g., once every 2–4 weeks) because plants grow and weather changes. Other times to retest LF are after significant pruning or when plants are respaced.
-
Keep records of LF testing and irrigation rate adjustments along with plant species, size, spacing, etc. because this information can help direct future irrigation scheduling. Records also document the nursery's use of an irrigation BMP.
-
Ensure high LF values are not due to poor retention of water by the substrate. A typical example is poor lateral movement of microirrigation water resulting in disproportional drainage. High LF values can also be due to the development of water-repelling (hydrophobic) properties in the substrate.
-
Train and monitor staff on the proper procedures to follow and instill in them the importance of their work on irrigation scheduling and therefore, profitability and sustainability of the nursery.
References
Florida Department of Agriculture and Consumer Services. 2014. "Water Quality/Quantity Best Management Practices for Florida Nurseries." DACS-P-O1267
Leaching Fraction Videos: https://hort.ifas.ufl.edu/faculty-profiles/tom-yeager/thomas-yeager-videos/
