Tropical and Subtropical Fruit Propagation
Plant propagation is used to produce new plants from a desired parent plant. There are two categories of plant propagation: asexual and sexual.
Asexual propagation is used to maintain selections of known identity and quality and includes such techniques as division, cuttings, air-layering, and grafting. Asexual propagation creates plants that are genetically identical to the parent plant. Because fruit trees often have desirable traits, in order to maintain their characteristics, they are often propagated using asexual propagation. Fruit trees with specific characteristics are often distinct cultivars. Make sure to always label what you are propagating so as it begins to grow, you know what cultivar it is. Trees propagated asexually are ready to produce fruit as soon as they are large enough to bear the weight of the fruit.
Sexual propagation is a natural process resulting in a parent plant forming seeds that create offspring that are usually not genetically identical to the parent plant. This type of propagation is rarely done for fruit trees unless there are no known superior cultivars or you are growing rootstocks for grafting, or the seeds produce plants very similar to the parents. Growing a tropical fruit tree from seed will usually require many years before the tree is mature enough to produce fruit, with some exceptions like the papaya.
Types of Asexual Propagation
Division
Division is the simplest type of asexual propagation. May through September is the best time to divide plants in south Florida, but division can be done successfully in other warm months. Division is suitable for plants such as bromeliads and orchids, as well as gingers, heliconias, and bamboo. Fruit trees that are most likely to be propagated by division are bananas, plantains, and pineapples. Bananas, plantains, and pineapples naturally clump by sending out rhizomes or "pups." Clumping plants grow from the center of the plant out, so the best place to get new plant material is on the perimeter of the plant. When dividing a clumping plant like a banana or a plantain, remove a pup approximately 1/3 the size of the mother plant and try to get as many roots as possible. Try to remove any of the soil attached to the roots, because this may harbor insects or nematodes. This pup can then be planted in well-draining soil or directly in the ground. Remove 2/3 of the leaves when moving a pup for bananas and plantains. This is not necessary for pineapples.
Cuttings
This type of asexual propagation involves removing a small portion of a mature plant to force it to root. May through September is the best time to make cuttings. The tropical fruits pitaya (dragon fruit) and spondias are grown very easily from cuttings. Pitayas and spondias may be propagated by cuttings in well-draining soil and do not require misting. Many tropical fruit should not be propagated from cuttings because they will develop weak roots and eventually topple.
When taking cuttings, look for clean, healthy plant material to propagate. Pitayas can be cut at lengths about 12 inches or more. Spondias can be cut about the same length and should be about ¾ of an inch thick. After the cuttings are collected, they can be placed in a dry, cool area for approximately 24 hours to allow their wounds to callus. Cuttings should be potted in one-gallon containers in well-draining media. The media should be kept moist but not wet.

Credit: Jeff Wasielewski, UF/IFAS
Before spondias cuttings are potted, the lower leaves should be removed along with any flowers or fruits. The lower leaves are removed so the plant can be placed easily into the media mix, and the flowers and fruits are removed so they do not sap energy from the process of root generation. Rooting hormones are not needed with pitayas and spondias, but they are used for other types of cuttings. Rooting hormones are a manufactured product that mimics natural hormones in the plant that signal it is time to produce roots.
Cuttings should be placed in a one-gallon container filled with well-draining media that is kept moist but not wet. The cuttings should be placed in dappled shade (not full sun) and checked daily. Cuttings are ready to plant or move to a larger container when roots begin to fill the container. Make sure that the cuttings are not placed upside down (buds should be pointed up), because they will not grow if inverted.
Air-Layering
Air-layering is a type of asexual propagation that has a high success rate because it allows the new plant to grow roots while still attached to the parent plant. The best time of year to do air-layers is May through September. Guavas, caimitos, Spanish limes, lychees, and longans are typically propagated by air-layering.
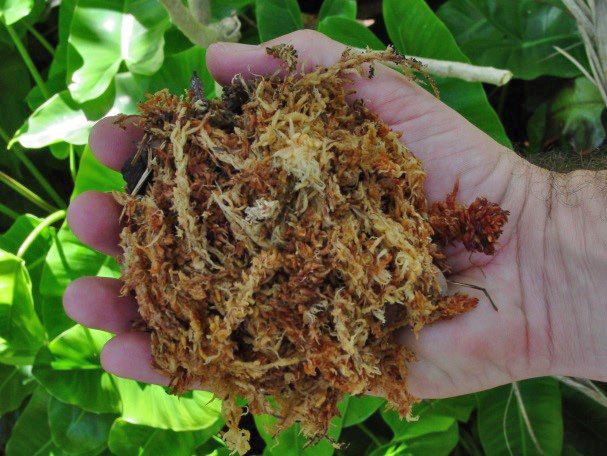
In order to make the initial air-layer, you will need a healthy parent plant, a knife, moist sphagnum moss (place it in a bucket full of water, soak, and then drain) and aluminum foil sheets (5? × 8?).
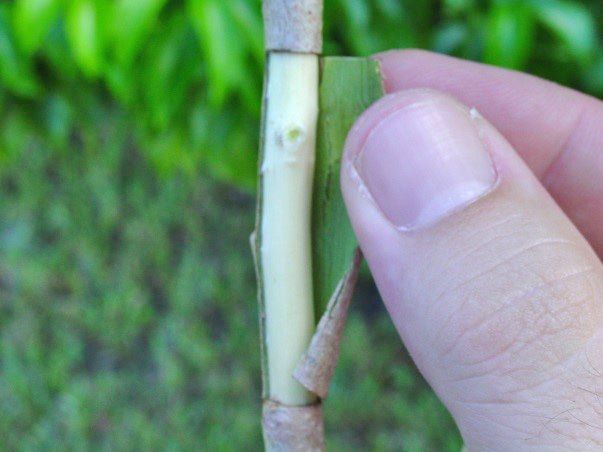
Multiple air-layers can be made on one parent plant. Air-layers can vary in size and width from 12 inches long and ¼ inches thick to 3 feet long and 7 inches thick. Smaller air-layers are generally more manageable than larger ones. To begin, find a vertical branch on the parent plant about the width of a pencil. About 12 inches down from the tip of the branch, make a ring around the branch with the knife. When you make the ring, you should feel the knife go into the bark and then hit the woody portion of the branch. Do not cut into the woody portion of the plant—just ring the bark. Make a second ring about 1½ inches from the top ring. Then make a vertical cut that connects the two rings. If the plant is actively growing, you should be able to place the tip of your knife in the vertical cut and peel away the bark. This will leave you with a ring of exposed wood on your chosen branch.
Next, you must gently scrape the exposed wood in order to remove a portion of the plant known as the cambium. The cambium is a layer of cells that is responsible for generating the bark and wood of the tree. If the cambium is not removed, the bark will regrow and roots will not form. Because the bark and cambium have been removed, the flow of sugars to the roots is interrupted. New roots will form at the top of the exposed wood.
Credit: Jeff Wasielewski, UF/IFAS
Credit: Jeff Wasielewski, UF/IFAS
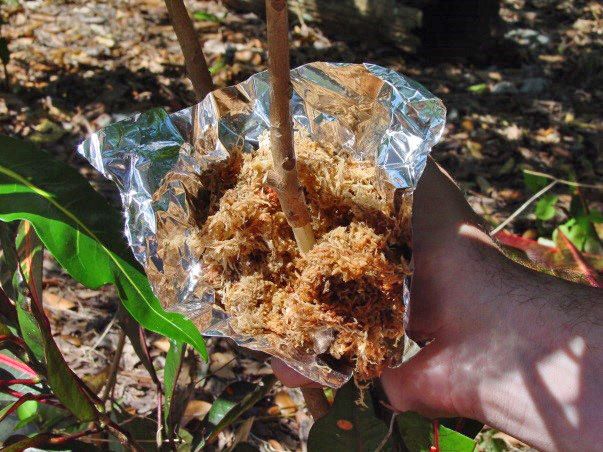
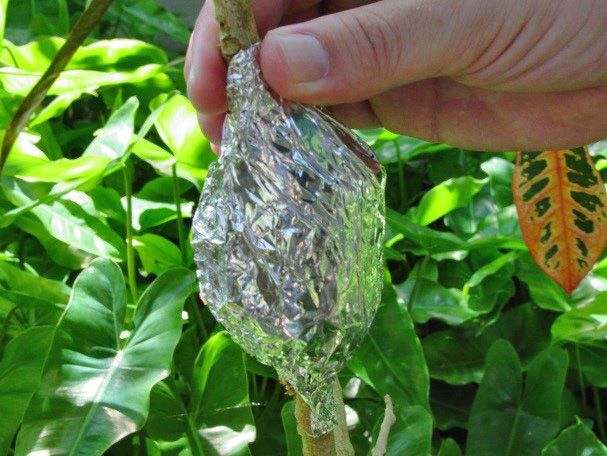
In order to facilitate root growth, place the moist sphagnum around the exposed area. Gently squeeze it to remove some of the water so it is moist but not wet. Place a generous amount of sphagnum and hold it tightly in place with the aluminum foil. Twist the foil closed at the top and bottom of the working area.
Credit: Jeff Wasielewski, UF/IFAS
Credit: Jeff Wasielewski, UF/IFAS
The air-layer should be checked after three or four weeks for root formation. At this point, gently pull back the foil to look for roots. If roots have covered the sphagnum, the air-layer should be removed from the parent tree by cutting it just below the sphagnum-root mass. Removed air-layers should be placed in a bucket of water and taken to a potting area. Remove the foil and plant in well-draining soil. The air-layer should be potted in a two-gallon container with the roots placed below the soil line. The soil should be carefully packed around the tender roots. The air-layer should then be watered and may be given a liquid drench of a weak solution of 20-20-20 fertilizer. The air-layer should then be placed in a protected area. A mist bench is preferred but not as necessary as with cuttings. When the new container is filled with roots, the plant may be repotted or placed into the ground.
Grafting
Grafting is one of the most difficult types of asexual propagation, but it can be accomplished with sufficient practice. Grafting involves joining a piece of a mature tree (scion or budwood) to a seedling (rootstock). The scion becomes the new trunk and branches of the tree and the rootstock becomes the root system. Some trees, such as mangos or avocados, will produce roots using air-layers, but the roots will not be strong enough to maintain the tree. In those cases, grafting is the preferred type of propagation.
The cambium is a key component in a successful graft, because cambium layers from both the scion and the rootstock must be matched for a successful graft. The cambium is an active layer of cells located between the bark and woody portion of a stem or branch. Most tropical fruit is propagated using grafting because you are able to join the genetic material you want (scion) with a strong seedling with good roots (rootstock).
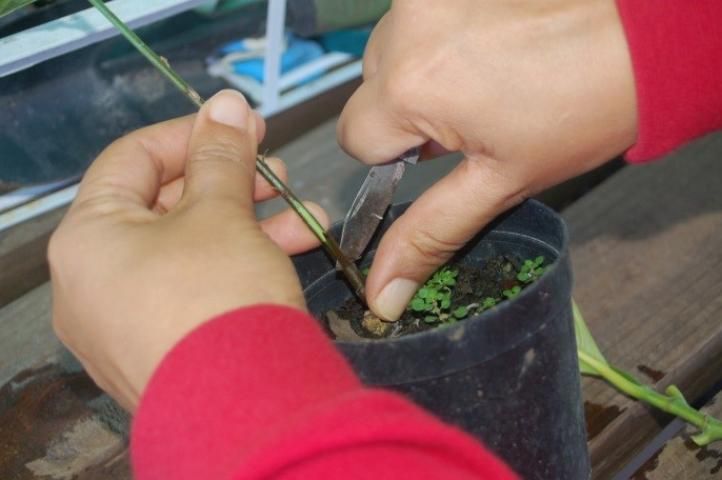
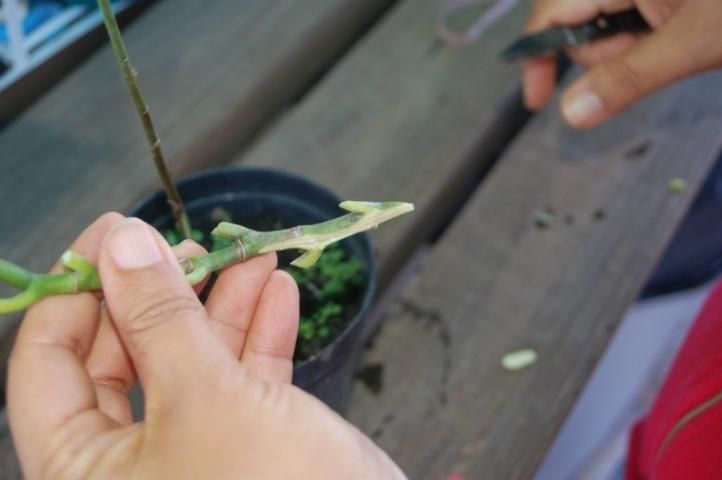
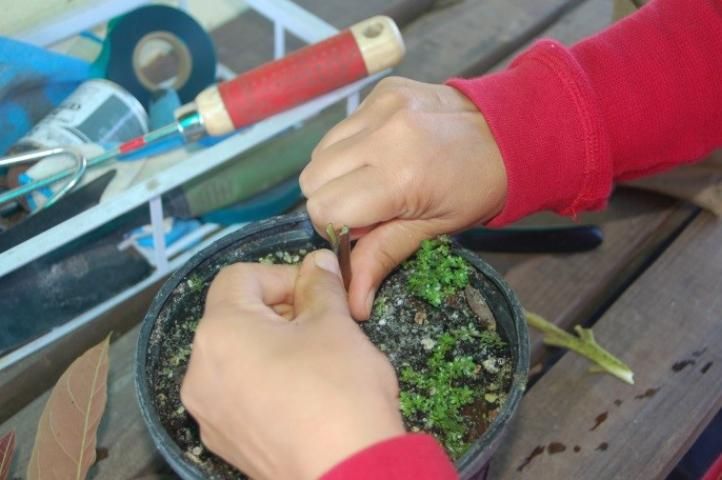
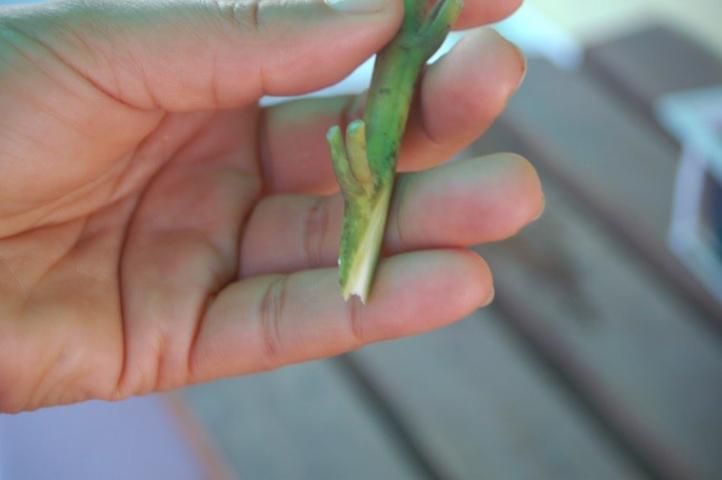
There are two main types of grafting: veneer and cleft. Both types of grafts require healthy scions and rootstock. Both the scions and the rootstock should be about the diameter of a pencil. When selecting scions for veneer or cleft grafts, choose healthy portions of the parent plant with buds that are going to open soon but have not opened yet (swollen). The scions should be about three to four inches long and the width of a pencil, and they generally should have their leaves removed after they are cut from the parent plant. It may be desirable to leave the top leaves on the scion when completing a cleft graft. Scions should be placed in a sealed bag as soon as they are removed from the parent plant. Scions may be kept several days before they are grafted. With both types of grafting, a sharp, high-quality grafting knife is recommended. A grafting knife differs from a standard knife in that it is beveled on only one side. This unique quality of the grafting knife allows it to make the smooth, flat, and even cuts required for a successful graft.
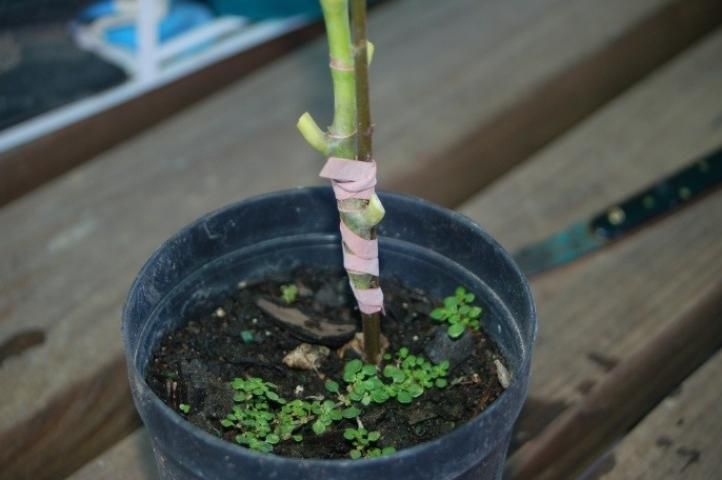
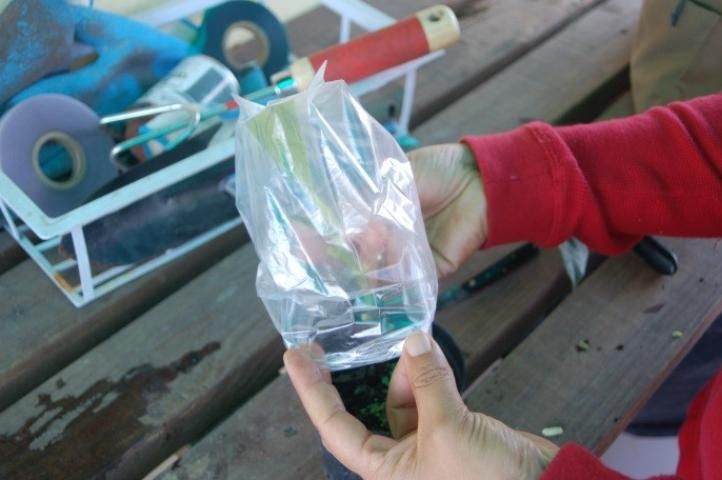
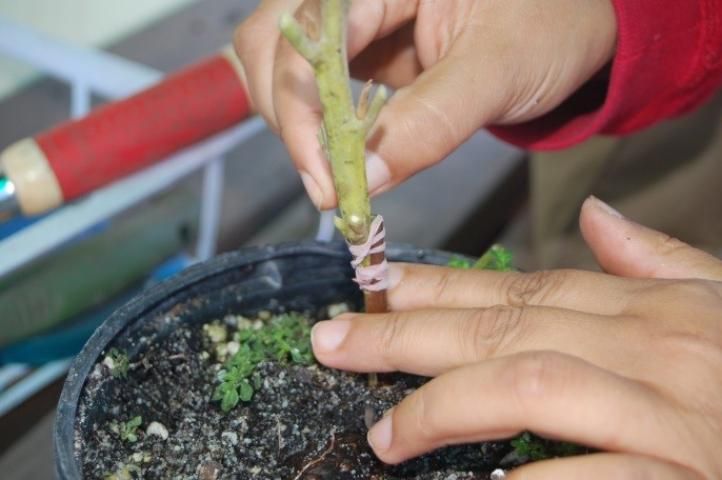
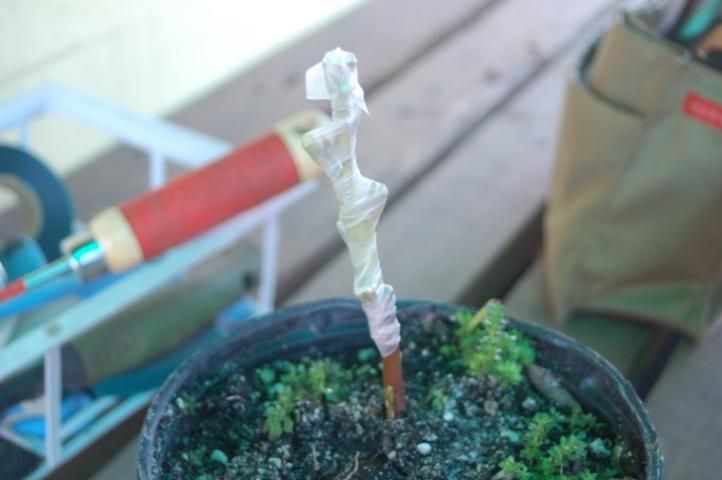
Veneer grafting is done by removing the bark from one side of the scion. The bark is then removed from a portion of the rootstock that is roughly the same length as the scion. A flap of bark should be left on the bottom of the rootstock cut to help the scion hold in place. The bottom of the scion should be cut at a 45° angle to fit into the flap left on the rootstock. The exposed cambium (found just below the bark) of the scion and rootstock are then placed together and held in place with transparent grafting tape or a rubber band. The tape or band should be wrapped from bottom to top firmly, but not overly tightly. The tape will seal the graft to retain moisture as well as hold the scion in place. If you use a rubber band, you may need to seal in moisture with a plastic bag or parafilm.
Credit: Jeff Wasielewski, UF/IFAS
Credit: Jeff Wasielewski, UF/IFAS
Credit: Jeff Wasielewski, UF/IFAS
Credit: Jeff Wasielewski, UF/IFAS
It is important that the cuts made on both the scion and the rootstock are smooth, flat, and equal in width and length. The top of the rootstock should then be trimmed in order to stimulate bud growth in the scion. Once the cambiums have been joined, they will grow together and form a strong union of scion and rootstock that will become the newly propagated plant.
Cleft grafting is done by cutting off the top of the rootstock and gently making a cut down the middle of the rootstock about ½ inch in depth. The scion is then prepared by creating a thin wedge at the base of the scion that will fit into the cut made in the rootstock. The scion is then placed into the rootstock. Both rootstock and scion should be the same size, and there should not be any air space when the two are joined. Scion and rootstock are then held in place by grafting tape or a rubber band. The tape will seal the graft to retain moisture as well as hold the scion in place. If you use a rubber band, you may need to seal in moisture with a plastic bag or parafilm.
Credit: Jeff Wasielewski, UF/IFAS
Credit: Jeff Wasielewski, UF/IFAS
Credit: Jeff Wasielewski, UF/IFAS
Credit: Jeff Wasielewski, UF/IFAS
Aftercare for both types of grafting is similar. After the graft is completed, the graft should be placed in a shady, humid, and protected area. The graft union should be complete in approximately four to seven weeks. Leaves will grow from the scion when the graft is successful. It may be necessary to cut holes in the grafting tape to allow the leaves to emerge. The grafting tape can be completely removed once a strong union has been formed. With a veneer graft, the top of the rootstock should be removed down to the scion once the tape is removed. Newly grafted plants are ready for planting when they have grown approximately 14 inches in length.
Sexual Propagation: Growing Plants from Seed
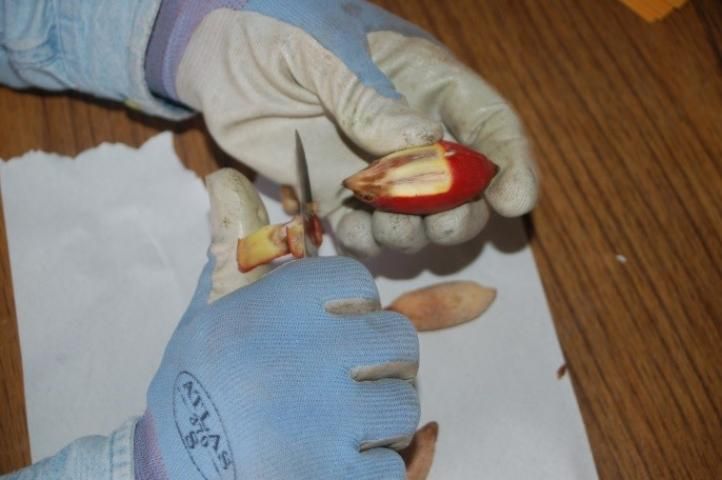
Growing plants from seed is a very natural and easy process. Tropical fruit are grown from seed if there are no superior cultivars to use as rootstocks for grafting. It is important to remember when collecting seeds to be propagated that there are two main types of seed: fleshy and dry. Fleshy seeds are packaged inside fruits and are usually dispersed by animals. The fleshy portion needs to be removed before the seed is sown.
When collecting fruit, look for mature fruit that are usually very colorful and somewhat soft to the touch. A fruit may go from green to light red to dark red or orange before it is fully mature and ready to be collected and sown. Dry seeds are usually dispersed by wind and sometimes need their seed coats to be worn away in order to germinate. When collecting dry seeds, look for seed pods to become brown, withered, and ready to open to release the seeds.
Credit: Jeff Wasielewski, UF/IFAS
Credit: Jeff Wasielewski, UF/IFAS
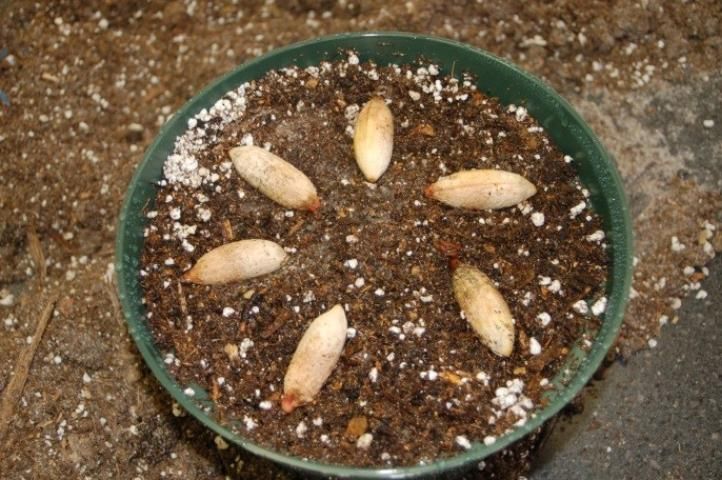
Once the mature seeds have been collected and cleaned, they are ready to be sown. Seeds with a very hard seed coat may benefit from soaking in clean water for 24 to 48 hours. A well-draining, aerated, and sterile medium is important to use. Seeds may be sown directly on top of the media in a container about 3–4 inches deep and then lightly dusted with media. Seeds should be just below the surface of the media. Multiple seeds may be placed in a single container. Once in place, the seeds should be lightly watered. Smaller seeds should be misted so that they are not displaced by the flow of the water. The container should then be placed in a protected area with dappled sunlight. The temperature of the seeds should remain above 70°F.
Seeds of some species may take several months to germinate. Once the seed has some well-established roots, it can be removed from the community container and placed in its own container. The container should be deep enough to house the full depth of the root system. Once the new container begins to fill with roots, the seedling may be placed in a larger container or in the ground. It is crucial that the seedlings are not left in a container that is too small for them for an extended period of time. This will cause root binding, which is detrimental to the plant.
In all types of plant propagation, it is necessary to remember that when plants are being grown in heavy shade, they cannot be immediately moved to full sun or they will suffer sunburn. Plants should be acclimatized slowly from heavy shade, to lighter shade, to full sun over a period of several weeks. To avoid the acclimatization period, keep newly propagated plants in light shade rather than deep shade.