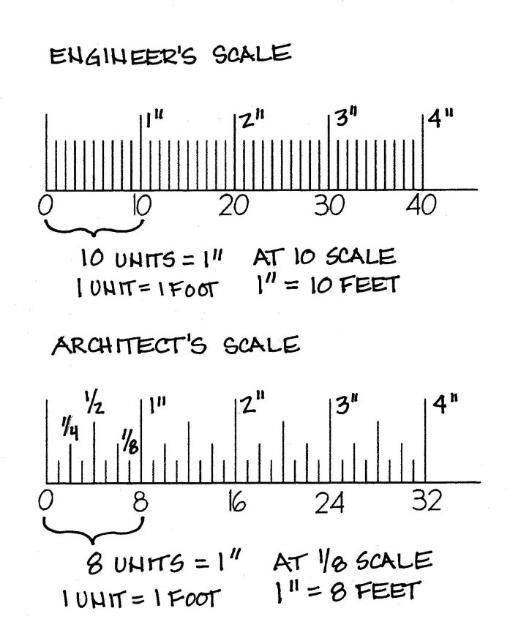
Before you begin planning a new design, you will need a base map of your yard on which to draw the proposed features. A base map is a bird's-eye view of your property that is drawn to scale on a large sheet of paper. To inventory your yard, a quick sketch will work, but you must convert this to a scaled drawing for accuracy on the final plan. A scaled drawing shows the true dimensions and locations of features at a particular scale. You can use a standard ruler that shows 1/8th in. divisions and draw your base so that every 1/8th in. equals 1 ft, which translates to 1 in. = 8 ft, similar to an architect's scale (Figure 1), or you can use an engineer's scale (Figure 1) and draw the base map at 10 scale, where 1 in. is divided into 10 units and every unit equals 1 ft (1 in. = 10 ft). It is important to use the legal site survey to create your base map. You must have accurate measurements for your property lines and house to prevent building on your neighbor's property and to ensure that the design will fit your site. Using the legal survey will also save you a great deal of time when measuring and drawing, as it includes many dimensions.
Site Survey
A legal site survey is also called a mortgage plat because it is usually given to the homeowner at closing when the house is purchased. If you do not have the legal site survey, you can usually get a copy from the county surveyor, or possibly from the general contractor or the mortgage company. The site survey is important to define the property lines, the footprint (outline) of the building, and the driveway/sidewalks. The survey is drawn using the engineer's scale. If you wish to use 1/8th scale (standard ruler) to draw the base map, use the lengths of the property lines and house dimensions written on the survey. Other features—such as trees, patios, and decks—may not be located on the survey but can be measured on site and added to the base map. First, check the survey for accuracy—anything that was added after the survey was completed will not be included. Check to make sure that the house is properly located by taking several measurements from the house corner to the property corner or some other fixed benchmark, such as the corner where the concrete driveway meets the sidewalk. As long as the house is accurately located in relation to the property lines, the corners of the house can be used as the fixed points to measure and locate other features on the site. This point is typically referred to as the point of beginning, or POB.
It is also important to note the setback, easement, and right-of-way lines on the survey. These lines indicate areas where you may not be allowed to build structures, although you can typically install plants. Be aware that utility lines usually run underground in easements and rights-of-way, and local ordinances apply. Also check for any restrictions that may apply if you have neighborhood covenants—these are not shown on the survey. It is also important to have underground utilities marked before you do any digging—don't assume that they are located in the center of the easement.
Tools for Measurement
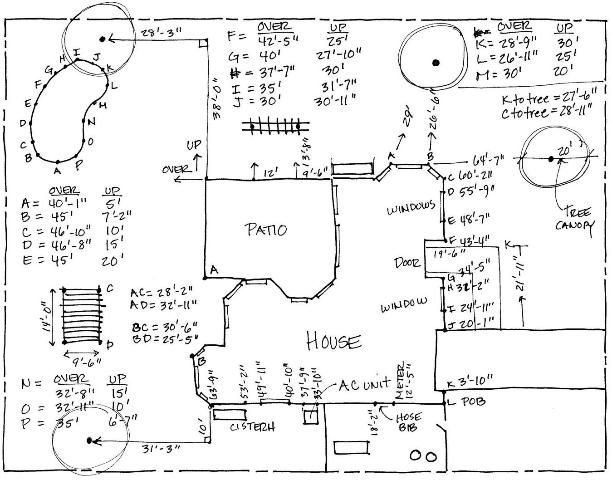
You will need one or two long tape measures, of 100 or 200 ft in length. A screwdriver with a long shaft is helpful for anchoring one end of the tape if you don't have a helper. Remember to always hold the tape tight when measuring and check your numbers twice before recording to prevent inaccurate measurements. Before you start, draw a simple sketch on which to record the measurements. The sketch does not have to be any particular size, as long as there is enough room to write the numbers. Draw the property lines, house footprint, and hardscape features on a blank sheet of paper. Make sure the outline of the house is accurate for all the corners, windows, doors, and changes of direction. A typical sketch is shown in Figure 2. After you take the site measurements, redraw the site to scale. To redraw the site, you will need a large sheet of paper, usually at least 24" x 18", an engineer's or architect's scale, a straightedge, and a pencil compass.
Measurement Methods
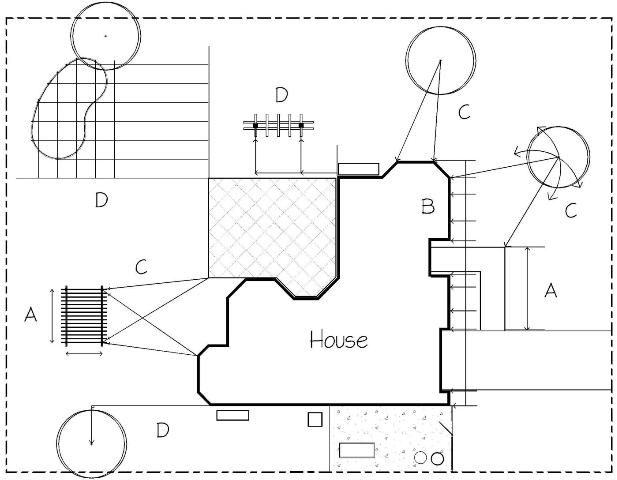
There are several different methods for measuring features on the site, depending on the type of feature and the location. Figure 3 shows all of the different methods used in a yard. Point-to-point (A) is a simple measurement of length. Baseline (or running) measurements (B) are used along walls or other linear features to measure several points along a line from a single POB. Triangulation (C) is used for single-point measurements, such as trees. Grid (or right angle) measurements (D) are used for large or odd-shaped features. All measurements start at a stationary fixed point. Measurements should be as accurate as possible. Try to pull the tape under shrubs and other plants to keep the tape level, straight, and tight. Write clearly so that you can read your notes when you draw your scale base map. Remember to take neat, accurate notes and label everything because when you sit down to draw, you may not remember the shorthand you used in the field. If you use symbols, draw a key on the side of the sheet. Large trees should be measured to the center of the tree by pulling the tape to the side of the trunk and estimating the center.
A. Point-to-Point Measurements
All measurements are essentially point-to-point measurements—the distance between two fixed points. However, they are rarely used as a single measurement; the location of most objects must be calculated by using a series of point-to-point measurements from several reference or fixed points. For example, triangulation requires two point-to-point measurements, and grids require many point-to-point measurements. Single point-to-point measurements are typically used to measure the dimensions of an object.
B. Baseline Measurements
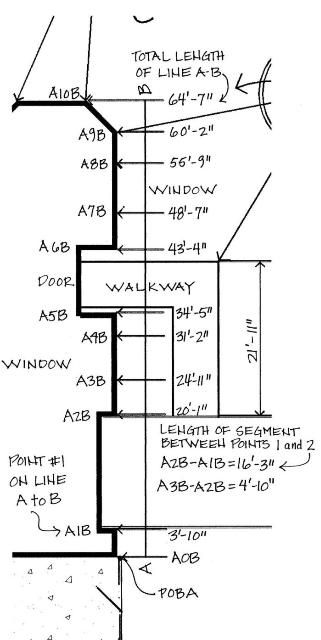
Baseline or running measurements (Figure 4) are used for a series of measurements along a surface or wall. Stretching one tape along the edge of a wall or fence eliminates the need to continually move the tape and reduces error in measurements. Take baseline measurements as follows:
- Pull the tape as close to the wall as possible from one corner to the opposite corner (POB A–B).
- Start at corner A (the POB) and work toward corner B, recording a measurement at each edge of each window, corner, and door, as well as any other object attached to the house, such as a meter or a water spigot.
- Label each point so that you can calculate distances between each point if needed.
- Calculate distances between points by subtracting the running measurements. For example, if you want to know the width of a window from point 3 to point 4, subtract the measurement of point 3 from point 4. In Figure 4, point 4 on line A–B = 31'2", point 3 = 24'11"; therefore, A4B–A3B = 6'3".
C. Triangulation Measurements
This method is used to determine the location of one point from two fixed or reference points. Various corners on the house are most often used as reference points. These corners become the POBs, and measurements are taken from the house to the tree center from both POBs. Other objects, such as walkway corners or utilities, can also be used as POBs as long as they are shown on the legal survey. Figure 5 shows two trees measured from the corners of the house and the walkway (POBs A, B, C, and D). Take triangulation measurements as follows:
- Label each tree T1, T2, T3, etc. if you have more than one tree.
- Label the POBs and draw a tape from each POB to each tree.
- Write the distance from each POB to each tree along a line that represents the tape, or record the measurement as the distance from POB A to T1.
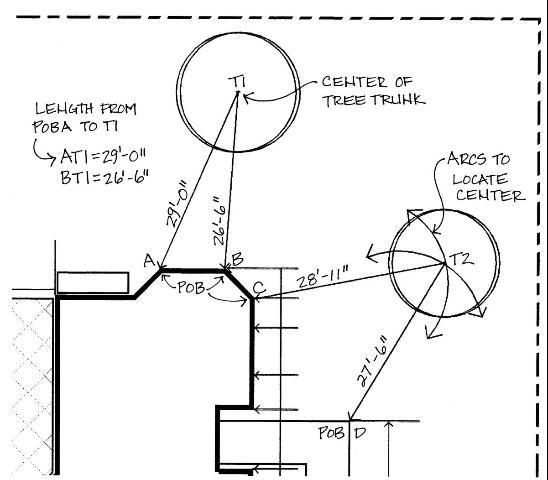
The arcs drawn on T2 show how to locate the center of the tree when redrawing the plan to scale.
- Use a compass and adjust the legs to equal the distance of the line (CT2 = 28'11") at the scale you are using—1/8th or 10 scale.
- Place the point of the compass at POB C and draw a short arc.
- Adjust the compass legs to the length of line DT2 (27'6"), place the compass point at POB D, and draw a second arc that passes through the first. The two arcs intersect at the center of the tree.
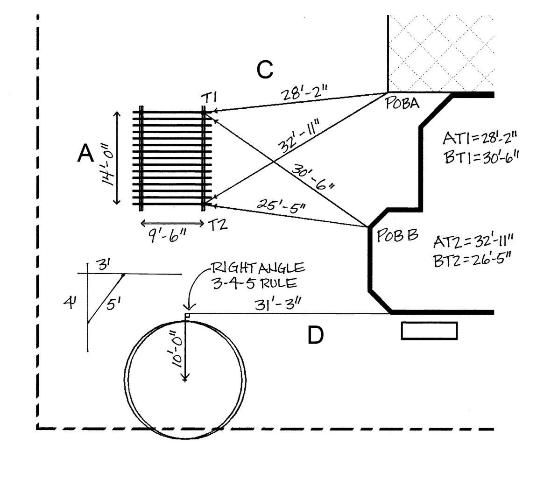
Figure 6 shows another use of the triangulation method (C). In this situation, two points are located at the posts of a trellis (T1 and T2). Each point is measured from two different corners of the house (POB A and POB B). Figure 6 also shows simple point-to-point measurements (A) between the corner posts of the trellis and a simple grid or right angle measurement (D) to locate the tree. In the right angle method, a tape is pulled as an extension of the side of the house and a second tape is pulled from the center of the tree. Where the two tapes cross, the 3-4-5 rule from basic geometry, A2 + B2 = C2, is used to make sure the tapes form a right angle (90°). This means the square of the hypotenuse (long side) of a right triangle is equal to the sum of the square of both legs (Pythagorean Theorem). Start by crossing the tape from the tree over the tape from the house at a right angle. Estimate the angle by sight. Measure 4 ft from the corner of the tree tape and mark, then measure 3 ft from the corner of the house tape and mark. Measure the distance between these marks with a third tape. If the distance is 5 ft, it is a right triangle. If not, adjust the tapes until you have a 5 ft hypotenuse (long side of a right triangle) and 3 and 4 ft legs on the triangle. For longer distances, use a larger number combination where all three numbers are multiples of 3-4-5, such as 15-20-25 (3 x 5 = 15, 4 x 5 = 20, 5 x 5 = 25).
D. Grid (Right Angle) Measurements
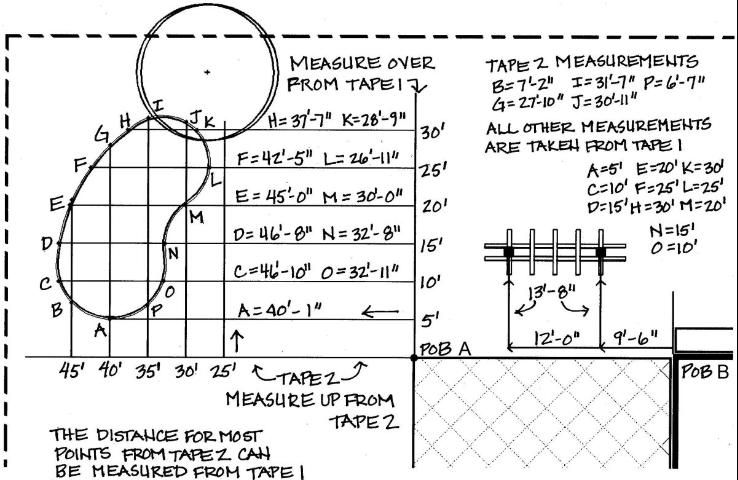
Grid measurements are used to locate large, odd-shaped areas on the ground plane, such as a plant bed or a curvilinear swimming pool (Figure 7). To create a grid, you need two tapes to be most accurate. Steps to creating the grid are as follows:
- Use a corner of the house or other stationary feature for POB A. Pull a tape (Tape 1) from the POB along one side of the area to be measured and leave it on the ground.
- Pull a second tape perpendicular to Tape 1 on the ground at each 5 ft increment to the near and far points (two points) on the edge of the area.
- Label each point on your base sheet and record the distance, as shown in Figure 7.
- Pull the second tape (Tape 2) from POB A at a right angle to Tape 1 while it is still on the ground, pick up Tape 1 and pull it from each 5 ft increment on Tape 2, and record the distance to the near and far points on the edge.
Figure 7 also shows the use of the grid method to locate two posts on a trellis by pulling a tape from the corner of the house (POB B) and then pulling tapes at right angles from the edge of the patio. Although the triangulation method may be easier in the field, the grid method is easier to redraw on the scale base map if you don't have a compass.
Recording Multiple Measurements
Multiple measurements are recorded on most base maps, and the small sheet of paper can make it difficult to fit everything on one page. It is sometimes best to make several copies of your base sheet and record triangulated measurements separate from baseline and grid measurements.
Measuring Overhead, Underground, and Vertical Features
Overhead measurements should also be taken, including the width of tree canopies and the location of overhead wires. To measure a tree canopy, anchor one end of the tape at the edge of the dripline (the outer edge of the canopy) and pull the tape to the other side of the canopy. If the canopy is oddly shaped, you may have to take two diameter measurements.
To determine the location of overhead wires, locate the supporting pole; if the pole is off the property, stand directly beneath the wires and locate a starting point on the property edge. It may be important to determine the height of wires or other vertical elements, particularly if you want to plant trees.
Underground lines that go from utility boxes to the house can be estimated by first locating the utility boxes and the meters or connection on the side of the house and drawing a line between the two. Main utility lines must be located by the utility company. In most areas, utility location is provided as a free service. Irrigation lines are another underground feature to be located. The best option is to have a plan of the irrigation system as it was built that shows exactly how it was installed. If you don't have one, you can gently push a stake or screwdriver in the ground between each of the spray heads to see if you can locate the pipe. Draw lines on the map between heads where you find a pipe.
Other vertical measurements that are important include the height to the bottom of windows or other elements on the side of the house, such as the rail around a porch. Also indicate the height of mailboxes, overhead lights, fences, and overhead views (such as your neighbor's second story bedroom window) that you may want to block.
Tips for Taking Measurements and Drawing a Base Map
- Enlist others to help you. It's much easier to have two people pulling the tape and one person recording.
- Use long (100 and 200 ft) tapes. Piecing together measurements because the tape is too short increases the possibility for error and makes the process of measuring more difficult.
- Record the measurements carefully in legible handwriting. If you are not able to read your notes later, you will have to go back and measure again. Use several sheets of paper and multiple sketches if room is limited. Draw quick enlargements of areas where many small measurements must be recorded.
- If you have large shrubs or trees blocking a straight line with the tape, try to find another POB from which to record. Sometimes you can locate one or two trees or another object and then use those as your POB.
- If you don't have two good points for triangulation measurements, you may have to create a second point by locating a flag or stake for a new POB, then use the new point to locate other objects. Make sure to locate the new POB using triangulation.
- Try to record the fewest measurements for each object and still be accurate. Take running (baseline) measurements whenever possible. If you have a symmetrical layout, measure one side only (it's always best to check a few measurements to ensure it is symmetrical).
- Round up or down to the nearest inch—at 1/8th scale or 10 scale you will not be able to show any more accuracy on your base sheet. At both scales, the width of your pencil is equivalent to about 4 in.