Fertilizer application is only effective if you ensure uniform coverage. Dry fertilizers can be applied with either a drop spreader (Figure 1) or a rotary spreader (Figure 2). A drop spreader has the advantage of applying a precise pattern because it is limited to the distance between the wheels (Figure 3). This allows a highly accurate pattern to be spread, but requires that each pass meets exactly with the previous one; otherwise, skips will be noticeable. Wide (> 6 feet) drop spreaders can become cumbersome in the landscape by limiting access around trees and shrubs and through gates. Thus, rotary spreaders are often used more in the landscape. Conversely, drop spreaders are commonly used to precisely apply granular products on certain areas of golf courses (such as putting green collars) where a different fertilizer grade or size is desired on the collar compared to the putting green. The agitator in the bottom of the drop spreader may damage the coating of some slow-release fertilizers (e.g., coated products). Thus, only soluble or reacted slow-release fertilizers (e.g., organics and reacted products) should be applied through a drop spreader.
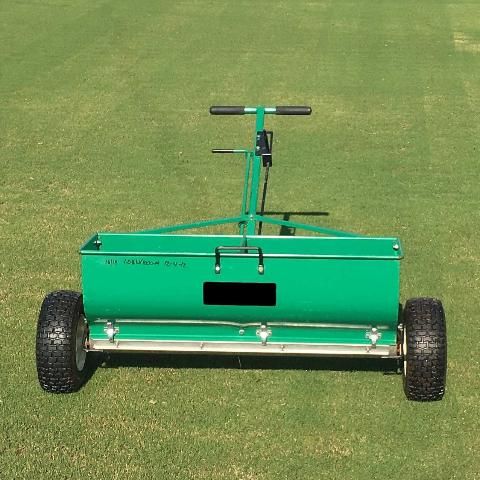
Credit: Travis Shaddox, UF/IFAS
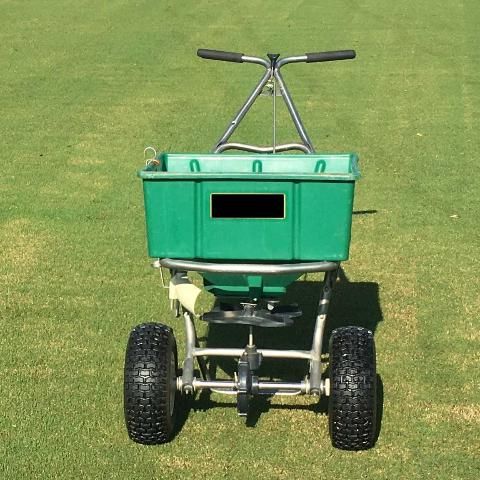
Credit: Travis Shaddox, UF/IFAS
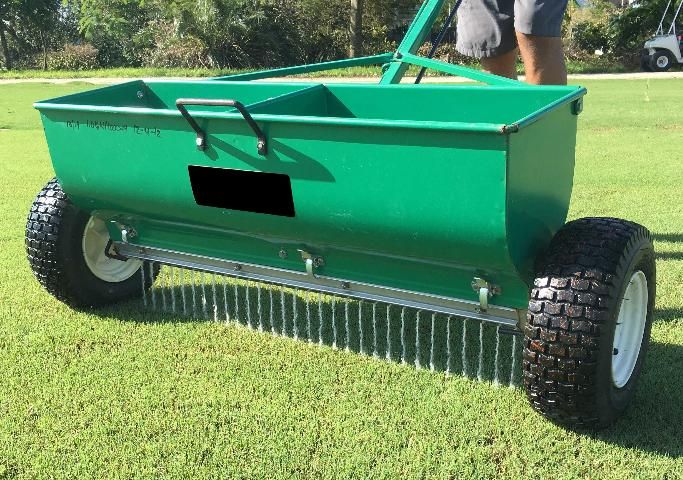
Credit: Travis Shaddox, UF/IFAS
The rotary spreader has a wider distribution pattern compared to a drop spreader, and therefore can cover a larger area in a shorter time. The application pattern of a rotary spreader also gradually diminishes away from the machine, reducing the probability of an application skip. The uneven, wide pattern of the rotary spreader is initially harder to calibrate, and heavier fertilizer particles tend to sling farther away from the machine.
Spreader calibration consists of two processes. First, the spread pattern must be adjusted to distribute the fertilizer particles uniformly. Second, the amount of fertilizer spread over the desired area must be measured and adjusted, if necessary, to equal the recommended application rate. The following supplies may be necessary:
- Tape measure
- Measuring scale
- Catch pan
- Broom
- Calculator
Step One: Spread Pattern
Drop spreaders are designed to uniformly distribute fertilizer only between the wheels (Figure 3). Thus, an adjustment of the spread pattern is not necessary for drop spreaders.
Rotary spreaders distribute fertilizer particles far beyond the width of the spreader itself. The distribution of particles is uneven across the spreader's swath width. The majority of fertilizer is applied near the center of the spreader and tapers off near the edges of the swath. This will be accounted for when determining the effective swath width. However, it is also common to have more particles spread on one side of the spreader than the other. Most modern rotary spreaders have a slide lever that sits flush on a shutoff plate positioned above the propeller (Figure 4). This slide lever reduces the amount of fertilizer distributed on the right side (operator's side) of the spreader compared to the left.
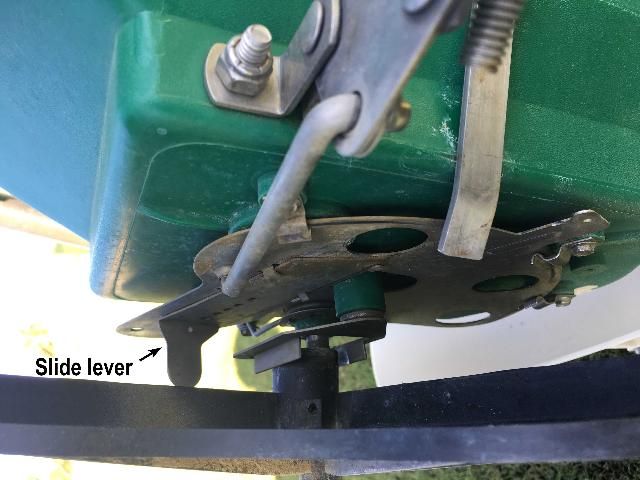
Credit: Travis Shaddox, UF/IFAS
The slide lever and the effective swath width can be determined at the same time using shallow catch pans. Place eleven catch pans 1 foot apart in a line perpendicular to your walking path. Catch pans should be approximately 2 inches in depth so that the spreader can pass over them but the fertilizer granules will not bounce out. Fill the spreader ¼ to ½ full with the fertilizer you intend to spread. Align yourself and the spreader so that the spreader will pass directly over the middle catch pan. Begin with the slide lever completely open. Make at least three passes at the same speed directly over the middle catch pan while walking in the same direction with each of the three passes. The particles caught in each pan can then be weighed using a scale. If a scale is not available, the particles may be poured into separate small vials and placed side-by-side in the same order as the pans were placed on the ground (Figure 5). The particles may be visually assessed to determine if the particles on the right side of the spreader are equal to the particles on the left. Whether by using a scale or by visual assessment, the slide lever should be closed slightly and the process repeated until the particles on the right side of the spreader are approximately equal to the particles on the left. The effective swath width is the distance at which the quantity of particles equals 50% of the particles dropped at the center (Figure 6). If the effective swath width is 8 feet, the distance between spreader passes should be 8 feet when the fertilizer is actually being spread.
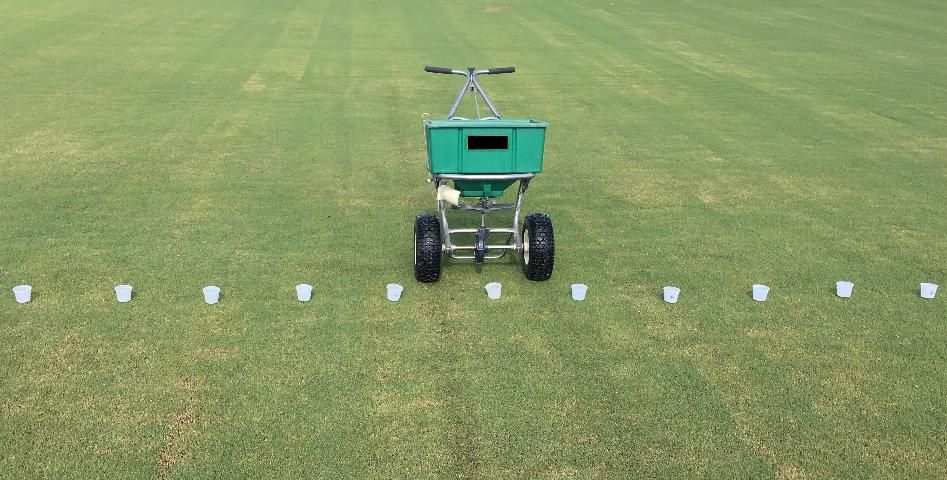
Credit: Travis Shaddox, UF/IFAS
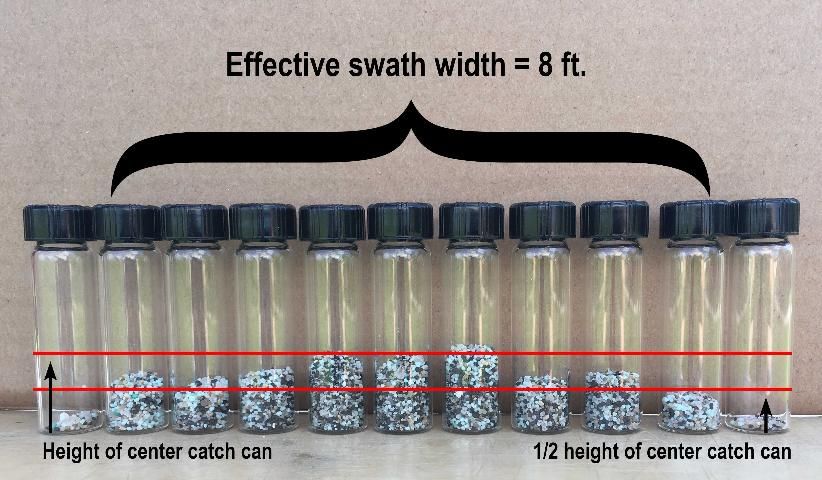
Credit: Travis Shaddox, UF/IFAS
Step Two: Application Rate
Rotary Spreader
After the spreader uniformity has been confirmed as accurate, the spreader's application rate can be calibrated. Many fertilizer labels have a recommended setting for various spreader types. This setting should be used only as an initial setting for calibration purposes. Use the effective spread width determined in Step One to lay out a known test area of 1,000 sq. ft. For example, if the effective spreader width is 10 ft, measure out an area 10 ft by 100 ft, or 20 ft by 50 ft. Place 20 pounds of the fertilizer in the spreader and make one pass over the test area. Weigh the fertilizer remaining in the spreader and subtract this amount from the initial 20 pounds. The difference is the amount of fertilizer product spread over 1,000 sq. ft. Adjust the spreader setting up or down to apply more or less fertilizer as needed to equal the recommended rate, usually 1 lb of nitrogen per 1,000 sq. ft of turfgrass (Table 1).
Drop Spreader
Although rotary and drop spreaders differ in their swath width and, therefore, the distance between passes, the process of calibrating a drop spreader is essentially the same as a rotary. Measure a known area, spread the fertilizer over this area, determine the amount of fertilizer applied, and adjust the spreader settings up or down to apply more or less fertilizer as needed. It is easiest to use a solid surface such as a shop floor, garage, or driveway because the amount of fertilizer applied can be swept up and weighed. For example, suppose you are applying a 20-0-10 and you wish to apply 1 lb of nitrogen per 1,000 sq. ft of turfgrass. The amount of fertilizer you need to apply is 5 lbs per 1,000 sq. ft (Table 1), which is 0.5 lbs per 100 sq. ft. Simply measure a 100 sq. ft area (ie. 5 ft wide by 20 ft long), use the drop spreader and make one pass over this area, sweep up the fertilizer, and weigh it. If the amount of fertilizer you weighed does not equal 0.5 lbs, then adjust the spreader settings up or down as needed and repeat the process until 0.5 lbs is applied over 100 sq. ft.
The same calibration procedure is used for each material you want to apply. Because the quantity applied depends upon the physical properties of the material (e.g., weight, density, size, etc.) and the walking speed of the operator, spreaders should be calibrated for each material and operator, even if the fertilizer analyses are the same. Once the spreader is calibrated and set for the proper rate, any sized area can be treated accurately.