The daylily is a popular flowering perennial that adapts well to Florida landscapes statewide. Plants are available in a wide variety of growth habits, flower shapes, and colors, including yellow, orange, red, pink, purple, near-white shades, and combinations of all of these. Flowering starts in March for early-season bloomers while late-season daylilies will not bloom until mid-May. Select early- and late-season bloomers to extend the flowering season. The typical bloom period is about four to seven weeks, although some varieties bloom even longer.
Daylilies are members of the lily family, in the genus Hemerocallis; "Hemero" is Greek for "day" and "callis" for "beauty," i.e., beauty for a day. The flower buds and petals are edible raw, boiled, stir-fried, steamed, stuffed, or battered and fried. Dried daylily petals, called "golden needles," are used in numerous Chinese dishes. The modern varieties of daylilies have been developed from native Chinese species. Early settlers from Europe and Asia brought many of the original species with them to America. During the last 75 years, hybridizers in the United States and England have made great improvements in daylily varieties.
Landscape Uses
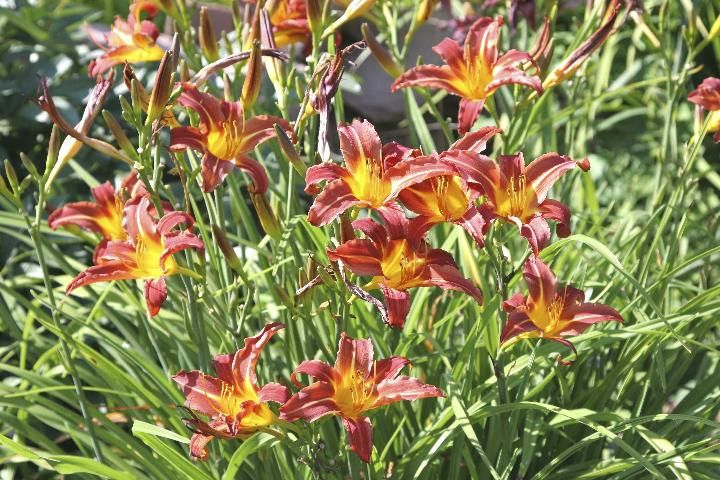
The clumping form, grass-like texture, and colorful blooms combine to make daylilies a lovely and versatile landscape plant. Daylilies are most effective when planted in groups of 10 or more plants of all the same color or of related hues (Figure 1). An equally attractive planting would be a bed of daylilies with the same color base such as pastel yellows, pinks, and melons. An impression of order and harmony can be achieved by using either the lightest hue or the darkest hue as a focal point, with the other shades graduated away from this point.
Credit: iStock
Daylilies combine and contrast nicely with evergreen shrubs and can be used in mixed borders or as foundation plantings (next to or close to the home).
Keep in mind the color of the home or building when selecting varieties. Use bright flower colors, such as yellow, against dark backgrounds, and dark flower colors against white or light backgrounds. Also note the height of the scapes (flower stems). Daylilies with scapes over 36 inches tall should be used as foundation plantings or in the back of daylily beds or mixed borders. Those 16 to 36 inches tall can be used in most settings. Daylilies with scapes 12 inches tall or shorter are best used for border plantings. Create a special effect by planting daylilies around a garden pool or along the banks of a lake or stream.
Selection
Local daylily societies and enthusiasts are usually happy to share information about which types grow best in your area of the state. Information about Florida daylily societies and popular varieties for our state can be found at https://daylilies.org/society/region-12/.
Daylilies are usually available as potted plants or bare-root plants. Potted daylilies establish quickly and can be found at garden centers for a reasonable price, although the variety choices are usually limited. The best sources of daylilies are local daylily nurseries (which sell bare-root plants at the site), mail-order, and the Internet. Local nurseries typically carry the best performers for their regions as well as the latest varieties. Price may range from economical to very expensive.
When selecting a daylily, remember that there are three types of foliage growth.
- Dormant foliage dies back after frost and new foliage grows in the spring. In central and south Florida, these types may not receive sufficient winter "chilling" to grow and bloom successfully.
- Evergreen foliage remains green throughout the year.
- Semi-Evergreen describes a plant whose foliage can be either evergreen or dormant depending on where the plant is grown.
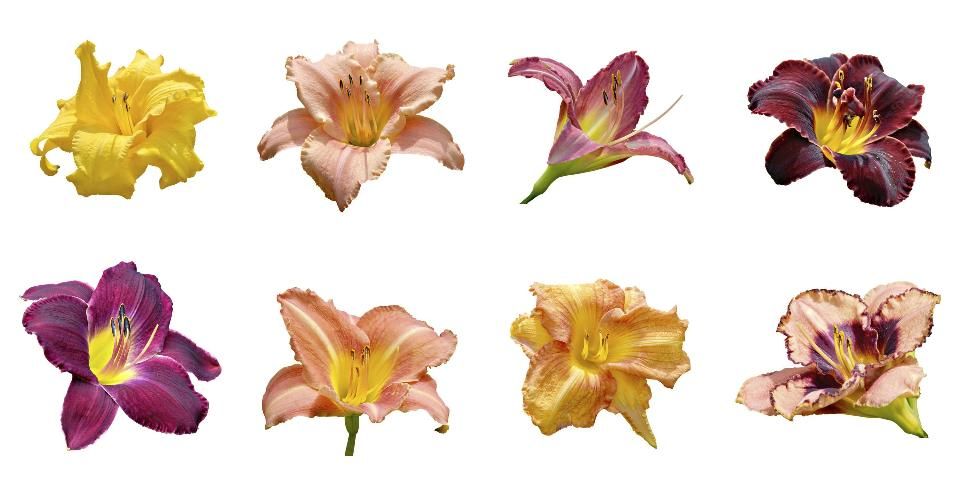
Daylily flowers vary in size from a few inches up to 10 inches. Most are about 5–6 inches across. Many color patterns are now available, ranging from pure colors to blends of two, three, or more colors. Some types have petals and sepals of different colors. Others have colored throats or contrasting midribs or edges (Figure 2).
Credit: iStock
Daylily blooms are also available in a wide variety of shapes and forms from the simplest single (3 petals and 3 sepals) to double, spider, and highly unusual shapes that twist, curl, or cascade. For detailed information, see Search Results for “flower forms” – American Daylily Society (daylilies.org).
Planting Site
In Florida, the daylily is considered a cosmopolitan plant that thrives in the muck of the Everglades, the limestone rock of Dade County, the light sands of central Florida, and the red clay of the northern part of the state.
Daylilies grow in full sun or filtered shade. The darker colored varieties (reds and purples) grow best in partial shade, while light colored varieties (yellows, pinks, and pastels) need full sun to bring out their lovely colors. Heavy shade should be avoided because it will cause thin, spindly growth and poor flowering. The filtered light under pine trees is ideal for growing daylilies.
Amend the soil for a daylily bed with 3 to 4 inches of organic matter, such as peat, compost, or well-rotted manure. Add ¾–1 ½ pounds of a fertilizer with an N:P:K ratio of 3:1:2 or similar per 100 square feet. (Note: ratio refers to the relative amounts of nitrogen, phosphorus, and potassium and is reflected in the three numbers displayed on the bag). The amended soil should be mixed or tilled, leveled, and moistened. The soil pH should be between 6.2–6.8 with 6.5 being optimal. Your local UF/IFAS Extension office can provide information about soil testing: https://sfyl.ifas.ufl.edu/find-your-local-office/.
Planting
Daylilies—either bare-root or potted—can be planted throughout the year in Florida; however, spring and fall are ideal. Fall planting allows the plants time to develop new roots and become established before the next blooming season. Prepare bare-root daylilies for planting by removing foliage 6 to 8 inches from the crown (the point where foliage and roots join) and trimming in an inverted V-shape. Examine the root system closely and remove any damaged roots. Daylilies purchased in containers do not require this preparation.
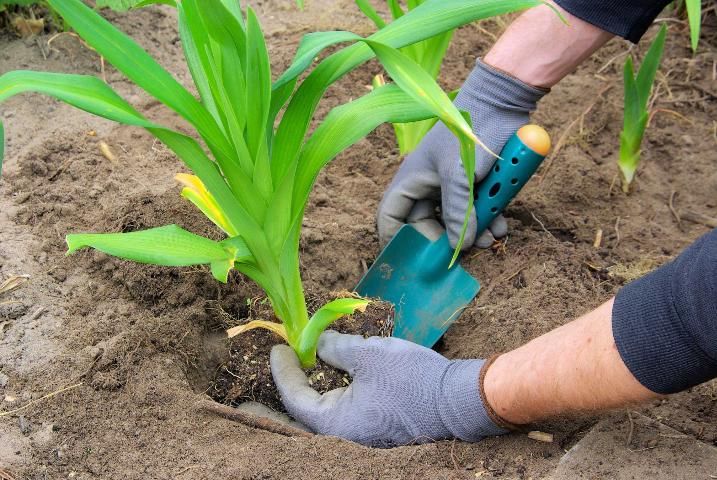
To plant a bare-root daylily, dig a hole larger than the root mass. Make a mound of soil in the center of the hole, set the center of the daylily on top of the mound, and spread the roots out to the sides of the mound. Next, fill in the hole with loose soil, making sure the crown of the daylily is at ground level. Plant bare-root and potted daylilies at the same depth at which they were originally grown (Figure 3). Water well, mulch, and keep the soil moist until plants are well established.
Credit: Hemera
Plant daylilies 18 to 24 inches apart, since some varieties multiply quickly and become so crowded that flower production is affected. When spaced this way, daylilies will usually not need to be divided for 3 to 5 years.
General Care
Mulch daylilies to help retain soil moisture, reduce weeds, and moderate soil temperatures. Pine needles, leaves, or shredded bark are among the most desirable mulches and should be applied in a 2- to 3-inch layer.
Daylilies survive dry conditions well due to their extensive root systems. However, the number and size of blooms, plant growth, and overall vigor can be adversely affected by prolonged drought. A spectacular display of blooms can be achieved by the weekly application of ½–2 inches of irrigation or rain. During the summer heat, irrigate them frequently if regular rainfall does not occur. Fertilize daylilies in the fall, early spring, and mid-summer with 3/4 to 1½ pounds of fertilizer per 100 square feet of bed. Use the same general N:P:K ratio (3-1-2) fertilizer used at planting time. Fertilizer should be evenly applied between plants, kept off the foliage, and watered into the soil after application.
Insects, Mites, and Diseases
Daylilies are rarely bothered by pests; however, aphids, thrips, spider mites, and grasshoppers are known to occasionally attack the foliage and flower buds. Aphids are small, soft-bodied insects with sucking mouthparts. They feed on leaves, causing the tips of the damaged leaves to curl and die.
Most home gardeners do not realize spider mites are present until damage is severe. These pests are very tiny and usually go undetected on the undersides of leaves. Mites damage leaves by sucking plant juices and chlorophyll. Damaged leaves lose their green color, turn tan and then brown, and eventually die.
Thrips are one of the most serious pests that attack daylilies. Thrips are gray-black insects about the size and shape of the upper part of a small exclamation point (!). Thrips damage immature stems and blooms. The damage causes discolored, misshapen flowers and reduces flower bud set. Grasshoppers chew the leaves and their damage is easy to detect.
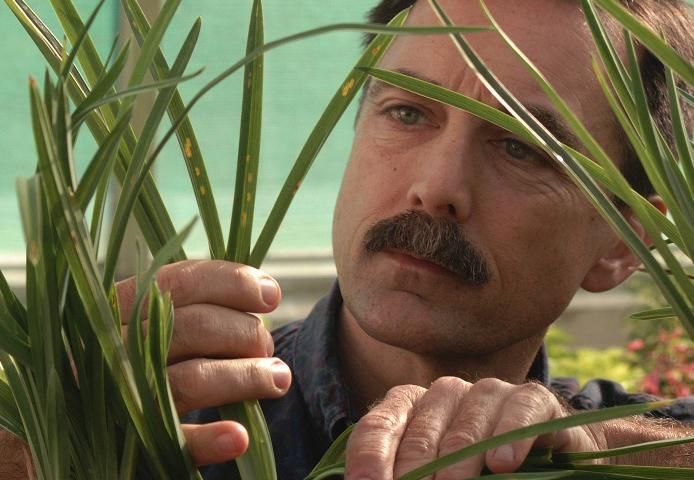
In 2000, a new fungus disease called daylily rust (Puccinia hemerocallis) began to attack daylilies nationwide. It will not kill an otherwise healthy plant but will make it unsightly and decrease its performance. The most obvious symptoms of daylily rust are yellow to brown streaks and small, very bright yellow spots on the surfaces of the leaves (Figure 4). Small, orange to yellow spots on the undersurfaces of the leaves contain pustules that release numerous dust-like, orange-colored spores. As symptoms progress, leaves turn yellow and dry.
Credit: UF/IFAS
Management strategies for daylily rust rely on growing varieties that are resistant to this disease, and sanitation—i.e., cutting off infected foliage and removing it from the garden. More information on daylily rust and resistant varieties can be found at https://edis.ifas.ufl.edu/pp172 and Search Results for “daylily rust” – American Daylily Society (daylilies.org). Local daylily societies can also provide information on rust-resistant cultivars and daylilies in your area.
Apply a pesticide only when insect and/or mite infestations are severe or when large numbers of plants are affected. For recommendations on selection and application of pesticides, contact your local UF/IFAS Extension office: https://sfyl.ifas.ufl.edu/find-your-local-office/.
Propagation and Hybridizing
Daylilies are propagated by seed, division, or proliferations (small plants that grow on the flower stalk). Although daylilies can be grown readily from seed, genetic variation in seedling populations is great. Therefore, named varieties and selected clones must be propagated vegetatively (by division or proliferations) to maintain a true line.
Daylilies multiply fairly rapidly, and plant division is an easy way to propagate them. Division is best done immediately after the flowering season. Dig the entire clump and shake or wash off the soil without damaging the roots (Figure 5). Next, cut the leaves off 6 inches above the crown and divide the clump with a sharp knife. It should be fairly easy to see where divisions can be made. Smaller clumps can be pulled apart. The old portions of the roots should be pruned to promote the formation of new roots. After the plant is divided, it is ready to be planted as described above.
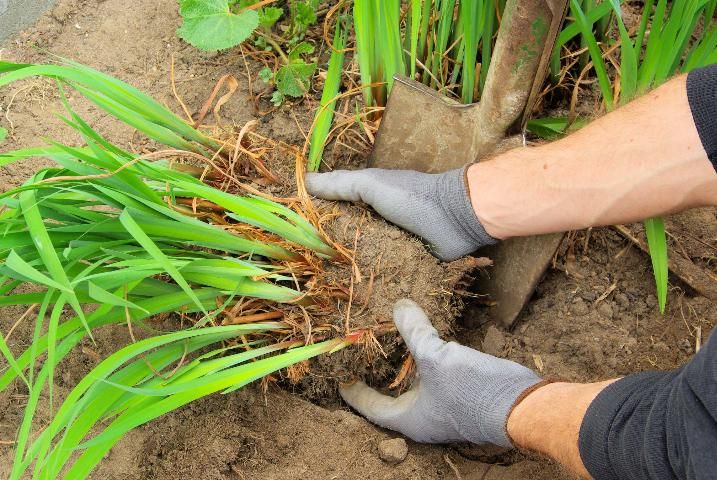
Credit: Hemera
The flower stems or scapes of daylilies often develop small plants called proliferations that can be removed and rooted to form another plant. Cut the scape a few inches below the proliferation and place it into a potting mix so that the base of the proliferation is in contact with the soil. Keep the plant watered while it is establishing its root system.
Breeding daylilies can be an enjoyable and rewarding experience. The large flowers are easy to work with and the male and female reproductive parts are easy to see. Hybridizing is usually done to improve plant characteristics such as flower color, width of petals, number of blooms, and length of scapes. Carefully study each plant's desirable features and avoid crossing daylilies that have serious weaknesses.
There are two types of daylilies, diploids (2 sets of chromosomes) and tetraploids (4 sets), and the two cannot be crossed successfully. It is difficult for the layperson to tell them apart, but you can consult the Daylily Registry, a database maintained by the American Hemerocallis Society, for that information: http://www.daylilydatabase.org/. If the cultivar names are unknown, make several crosses with different plants and see which set seed.
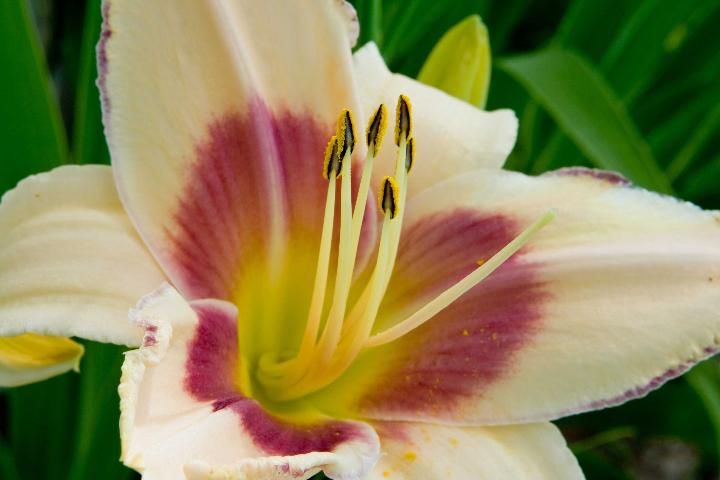
In Figure 6, you can see six stamens (male reproductive parts) and one pistil (female reproductive part). The yellow, powdery pollen is held on the tips of the stamens. It is a simple procedure to take pollen from one plant (the male parent) and pollinate the flower(s) on a different plant (the female parent). First remove the stamens of the female parent to prevent accidental self-fertilization. Then break off a stamen from the male parent and rub the pollen-laden end across the sticky tip of the pistil of the female parent. A small paint-brush can also be used to transfer pollen.
Credit: iStock
Crosses should be labeled, listing both parents and date of pollination. The pods will ripen in six to eight weeks and are ready for collection when they turn brown, begin to dry, and the tops start to split.
Plant freshly harvested seed in flats or pots filled with commercial potting soil. Cover the seeds with finely sifted soil or vermiculite to a depth of 1/8 to 1/4 inch. Keep the soil carefully watered and moist while seeds are germinating. Place the flats or pots in a shaded location and cover with glass or clear plastic to prevent the soil from drying out. Seeds of daylilies germinate in 10 days to 2 weeks and require no special treatment. When seedlings are 4-6 inches in height, transplant them into new flats or pots, spacing them 1 to 2 inches apart. Some prefer to leave the seedlings in flats until they are large enough to set out in the landscape. Daylilies usually take 2 years from seed to flowering. However, if seeds are harvested in May and immediately germinated and if seedlings are given good care, it is possible in Florida to have a seedling bloom by the following year.
Further Reading
Rusts on Ornamentals in Florida: https://edis.ifas.ufl.edu/pp172
The American Hemerocallis Society: https://www.daylilynetwork.org/
Acknowledgments
Original version: Robert J. Black, retired associate professor; UF/IFAS Environmental Horticulture Department, Gainesville, FL 32611.