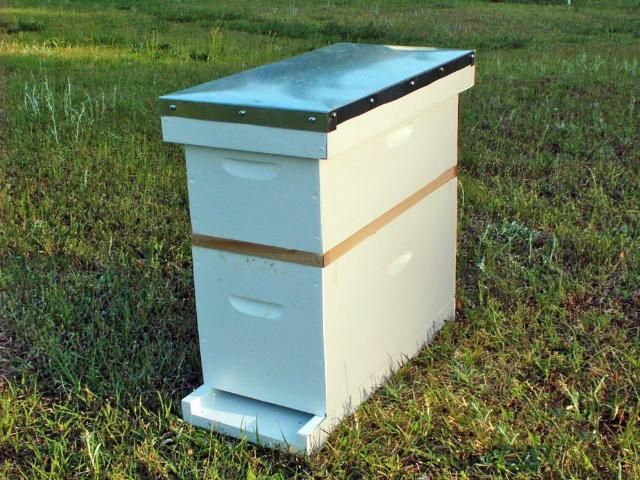
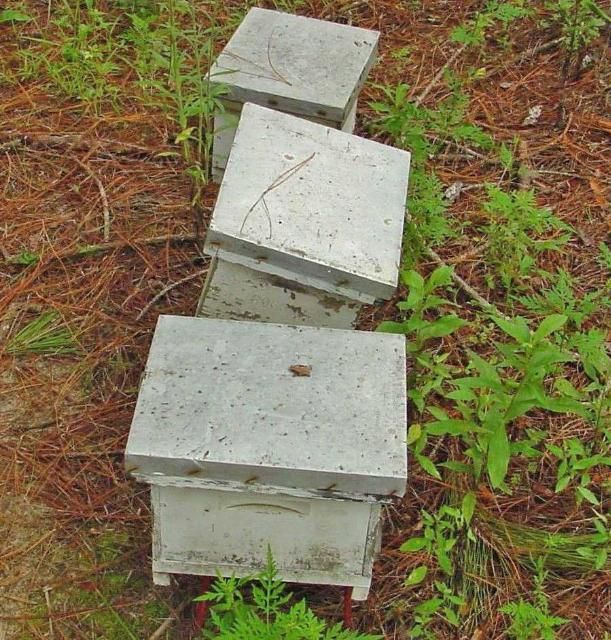
The term "nuc," a shortened version of the term "nucleus colony," most correctly refers to a small-sized hive in which a small colony of bees resides but also can be used to describe the small colony of bees itself. There are two types of nucs, a standard nuc and a baby or mating nuc. A standard nuc is a narrower version of a full-size, Langstroth-style hive (Figure 1). It is the same length/depth and height as a full-size hive, though it is not as wide as one. Correspondingly, nucs hold two to five full-size frames rather than the eight to ten frames held by a full-size hive. Most standard nucs accommodate five frames, though some may hold four or fewer frames. Many beekeepers refer to nucs by the number of frames they hold, i.e. "five-frame nuc," "four-frame nuc," etc., and when they simply say "nuc," they usually mean "five-frame nuc," given the widespread popularity of nucs this size. A baby nuc or mating nuc (Figure 2) is smaller than a full-size hive in every dimension and is used primarily for queen bee production. There is little size standardization among baby nucs, with many queen producers building their own, uniquely sized baby nucs.
Credit: UF/IFAS Honey Bee Lab
Credit: UF/IFAS Honey Bee Lab
Standard nucs, the subject of this fact sheet, hereafter referred to as "nucs," are extremely useful tools. Nucs play an important role in the management of every apiary and should be used by every beekeeper.
Benefits of Using Nucs
Nucs are indispensable beekeeping tools for all sorts of beekeeping processes from disease/pest management to solving queen problems. Listed below are seven primary reasons nucs are useful. This list is not comprehensive.
- Swarm Control: Creating a nuc from a full-size colony (sometimes called "splitting" a colony) is a good way to alleviate swarming tendencies in the split colony (hereafter called the "parent" colony or colony from which a nuc was made). Colonies grow in strength as nectar and pollen availability increases in early spring. The colonies then initiate the swarm process a few weeks before and during the major nectar flow in order to take advantage of the increased availability of resources. The creation of nucs from colonies four to six weeks before the primary nectar flow (a management practice that is similar to a controlled swarm) alleviates the stress of growing colony populations in crowded, full-size hives. After all, nest congestion is a swarming stimulus. Thus, splitting colonies reduces one of the main swarming stimuli. It is impossible to eliminate the swarming tendency completely; however, splitting a colony before the primary nectar flow greatly reduces the swarming tendency at a time when that reduction is most needed. Many commercial beekeepers split their colonies in early spring for this purpose. It is important to note that splitting a full-size colony too close to the main nectar flow can be counterproductive. Split your colonies (make nucs) four to six weeks before the main flow. This will give the parent colonies time to rebound in time for the flow. Many beekeepers feed the parent colonies after splitting them. This will help them recover from the split faster.
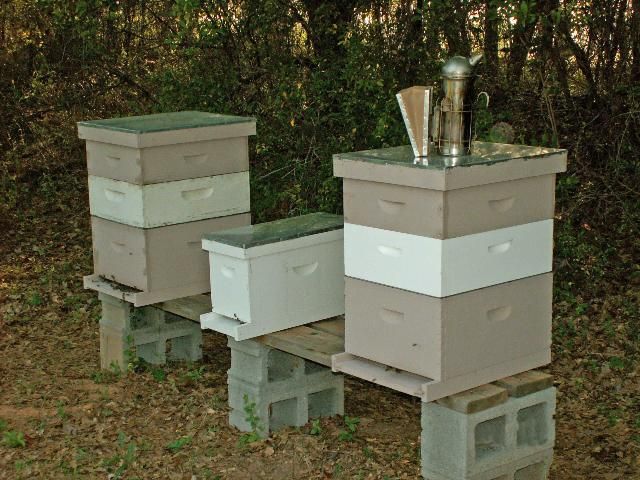
- Strengthen Production Colonies: Nucs provide a tool you can use to keep your production colonies strong. Many beekeepers keep extra nucs on hand as support colonies for the production colonies they maintain. A good rule of thumb is to keep one support nuc for every two to three production colonies in an apiary (Figure 3). Use support nucs to keep production colonies as strong as possible so they can make as much honey as possible. Consider that nucs are growing bee colonies housed in small-sized hives and thus have extremely high swarming tendencies. You can take advantage of this tendency by removing brood and bees (not the queen) from the nuc every week and adding them to your production colonies. Doing this weakens your nuc, which is not in production, and strengthens your production colonies. The best time to build up your production colonies is during the three weeks before the primary spring nectar flow continuing throughout the nectar flow. For an explanation for how to use a nuc to strengthen a production colony see the section in this fact sheet titled Using a Nuc to Strengthen a Colony. Begin to take bees and brood from nucs and place them into full-size colonies about three weeks before the primary spring nectar flow. To facilitate this, keep support nucs in the same apiary as, and often immediately beside, production colonies (Figure 3). Some of the adult bees shaken from a nuc into a production colony may fly back to the nuc. If this worries you, you can shake the bees from the frames of capped brood that you take from the nuc back into the nuc before moving them to the full-size colony. The full-size colony will benefit from the capped brood provided by the nuc.
Credit: UF/IFAS Honey Bee Lab
3. Requeen: Having a nuc on hand allows you to deal with untimely queen problems encountered in production colonies. No matter how long you have been keeping bees, some of your production colonies are going to swarm or lose their queens during the nectar flow or at other times of the year. In these instances, the colony is forced to make a new queen, thereby greatly reducing the production potential of that colony. If a colony goes queenless or swarms right at the beginning of the nectar flow, it will take seven to ten days for the nuc to make a queen cell and for the new queen to emerge. It will take the new queen about two weeks to mate and start laying eggs. It will take the new eggs three weeks to go from egg to adult worker bee. In this way, you are losing six weeks of brood production. Six weeks is the average length of the major nectar flow in most areas. Thus, to have queen problems during the nectar flow is to forfeit the honey production in the struggling colony. It is particularly difficult to purchase queens during production season because of the high demand for queens. Consequently, the beekeeper is left with few options when addressing queen issues during the nectar flow as well as other times of the year. If you have a nuc available, however, you can requeen a queenless production colony. (See Requeening a Production Colony with a Nuc.) Requeening a production colony with a nuc means that the colony immediately has a laying queen and brood with which it can optimize its production potential. It does not have to wait for you to order a queen or to make its own queen. Instead, you can solve its queen problem almost instantly.
There are other scenarios under which nucs prove their worth when requeening is necessary. For example, production colonies can have failing queens that need to be replaced. Maybe the queen from the production colony has developed a spotty brood pattern or is producing less brood. If any of this occurs, kill the queen and leave the colony queenless for two to three days. Following this, remove all of the queen cells the worker bees made during the two-to-three-day period the colony spent queenless and requeen the production colony with the nuc as described in Requeening a Production Colony with a Nuc.
Finally, nucs are great to have for those times of the year that queens are not available. For example, some colonies lose their queens during winter. Support nucs make it possible to fix that problem instantly.
4. Strengthen Weak Colonies: You can strengthen a sick or weak colony by giving it bees and brood from a nuc, exactly as you would do when strengthening a production colony (Using a Nuc to Strengthen a Colony). Likewise, if a colony is too weak to occupy a full-size hive body, you can move it into a nuc hive body where it will be easier to feed and manage. This is especially pertinent because colonies too weak to occupy all of the frames in a full-size hive are prone to takeover by wax moths and small hive beetles. Condensing the colony into a nuc allows you to prevent colony pest problems before they occur.
5. Expand Your Operation: It is easy to take a healthy nuc and move its frames into a full-size hive body with five additional frames of foundation or pulled comb to create a new hive (Box 4). This is a quick, easy, and cheap way to expand your beekeeping operation. Furthermore, it is possible to double, triple, or even further increase the number of production colonies you have by making splits from those colonies using nucs. (See Hiving a Nuc.) A beekeeper can potentially save thousands of dollars by making his/her own splits rather than purchasing those made by others. Remember, though, that production in heavily split colonies will not be maximized until the colony populations rebound. Thus, you will sacrifice some productivity if you are trying to expand your operation aggressively by making your own nucs. At some point, you will reach the number of full-size colonies/nucs that you wish to have, and your productivity will correspondingly begin to increase.
6. Hive Swarms: Having nuc equipment on hand provides a place to hive swarms. Nuc hive bodies, lids, and bottom boards are smaller and cheaper than full-size hive bodies. Many beekeepers keep empty nucs in their vehicles, shops, etc. so that they can have something on hand in which to hive a swarm they find in their own apiary or somewhere else.
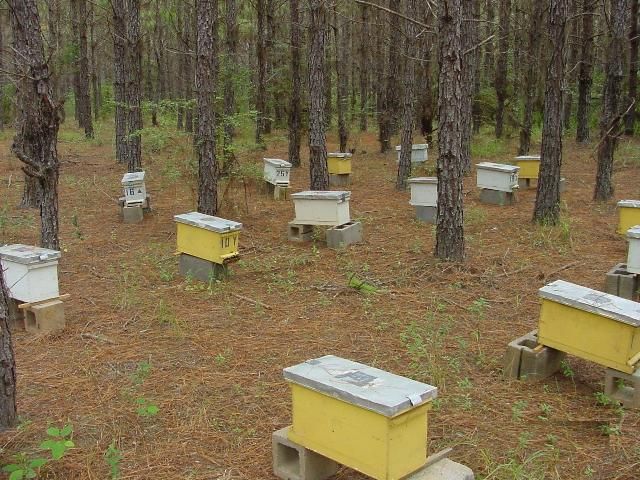
7. Selling Bees: Producing and selling nucs is a good additional source of income. In many cases, selling nucs can be more lucrative than extracting and selling honey from your colonies or using your colonies to provide crop pollination services. With the number of new beekeepers on the rise, the demand for bees is at an all-time high. It is relatively easy to find customers interested in purchasing nucs (Figure 4).
Credit: Jamie Ellis, UF/IFAS
Special Management Considerations for Nucs
When managing nucs in your beekeeping operations, there are additional practices to consider that may not be necessary in the management of full-size colony. These special management considerations include:
- Management Frequency: Nucs require more attention during the year than do full-size colonies. Their populations often expand beyond what is allowed by the equipment in which they reside, making them more likely to swarm, especially in the spring. Keep populations low by removing bees and brood from the nuc and adding them to full-size production colonies (Using a Nuc to Strengthen a Colony). If your full-size colonies no longer need bees and/or brood, consider hiving the nucs (Hiving a Nuc), splitting the nucs to alleviate congestion (Creating a Nuc by Splitting a Full-Size Colony), or selling the nucs.
- Supplemental Feeding: Nucs can exhaust their food supplies rapidly, especially during winter. Nucs must be monitored at least monthly to determine if they have an adequate food supply. They should be fed if they do not have enough food. Nucs are easy to feed, so starvation should not be a problem with proper management.
- Pest and Disease Control: Nucs may be more susceptible to pests and diseases than are full-size colonies. For example, nucs seem to be more susceptible to damage from small hive beetles than are their full-size counterparts. Furthermore, disease/pest treatments and medications often are dosed for full-size colonies rather than nucs. Consequently, beekeepers must monitor diseases and pests in nucs closely and respond with appropriately dosed treatments.
The usefulness of nucs may vary around the country and under different management practices. However, most honey bee operations, whether large or small, will benefit from beekeeper use of nucs. Be aware that some techniques described herein will need to be modified under varying circumstances.
Creating a Nuc by Splitting a Full-size Colony
Nucs can be made during the spring and summer months in most areas. There is no one-size-fits-all formula for creating a nuc. The method describe herein can be used when making nucs in spring or summer and can be amended to meet your particular goals. Fall and winter are difficult times of the year to make nucs because queens are difficult to produce at those times of the year (no drones available with which to mate). Furthermore, queen breeders usually do not have queens available in fall and winter.
Preparing the Parent Colony: Before creating a nuc, the full-size or parent colonies (the ones that will be split) need to be prepared. The colonies must have enough incoming resources (pollen or nectar) to stimulate them to grow before and after the split. You can provide these resources if they are not otherwise available at the time of year you want to split your colonies. When pollen and nectar are not available, the parent colonies should be fed a 1:1 sugar-water mixture (by volume) when daytime temperatures consistently exceed 60°F. Pollen patties may be fed to the bees as an additional stimulant, but are not always necessary if the bees are bringing in pollen. Both sugar-water and pollen patties stimulate colony build-up/brood production. When splitting in spring, feeding the parent colonies three to four weeks before the main flow and after the colonies are split allows the population of the parent colonies to recover to pre-split levels. The feeding and split dates should be postponed if late winter or early spring is unusually cool.
Requeening: Inherently, one colony, the parent or the new nuc, will be queenless after the split occurs. Some beekeepers prefer to leave the old queen in the parent colony while others prefer to move her to the new nuc. Either way, one of the two colonies becomes queenless at the time of the split. There are multiple ways of addressing queenlessness in these situations. You can purchase a queen to place into the queenless nuc or parent colony (whichever you leave queenless), but this method can be limited seasonally (caged queens are not available at certain times of the year). You also can allow one of the colonies to requeen itself; but this, too, is limited seasonally (drones may not be available, the colonies may not make queens, etc.). Therefore, it is important to plan to make nucs when queens are available for purchase or when colonies are otherwise capable of requeening themselves. If you live in an area where African bees are present, you should purchase a mated queen from a queen producer who follows best management practices for producing queens from European stock. You should not allow the colony to requeen itself. If you do, you assume the risk associated with open-mating a queen where African bee drones are present. At this point, proceed as if you elected to allow your nuc to requeen itself, while leaving the old queen in the parent colony.
If you allow the nuc to be queenless, the worker bees in the queenless nuc will construct queen cells on the frame(s) of eggs placed in them. Queenless nucs often make a large number of queen cells (10+). It is recommend that you remove all but the 2–3 largest queen cells from the nuc about one week after creating the nuc. If you leave four or more queen cells to develop, the likelihood that the nuc will issue a swarm or swarms with one or more of the multiple queens emerging increases. If you maintain fewer than 10 colonies, it is best to move your queenless nuc to another beekeeper's apiary so that the risk that your new queen will mate with related drones (inbreeding) will decrease. When doing this, inspect the beekeeper's apiary/ colonies to be sure the colonies are disease/ pest-free and that the beekeeper maintains a good bee stock. About 10–14 days after emerging from her cell, the new queen will go on her mating flight, during which time she will mate with a dozen or more drones. It can take 5–6 weeks for a new queen to emerge, mate, and lay eggs, and for her first round of worker offspring to emerge as adult bees. During these 5–6 weeks, the colony population will shrink until the new queen's brood begins to emerge. The population will grow rapidly once this happens. The nuc should be fed a 1:1 sugar-water solution (by volume) until or unless resources are available in the environment. Sugar-water stimulates the growing colony.
Steps for Creating a Nuc
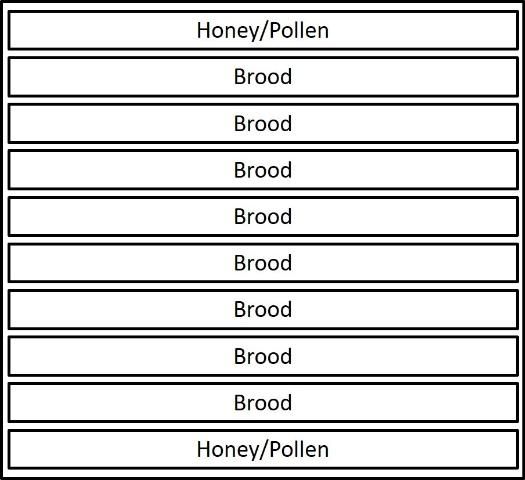
- A typical parent colony (Figure 5) that is strong enough to split has about eight frames of brood and two frames of honey/pollen in its brood chamber.
2. Find the frame that contains the queen in the parent colony and set the frame aside (Figure 6). You will return the queen to the parent colony after the nuc has been made.
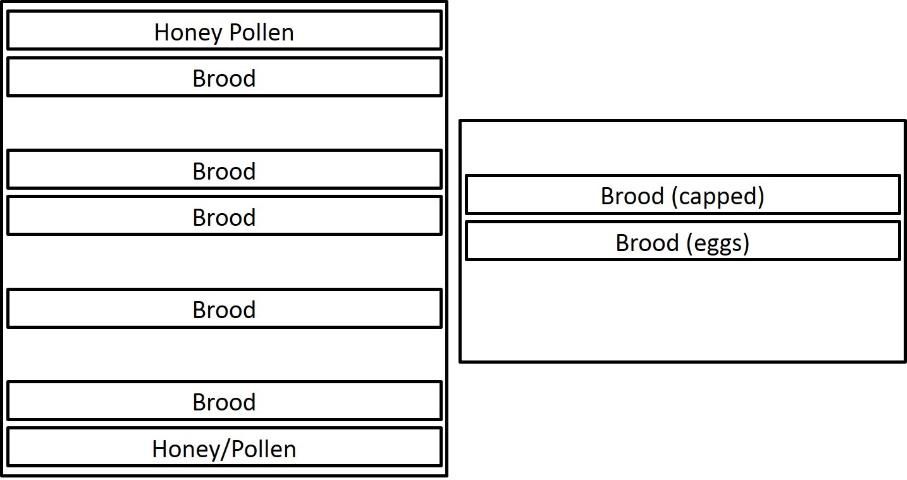
3. Take one frame of eggs and one frame of capped brood from the parent colony (Figure 5) and place them into an empty nuc hive body (Figure 6). It is important that at least one frame contains eggs if you plan to allow the nuc to requeen itself. In this case, the bees will make queens out of the young larvae that emerge from some of the eggs. The nuc will be unable to requeen itself if you do not include eggs or the youngest of larvae. It is recommended that you include a frame of capped brood in the new nuc because adult bees will emerge from the comb soon and provide a population boost to the nuc.
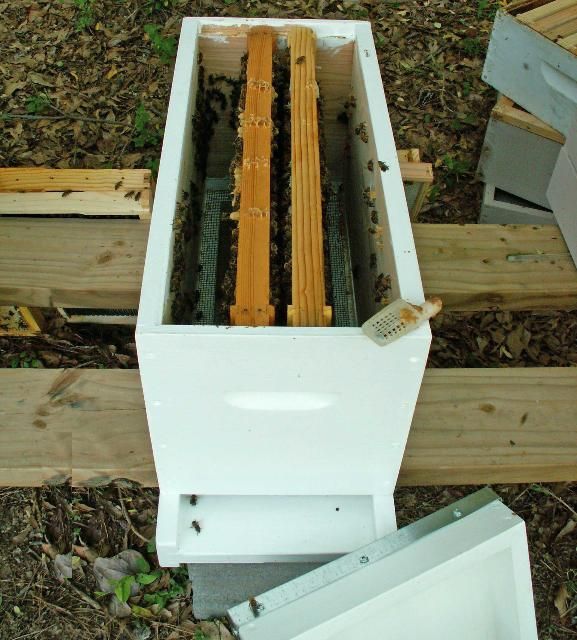
4. The 5-frame nuc now has two frames from the parent colony (Figure 7). There are a number of things you can do next. Three are described here. They range from Step 4A: leaving the parent colony strong while making a weaker nuc, to Step 4C: weakening the parent colony considerably to make a very strong nuc. The former is good if you want to make multiple nucs from the parent colony or to leave it strong in advance of the honey flow. The latter is useful if you want to make a ready-to-sell nuc or if you want to reduce the swarming tendency in the parent colony.
Credit: Amanda Ellis, UF/IFAS
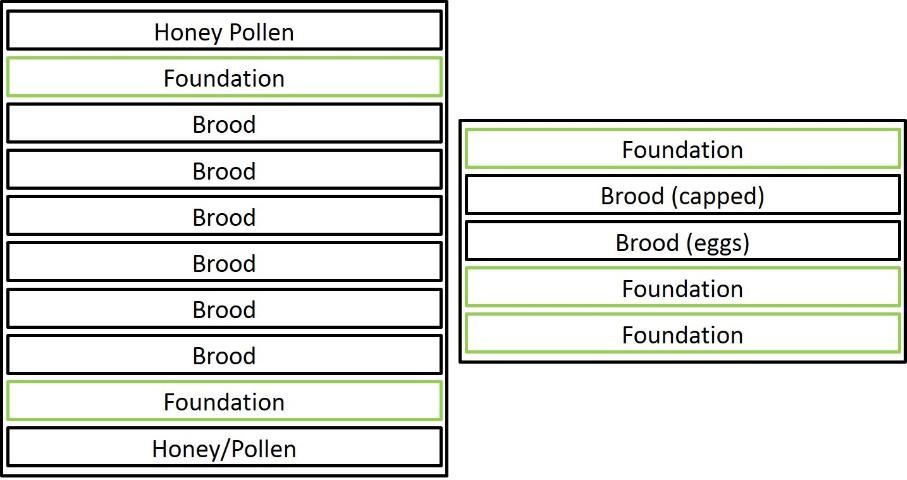
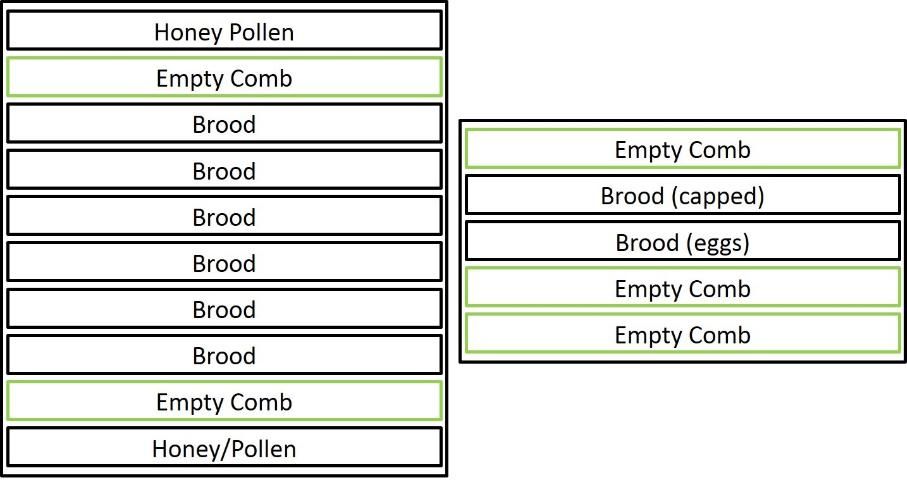
A) Add three frames of foundation to the nuc (Figure 4) and two to the parent colony (Figure 8). For the parent colony, place frames of foundation immediately inside the honey/pollen frames (or, frame positions 2 and 9 in a 10-frame hive). Squeeze the remaining brood frames together into the center of the nest. For the nuc, put the foundation on both sides of the brood, toward the outside of the nest. The parent colony and nuc will need to be fed so that the bees can build comb on the foundation unless there is a strong nectar flow. Shake one or two additional frames of bees from the parent colony into the nuc.
B) Add three frames of empty, pulled comb to the nuc (Figure 9, right) and two to the parent colony (Figure 9, left). The pulled combs can be placed in any position in the parent colony but should still be outside of the brood in the nuc. When using pulled comb, the parent colony does not necessarily need to be fed (the comb is constructed already). The nuc will need to be fed unless there is a strong nectar flow. After all, it was not provided any food resources. Shake one or two additional frames of bees from the parent colony into the nuc.
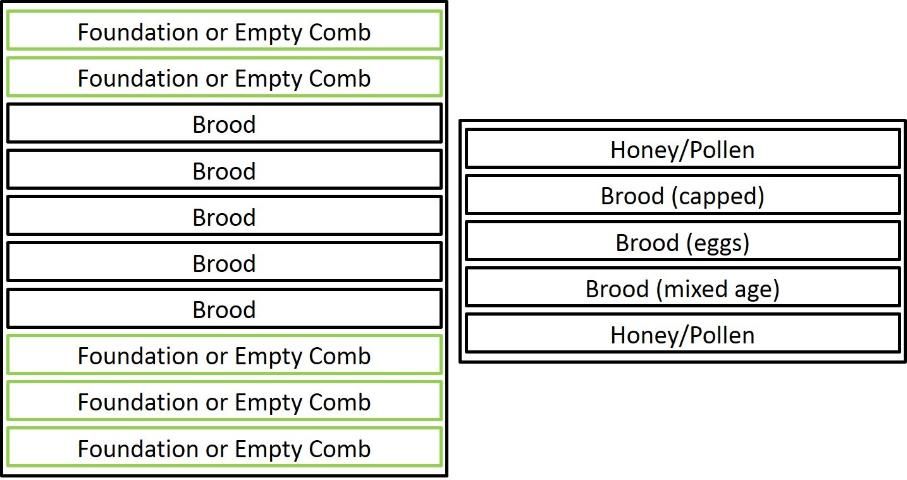
C) Add an additional frame of brood (mixed stages of development) and two frames of honey/pollen from the parent colony to the nuc (Figure 10, right). The parent colony needs five frames in return, all of which can be foundation, empty comb, or some combination thereof (Figure 10, left). Shake one or two additional frames of bees from the parent colony into the nuc.
5. Return the queen and the frame on which she was found to the parent colony.
6. Nucs created per Steps 4A and 4B (created either queenless or given a caged queen) must be moved to another apiary. This is necessary so that the bees in the nuc will not drift back to the parent hive. Nucs created per Step 4C can be left in the apiary. They were created to be strong and can afford to lose some of their adult force to drifting (i.e., the return of some of their adult bees back to the original parent colony). A nuc created this way only needs to be moved to another apiary if you are allowing it to requeen itself and you have fewer than ten colonies in the apiary. Beekeepers who do not have a second apiary can ask another beekeeper if they can keep a nuc in their apiary until the nuc's queen has emerged and is mated (about three–four weeks).
Using a Nuc to Strengthen a Colony
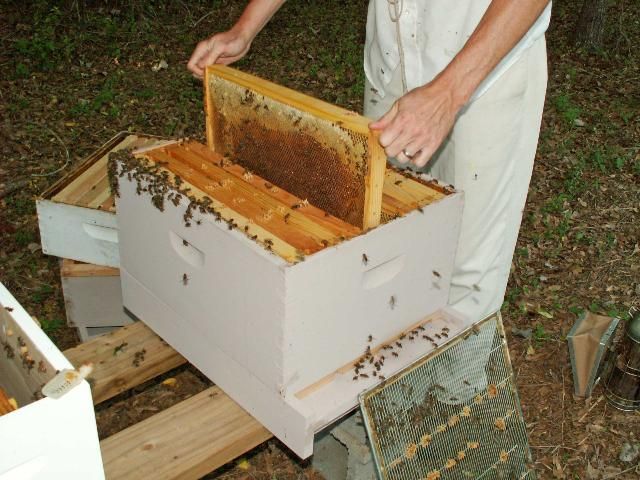
- Remove empty frames, frames with eggs, frames containing only a little brood, or frames of honey/pollen from the brood nest of the production or weak colony (Figure 11).
Credit: Amanda Ellis, UF/IFAS
2. Shake these frames over the full-size colony's brood nest to dislodge the bees from those combs, thus shaking them back into their original colony.
3. Set the bee-free frames aside.
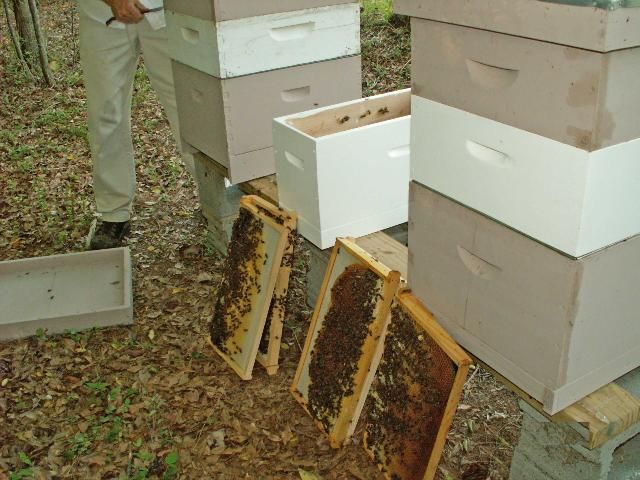
4. Enter a neighboring nuc and set aside the frame on which you find the queen (Figure 12). You do not want to put the queen into the production or weak colony accidently.
Credit: Amanda Ellis, UF/IFAS
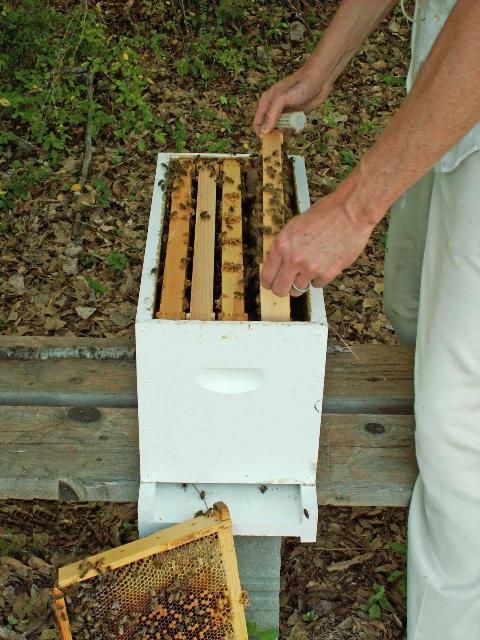
5. Go through the nuc looking for frames of bees and capped brood (Figure 13). You want capped brood because adult bees will emerge from this brood soon, quickly adding to the overall population of the production or weak colony into which you are adding the frame.
Credit: Amanda Ellis, UF/IFAS
6. Place the frames of capped brood/bees (without the queen) collected from the nuc into the production colony.
7. Place the frames originally set aside from the production or weak colony (frames of empty combs, broodless combs, combs with only young eggs/larvae etc.) into the space in the nuc formerly occupied by the combs moved to the production or weak colony.
8. There are times when nucs have little brood to donate to a production or weak colony. In this case, shake frames of bees, whatever the nuc can spare, from the nuc directly into the supers of the production or weak colony.
Requeening a Production Colony with a Nuc
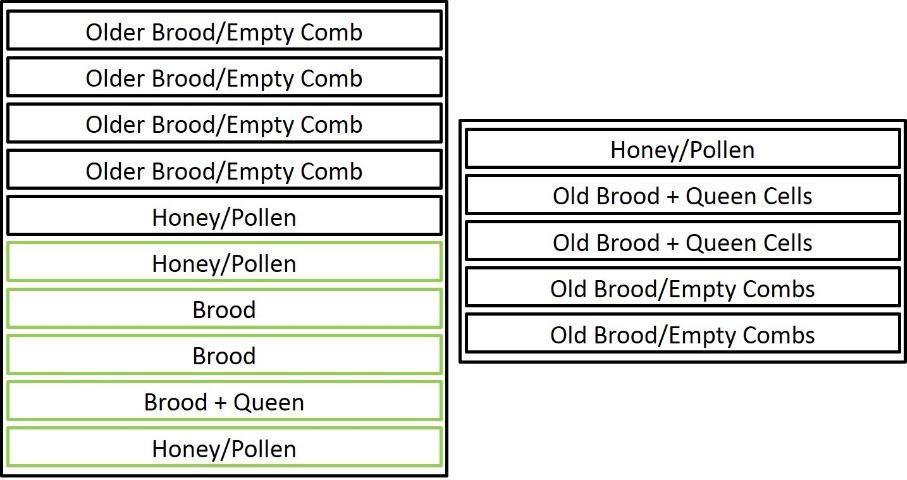
- A queenless colony typically will have some frames of older brood (no queen present to lay eggs), frames of honey and pollen, and frames with some queen cells (Figure 14, left).
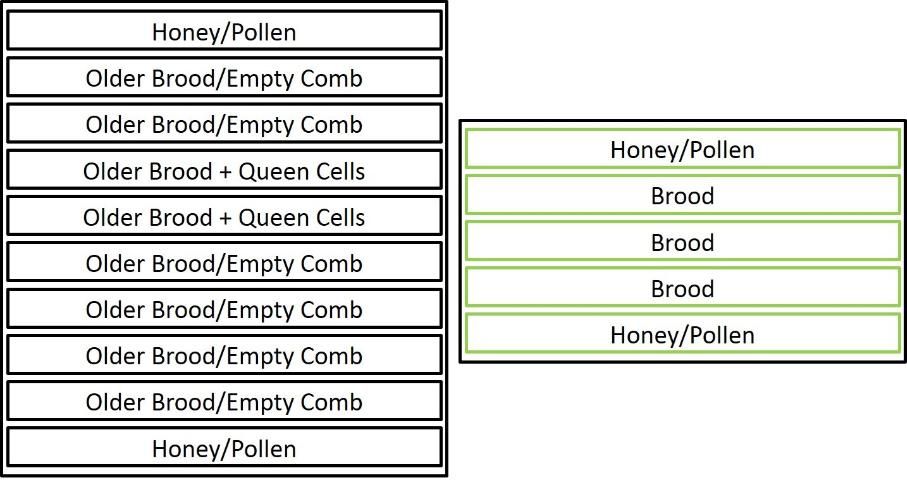
2. Remove five frames from the queenless, full-size colony (Figure 15, left). At least one frame should contain queen cells if you intend for the nuc to requeen itself. Another frame should contain mostly honey/pollen as food for the new nuc.
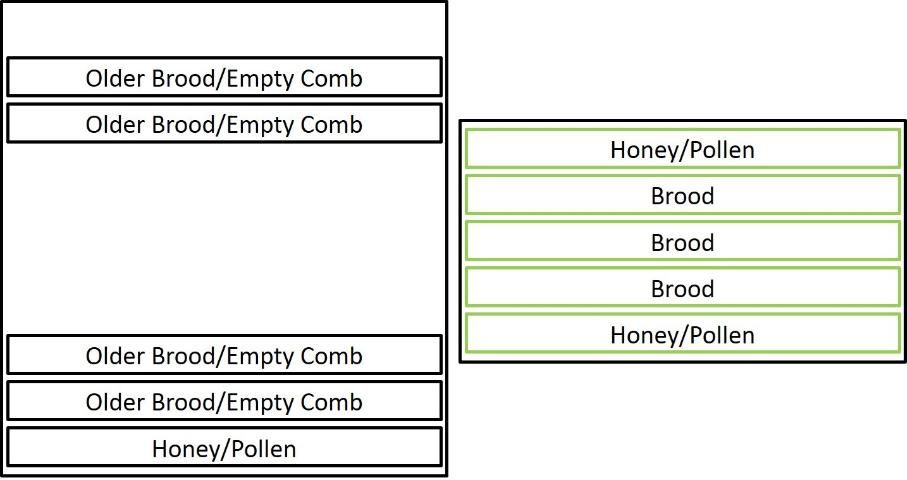
3. Remove any queen cells that are left on the five frames remaining in the full-size colony. Most of these frames will contain older brood given that no queen is present to produce eggs.
4. Push all frames in the full-size colony to one side of the hive (Figure 16, left).
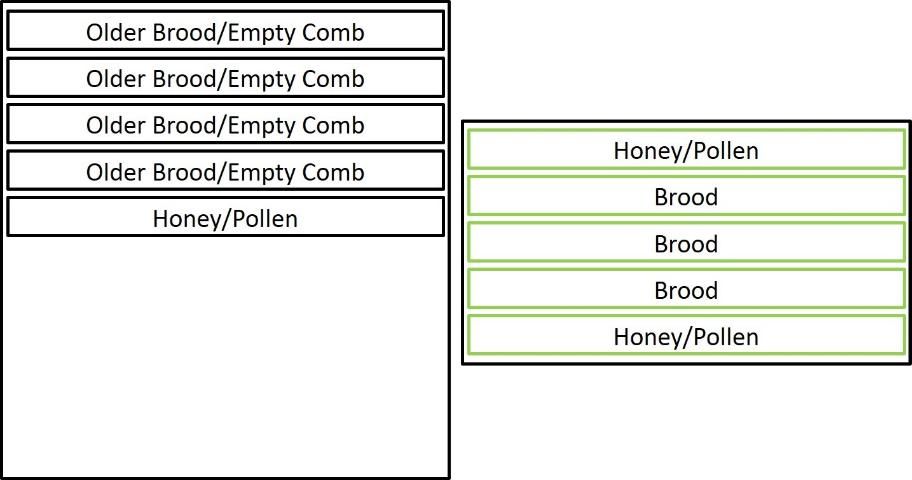
5. Move all five frames from the support nuc, including the frame containing the queen, into the space left in the queenless hive after removing the five frames (Figure 17, left). Use two frames of honey/ pollen (one from the parent colony and one from the nuc) to separate the two colonies' clusters. Also, put the nuc frame on which the queen is found away from the frames from the colony being requeened, usually the second position in from the side of the hive (Figure 17, left). Some beekeepers prefer to cage the queen from the nuc before putting her and the nuc frames into the full-size hive to keep the worker bees from the full-size colony from killing the new queen. Even if in the past your full-size colonies have always accepted the free-running queen from the nuc, to be sure not to lose your queen, it is safest to cage her for a few days. You will have to release the queen manually 3–4 days later if you elect to cage her.
6. The five frames originally taken from the full-size hive can be moved into the newly empty nuc hive body (Figure 17, right). The bees in the nuc will be able to requeen themselves if the frames contain one or more queen cells, or you can purchase a queen from a queen breeder and use it to requeen the nuc.
Hiving a Nuc
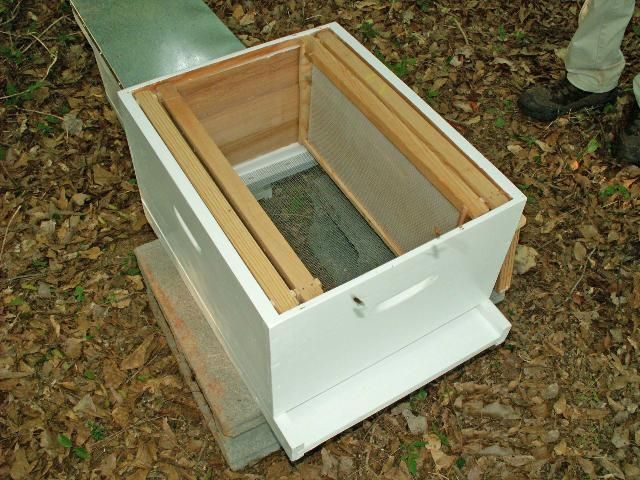
- Set up an empty full-size hive body and remove the five centermost frames (Figure 18).
Credit: Amanda Ellis, UF/IFAS
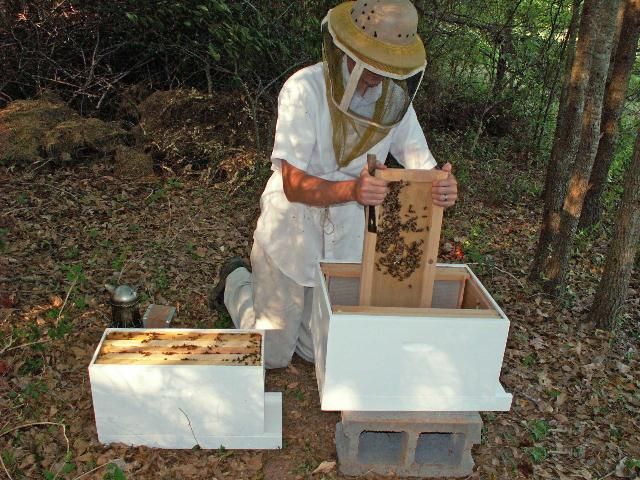
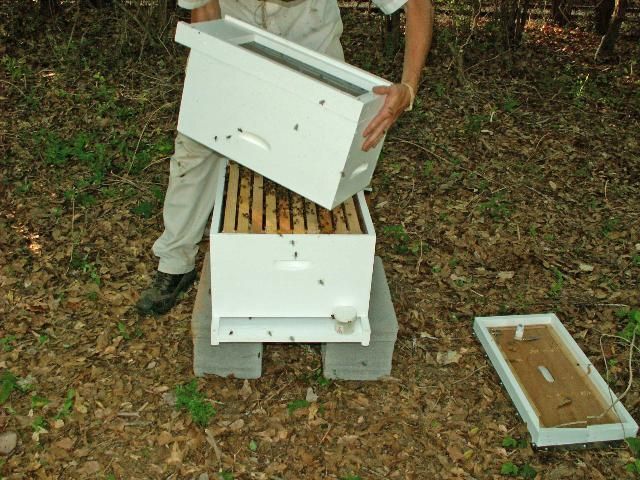
2. Take the lid off of the nuc and shake the bees into the full-size hive (Figure 19).
Credit: Amanda Ellis, UF/IFAS
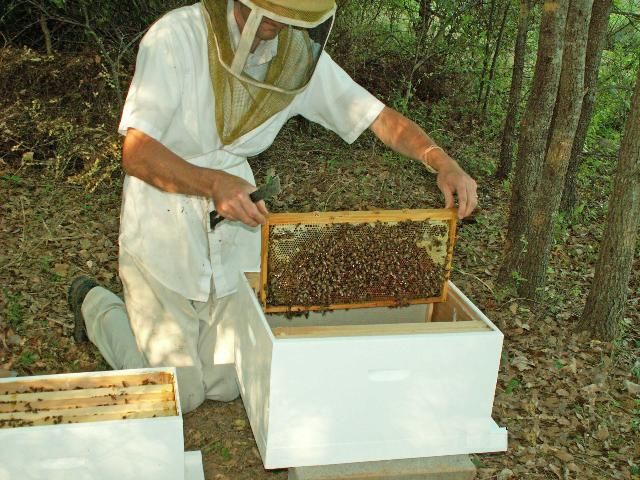
3. Transfer all of the frames from the nuc into the full-size hive (Figure 20).
Credit: Amanda Ellis, UF/IFAS
4. Shake the remaining bees from the nuc into the full-size hive (Figure 21).
Credit: Amanda Ellis, UF/IFAS
5. The 10-frame hive will be composed of five frames from the nuc and five additional frames, either foundation or pulled comb.
6. Feed the new hive until it becomes established (i.e., pulls all of its foundation and has enough honey to survive) or until a major nectar flow begins.