Introduction
As African honey bees (AHBs—Box 1) establish a stronger presence in Florida, it is imperative for public safety reasons that any swarms or feral honey bee colonies found nesting in close proximity to humans or animals be removed alive by a registered beekeeper according to Rule 5E-14.151, Florida Administrative Code or eradicated by a licensed pest control operator. [See Box 2 for the state's official recommendation.] Therefore, there is a need for pest control operators (PCOs*) who can provide honey bee eradication services. In this document, we outline the standard operating procedures for removing swarms and colonies.
*PCO may be interchanged with PMP (Pest Management Professional); however, for consistency purposes, we will use PCO in this document.
Personal Protective Equipment (PPE)
It is imperative that PCOs wear appropriate PPE when dealing with any type of stinging insects. Effective PPE for honey bees consists of a veil, sting suit or bee suit, gloves, and boots or foot protection. The goal of this apparel is to cover all exposed skin and to secure any openings in clothing; for example, if pants have wide cuffs or openings into which bees may crawl or fly, we recommend that you tape pants to boots to prevent any bees from entering. Even though appropriate PPE will protect from most stings, an occasional bee may sting through the suit, and some stinging insects (bumble bees, yellow jackets, etc.) have been known to sting through PPE more often; as a result, if a PCO is allergic to bee stings, he or she should not conduct honey bee removals of any kind. It is important that all PCOs working with honey bees know if they are allergic to honey bee stings.
Veils
A veil should offer complete protection of the head and face area. It should also provide ample space for peripheral vision. There are many types of veils on the market. Veils that attach with a zipper to the sting suit are the recommended type because they prohibit bee entry. Detachable veils may be helpful if head protection (hard hat, pith helmet, etc.) needs to be interchanged.
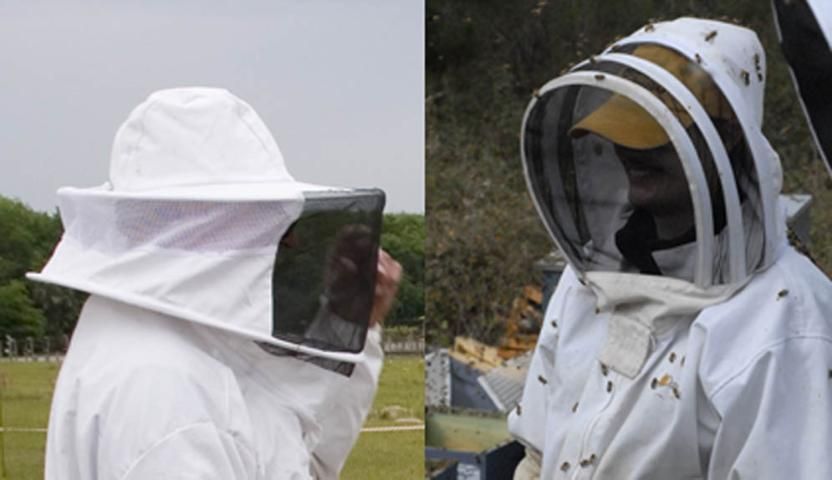
Credit: UF/IFAS Honey Bee Lab
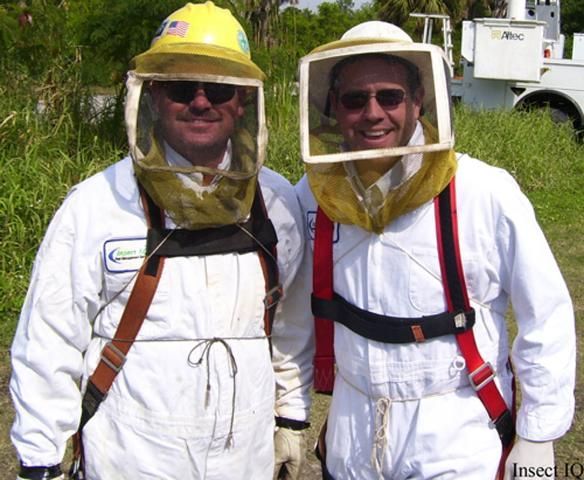
Credit: AllFloridaBeeRemoval.com
Gloves
Gloves provide complete hand protection for the PCO. They should have a gauntlet that extends onto the forearm and cinches there with elastic over the sting suit. Gloves should also be taped to the jacket/suit using duct tape to prevent bees from entering. Usually leather gloves with an extended gauntlet are used to enhance protection; gauntlet-extended rubber gloves may also be appropriate for use with pesticides. Always check the pesticide label to verify.
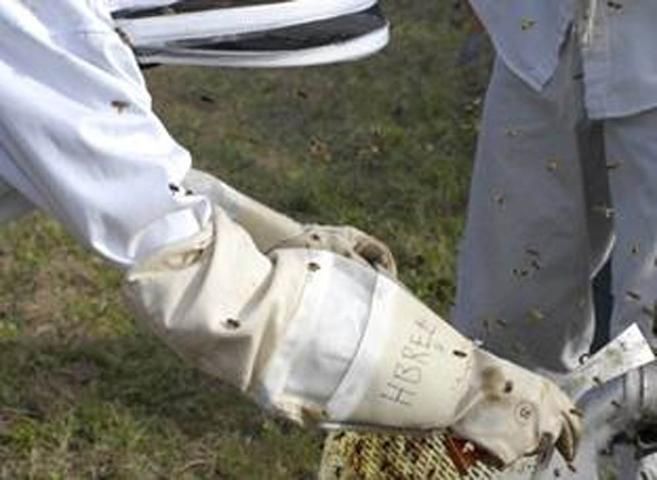
Credit: UF/IFAS Honey Bee Lab
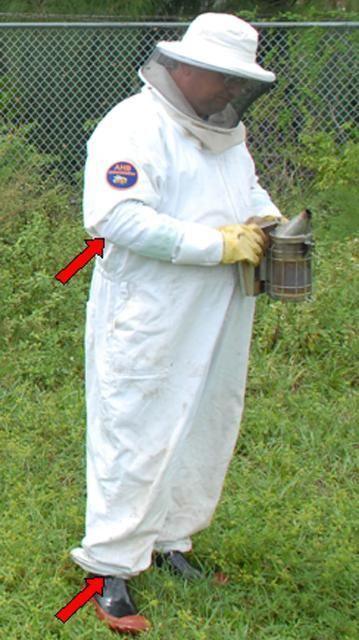
Credit: UF/IFAS Honey Bee Lab
Suit
The sting suit or bee suit should cover the full length of arms and legs as well as the complete torso. Elastic should cinch around ankles and wrists to prevent bees from entering the suit. PCOs should tape gloves and boots to the suit for additional protection. It may be helpful to order bee suits one or two sizes larger than would be usual in order to increase the distance between the skin and the bee suit; this precaution may protect a PCO from being stung through the bee suit.
Boots
Boots should provide foot and ankle protection for the PCO. Many PCOs use leather boots, but rubber boots may be better protection when using pesticides. Always check the pesticide label to verify for required PPE.
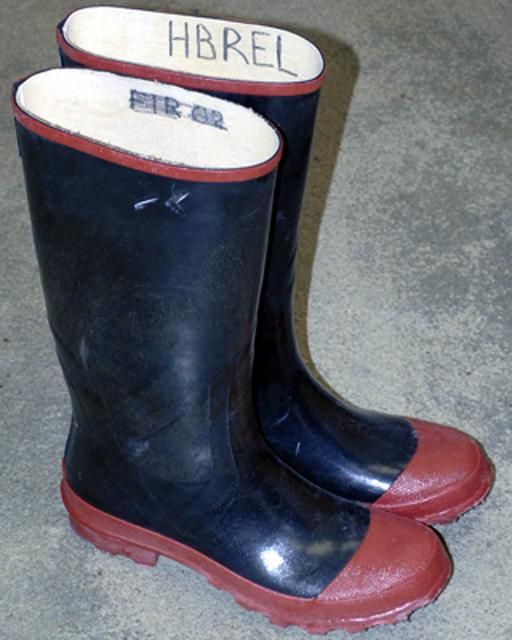
Credit: UF/IFAS Honey Bee Lab
Swarms
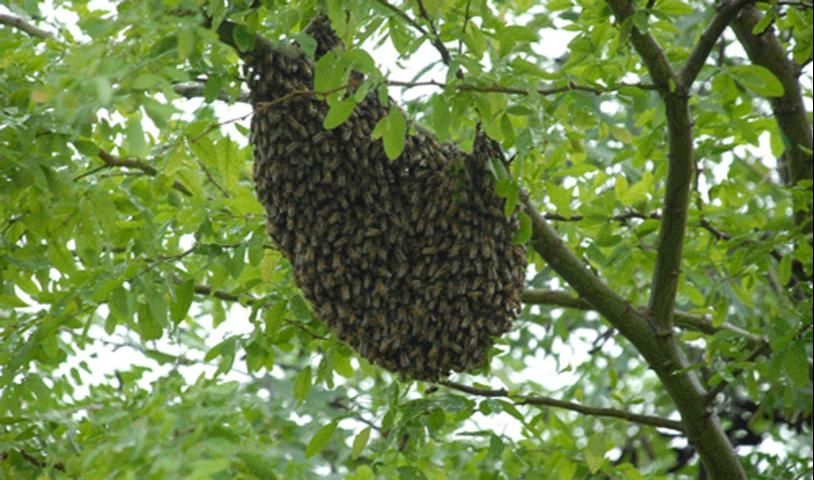
Honey bee colonies do not reproduce only in numbers of bees per colony, but also in numbers of colonies. Bee reproduction on the colony level is called swarming (https://edis.ifas.ufl.edu/in970). Most people use the term "swarming" to refer to dangerous bee activity or just bees flying around, but this is not accurate. A swarm is a large number of bees concentrated in a specific area or splitting from its previous colony to that holding area. The process begins when a bee colony begins to rear new queens. Before the new queens emerge, the old queen in the colony will leave the nest site with about 30–70% of the adult bee population. The original colony will remain at the nest site, rear a new queen, and continue as a functioning colony. The process whereby a group of bees splits from its original colony, leaves the nest sites, and searches for/moves into a new nest site is called swarming.
Upon leaving the colony, the queen will settle on a nearby structure, often a tree branch, the side of a house, a fence post, etc. At this time, the bees that left the colony with her (which are circling in the air looking for the queen), land on/around the queen, thus forming a cluster of bees. This cluster can range from the size of an orange to the size of a 5 gallon bucket. The swarm cluster is a type of holding pattern for the bees. While the colony is in the swarm cluster, scout bees will leave the cluster in search of a new cavity in which to build a home. Once the scout bees locate a new home, they will leave the structure and move to their new home. Bees can remain clustered from a few minutes to many days, depending on the length of time it takes them to find a suitable nest. As such, PCOs may receive phone calls from concerned homeowners about a swarm that is no longer there once the PCO arrives on location. The reason for this is simple: the swarm finally found a site to build a nest and they have moved to occupy it.
A swarm of bees can be found almost anywhere (the side of a wall, a tree branch, a light post, etc.); swarms are usually described as a ball or clump of bees. Swarms that have settled on an object (wall, palm frond, bicycle seat, etc.) should be removed before they move to their permanent nest site, or before they start building comb and exhibiting defensive behavior. They are easiest to remove during the swarm stage. In most cases, swarming bees are remarkably docile because they have no nest to protect.
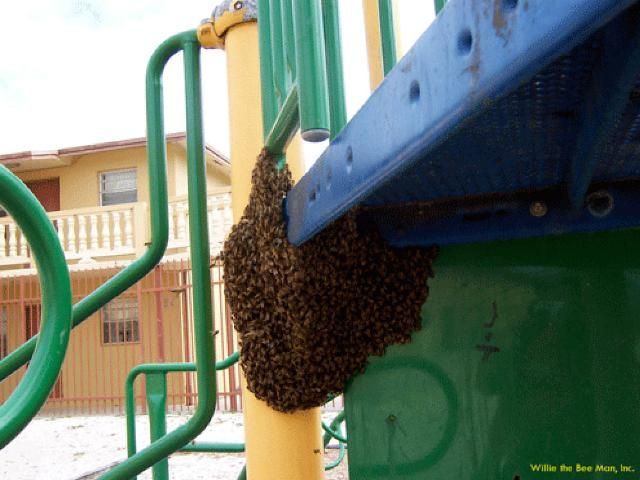
Credit: Willie the Bee Man, Inc.
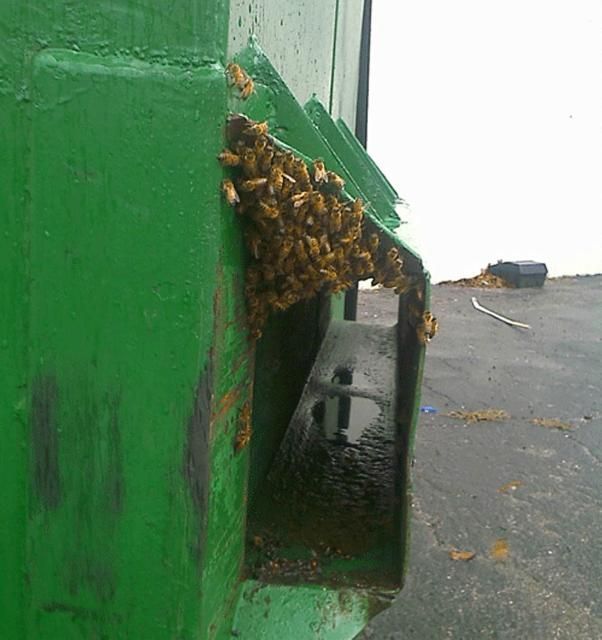
Credit: AllFloridaBeeRemoval.com
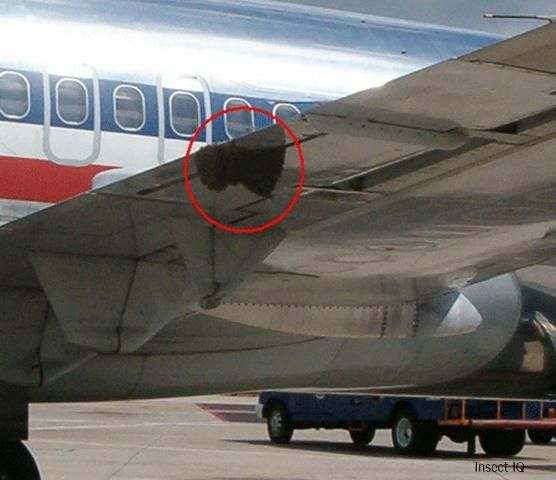
Credit: AllFloridaBeeRemoval.com
Credit: UF/IFAS Honey Bee Lab
Swarm Removal
Whether a nuisance swarm has settled in a trap or has landed on a structure, it should be removed (alive by a registered beekeeper) or eradicated. Spraying the swarm with insecticidal soap is the preferred method for safely eradicating swarms if live removal is not an option. When safe removal is an option, PCOs can work with local registered beekeepers to capture and relocate the swarming bees to a registered, managed apiary.
To eradicate a nuisance swarm, use a registered insecticide and follow the guidelines: The Label Is The Law. Then place a garbage bag, can, or bucket under the swarm. Next, wet the surface of the swarm with the insecticide until the first layer of bees becomes soaked and falls into the bag or bucket. Finally, continue spraying the inner layers of bees until the entire swarm has fallen.
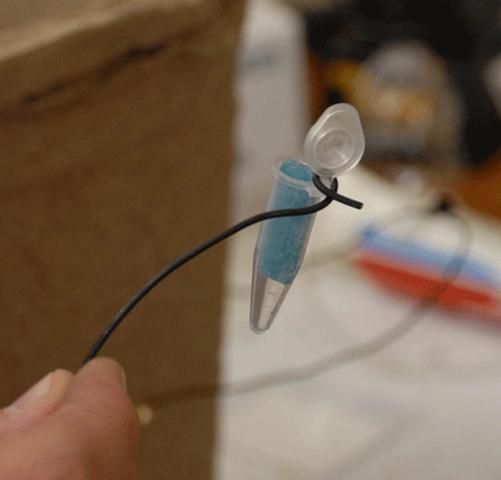
If a swarm has settled in a location where it is difficult to place a bag or bucket under the bees, or if the location is simply difficult to reach, a PCO can use a cardboard box, swarm trap, or similar container. If using a box, wrap it in plastic, secure the plastic using duct tape, and cut a hole about 2 inches in diameter in the side of the box. Place the box or trap near the swarm and angle the hole towards the bees. Secure a pheromone lure (which can be purchased through beekeeping supply companies) into the box or trap using wire and a staple gun (see Resources section, https://edis.ifas.ufl.edu/in785), and simply wait for bees to move into the container. This process could take anywhere from 20 minutes to several hours. Once bees have been caught, place a container/swarm trap in a garbage bag, seal with duct tape, and use an insecticide to kill the bees. Additional options for eradication include placing the bag in full sun for several hours to solarize the bees or freezing the bag. If pesticides are not used, the swarm trap may be reused.
Credit: UF/IFAS Honey Bee Lab
Colonies
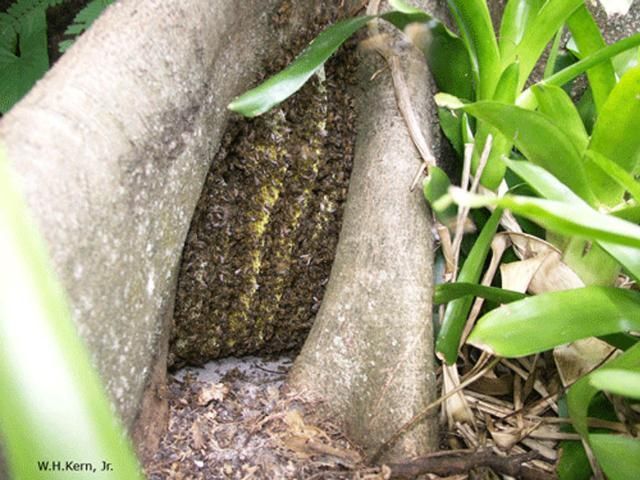
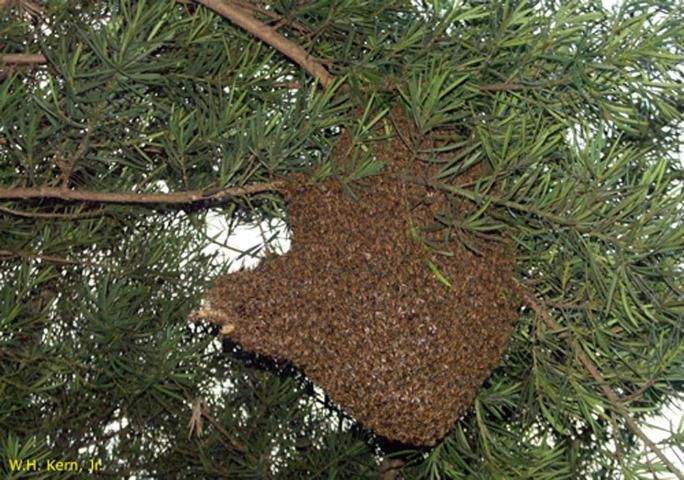
A honey bee colony consists of bees on one or multiple wax combs. Colonies usually are defensive only when they have resources (honey, brood, pollen, etc.) to protect and defend. Often what appears to be a swarm is actually the beginning of a colony (comb is being built inside the cluster of bees); therefore, it is important to be cautious at all times as bees in an established colony can be very defensive. It is important to note that, in general, European races of honey bees (https://edis.ifas.ufl.edu/in1005) prefer to nest inside cavities so it is not common to see an open-nesting cluster of bees (bees that are constructing comb on an exposed surface such as a tree limb). African honey bees, on the other hand, often construct open nests (i.e. nest outside of cavities). As such, all clusters of bees should be approached cautiously since it can be difficult to tell the difference between a docile swarm and an established, open-nesting colony.
Colony nest location can vary depending upon many variables (type of honey bee, other available nesting sites, etc.). AHBs, especially, have been known to nest almost anywhere; yet all honey bees favor certain sites over others. Sites that are potentially attractive to honey bee colonies consist of a small opening that accesses a shaded, enclosed area. However, African honey bees often nest in open, exposed areas. Examples include eaves under roofs, water meters, manholes, electrical boxes, holes in a structure that lead to a void inside a wall, gutter down-spouts, etc. Examine these photos as references.
Credit: W. H. Kern Jr. University of Florida
Credit: W. H. Kern Jr., University of Florida
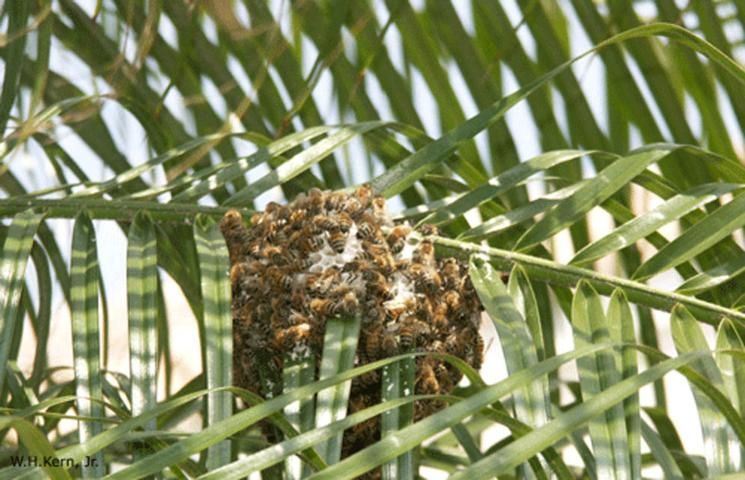
Credit: W. H. Kern Jr., University of Florida
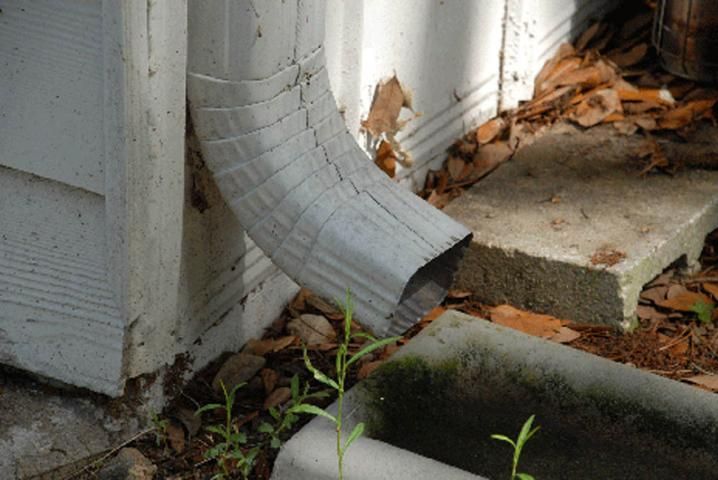
Credit: UF/IFAS Honey Bee Lab
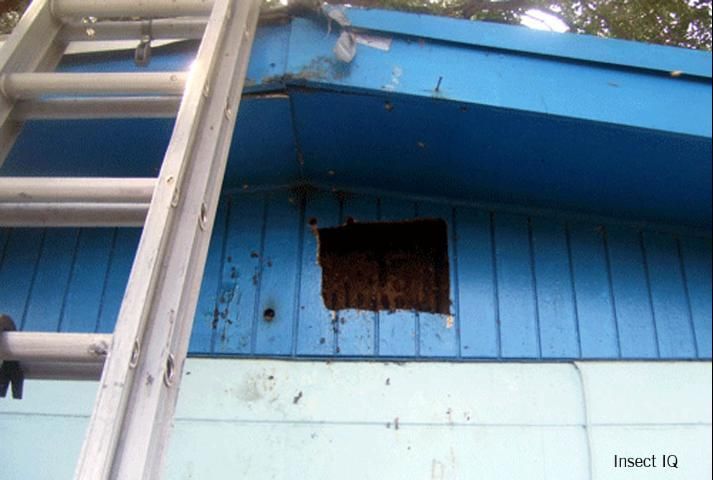
Credit: AllFloridaBeeRemoval.com
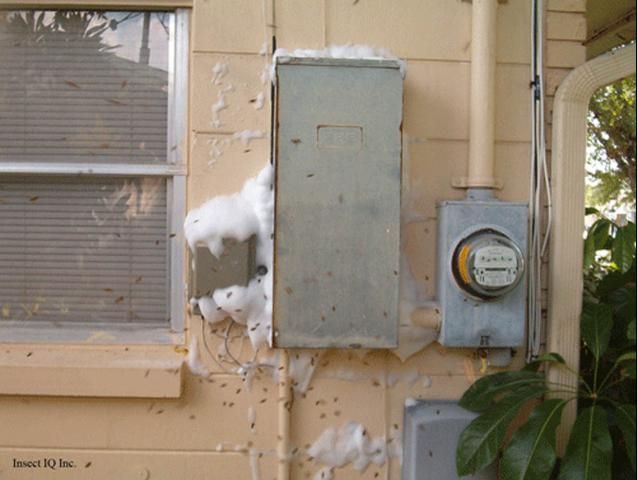
Credit: AllFloridaBeeRemoval.com
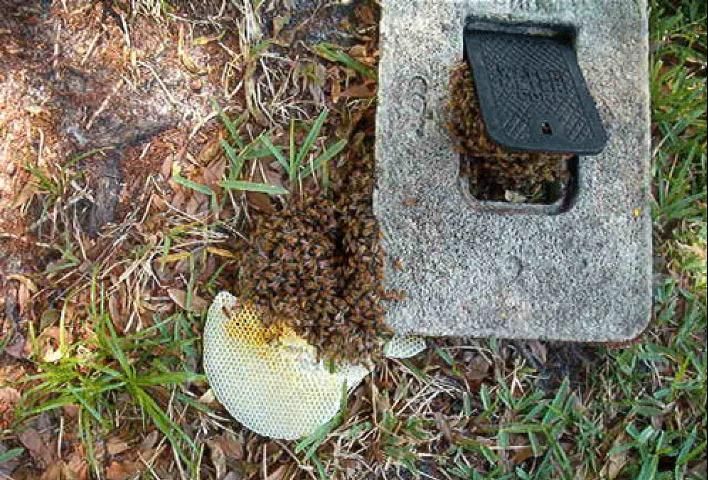
Credit: AllFloridaBeeRemoval.com
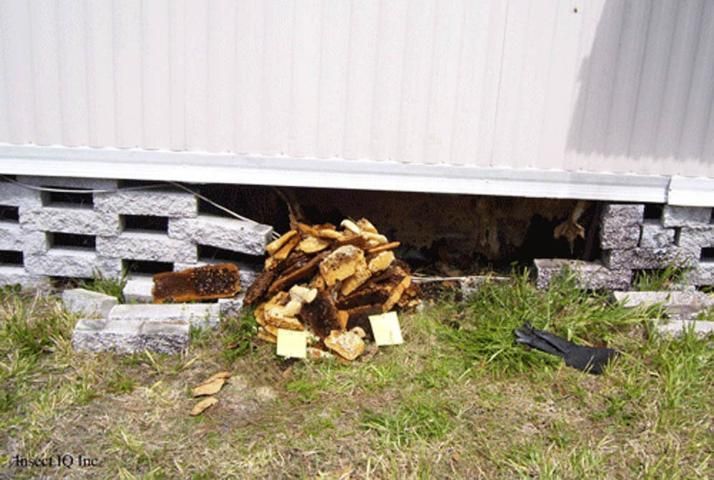
Credit: AllFloridaBeeRemoval.com
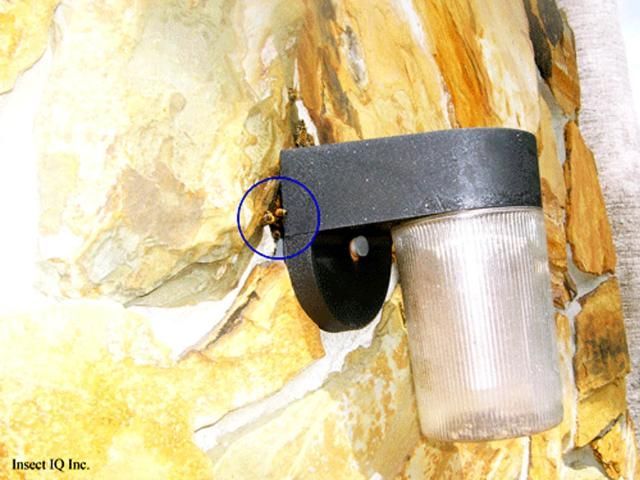
Credit: AllFloridaBeeRemoval.com
Colony Removal
When a nuisance established colony is found, it must be removed as soon as possible by a PCO (See box 2). It is essential that clients or untrained personnel do not attempt to remove a colony as the job may pose a risk to the community and surrounding areas if not handled properly.
Equipment Needed
The following list details includes the equipment needed for removing honey bee colonies. Every piece may not be necessary for every job, yet it is recommended that PCOs carry all of the items in order to be prepared for any possible circumstance. It is very important to use the correct tools to be sure that the colony is removed without the potential for dangerous mistakes. A generator, 400 ft extension cord, and flashlight are needed to provide light during job as the best time to remove a colony is at night, when bees are unlikely to fly. Red light is ideal, as bees cannot see red light and thus will be less disturbed during the procedure than if using white light.
A sting suit, veil, hat, leather gloves, duct tape, and foot and ankle protection (boots) should always be used for protection from defensive colonies. A hive tool, respirator, garbage bags, broom, dustpan, vacuum, hose extension, and water are needed for clean-up and comb removal purposes. Colonies are often found within the walls of a structure, so a drywall saw, reciprocating saw, circular saw and blades, a drill with 1/16" bit, and a stethoscope are required to access such colonies. A ladder is needed to access elevated colonies while a shovel may be used for underground nests. Insect screen, caulk, wood/concrete filler, 1/8" hardware cloth, and a staple gun are used for bee-proofing an area after the colony has been removed. Wooden stakes and colored tape should be used to block off the area prior to removal.

Credit: UF/IFAS Honey Bee Lab
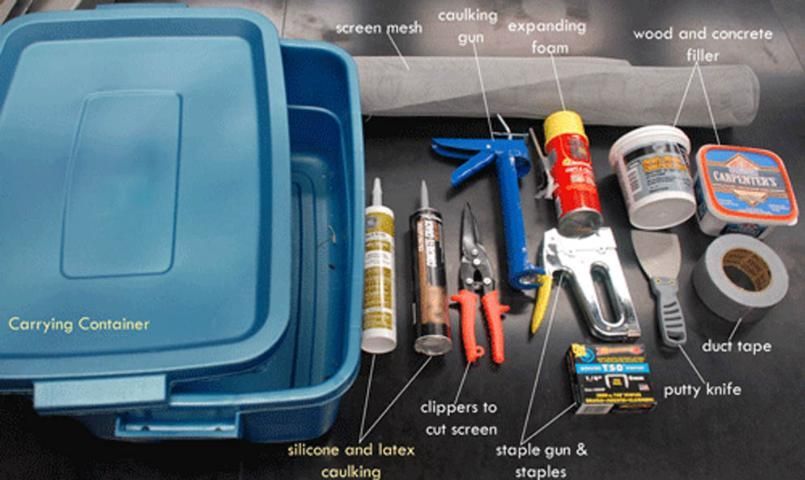
Credit: UF/IFAS Honey Bee Lab
Insecticides Needed
There are four types of insecticides that typically may be used for colony removal.
Foam is the optimal choice for honey bees because it quickly blocks colony exits so bees cannot attack. It is efficient for eradicating colonies established inside a void because it fills the entire void and usually penetrates to all parts of the colony. Foam also works well to knock defensive bees out of the air. Several commercial foaming agents are available, and insecticides can be added for a quicker kill. Foam should not be used near exposed electrical wires; in these cases, dust is suitable.
Dust insecticide can be blown into nest after exit is blocked. Dust is slower acting, but bee movement distributes it throughout the colony; also, dust insecticide is best used when a colony is located near exposed electrical equipment or wires.
Liquid sprays do not work as well against nesting bees. Spraying liquid insecticide into the entrance will not sufficiently eradicate a honey bee colony. However, liquids are the recommended medium as residual treatments to be applied to an area after the nest has been removed.
Aerosols can be directed into nest openings and used for a fast knockdown kill, yet they do not provide residual protection.
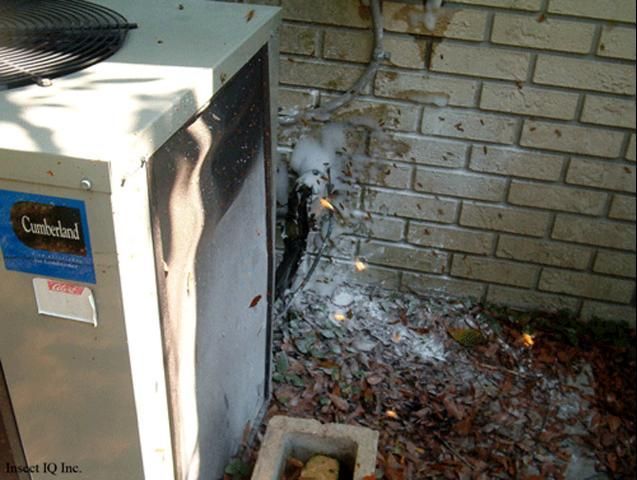
Credit: AllFloridaBeeRemoval.com
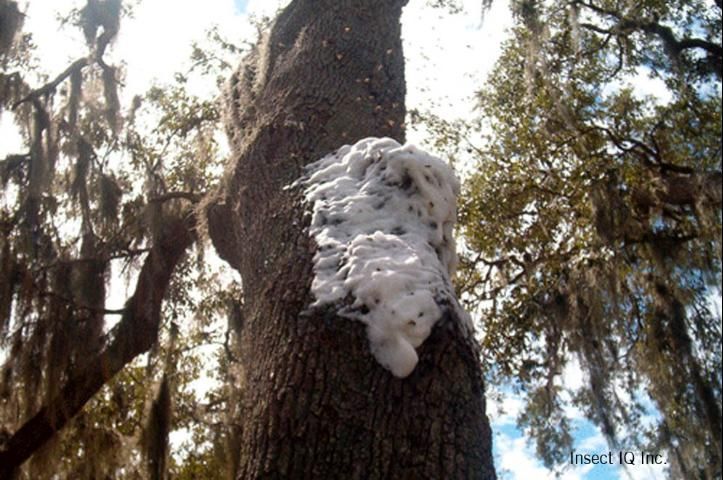
Credit: AllFloridaBeeRemoval.com
Procedure
Work at late evening
While removing a colony, it is best to work at night to ensure that most of the bees will be present within the nest. During daylight hours, a significant percentage of the honey bees from the nest will be away from the nest foraging on flowers. If the colony is removed during the day, the foraging bees will return to the area of the removed colony and congregate there; this may not be pleasing to the customer/property owner. If nighttime removal is not an option, it may be helpful to place a swarm trap and pheromone lure on or near the location of the removed colony to attract the returning foragers (see Resources section for Bee Proofing for PCOs EDIS). The trap can be removed at night once the remaining bees have returned to it and are no longer flying.
Suit-Up
Any time a PCO is dealing with stinging insects of any kind, he or she should be completely suited in PPE (see PPE section above).
Locate the Colony
First, find the colony's exact location (approach with caution). Listen for buzzing and look for honey bee activity, especially bees entering and exiting a specific area. If the colony is located within the walls of a structure, it may be difficult to locate the comb as it may be some distance from the entrance used by bees. To locate comb within a wall or structure, feel sheet rock for warmth, tap sheet rock for solid sound vs. hollow sound, and use stethoscope to listen for buzzing when tapping. In order to confirm that the comb has been located, drill a hole using a 1/16" bit (bees can pass through larger holes) close to the top of the wall as bees often hang combs from the top of voids, and insert a stiff wire. If honey or wax is on the wire, the comb has been successfully located.
Secure the Area
Inspect surrounding area and clear any onlookers or penned/tied animals. Alert nearby homeowners/business employees to stay inside while colony removal takes place. Block off area using wooden stakes and colored tape. Park work vehicle a safe distance from colony.
Approach and Eradicate
Next, run extension cord from generator to nest for light, and position insecticides about 10ft from nest. Locate entrances and exits of nest and any comb (if visible). Apply foam into all nest entrances to subdue the bees' attack. Once the colony is disturbed it only takes between 1–5 seconds before bees exhibit defensive behavior; therefore, it is crucial to work quickly so the surrounding area is not disturbed.
After foaming all entrances, apply pesticides into the nest cavity by either filling the cavity with a dense foam spray, or injecting dust into the cavity. Once insecticide has been applied, wait for the bees to die; this may happen in less than a minute or up to several minutes depending upon the colony size and type of pesticide being applied. Remove the dead bees (place dead bees in garbage bag). Next, cut out the comb, and place in garbage bag along with dead bees. Remove bag from premises, and apply residual insecticides (liquid is best for this purpose), bee-proof area if applicable, and/or recommend that client have area structurally repaired (see Resources section for Bee Proofing EDIS).
A note on comb removal: removing all comb from the site is important because unattended beeswax, honey, brood, or pollen will attract other insects and animals. Leaving behind remaining comb will also attract bees from neighboring managed colonies, causing intended pesticide exposure and potential spreading of honey bee diseases. Wax moths (https://edis.ifas.ufl.edu/in1108) or small hive beetles (https://edis.ifas.ufl.edu/in854) may consume the colony components, and decaying brood and fermenting honey will cause undesirable odors. If the wax comb remains inside a wall, it can melt into the structure and stain the wall, making it nearly impossible to paint or wallpaper the affected area. Colony eradication is not complete until the entire nest is removed. It is recommended that you advise the property owner to seal all possible points of entry to the nest site to avoid reinfestation.
Standard Operating Procedure Summary
Swarm Removal—for removal of swarms that have already settled on an object
- Place open garbage bag, can, or bucket under swarm to catch bees as they fall.
- Wet the surface of the swarm until the first layer of bees becomes soaked and falls into the container. Spraying with insecticidal soap is the preferred means for controlling swarms (mix a 5% solution using ¾ cup liquid dishwashing detergent with one gallon of water).
- Continue spraying inner layers until entire swarm has fallen from its perch.
- Seal container/ bag of bees and eradicate.
Alternate Method—cardboard box or swarm trap
- If using a box, wrap it in plastic.
- Secure the plastic using duct tape.
- Cut a hole (about 2 inches in diameter) in the side of the box.
- Secure box or trap near swarm.
- Angle hole in container towards bees.
- Insert pheromone lure.
- Wait for bees to enter container.
- Place container in garbage bag and seal with duct tape.
- Proceed to use insecticide to kill bees. Follow the Label.
Swarm Removal Equipment List:
- garbage bags
- garbage can
- sprayer
- cardboard box
- plastic wrapping
- water
- duct tape
- swarm trap
- pheromone lure
- insecticide
- rubber gloves
- beekeepers protective gear—PPE
Colony Removal—for removal of established colonies
- Best removal time is at night (if eradication is done during the day, have a plan to trap foraging bees returning to the hive location).
- Put on personal protective equipment.
- Find colony's exact location.
- Inspect surrounding area and clear onlookers and penned/tied animals.
- Make sure people in nearby homes or businesses know to stay inside while removal is happening.
- Block-off area using wooden stakes and colored tape.
- Park vehicle safely away from colony.
- Run extension cord from generator to nest for light (red light is best—you can cover the lens with a red film)—set light at desired angle.
- Position insecticides about 10 ft. from nest.
- Locate and block nest entrances/ exits using insecticides (foam is best).
- Remove dead bees.
- Cut out comb.
- Place comb and bees in a garbage bag and remove from premises.
- Apply residual insecticides.
- Bee-proof area and recommend that client have area structurally repaired.
Colony Removal Equipment List:
- Generator AC/DC converter
- 400 ft extension cord
- flashlight (150 watt halogen bulb) and spare batteries
- sting suit
- veil
- hat
- leather gloves
- duct tape
- foot and ankle protection (boots)
- hive tool
- respirator
- garbage bags
- broom
- dustpan
- vacuum
- hose extension
- water
- drywall saw
- drill with 1/16" bit
- stethoscope
- ladder
- shovel
- insect screen or 1/8" hardware cloth
- staple gun
- wooden stakes
- colored tape
Conclusion
Pest control operators play an important role in maintaining public safety. If PCOs offer a comprehensive honey bee eradication, monitoring, and prevention service, they will have the opportunity not only to acquire additional customers but to offer a valuable public service: colony and swarm removal benefits the entire community. Any PCOs who are interested in doing live bee removal must be a registered beekeeper (for information about becoming a registered beekeeper, visit www.FDACS.gov/BeekeeperRegistration). A comprehensive program should consist of a professional monitoring service that prevents establishment of dangerous colonies and a professional bee removal service that
- utilizes proper equipment and procedures
- provides safe areas for work and play
- eliminates bees without the hazard of neighbors and bystanders being attacked
- protects at-risk animals and people from stings.
Additional Resources
https://edis.ifas.ufl.edu/topic_africanized_honey_bee