Introduction
This document outlines the standard operating procedures for trapping honey bee swarms. Please note, these procedures are NOT meant for homeowners and should only be conducted by trained individuals such as pest control operators or registered beekeepers. Also, only those individuals holding licenses to dispense pesticides may do so in the removal of any bee pest. Please contact the Florida Department of Agriculture and Consumer Services (FDACS) Bureau of Licensing and Enforcement for clarification or confirmation of licensing requirements. The contact information for the bureau is in the additional information section.
Swarms and Trapping
Honey bee colonies do not reproduce only in numbers of bees per colony, but also in numbers of colonies. Bee reproduction on the colony level is called swarming (see: https://edis.ifas.ufl.edu/in970). Most people use the term "swarming" to refer to dangerous bee activity or just bees flying around, but this is not accurate. A swarm is a large number of bees concentrated in a specific area or splitting from its previous colony to that holding area. The process begins when a bee colony begins to rear new queens. Before the new queens emerge, the old queen in the colony will leave the nest site with about 30%–70% of the adult bee population. The original colony will remain at the nest site, rear a new queen, and continue as a functioning colony. The process whereby a group of bees splits from its original colony, leaves the nest sites, and searches for/moves into a new nest site is called swarming.
Upon leaving the colony, the queen will settle on a nearby structure, often a tree branch, the side of a house, a fence post, etc. At this time, the bees that left the colony with her (which are circling in the air looking for the queen), land on/around the queen, thus forming a cluster of bees. This cluster can range from the size of an orange to the size of a 5-gallon bucket. The swarm cluster is a type of holding pattern for the bees. While the colony is in the swarm cluster, scout bees will leave the cluster in search of a new cavity in which to build a home. Once the scout bees locate a new home, they will leave the structure and move en masse to their new home. Bees can remain clustered from a few minutes to many days, depending on the length of time it takes them to find a suitable nest. As such, PCOs may receive phone calls from concerned homeowners about a swarm that is no longer there once the PCO arrives on location. The reason for this is simple: the swarm finally found a site to build a nest and they have moved to occupy it.
Swarm trapping is a precautionary measure through which one captures swarms before they occupy a nesting site from which they may be difficult to remove. Swarm trapping is done by setting out traps in strategic locations and attracting the bees with pheromone lures to the trap as the bees search for a suitable nest site.
In popular literature, "African," "Africanized," and "Killer" bees are terms that have been used to describe the same honey bee. However, "African bee" or "African honey bee" most correctly refers to Apis mellifera scutellata when it is found outside of its native range. A.m. scutellata is a subspecies or race of honey bee native to sub-Saharan Africa where it is referred to as "Savannah honey bee" given that there are many subspecies of African honey bee, making the term "African honey bee" too ambiguous there. The term "Africanized honey bee" refers to hybrids between A.m. scutella and one or more of the European subspecies of honey bees kept in the Americas. There is remarkably little introgression of European genes into the introduced A.m. scutellata population throughout South America, Central America, and Mexico. Thus, it is more precise to refer to the population of African honey bees present in the Americas as "African-derived honey bees." However, for the sake of simplicity/consistency, we will refer to African-derived honey bees outside of their native range as "African honey bees" or "AHBs."
Equipment
Swarm trapping requires few specialized tools. Swarm traps are 5- to 10-gallon pots, consisting of a body and a lid, made from a fiber/pulp-paper based material. Often, they are treated with a fungicide to prevent mold and rot if exposed to weather. Lures come in small plastic vials and are filled with a liquid pheromone that attracts the bees. Lures can be purchased from most beekeeping supply companies. Additional recommended equipment includes safety cones, safety vest, rubber gloves, first aid kit, insecticidal soap, hard hat, splash goggles, binoculars, beekeeping protective gear, hive smoker, weather-proof labeling tags, a spool of wire, wire cutters, garbage bags, duct tape, hammer, nails, staple gun, staples, and pesticide foams.
Placement
Generally, swarm traps (also called bait hives) should be placed along the perimeter of a client's property, about 50–100 yards apart. When they are placed in such a fashion, the row of traps is referred to as a trap line. When considering swarm trap locations, remember that the traps should be placed away from homes or other buildings frequented by people. The traps should be placed 10–20 feet high if possible in a shady area, yet they need to be easily accessible for the removal of bees. The correct placement of traps allows one room to park and exit vehicles at a safe distance, yet traps should not be easily accessible to the general public. Be aware of environmental hazards while placing traps. These include power lines, unstable trees, etc. During placement, each trap should be labeled with the trap-line name, date last worked, and relevant contact information. Survey records and maps should be maintained for each trap site.
Assembly
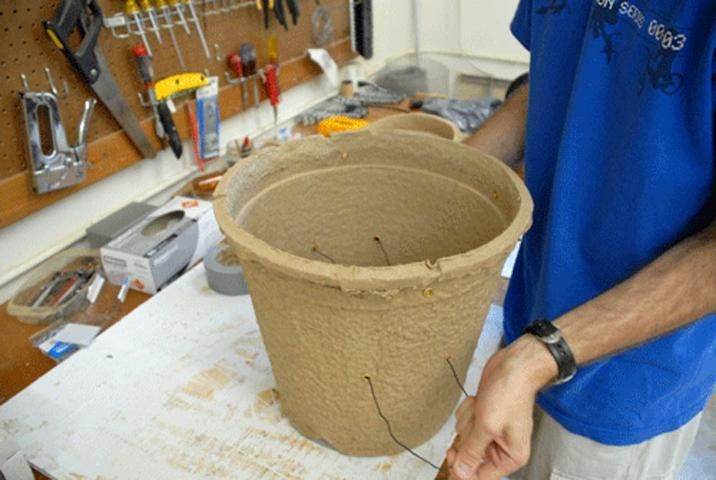
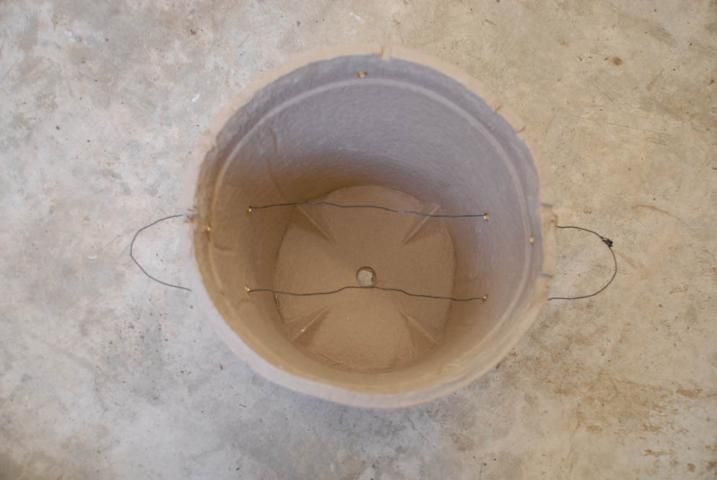
The traps should be assembled on site, so be sure to take precautions while parking or working near a public right-of-way. Always display safety cones and wear a safety vest. Be aware that some construction sites and port areas require hard hats. To assemble traps, first insert wiring through the center of the trap for added support (this also provides an anchor site that can be used for hanging) (Figures 1 and 2).
Credit: UF/IFAS Honey Bee Lab
Credit: UF/IFAS Honey Bee Lab
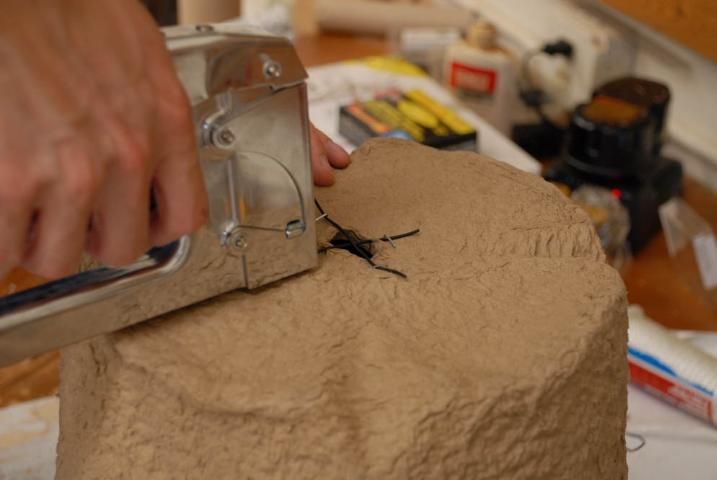
Next, cut two pieces of wire, approximately three inches in length. Use a staple gun to secure wire in a cross-shape over the trap's opening; this will help discourage intruders such as birds, mice, or squirrels (Figure 3).
Credit: UF/IFAS Honey Bee Lab
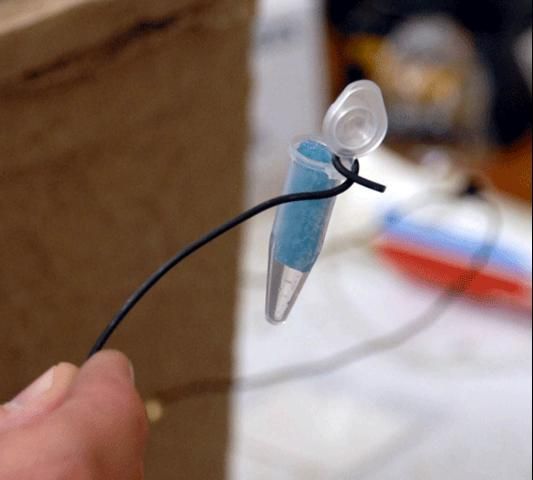
Next, a wire hook or hanger should be created to hang the pheromone lure (Figure 4).
Credit: UF/IFAS Honey Bee Lab
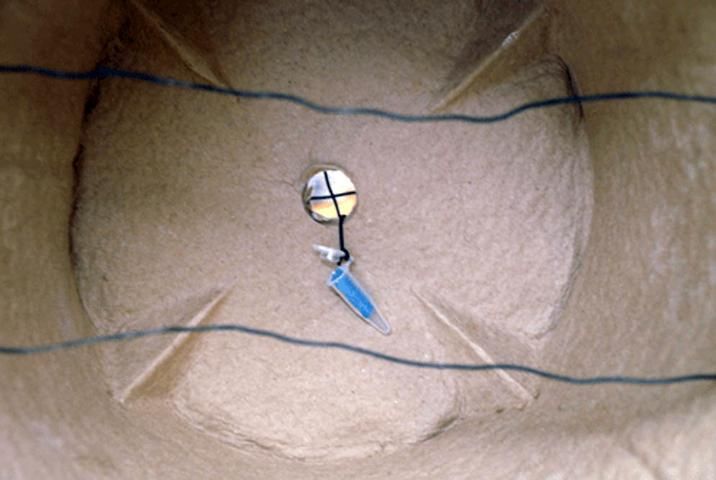
Once the hanger is made, hang the lure on the inside of the trap's opening, and staple the protruding wire to the outside (Figures 5).
Credit: UF/IFAS Honey Bee Lab
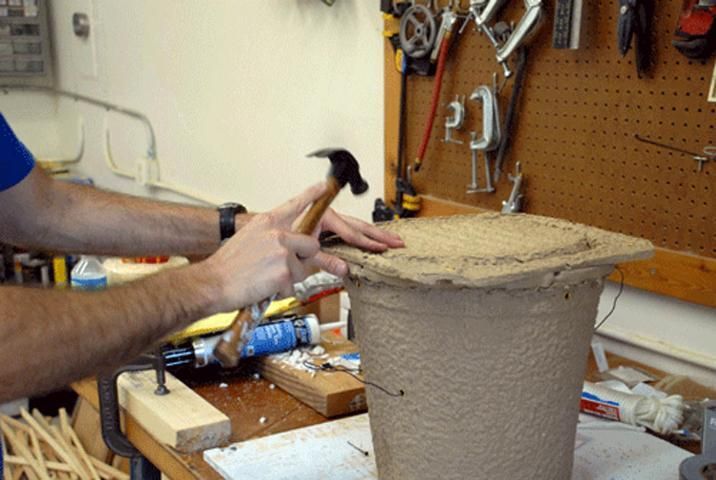
Finally, nail together the trap top and bottom (Figure 6).
Credit: UF/IFAS Honey Bee Lab
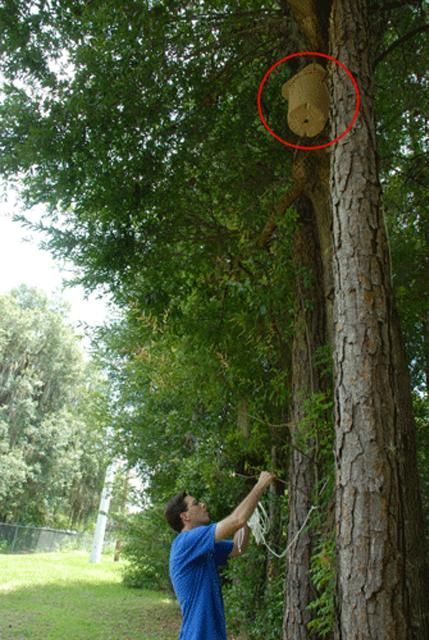
Because it must be able to support the weight of a swarm, be sure that the trap is firmly attached to an object (usually a tree, but other structures can be used if necessary). The trap can be hung using wire or rope or attached to a surface with screws—just be sure it will handle the weight of a colony of bees, comb, and honey (~10–30 lbs.). If hanging traps in trees, placing the traps 10–20 feet above ground is ideal. Once the trap is hung, fill out and attach an information card (Figures 7 and 8).
Credit: UF/IFAS Honey Bee Lab

Credit: UF/IFAS Honey Bee Lab
Servicing
Traps should be monitored every 21 days, and pheromone lures should be replaced twice a year in January/February and July/August. For traps placed 20 feet or higher, binoculars can be used to determine if any swarms have occupied the trap. Placing traps at such a height allows individuals to monitor for bees without putting themselves in danger of triggering a defensive attack. If bee activity is noticed in or around a trap, the colony must be removed immediately. Any bees caught by the trap may exhibit defensive characteristics; therefore, a complete beekeeper protective suit should be worn (to prevent openings in suit, pants can be duct taped to boots, and gloves taped to suit).
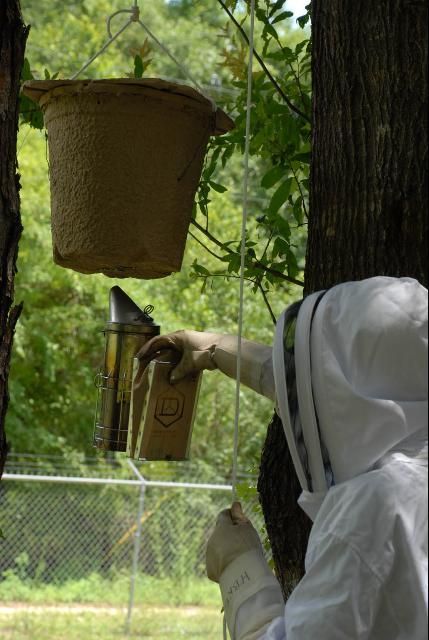
After securing the bee suit, light the smoker, approach the trap with caution, slowly lower the trap, and inject smoke into the trap's opening (Figure 9).
Credit: UF/IFAS Honey Bee Lab
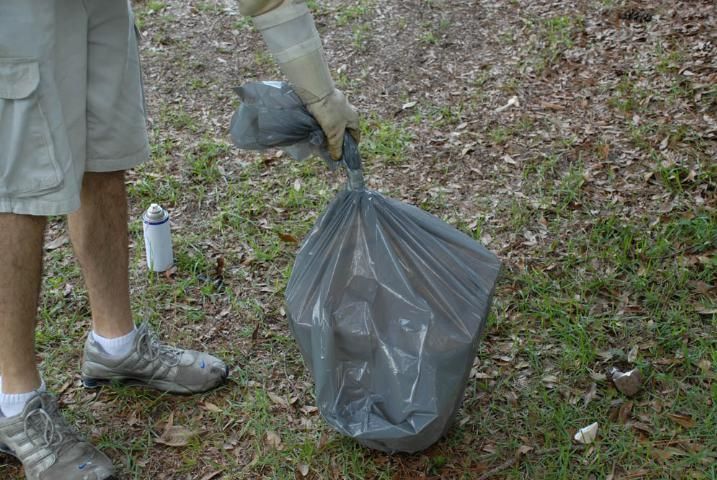
Gently remove the trap from the structure, place the entire trap in a garbage bag, and seal the bag with duct tape (Figure 10).
Credit: UF/IFAS Honey Bee Lab
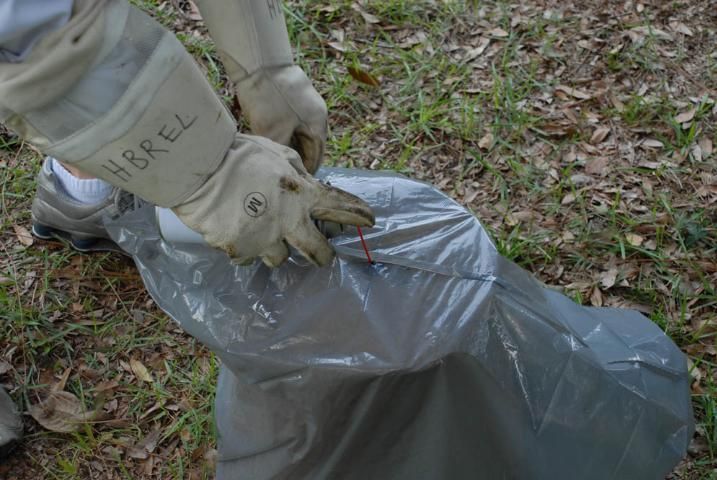
Once the trap is in the bag, there are several options for eliminating the colony. The trap entrance can be located through the bag, and an insecticidal soap sprayed through the bag into the opening (Figure 11). Other options include placing the hive in a freezer for several days to freeze the bees, or leaving the bag in full sun for several hours to solarize the bees. Label the bag with the date, location, and other details as needed.
Credit: UF/IFAS Honey Bee Lab
Remember to wash your hands thoroughly after using pesticides.
Proposed Business Plans
Pest control operators may choose to include swarm trapping as a part of their feral honey bee removal and monitoring services (see Box 2). Three grades of service are suggested:
Trapping Station Installation—initial visit
- Property is analyzed by pest control personnel.
- Number and location of necessary traps are determined.
- Each trap is installed and outfitted with pheromone lure.
- Per-trap charge is recommended.
Premium Service Plans—site maintenance
- Pest control personnel inspect stations every 21 days.
- Trapped swarms are neutralized and removed.
- Monthly charge is recommended.
Self-Monitoring Service Plan—site maintenance
- Clients inspect stations regularly.
- Client contacts company when a swarm is trapped.
- PCO personnel neutralize and remove each swarm.
- Monthly per-trap charge is recommended, plus additional charge for each removed swarm.
The state of Florida recommends that nuisance honey bees (https://edis.ifas.ufl.edu/in1005 and https://edis.ifas.ufl.edu/in790) found nesting outside of hives managed by a beekeeper (like those nesting in tree cavities, walls, water meter boxes, etc.) be either (1) removed from the nest site by a registered beekeeper (www.FDACS.gov/BeekeeperRegistration) or (2) eradicated by a licensed PCO. It is the responsibility of the property owner to deal with an unwanted swarm (https://edis.ifas.ufl.edu/in970) or colony of honey bees. To find a registered beekeeper or PCO who offers removal or eradication services, visit: http://entnemdept.ufl.edu/honey-bee/beekeeper-resources/bee-removal/and click on "Find a Bee Removal Expert in your area." For more information on African honey bees, see http://entnemdept.ufl.edu/honey-bee/beekeeper-resources/african-bees/.
Standard Operating Procedure Summary
Trap Assembly
- Insert wiring through the center of the trap for added support while hanging.
- Use staple gun to attach wire in a cross shape over the opening in the trap; this will help discourage intruders.
- Create a hanger for the pheromone lure using wire.
- Hang lure on the inside of the trap's opening, and staple protruding wire to outside of trap.
- Nail together the trap top and bottom.
- Trap lines should be established along perimeters of property.
- Trap should be placed as high as possible (10–20 ft.).
- Because it must be able to support the weight of a swarm, be sure to attach the trap securely to a tree or other object.
- Attach the information tag to the trap.
Trap Servicing
Monitor traps on 21-day intervals, change pheromone lures in July/August and January/February.
- Park vehicle a safe distance from trap in order to prepare for bee removal.
- Due to the unpredictable and defensive nature of AHBs, put on complete protective gear (veil, jacket/pants, gloves, boots).
- Light smoker.
- Approach bait hive with caution, and inject smoke into the opening.
- Detach and lower trap.
- Place trap in garbage bag, and seal bag with duct tape.
- Locate trap opening and spray in pesticide (foams work best).
- Label bag for sampling.
- Wash hands with soap and water after using pesticides.
Equipment List
- trap top and bottom
- pheromone lure
- safety cones
- safety vest
- rubber gloves
- first aid kit
- soap and water
- hard hat
- splash goggles
- beekeepers protective gear
- hive smoker
- binoculars
- weather-proof labeling tags
- spool of wire
- wire cutters
- garbage bags
- duct tape
- hammer
- nails
- staple gun
- staples
- pesticides
For more information, see: Florida Department of Agriculture and Consumer Services
Division of Agricultural Environmental Services
Bureau of Licensing and Enforcement