The purpose of this document is to provide guidance on the appropriate use of unmanned aerial vehicles (UAVs) for agricultural applications in Florida. Flight software (e.g., mission planning apps) are used to program the flight of the UAV to collect data in a particular area by setting various parameters such as flight height, flight speed, overlap data collection percentage, etc. Post data processing software are used to process the UAV-collected data to create several types of maps based on the application and type of sensor(s) used for data collection. These maps include orthomosaics, 3D maps, plant health or stress status maps (e.g., normalized difference vegetation index—NDVI maps), etc. There are several apps and software available for flight planning and postflight data analysis. Most flight mission planning apps are free, but almost all post-processing software require a subscription fee. This document provides step-by-step instructions for preparing a UAV for flight, creating a mission path (using flight mission planning apps), and collecting UAV-based data. Instructions on the use of post-processing data analysis software are provided in another EDIS document.
Introduction
Traditional field monitoring and pest scouting techniques rely on manual sampling and are time-consuming and labor-intensive. To address this issue, several remote sensing technologies and techniques have been developed (Ampatzidis et al. 2017). Recently, small unmanned aerial vehicles (UAVs) equipped with several sensors became cost-effective solutions for rapid and non-destructive field data collection (Matese et al. 2015; Pajares 2015). Small UAVs can be used for high-resolution image acquisition at low cost compared to other sensing technologies (e.g., airborne and satellite imaging). Data collected from UAVs are used for photogrammetry processing to create orthomosaics, plant stress maps (e.g., NDVI maps), digital surface models (DSM) and 3D models (de Castro et al. 2018). Artificial intelligence (AI) algorithms have been developed to process the UAV-collected data to estimate plant water needs, monitor crop health status, and detect weeds, pests, and diseases (Abdulridha et al. 2019; Matese et al. 2013; Nebiker et al. 2008). For example, Garcia-Ruiz et al. (2013) developed a UAV-based technique to monitor tree stress in groves utilizing multispectral imaging, and Ampatzidis and Partel (2019) developed an AI-based technique to count citrus trees and tree gaps, measure tree height and canopy size, and develop individual tree NDVI maps. Acquiring high-resolution data is a critical step for precision agriculture applications. In order to acquire high-resolution UAV-based data and carefully create a flight path, several steps should be followed (Xiang and Tian 2011). This document presents steps that are necessary for a succesful UAV flight and data collection.
Off Field Preflight
In order to use a UAV for commercial or research purposes, the UAV user needs to obtain a remote pilot license and follow all rules and regulations established by the FAA (Part 107). Kakarla and Ampatzidis (2018) present all these steps, rules, and regulations.
Before you go to the field, you have to follow several steps in order to have a successful data collection operation.
Data Collection Area: The first step is to collect the GPS coordinates and find the location of the field where you want to collect data on the map, preferably in a satellite version.
Getting Your UAV Ready for the Flight: Before you go ahead with the flight, you have to make sure that various components are in working condition and supported by the UAV. These major components are:
- UAV batteries: Make sure the batteries are fully charged and compatible with the UAV you are using. Some UAVs may require two or more batteries for flying. In this case, you will have to make sure that both batteries are of the same version (this particularly happens when a user has a large inventory of batteries with multiple versions) and are fully charged. For example, DJI UAVs (SZ DJI Technology Co., Ltd., Guangdong, China) sometimes will not allow the UAV to take off when using batteries of the same version but with different charge percentages, citing voltage difference as a problem.
- Remote controller: Always make sure you are using a remote controller compatible with the UAV and perform firmware updates whenever you are prompted to do so. If you are using a tablet or mobile phone with the remote controller, make sure it is compatible with the flight mission planning apps you plan to use. Also, remember to carry the cable that connects the remote controller to the mobile device.
- Memory cards: Memory cards store all of your collected data. You have to constantly monitor the storage status. It is recommended to go with full capacity and fully formatted memory cards. Be sure to check if the memory card is compatible with the UAV or the sensor(s) you are using. Some sensors (e.g., multispectral cameras) and UAVs accept only a particular type of memory card; you can generally find that information in the user manuals. Providing each UAV with its own memory card is also recommended. Avoid using the same memory card in another UAV.
- Mobile device: Most of the remote controllers do not have screens of their own and often need to be connected to a mobile device. This can be a tablet or a mobile phone. Make sure mobile devices are fully charged. Avoid keeping them in the sunlight for too long. For example, prolonged exposure to sunlight may cause a tablet to overheat and force it to go into a "warning mode" that causes communication errors with the UAV, leading to loss of data. Most flight mission planning apps require a working Internet connection to load the maps, and it is recommended to have one. An alternative can be preloading the maps on the mobile device by planning the mission before going to field, while connected to the Internet (the following section discusses details on mission planning).
- Laptop: It is recommended to have a fully charged laptop with you during the data collection to verify the quality of the collected data in the field (and not later in the office). A memory card reader is also required to read the content of a memory card from the UAV.
In Field Preflight
Once you are in the field with the aforementioned materials ready, there are a few more steps to follow.
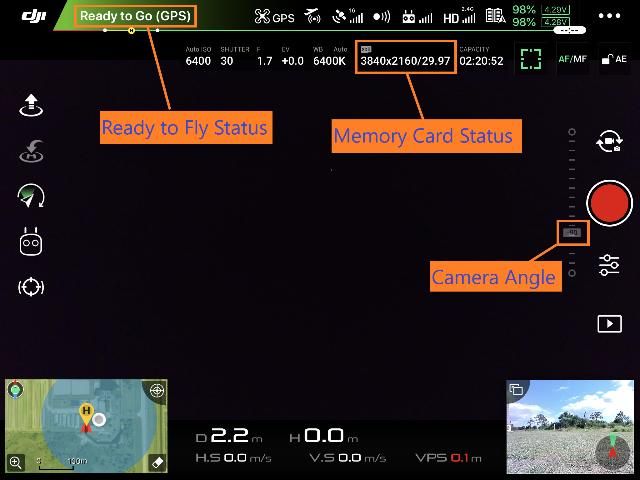
UAV Status: After you power on your UAV, you will have to check and make sure that the UAV is ready to fly (Figure 1). Most of the currently available UAVs provide a compatible app to check the "UAV status" and verify that the UAV is ready to fly. As an example, a Matrice 210 UAV (Quadcopter, SZ DJI Technology Co., Ltd., Guangdong, China) equipped with a Zenmuse X5S camera (SZ DJI Technology Co., Ltd., Guangdong, China) and the DJI GO 4 App will be used throughout this document to better demonstrate all the steps you need to follow for a successful flight.
If the sensor you are using is attached to a gimbal and you are performing a mapping mission, make sure that the sensor is facing downwards at 90 degrees (Figure 1, "Camera Angle"). In other cases, where the sensor used is in a stationary position, make sure it is aligned according to the mission requirements. Furthermore, make sure that the memory card is inserted into the UAV (or the sensor you are using), and verify the status of the memory card in the corresponding mobile app (Figure 1; "Memory Card" status). Remember to remove the lens cap of the sensor, if there is one. Once the UAV mobile app shows that the UAV is ready to fly (Figure 1; "Ready to Fly" status) and all the statuses are checked and verified, open the flight mission planning app on your mobile device.
Credit: UF/IFAS
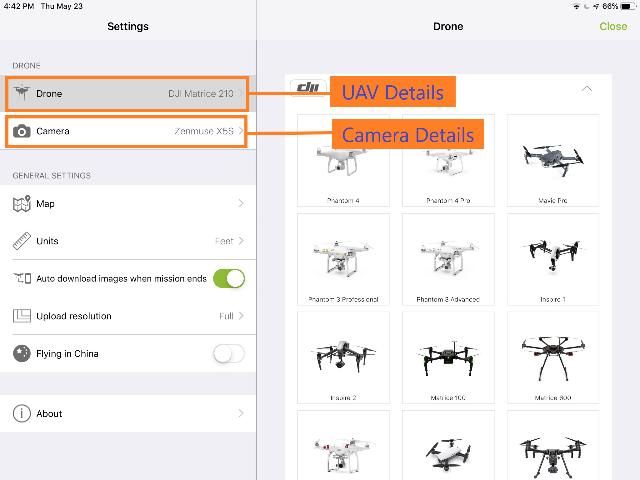
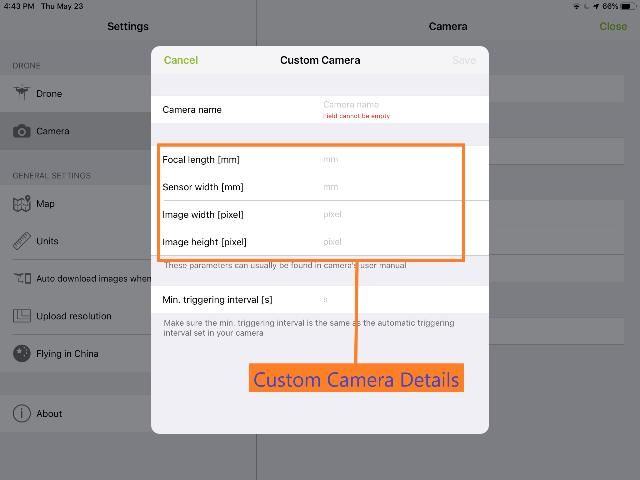
Flight Mission Planning: After you open the flight mission planning app, make sure the app detects the UAV and the sensor (e.g., thermal camera) you are using (Figure 2). You can usually check this in the status menu or settings menu. Sometimes, the sensor is independent of the mission planning app, and you will have to enter its details as a custom camera with all the details required in the app (Figure 3). As an example, the Pix4Dcapture app on an Apple iPad is used throughout this document for better understanding of the procedures.
Credit: UF/IFAS
Credit: UF/IFAS
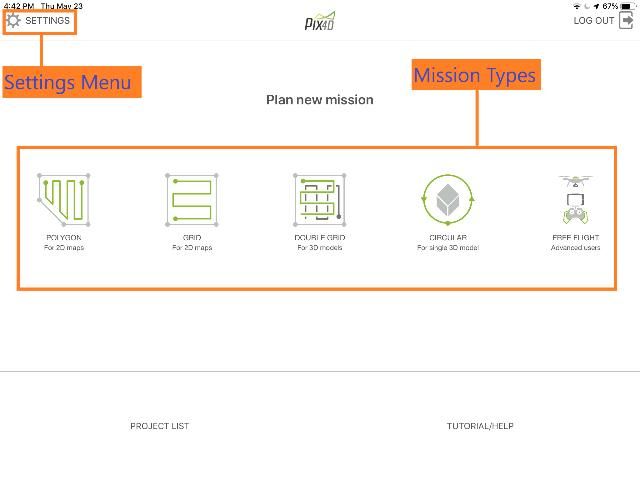
After you make sure the app detects the UAV, select the kind of mission you want to fly (Figure 4). Apps generally offer several different kinds of missions, and it is up to the user to decide which mission type is best suited for them. Note that a polygon mission type will probably be completed in lesser time than a grid mission type when the data collection area is an irregular shape. The user can compare both mission types by planning them and checking their estimated flight times. You can see the estimated flight time in the app while planning the mission (Figure 5; "Estimated Flight Time").
Credit: UF/IFAS
The estimated flight time can vary based on several factors. Some of the major factors are flight height, overlap percentage, picture trigger mode, and UAV speed. As the flight height increases, the estimated flight time decreases. The options for setting the flight height can be found in the settings menu (Figure 5). As the overlap percentage increases, the flight time increases because the UAV has to cover more area when compared to a smaller overlap percentage. You can find the overlap percentage settings in the settings menu (Figure 6). It consists of two options, namely, front overlap and side overlap. The ideal overlap percentage values depend on the mission; it is up to the user to determine them. The most widely used overlap percentage values are 70–80%. You will also find options for picture triggering mode and UAV speed setting in the settings menu (Figure 6). These two factors also depend on the mission. Most of the time, they are set to a high setting as long as the quality of the data is not compromised. When planning a flight mission, make sure that the starting point is closest to the UAV position (Figure 5; check "Current UAV Position" and "Mission Start Position"). This could save more than a minute of flight time, which is almost 5% or more of the battery capacity for most of the UAVs. Another small change that can decrease the required flight time significantly is the number of turns in the flight mission plan. It is recommended to choose paths with fewer turns.
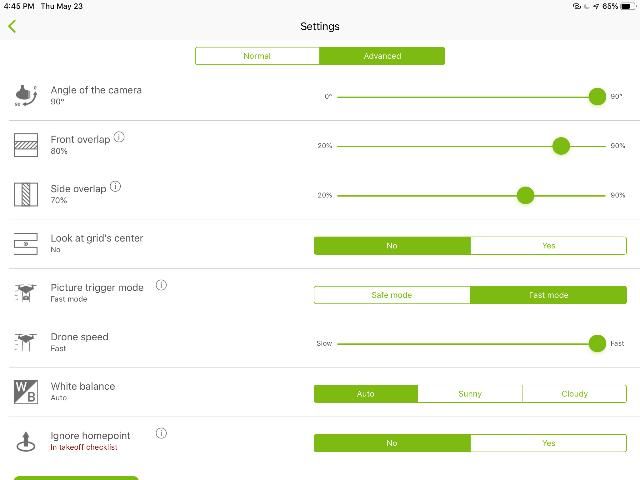
Credit: UF/IFAS
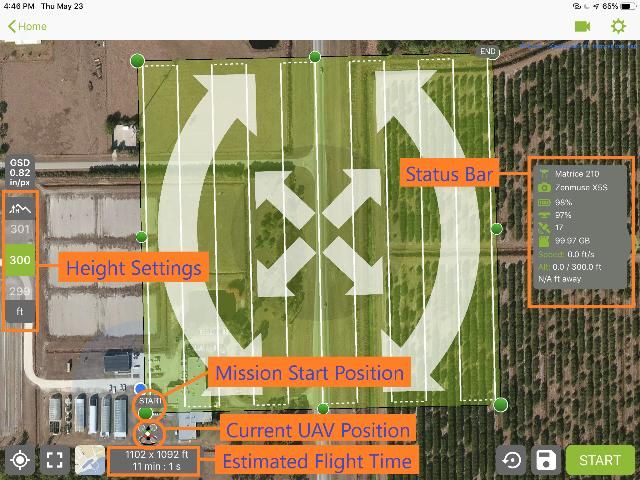
Credit: UF/IFAS
After you make sure everything is ready, click the start button. A checklist will appear verifying the status of various parameters. Once everything is good, the UAV will start its mission (Figure 7). There may be cases where you find errors after you click the start button. Examples include:
- Problems with the battery capacity—This can be solved by reducing the size of the data collection area.
- Flight mode switch in the wrong position—You have to make sure it is in the correct mode. Refer to the UAV's user manual to find out which is the right mode.
- Failed upload of mission to the drone—You will need to retry by canceling and clicking the start button again.
- Insufficient UAV storage—You will need to replace it with a new memory card.
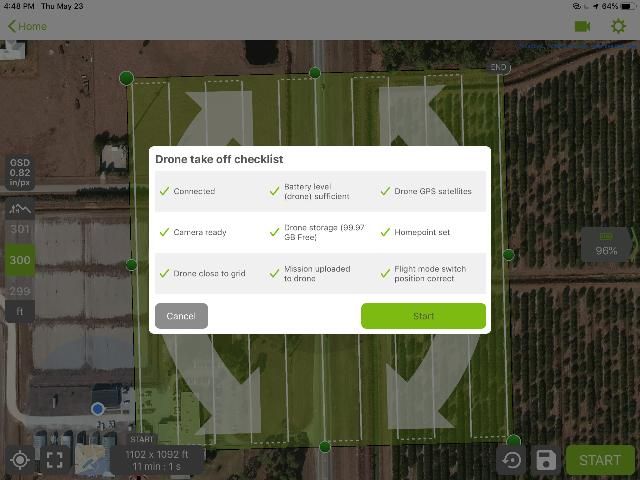
Credit: UF/IFAS
In Field Postflight
After the UAV completes its mission, it automatically lands at the same position where it took off. Once it lands, remove the memory card from the UAV or the sensor and verify in the laptop that all the collected data meet required standards using a memory card reader. If the data are not up to the required standards, you will have to find out which parameter has an effect on the data and repeat the mission with updated parameters.
Common Problems
Camera Focus Issues: Sometimes, the sensor is out of focus, which will make the data useless. You have to figure out the recommended focus settings for the sensor and redo the mission. Sometimes, using manual focus instead of auto focus can help solve this problem.
Missing Data: Various factors can cause this issue. The major one is wireless interference with the remote controller, which usually occurs when there are any magnetic interference points or another remote controller in use close to the user. Another cause can be communication error due to overheating of the mobile device. This can be avoided by placing the mobile device under a roof or close to an air circulation device. Memory cards can also be an issue if they are not compatible or if they run out of space mid-mission.
Overlap Issues: The overlap percentages used may not be enough to cover the data collection area. This problem generally occurs when the sensor is independent of the UAV. In such a case, the details of the sensor have to be entered in the flight mission planning app to avoid overlap issues.
Conclusion
In order to have a successful and efficient data collection mission, you must plan properly and follow several steps carefully. There are also several parameters to consider which can significantly decrease the required flight time. This can help you save battery power and fly over larger areas in less time. There might also be a few commonly occurring problems that can be solved through careful and constant monitoring of the settings. This document covers the most important steps you need to follow before and during a UAV flight.
References
Abdulridha, J., R. Ehsani, A. Abd-Elrahman, and Y. Ampatzidis. 2019. "A remote sensing technique for detecting laurel wilt disease in avocado in presence of other biotic and abiotic stresses." Computers and Electronics in Agriculture 156: 549–557.
Ampatzidis, Y., L. D. Bellis, and A. Luvisi. 2017. "iPathology: Robotic applications and management of plants and plant diseases." Sustainability 9: 1010.
Ampatzidis, Y., and V. Partel. 2019. "UAV-based high throughput phenotyping in citrus utilizing multispectral imaging and artificial intelligence." Remote Sens. 11(4): 410.
de Castro, A.I., J. Torres-Sánchez, J. M. Peña, F. M. Jiménez-Brenes, O. Csillik, and F. López-Granados. 2018. "An automatic random forest-OBIA algorithm for early weed mapping between and within crop rows." Remote Sens. 285.
Garcia-Ruiz, F., S. Sankaran, J. M. Maja, W. S. Lee, J. Rasmussen, and R. Ehsani. 2013. "Comparison of two aerial imaging platforms for identification of Huanglongbing-infected citrus trees." Comput. Electron. Agric.: 106–115.
Kakarla, S., and Y. Ampatzidis. 2018. Instructions on the Use of Unmanned Aerial Vehicles (UAVs). AE527. Gainesville: University of Florida Institute of Food and Agricultural Sciences. https://edis.ifas.ufl.edu/ae527
Matese, A., F. Capraro, J. Primicerio, G. Gualato, S. F. Di Gennaro, and G. Agati. 2013. "Mapping of vine vigor by UAV." Precis. Agric.: 201–208.
Matese, A., P. Toscano, S. F. Di Gennaro, L. Genesio, F. P. Vaccari, J. Primicerio, C. Belli, and A. Zaldei. 2015. "Intercomparison of UAV, aircraft and satellite remote sensing platforms for precision." Remote Sens.: 2971–2990.
Nebiker, S., A. Annen, M. Scherrer, and D. Oesch. 2008. "A light-weight multispectral sensor for micro UAV—Opportunities for very high resolution airborne remote sensing." In International Archives of the Photogrammetry, Remote Sensing and Spatial Information Sciences, 37, B1.
Pajares, G. 2015. "Overview and current status of remote sensing applications based on unmanned aerial vehicles (UAVs)." Photogramm. Eng. Remote Sens. 81: 281–330.
Xiang, H., and L. Tian. 2011. "Development of a low-cost agricultural remote sensing system based on an autonomous." Biosyst. Eng.: 174–190.