This document explains what procedures are involved in creating a legally empty container.
A Legally Empty Container
The containers of some commonly used pesticides are classified as hazardous wastes if not properly rinsed, and as such are subject to the many rules and regulations governing hazardous waste. Improper disposal of a hazardous waste can result in very high fines and/or criminal penalties. However, pesticide containers that have been properly rinsed can be handled and disposed of as non-hazardous solid waste. Both federal law (FIFRA) and the Florida Pesticide Law (Chapter 487 F.S.) require pesticide applicators to rinse all "empty" pesticide containers before taking other container disposal steps. Under federal law (RCRA), "A PESTICIDE CONTAINER IS NOT 'EMPTY' UNTIL IT HAS BEEN PROPERLY RINSED." For more information, see the UF/IFAS publication Proper Disposal of Pesticide Wastes, (https://edis.ifas.ufl.edu/pi010).
Rinsing Pesticide Containers
Immediate and proper rinsing removes more than 99% of the container residues typically left by most pesticide formulations. Properly rinsed pesticide containers pose minimal risk for contamination of soil and water resources. Preventing contamination is an important part of pesticide management.
Pesticide containers should be rinsed as soon as they are empty; thus, the time to rinse is during the mixing and loading process. Immediate rinsing has several advantages. A freshly emptied container is easier to clean because the formulation residues have not had time to dry and cake on the inside of the container. Also, rinsing containers during the mixing and loading process solves the problem of what to do with container rinse water because the rinse water can be used to prepare the finished spray mix.
Newly emptied pesticide containers can be properly rinsed by either of two methods: triple-rinsing or pressure-rinsing—both will work.
Triple-Rinsing a Container
- Put on the personal protective equipment listed on the product's label.
- Allow the formulation to drip-drain from its container into the sprayer's tank for at least 30 seconds.
- Partially fill the container with clean water (about 20% of its capacity).
- With the container cap placed back on, swirl the water so that all sides are rinsed.
- Pour the rinse water back into the sprayer's tank and allow the container to drip-drain for at least 30 seconds.
- Repeat steps 2 through 5 two more times.
Pressure-Rinsing a Container
- Put on the personal protective equipment listed on the product's label.
- Install pressure-rinse nozzle on hose connected to a water supply capable of delivering 35–60 psi of water pressure.
- Allow formulation to drip-drain from its container into the sprayer's tank for at least 30 seconds.
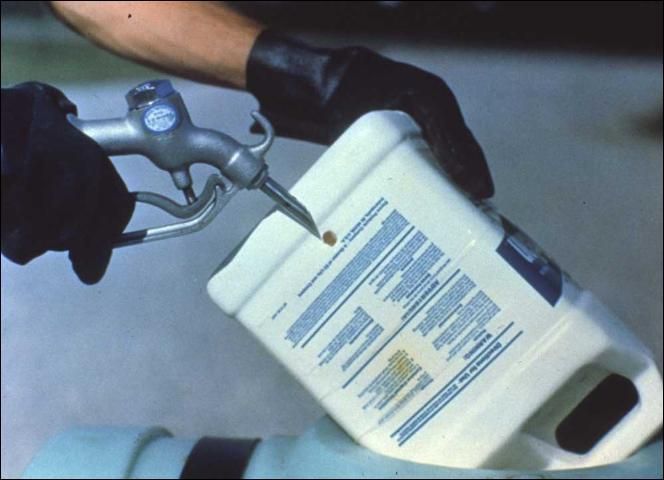
- Firmly press the pressure-rinse nozzle tip into the side of the pesticide container until the probe is inserted and seated, then turn on and rinse the container for at least 30 seconds with it draining into the sprayer's tank. For containers that are larger than 5 gallons, insert the pressure-rinse nozzle into its bottom.
- Allow the container to drip-drain for at least 30 seconds.

Credit: UF/IFAS
Pressure-Rinse Nozzles
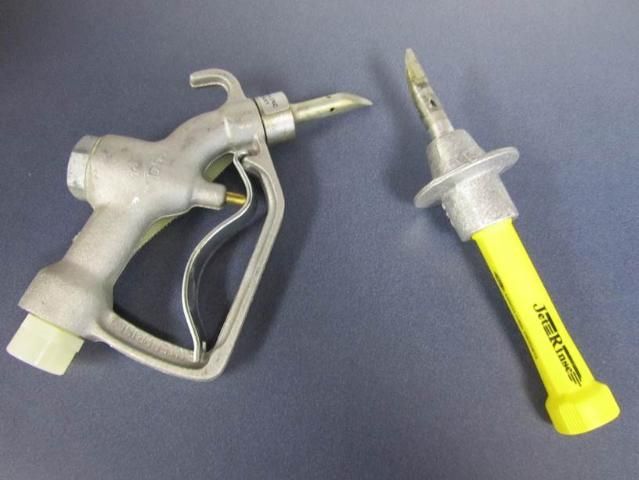
There are several styles of pressure-rinse nozzles commercially available. Most have a pointed nozzle tip with small holes set at 90-degree angles around the shaft. They attach to a standard garden hose.

Credit: UF/IFAS
Additional Information
Proper Disposal of Pesticide Wastes. PI-18. Gainesville: University of Florida Institute of Food and Agricultural Sciences. (https://edis.ifas.ufl.edu/pi010)