Management and Cultural Practices for Peanuts1
Introduction
Peanuts in the United States are grown for peanut butter, peanut candy, roasted peanuts, peanut oil, and other peanut products. The southeastern coastal plains are the highest producers of peanut in the US. Farm programs with the quota system made peanut production an attractive enterprise. The elimination of the quota system has led to a shift in acreage resulting in a 50% increase in total acreage in Florida since 2000. In 2017 and 2018 total peanut acreage was 195,000 acres while in 2019 Florida had 165,000 acres of peanut planted with almost 94% of it harvested. With current prices, budgets should be studied carefully to determine where peanuts fit into your operation. Enterprise budgets for irrigated and dry land peanuts can be found at https://agecon.uga.edu/extension/budgets.html. Where peanuts are grown in new areas or rotated with other crops, yields are often higher than where peanuts have been produced for many years. This is due to lower pest and disease pressure when peanuts are rotated. Peanut yield responds better to good rotation as compared to most other crops. Peanuts fit well into many rotation schemes including corn, cotton, and other grass crops, and do best when planted after perennial grasses.
Peanut Production and TSWV
Peanut production has changed dramatically in the last 5–10 years and many of the management considerations have been driven by tomato spotted wilt virus (TSWV). Although TSWV outbreak has not been severe in the last several years, it has made significant comebacks in the more recent past. Factors affecting spotted wilt incidence and severity are shown below in approximate order of importance:
-
Rotation and location
-
Cultivar
-
Planting date
-
Plant population
-
Insecticide use
-
Row pattern
-
Conservation/conventional tillage
-
Cover crops
-
Herbicides
However, in the past several years, new cultivars have been released that appear to be more resistant to TSWV. There are dramatic differences between years in the amount and severity of TSWV. Weather, thrips populations, and other factors shown in Table 1 will largely determine the severity of the disease. Variety selection and planting date are the most consistent factors that influence TSWV severity. Optimum planting dates have shifted over the years. Peanut planting once began in mid- to late April and would end by mid-May or until peanuts were planted. This date has continued to shift and recently focused on the period between May 11 and May 25. However, recent research with the newer varieties has shown no yield advantage or penalty if peanuts are planted in the April 25 to June 1 date range. The TSWV Risk Index is modified each year as better information is gained to help farmers adapt to a shifting disease or other production factors. The Peanut Rx and Peanut Disease Risk Calculator are handy resources to predict risk under various management and cultural practice scenarios of production. Plant stands are critical for minimizing spotted wilt incidence and severity regardless of cultivar used. Although most insecticides have little, if any, effect on spotted wilt incidence, use of phorate (Thimet or Phorate) in-furrow at planting will reduce thrips damage. Twin row (seven-to-ten-inch spacing) with strip tillage, and rotation with bahiagrass have provided consistent suppression of spotted wilt as well as higher peanut grade in recent years, due to more uniform maturity. Use of Classic® herbicide tends to increase severity of spotted wilt. Recent research in Florida has shown that strip tillage instead of conventional tillage, and use of perennial grasses in rotation with peanuts reduces TSWV. Getting a good plant stand (4–6 plants/row ft.) is critical to minimizing TSWV.
The website for TSWV index is found at https://tswv.caes.uga.edu/peanut.html.
Peanut Types
There are four market types of peanuts in the United States: runner, Virginia, Spanish, and Valencia. Runners have an intermediate seed size and are the primary type grown in Florida and the Southeast. Virginia peanuts have a large seed and are grown mostly in North Carolina, Virginia, and Texas. Spanish peanuts have small kernels and are grown mostly in Texas and Oklahoma. Virginia and Spanish peanuts are grown in Florida, but acreage is very minor relative to runners. Valencia peanuts are usually about the same size as Spanish peanuts but are considered special-use peanuts, such as for boiling. Florida is a major producer of boiling peanuts, which are usually planted early and throughout the year (February–July) to keep a continuous supply.
There are two vegetative types (growth habit) of peanuts: runner and bunch. Runner peanuts have a spreading growth habit with lateral branches that are long and grow close to the ground. The bunch type grows mostly erect stems and does not spread like the runner type. The peanut seed is called a kernel, and is found inside pods or hulls. Peanuts flower above ground and then a "peg" or reproductive stem grows down from the flower and enters the soil. The peanut pod forms at the end of this peg. The peanut leaf is made up of four leaflets. Peanuts are harvested by digging pods from the ground with a digger-shaker-inverter, letting them partially dry in the field for three days and then combining them. As the peanuts are dug, the vines are shaken to remove excess dirt and the peanut vines are inverted in the digging process so that the peanuts are exposed to the sunlight for quick drying. After drying in the field, the nuts are removed from the vine with a peanut combine or picker. After combining, they are placed on trailers where heated air is passed through the peanuts to complete the drying process. Peanuts should be stored at a moisture content of 10% or less.
Land Selection and Preparation
Peanuts grow best on well-drained soils and in full sun. If planted on poorly drained soils, diseases will be prevalent and yields are normally low. Peanuts can be grown on sandy or excessively drained soils, but irrigation may be needed for consistent production on deep sands.
Variety Selection
Variety trial information on peanuts can be found on the web at https://nfrec.ifas.ufl.edu/florida-peanut-team/ for Florida, http://www.swvt.uga.edu/ for Georgia, and https://aaes.auburn.edu/variety-tests/ for Alabama. Deciding on best varieties is a very important decision for yield and markets. Many varieties are resistant to diseases and good growth characteristics, but high yields and grades are the most important factors to growers to make it economically feasible. There is often a 10%–20% (400–800 lbs/A) difference between some of the highest and the lower yielding varieties. Price also varies with the quality or grade of the peanuts. You have only one chance per season to make the right decision with variety selection, and yield limits are set with the variety. Runner peanuts are grown for the dry market, and information on those is readily available. Valencias are grown because they have a good flavor, grow rapidly, and mature quicker than other types. Virginia type varieties have larger seed, and are suitable for roasting purposes. The runner type peanuts may be planted in home gardens because of their flavor and good yield. Seed for planting are relatively easy to find. The Spanish varieties are mostly grown in Texas because of their status as a short season crop, lower water requirements flavor, and small kernel. Whatever your choice of variety, consult your local seed dealer for availability. If you are growing peanuts for market purposes, be sure to check with the buying point to be sure they can handle and process the variety you have chosen. Most of the peanuts grown in the Southeast are runner types.
Plant Population
Peanut seed have always been expensive and continue to be one of the higher cost factors in production. Before TSWV became a problem, as few as 3 seeds/row ft. were planted with little difference in yield. After TSWV became a problem, it was found that seeding rates needed to be higher (5–6 seeds/row ft.) to keep disease levels lower. This meant going from 85–100 lb/A seed to 100–140 lb/A depending on seed size and variety. Current recommendations suggest 5–6 seeds per ft. of row in single rows and 3 seeds per ft. of row in twin rows to reduce TSWV levels. Where there are skips in the row, adjacent plants tend to be more susceptible to TSWV infection.
Crop Rotation
Crop rotation is an important cultural practice that is recommended for all crops and especially for peanuts. Rotation is recommended to reduce the effects of pests (disease, nematode, insects, and weeds). Low value crops are usually the alternative for rotating with high cash value crops like peanuts to avoid high costs related to other proven beneficial integrated systems. Leafspot control is usually accomplished with a routine fungicide program but data shows that rotation with cotton or corn can reduce the incidence and severity of disease. Recent data shows that rotations with bahiagrass can reduce the disease even further and will result in higher yields. In one study peanut yields were 19% higher after two years of corn and 41% higher after two years of bahiagrass. Other data from Georgia indicates that growers find shorter rotations more profitable when under pivots due to the large capital investments required for irrigation systems. Compared to yield in continuous peanuts, a one-, two-, and three-year rotation under irrigation resulted in a 7%, 36%, and 34% yield increase over continuous peanuts, and an 11%, 25%, and 28% increase in non-irrigated peanuts. Good rotations produce more profit and reduce the amount of management and capital inputs needed.
Peanut Fertilization
Soil tests from samples taken immediately after harvest of crops in the fall can be used to determine lime as well as fertility requirements for crops for the coming year. If soil pH needs adjusting, fall is a good time of the year to apply needed lime since it may take as long as six months for it to take effect. However, some reaction does occur soon after application. Nitrogen fixing bacteria that form nodules on peanut roots do better and form more nodules with an adequate calcium (Ca) level and with pH around 6.0 or higher. If the crop that precedes peanuts is well-fertilized, there may be enough residual nutrients in the soil to make direct fertilization unnecessary. The analysis and report of the soil sample will also indicate which nutrients are needed on a particular field. Calcium and magnesium (Mg) may be supplied by limestone. If no lime is needed, Ca can be supplied by gypsum, and Mg can be included in the fertilizer. If phosphorus (P) is low, add P according to soil tests. The same is true for potassium (K) and other nutrients needed by peanuts. Boron (B) and manganese (Mn) are normally the most deficient micronutrients on sandy soils. Therefore, if peanuts are to be planted on a sandy soil, it would be advisable to use B at the rate of 0.5–0.75 lb of elemental B per acre. Higher rates of B can be toxic to the plants. Applications of B should be split since it is a highly leachable nutrient. High application rates of other nutrients can make B deficiency more pronounced. The deficiency that we most often associate with B deficiency is internal fruit damage called "hollow heart," which reduces the quality and value of the crop. However, in more severe cases, B deficiency can result in split stems and roots, shortened internodes, terminal death, and extensive secondary branching. Leaves may be dark green and mottled with few or no peanuts developing on stubbed pegs. B may be applied early with herbicides or with fungicides to avoid making additional trips across the field.
Peanuts with a yellow cast during the growing season can occur due to several reasons including poor nodulation, micronutrient deficiencies, water logged soils, or herbicide damage. Water logging can result in poor nodulation and therefore, nitrogen fixation. Plants usually grow out of this situation as soils dry out. Iron and other micronutrients may be limiting in water logged soils, too, which the plants will also grow out of as soils dry out. Manganese deficiencies often occur in soils that have been limed for years and have a pH above 6.3. These symptoms can be seen as a light green to yellow cast to the peanut canopy and are usually more prevalent late in the season and on sandier sites. Manganese applications can be made to the crop, or a base application may be made at planting. It is possible to lower the pH through acid forming fertilizers such as ammonium sulfate; however, applications of a few pounds of micronutrient may be more cost effective and the response will be quicker than changing the pH.
Calcium, Liming, pH, and Gypsum
Lime should be added if the soil pH is below 5.8, with the target pH being 6.2–6.5. If lime is needed, both a dolomitic or calcitic lime can be used and additional Ca as gypsum may be needed on larger seed varieties. In addition to reducing soil acidity, calcitic lime supplies the Ca while dolomitic lime supplies both Ca and Mg. Peanut responds very little to direct fertilization of most nutrients. An application of lime can improve the availability of Ca, Mg, and P and decrease aluminum toxicity. High levels of Ca are not necessary to grow a healthy plant. However, Ca is needed in high levels for developing a viable seed. The amount of Ca taken up by the plant is dependent on the concentration in soil solution and on the amount of water moving into the plant. Calcium deficiency results in high incidence of pod rot and unfilled pods called "pops." These peanuts also have lower germination if saved for seed. Georgia research has shown that Ca applied as lime should not be turned under and that turned under lime had yields similar to no lime. Even though peanut has a lower Ca requirement than soybean or cowpea, peanut does have a significant need for Ca for seed maturation and quality. Lime should be applied to fields well in advance of planting and may be applied to strip tilled fields as a surface application. For those growers who use minimum tillage and strip tillage, surface applications are acceptable. We have long- term rotations with peanuts that have not been turned or had lime incorporated for 35 years that are still producing good crop yields. A high Ca and P layer can develop in the top two to three inches after many years of surface applications of fertilizer and lime. Calcium is routinely applied as gypsum at pegging on sandy soils for rapid replenishment of soil solution Ca. This is not as necessary on heavier soils or fields with irrigation that have higher diffusion gradients toward the pods. Since peanuts are often grown on sandy soils, which are drought prone, there is a limited ability of these soils to replenish the soil solution Ca. Heavier soils and irrigated soils are better able to supply needed Ca for proper uptake. Test soils and apply needed amounts of Ca for good yields and quality.
The critical period for Ca absorption begins about 20 days after pegs start entering into the soil and may extend for an additional 60 days. However, some researchers have reported that 69% of total Ca uptake occurred between day 20 and 30 after pegging began. It is then a necessity that proper amounts of Ca are supplied for the first 30 days after pegging begins. The problem occurs when soil moisture limitation coincides with the period of high Ca need leading to inadequate moisture for Ca to be in solution for uptake by peanut. Sandy soils in the peanut region have low moisture retention capacity which leads to moisture-induced Ca deficiency. High levels of K and Mg in the soil can inhibit uptake of Ca; therefore, peanuts are often not fertilized and "high cal" lime is used instead of dolomite. Soil test levels of about 450 lb/A of Ca result in maximum yields of runner type peanuts while levels almost double this are necessary for maximum yield of Virginia type peanut as noted from research by S. Hodges at the University of Georgia. The larger peanuts have a smaller surface-to-weight ratio and require a higher concentration of soil solution Ca in order to provide adequate Ca to the pod. Therefore, if soil samples show only Ca to be low, then calcitic lime would be satisfactory. However, if both Ca and Mg are low, then dolomitic limestone should be selected. Rates of 250 lb/A of dry gypsum in a band to 1000 lb/A of wet gypsum are often applied to peanuts that are to be saved for seed or when the soil test shows a need. Recent research from Alabama over several Southeast locations has shown that non-irrigated peanuts may have proportional yield increases with gypsum applications up to 1500 lb/A.
Inoculating Peanuts
Peanuts may not always respond to rhizobium inoculation. The main reason for this is that there is an indigenous population of rhizobium called cowpea miscellany that is common to many native plants. These organisms are potentially able to nodulate a crop of peanuts grown for the first time in a field. Peanuts are only moderately efficient in fixing and translocating atmospheric nitrogen (N). With soybean, as much as 80% of the plant N comes from the atmosphere while in peanut about 55% of the plant N needs are from N fixation. Calcium is important to nodulation. Maximum peanut root growth occurs at a pH of about 7.3 while shoot growth, nodulation, and N fixation are best at a pH range of 5.9 to 6.3. Inoculants may be applied to soils that have not had peanuts grown on them for several years or at all. In some cases inoculation can increase nodulation and in others little response may be noted. However, inoculants are cheap insurance in providing needed N for plant growth. Nitrogen fertilizer will not normally increase yields unless the N-fixing bacteria that live in nodules on the peanut roots are present. If needed, a commercial inoculant can be applied in the seed furrow at planting to provide the needed bacteria.
Planting Date and Depth
Peanuts were traditionally planted in April before TSWV. This disease has pushed the planting window later. However, recent information with newer varieties shows that optimum yields may be obtained from plantings made around April 25. Peanuts can do well planted through the first week of June and will suffer yield loss planted later than this. Early planted peanuts (any time in early April) could suffer a yield loss from cool soils. The highest numbers of thrips (F. fusca) that vector the TSW virus occurred on April-planted peanuts, whereas peanuts planted in May had smaller populations. The population dynamics of thrips in non-crop plants or volunteer peanuts early in the season is a reason for these effects since these plants may serve as reservoirs for TSWV.
Modeling work with the PNUTGRO model in Gainesville indicated that the highest yield could be expected from an April 15 planting while planting April 1 would result in about a 6%–8% yield decrease and May 1 about 1%–2% yield decrease. However, the Gainesville area has not had the spotted wilt pressure that most of the other areas of the Southeast have experienced and it is located further to the south than much of the peanut growing area. The Southeast Climate Consortium has a peanut model for Florida. This model shows potential yields according to their climate predictions. The website can be found at http://agroclimate.org. If conditions are dry, cover crops can be killed early for those who strip till, or land can be bedded early to have enough moisture to plant on time.
Peanuts may be planted deeper than any of the other row crops. It will emerge from two to three inches deep or deeper. However, like other seed that are high in oil content, seed should be planted into moisture for rapid germination.
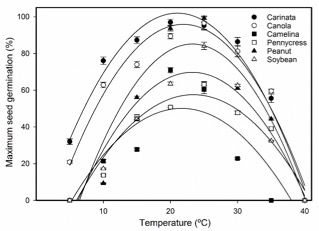
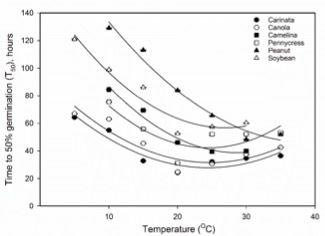
When planting peanuts, be sure to handle them gently and carefully. If seeds split, germination will be reduced and a poor stand results. Peanut seed should be planted in rows 30 to 36 inches apart. The distance between rows will be determined by the variety being planted and the equipment available. However, many growers plant in "twin rows," which are two rows 7 to 9 inches apart, with row centers 30 to 36 inches in width. Seed should normally be placed 2 to 4 inches apart in the rows depending on the row pattern and type of peanut. The seed should be placed 1 ½ to 3 inches deep in light-textured soils and 1 ½ to 2 inches deep in heavier-textured soils. After planting, the top of the seed rows should be level with or slightly raised above the middles. Many farmers prefer to plant peanuts on a bed in order to provide good water drainage away from the peanuts. If the soil is well drained, it would not be necessary to plant on a bed. Irrigation may be done ahead of planting in order to make the planting operation easier. If it is dry after planting, be sure to irrigate to get the peanuts up to a good stand. Also, if certain herbicides are applied at or soon after planting without any following rain or irrigation, weed control is unsatisfactory. Therefore, irrigation to move the pesticides into the top 2 or 3 inches of soil would be beneficial. Likewise, soil temperature needs to be near 70°F for optimum germination for most of the oilseed crops with the optimum range being from 64 to 75°F. Planting should be delayed in years with cool, wet soil conditions for maximum germination.
Conservation Tillage and Cover Crops for Peanuts
Strip tillage has been widely adopted by many peanut producers. With this method of tillage, the land is not turned but is subsoiled, and only a strip of soil (8"–12" wide) in the row is tilled. The soil between the rows remains undisturbed with cover crops or crop residue. This method of tillage reduces time and costs for land preparation and also helps prevent erosion of the soil by wind and water. Yields of crops planted in conservation tillage systems could be higher, lower, or more often the same as in conventional plantings depending on various factors. The residue on the surface lowers disease incidence of leaf spot, TSWV, white mold, and other diseases. In conventional tillage systems, the plant residue is incorporated into the soil resulting in more disease problems. Questions arise about strip tilling into fields that have not had crops grown for a few years. There are usually many hard-to-control weed species present including broom sedge and horseweed as well as other broadleaf weeds. Soils in these fields are often mellow in the top few inches due to decomposition of plant residue, not being tilled or compacted by equipment for several years. Normally, if a grower can plant through various plant material there will be no problem with digging. All weeds need to be controlled four to five weeks before planting and 2,4-D is often necessary for some of the hard to control weeds like horseweed and evening primrose. Glyphosate or other similar materials can be used to kill many other weeds a few weeks before planting. Peanut can also be planted into old cotton residue without having stalks in the picker when harvesting peanuts.
Yield variability can often be explained due to cover crops and the time the cover crops were killed and fungi associated with decomposition of the cover crops or previous crop residue. Many of the main pathogens of cotton and peanut (Pythium, Rhizoctonia, Phytophthora, and Fusarium) may be favored by planting in newly killed cover crops or plant residue. Green or newly decomposing plant material can set up favorable conditions for pathogens and result in seedling diseases. Seedling diseases could occur when cover crops are not killed soon enough since carbon and other nutrients are adequate for pathogen growth. With legume cover crops, about 50% of the biomass may be lost during the first four weeks. Grass cover crops may take several weeks longer than legumes to decompose due to a higher carbon to nitrogen ratio. Cover crops decompose more slowly when left on the soil surface as compared to when incorporated into the soil. Generally, decomposition of cover crops is two to three times faster for each 10°C increase in temperature. Therefore, cover crops decompose more slowly under cool conditions. This results in more residue (food resources) for plant pathogens to thrive and infect developing crops. One way to avoid having nutrient sources for the pathogens in the spring is to kill the cover crop earlier in the year so that the carbohydrates and proteins are expended by micro-organisms, leaving inadequate resources for the pathogens once the peanuts are planted. Another way to ensure good results from strip tillage is to precede the peanut crop with two years of bahiagrass. This will result in higher yields with lower pest incidence as compared to standard rotations.
Pest Management and Monitoring
After planting, peanuts should be monitored routinely for proper growth and pest problems. If stands are poor or if the plants are weak and deformed, it may be necessary to replant in order to get a good stand of healthy peanuts. However, it is important to try to determine the reason for the poor stands. If it is due to poor seed, you may have to find another seed source. If it is disease, you may have to modify the seed treatment being used. If it is caused by soil compaction, dryness, or other reasons, then the problems should be corrected before the peanuts are replanted.
Weed control is very important to making high yields. Peanut weed control information can be found at https://edis.ifas.ufl.edu/wg008. All-season weed control is necessary since weeds present at digging and harvest can disrupt these operations, resulting in yield losses. Many growers have stopped using tillage after planting even if tillage was done to prepare a seedbed. Researchers have reported that each cultivation can result in the loss of one inch of soil moisture, which can have a major impact on peanuts in a dry year without irrigation. Proper use of herbicides could provide the necessary weed control and eliminate the need for cultivation.
If peanuts are planted late, it may be necessary to apply fungicides starting 30 days after peanuts emerge. If peanuts have been planted early, fungicide application for leafspot control should begin about 30–45 days after planting, but no later than June 15. Leafspot disease is much worse in warm, wet weather than in cool, dry weather. Fungicides for leafspot control are one of the major costs in growing peanuts. If leafspot is controlled, white mold is controlled in turn, because white mold fungus thrives on the decaying defoliated leaves due to leafspot. Rust and other pests of peanuts must be monitored closely. Leafspot can typically be managed by applying an appropriate fungicide spray every 10–14 days, with this interval being shortened in case of frequent rainfall. Generally, all seed are fungicide treated since the peanut skin is very fragile and can be broken easily.
Thrips are one of the major early-season pests of peanuts (https://edis.ifas.ufl.edu/in176) and are often controlled by seed treatment or an in furrow application of material at plant. Many of these materials are systemic and will provide several weeks of control. Lesser corn stalk borers can be damaging to peanuts from planting until harvest. This is primarily a dry weather pest, so plenty of rain and/or irrigation should keep the population at low levels. Other insect pests of peanuts include worms that eat leaves. Weekly scouting can identify these pests so that proper control measures can be taken.
Nematodes should be managed by good rotation and use of nematicides (https://edis.ifas.ufl.edu/ng016). Certain nematicides can be applied at pegging, but nematodes cannot be effectively controlled in a crop after infestation occurs. In other words, preventative control of nematodes is most effective. Some nematicides and insecticides are applied before or at planting time. Fumigant nematicides are applied before planting while contact or systemic nematicides may be applied during the planting operation. Rotating with bahiagrass or other perennial grasses can greatly reduce the problem.
Irrigation
Peanuts grow well on sandy soils and are somewhat drought tolerant at certain growth stages. There are critical stages of growth that require higher levels of soil moisture or yields can be limited along with quality and lower grades. Table 3 shows four growth stages and the relative response of the plants to moisture during each stage. The period of greatest water use occurs during pegging and is necessary to move Ca through soil solution to pegs and developing pods.
Peanuts are the least susceptible of any of the row crops in the Southeast to drought at planting since they can emerge from up to two to three inches deep. However, adequate moisture is necessary for good, uniform stands. Mid-season nut development is the most critical time for irrigation since it is the stage of maximum water use by the plant. In the Southeast the critical part of the development/fruiting period includes the latter part of July, August, and the first week or so of September. Irrigation in the first two months after planting is usually not needed unless extremely dry conditions persist, because excess moisture can trigger excessive vine growth. Irrigation in late September may result in excessive moisture during the peanut maturity stage and can increase the severity of CBR, Sclerotinia blight, and leaf-spot diseases. In dry years, irrigation can suppress the outbreak of spider mites and lesser corn stalk borers, make digging operations easier, and reduce the threat of aflatoxin contamination.
Determining Maturity
Determination of optimum peanut maturity can be done in several ways but pod blasters that strip away the outer pod layer to expose colors indicative of the stage of pod maturity have become one of the primary methods. Blasters are widely used and are available at many UF/IFAS Extension offices. Blasters save considerable time, as well as improve the accuracy over hand-scraping for determining the pod maturity profile. A high-pressure washer and wire basket can serve as an inexpensive, quick, simple alternative to blasters that use glass beads, water, and compressed air. However, glass beads are still widely used. The key to the pressure washer effectiveness for blasting peanuts is a rotating turbo nozzle. A turbo nozzle takes a zero degree jet stream which has the highest stripping power of any nozzle, rotates it, and spreads it out over a wide area. It provides superior stripping action compared to a flat fan nozzle, at a pressure low enough not to damage the pods. An electric pressure washer providing 1.5 gpm at 1300 psi is quite adequate and fast. In higher capacity, engine-driven models, pressure should be reduced to approximately 1000 psi with the pressure regulator or by throttling down the engine. Pick all pods off plants to make about 200 pods from each location in the field with different maturities due to soil type, variety differences or other variables. Place the picked pods in a basket, and place the basket in a five-gallon bucket to prevent splashing. The bucket should be equipped with a drain to prevent water build-up. Hold the pressure washer nozzle approximately 12 inches away and blast while vigorously shaking the basket. Watch the pods carefully. Stop after approximately 30 seconds and remove the immatures (yellows) before they disintegrate. Place the more advanced pods (orange to black) back into the basket and blast until the entire outer pod layer has been removed. The entire process should be completed within three minutes or less. Blasted pods can be put on a chart in order to classify and rank the fields for time to harvest.
Peanut Harvest and Grades
One of the most critical parts of growing peanuts is timing of harvest to make maximum grade and yield. Two measurements are made from a sample taken directly out of the drying wagon. FM or foreign matter denotes the percent or amount of plant material, rocks, or soil that is in a load of peanut. Foreign matter increases if soils are either too wet or too dry while digging, or if peanuts vines not properly cured. Peanut combines can be adjusted to some extent to blow more or less air to help reduce the trash along with having the vines in the proper condition when harvesting. LSK or loose shelled kernels is the percent of peanut shelled during the harvest process, which may be due to too high a picker speed, too much air blowing peanuts against something sharp in the combine, or the picker fingers being set too aggressively.
A sample is then taken from wagons or trucks after harvest and shelled and the following are determined on a percentage basis: SMK (sound mature kernels) is the percentage of those peanut that are shelled for grading and determined to be mature, while SS (sound splits) is the percentage that are good peanuts but are split. OK is the percentage of other kernels that may be immature or very small. ELK is the percentage of extra-large kernel that ride over a certain screen size that manufacturers may use for special candy purposes. Certain peanuts have a tendency to have larger seed than others but growers seldom are paid for this. DK or Damaged Kernels are kernels that are damaged due to disease, insects, or other factors. Grades are based mostly on TSMK or Total Sound Mature Kernels. Grades in the mid-70s are considered good and are indicative of good timing on the digging. If the SMK were 73% and SS were 2% SS, the grade would be 75% while the other 25% would be shells and OK or DK. Some peanut varieties have thicker shells and will have lower grades than other varieties. Many growers may start digging too soon if they have large acreages and the first few loads of peanuts will grade in the upper 60s or low 70s. Low grades can also be caused by periods of drought when pegs did not set. This could lead to "two" crops of peanuts, one that sets early and one that sets later when moisture returns. This makes it difficult to determine when to dig since there will be some very mature peanuts along with some very immature peanuts that were set later. With irrigated peanuts, it is usually easier to determine proper digging date since moisture can be supplied for a continuous set of peanuts. However, other factors like disease control and weather conditions can determine digging date and these often cause yield losses. Vines should be kept disease free as much as possible in case weather forces you to delay digging by a week or more. Healthy vines will retain mature peanuts better than diseased vines. A week early or late digging peanuts can make 500 lb/A difference or more in yield and several points in grade. Five hundred pounds of peanuts are worth about $90 and the difference between a grade of 69 and 75 on a 4000 lb/A peanut crop is worth about $50. One key for high yields and profit is to keep vines healthy and dig on time.
Management Tips
-
Since peanuts require a high level of management, many decisions are required while growing the crop. Fortunately, most of these decisions can be made prior to planting. For example, land selection, variety, and crop rotation are of vital importance in preventing many weed, insect, disease, and nematode problems. If all pest problems in a field are monitored for the crop grown each year, then the selection of pesticides is much easier and many problems can be averted.
-
Whether or not to irrigate is a major decision because good yields cannot be maintained during dry years. However, for the small acreage producer, costs for irrigation equipment may make the practice uneconomical. If irrigation is utilized, a grower must be knowledgeable and judicious in use of supplemental water. White mold and pod rots are diseases that can be made more severe with poor irrigation management.
-
Gypsum can be used to supply calcium to peanuts. Calcium is needed by the peanuts to ensure well-filled pods, reduce pod rots caused by imbalances in other nutrients, and improve germination of peanuts produced for seed. The need for gypsum can be determined by soil tests and, if needed, the gypsum should be applied no later than early flowering. Gypsum should be considered on all non-irrigated fields.
-
Insecticide applications to the peanut foliage should be determined by scouting procedures that include insect counts of various species. Other insect pests, such as lesser corn stalk borers and cutworms, may attack below-ground peanut parts and thus require scouting techniques unique to peanuts.
-
Fungicide applications are generally required for high yields of peanuts. Leafspot is usually the major disease of the crop. Information is available on selecting fungicide programs for peanuts. Normally, fungicide applications must be made on 7–14 day intervals, but it is recommended that growers consider information from disease-risk models and weather-based disease forecasts. The decision on which fungicides to use should be based on the disease history of the field, cultivar being grown, crop rotation history, prevailing weather, as well as several other factors.
-
Most weed problems in the growing crop can be controlled by herbicide applications. Timing is of critical importance in these herbicide applications. In some instances, cultivation, hoeing, and/or hand pulling would be the preferred means of weed control on herbicide-resistant weeds. If cultivating, it is important not to throw dirt on the peanut vines because white mold problems can be made more severe if the vines are partially covered with soil.
-
Because all pods do not mature at the same time, one of the most difficult problems in producing peanuts is determining when to harvest. Runner peanuts normally mature in approximately 135–155 days after planting. However, if Valencia peanuts are grown for boiling purposes, they may mature in as little as 75 days from planting in mid-summer. The same variety may take from 15 to 30 days longer to mature when planted in early or late season. Therefore, it is not possible to accurately predict at planting when a peanut crop will be ready to harvest. There are reliable and objective procedures that can be used to determine peanut maturity and the best time to harvest. For the commercial grower, the peanut maturity profile is preferred while others may pull vines occasionally to check pod maturity. There are many locations where pod blasters are available and charts to determine proper digging dates. Years of experience on a particular variety will also help growers determine when to start looking for maturity.
-
After harvest, peanuts must be dried unless they are for consumption as boiled or green peanuts. Most peanuts are dried in the field for 3 days prior to picking and then artificial drying is normally used overnight to finish drying peanut to about 8% moisture. It is important to use care in harvesting and drying peanuts as the fungus that causes aflatoxin development is favored by poor drying techniques.
-
Storage of peanuts should be in an insect-free area. An insecticide is normally sprayed on the stored peanuts to prevent insect infestations. The moisture content of the peanuts should be below 10% for safe, long-term storage. The storage facility should be one that prevents moisture accumulation in or around the peanuts.
