Reinforcing Your Roof1
This publication is part 4 of 6 in the Education + Action = Wind Damage Mitigation series. For the rest of the series, visit https://edis.ifas.ufl.edu/topic_series_wind_damage_mitigation.
The roof helps keep your home comfortable and dry. But during the high winds of a hurricane, poorly designed or maintained roofs can fail (Figure 1). Here are a few tips to reinforce your roof.

Credit: Institute for Business & Home Safety
Why does roof design matter?
Roofs with very steep slopes perform poorly against horizontal winds. Roofs with very shallow slopes allow increased vertical uplift. Slopes between 3:12 and 6:12 (horizontal run: vertical rise) are often considered the safest.
Both hip roofs and gable roofs are common throughout Florida. Because of their design, hip roofs are more resistant to high wind loads.
Gable roofs can be made safer with a few minor improvements.
Cross ("X") Brace the Gable ("A" Frame)
First, install diagonal cross bracing between the gable truss and the fourth truss back (approximately 8 feet). See Figure 2. Be safe: remember to "X" the "A."
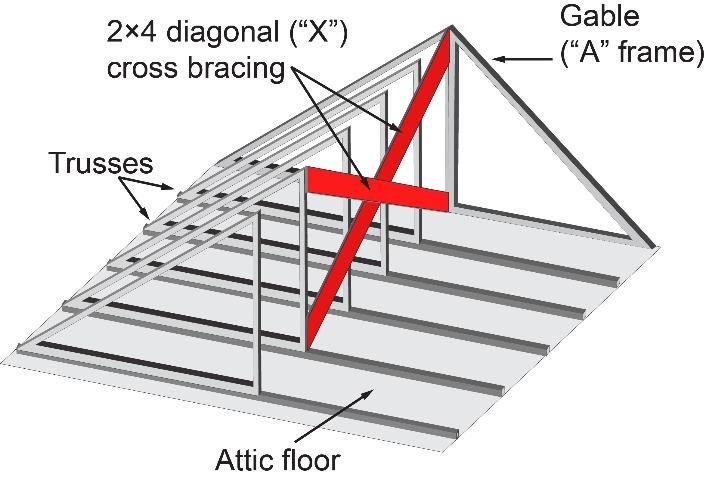
Credit: Barbara Haldeman, UF/IFAS PREC
Brace to Avoid the Domino Effect
Second, install horizontal truss bracing to prevent the trusses from getting pushed together by extreme winds. This is shown in Figure 3. Be safe: remember to "avoid the domino effect."
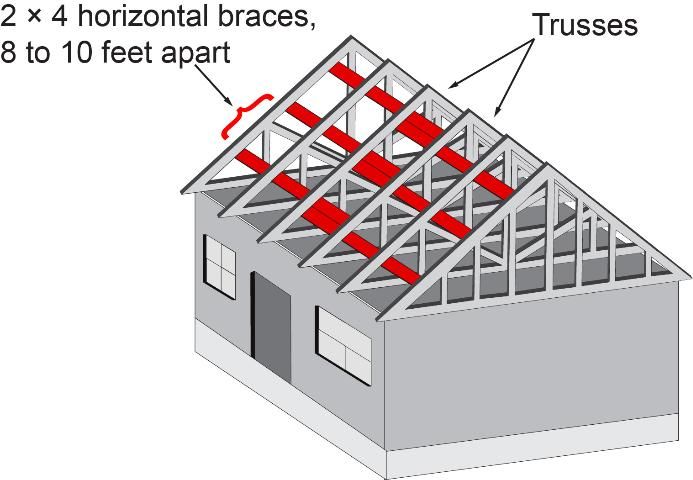
Credit: Barbara Haldeman, UF/IFAS PREC
Third, install a shutter over any vents on the gable end wall. If you are building a new house with a gable roof, consider using continuous wall construction or balloon framing. This creates a solid unit of wall framing from the ground through to the roof on the gabled end of the house.
Create a Continuous Load Path
A house is a system of connected parts. If there is one weak link in the system, the whole house can be damaged. This is why it is important to create a continuous load path between the ground and the top of your house. This unifies the vertical structure of your house and resists the uplift forces of hurricane winds.
A continuous load path requires that you anchor the house's roof to the walls, the second floor to the first floor, and the walls to the foundation (see Figure 4). This can be done using hurricane straps for the roof-to-wall and floor-to-floor connections, and anchor bolts for the wall-to-foundation connections.
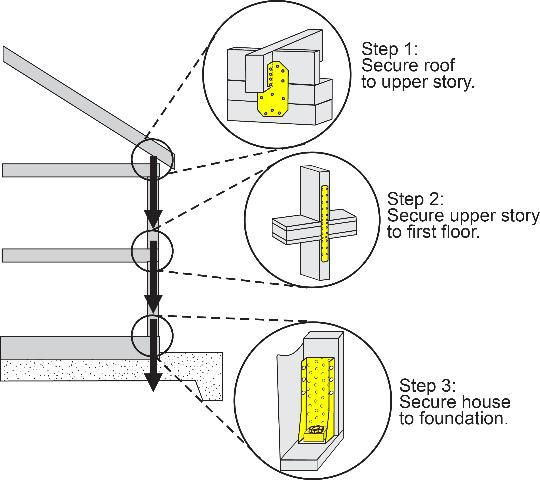
Credit: Barbara Haldeman, UF/IFAS PREC
Proper Sheathing and Shingle Attachment
When installed improperly or with substandard materials, roof shingles, siding, and other exterior materials can be torn from a house. This allows wind and water inside, damaging the house. Also, these materials can become dangerous flying or "wind-borne" debris during a storm. Proper fastening techniques can prevent materials from being torn off a home during severe storms.
Connect roof sheathing to the roof framing with ten-penny weight common or eight-penny weight ring shank nails. Space them four inches apart along the edges and six inches apart in the middle of the plywood sheathing. Use wood adhesive underneath the sheathing along the connecting joint with the roof trusses.
Ring shank nails provide increased holding power as a result of their threaded rings (Figure 5). These rings bite into the sheathing and framing and resist higher uplift forces.
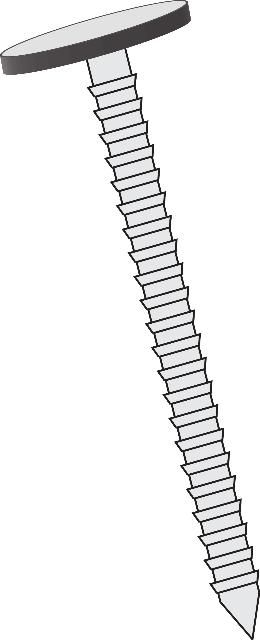
Credit: Barbara Haldeman, UF/IFAS PREC
Other Resources
Federal Alliance for Safe Homes: http://www.flash.org
Federal Emergency Management Agency National Preparedness Resource Library: https://www.fema.gov/national-preparedness-resource-library
FloridaDisaster.org: Florida Division of Emergency Management: http://www.floridadisaster.org
Institute for Business and Home Safety: http://www.disastersafety.org/
University of Florida: UF/IFAS Extension Disaster Handbook: https://branding.ifas.ufl.edu/disaster-handbook/