Introduction
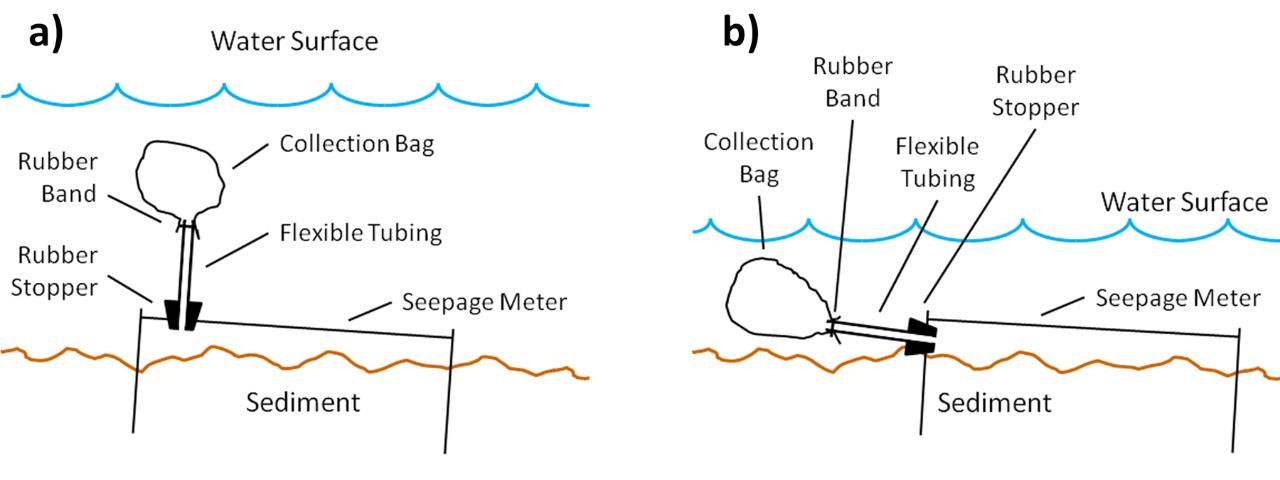
Seepage meters are instruments for measuring the flow of water between groundwater and a surface water body such as a lake, wetland, estuary, or stream (Figure 1). Seepage meters can be constructed inexpensively from readily available materials and can be custom-built for specific applications. When flow measurements from seepage meters are combined with hydraulic head measurements from mini-piezometers (see: https://edis.ifas.ufl.edu/AE454), the hydraulic conductivity of the bottom sediment can be calculated. This document is intended to aid those who are engaged in surface water–groundwater exchange studies in cost-effective construction, installation, and use of seepage meters.

Useful Terms and Information
Hydraulic head: A measure of the total energy (both potential and kinetic) at a point in the water column and is expressed in units of height (e.g., feet or meters). The hydraulic head (h) is the sum of the elevation head, water pressure head, and water velocity head.
Hydraulic gradient: The hydraulic gradient is the difference in hydraulic head between two points that are separated by some distance and is usually written as: dh/dl, where dh is the difference in hydraulic head between two points and dl is the distance between the two points. Fluids flow 'downhill' from points of high hydraulic head to points of low hydraulic head.
Hydraulic conductivity: The hydraulic conductivity (K) is a property of soil and sediment that is a measure of the ease that water can be transmitted through pore spaces. It is a useful property for conducting water budgets and hydrologic modeling studies and can be measured using a variety of laboratory and field techniques.
Darcy's Law: An equation that can be used to compute flow (Q) of water through a porous media using the hydraulic conductivity of the media (K), the hydraulic gradient (dh/dl), and the cross-sectional area of flow (A). Mathematically: Q/A = -K * dh/dl
Correction coefficient: A coefficient that the measured seepage is multiplied by to determine the actual rate of seepage. The correction coefficient compensates for inefficiencies in flow in the meter, any restriction to flow through the connection between the bag and the seepage meter, and any resistance to movement of the bag.
Seepage meter: An instrument that can be used to determine the rate of flow across the sediment–water interface (and described in detail in this document).
Mini-piezometer: Sometimes called a potentiomanometer, a mini-piezometer is an instrument that can be used to determine the hydraulic gradient between groundwater and surface water (mini-piezometers are described in: https://edis.ifas.ufl.edu/AE454).
How a Seepage Meter Works
The basic concept of a seepage meter is to enclose and isolate an area of the sediment–surface water interface with a cylinder that is open at its base and vented at the top to a plastic collection bag (Figure 1). The change in the volume of water in the collection bag over a measured time interval is used to determine the direction and rate of flow between surface water and groundwater. A gain in water volume in the collection bag indicates that flow is occurring from groundwater to surface water, while a loss in water volume indicates that flow is occurring from surface water to groundwater.
Seepage meters have an advantage over other methods of measuring groundwater–surface water exchange since flow measurements can be made without measurements of the hydraulic conductivity of the sediment. Seepage meters are particularly useful when many measurements are needed in order to characterize groundwater–surface water exchange in different segments of a water body.
Materials and Tools Required
Materials
- Top or bottom of a 55 gallon cylindrical drum or something similar
- Rubber stopper with a single hole drilled in the center to accept tubing
- Clear, flexible tubing that will fit snugly into the hole in the rubber stopper
- Rubber band to secure collection bag to tubing
- Plastic collection bag. The size will depend on the rate of seepage and the period that measurements are made, a larger bag will be needed for longer measurement periods and locations with larger rates of seepage. A collection bag that is 1 liter or larger is generally recommended. The bag chosen should be sturdy and free of leaks.
Tools
- Drill and bit to drill vent hole on seepage meter
- Rubber mallet to aid in seating the seepage meter into the sediment, if needed
- Graduated cylinder to measure the volume of water in the collection bag at the beginning and end of the measurement
Construction and Installation
Drill the vent hole near one edge of the top of the seepage meter (i.e., the top of the 55 gallon drum). When installed, the side of the seepage meter with the vent hole will be left slightly elevated allowing any gas to freely escape (Figure 1a). In shallow water conditions, a vent hole can be drilled on the side of the seepage meter, allowing the collection bag to remain submerged (Figure 1b). The collection bag must be submerged in order to maintain the same hydraulic head in the seepage meter and surrounding surface water.
To install the seepage meter into the bottom sediment, find a location that is free of vegetation, debris, and large rocks. Since the direction and rate of flow may vary by location, it is recommended that several seepage meters are installed. To install the seepage meter, slowly drive it into the sediment until an adequate seal is achieved. A depth of 8 cm is considered to be adequate unless the sediment is extremely soft (Lee and Cherry 1978). The seepage meter can be twisted or pushed (with the help of the rubber mallet, if needed), leaving it one to three inches above the sediment surface. The seepage meter lid should not contact the sediment. Remember to leave the side with the vent hole slightly elevated relative to the rest of the seepage meter. Once installed it may be desirable to allow the sediment time to equilibrate following possible compression of the sediment during installation (1–24 hours, depending on the nature of the sediment).
Non-Flowing Water Applications
For non-flowing or very low flow applications, such as a lake, wetland, or relatively slow-moving estuary or stream, the seepage meter is ready to be used. For higher flow conditions, however, additional measures are needed to ensure accurate measurements.
Flowing Water Applications
Seepage meters were originally designed for use in low- or no-flow applications such as lakes and estuaries where issues related to current and scour are generally small. In flowing applications, such as rivers and streams, scour can lead to a breach in the seal around the seepage meter, and flow across the seepage meter collection bag can alter the hydraulic head and induce seepage flow.
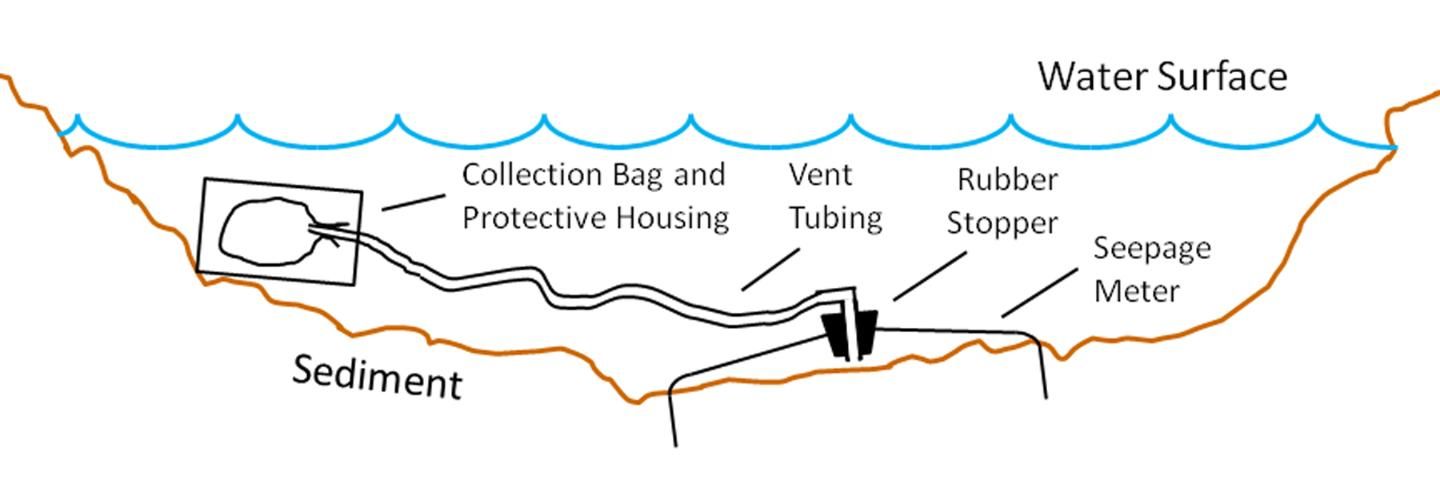
The effect of scour can be significantly reduced by using more streamlined, low-profile seepage meters (Figure 2). The seepage flow induced by flowing water can be significantly reduced by isolating the seepage meter collection bag from the flowing current. Streamlined seepage meters can minimize the disturbance of the sediment caused by the flowing water and can allow water and sediment to readily pass over the meter, making the seepage meter more similar to the surrounding streambed. Streamlined seepage meters can be constructed from readily available materials including plastic lids and garbage cans. Locating the collection bag in a protective housing near the stream bank where the current is much lower can minimize seepage induced by the flowing water. For more information on flowing water applications, please refer to the article by Rosenberry (2008) and the online document by Rosenberry et al. (2008; http://pubs.usgs.gov/tm/04d02/pdf/TM4-D2-chap2.pdf).

Measuring the Volume and Direction of Flow between Surface Water and Groundwater
The flow and direction of flow between groundwater and the overlying surface water is measured by the change in volume of water in the collection bag over a known period of time. The time that will be needed for an accurate measurement will vary for each application, with locations with low seepage requiring more time. One to two hours is a recommended starting point. If there does not appear to be a change in volume after 1–2 hours, repeat using a longer time period. If, after 1–2 hours the collection bag is completely full or completely empty, then the measurement should be repeated using a shorter time period.
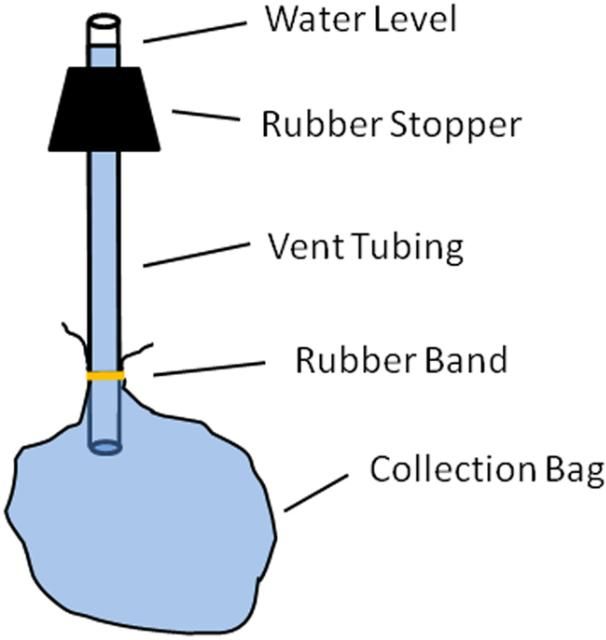
Once the sediment around the seepage meter has been allowed to equilibrate, insert the vent tube into the rubber stopper (Figure 3). The tube should fit tightly within the stopper. Fill the collection bag with a known volume of water using the graduated cylinder. If the direction of seepage flow is not yet known, it is recommended that the bag be filled half way (the bag can be empty if flow is already known to be upwards or filled completely if flow is known to be downwards). Attach the bag to the tube-side of the tube/stopper assembly using the rubber band (Figure 3). Next, holding the bag assembly stopper-end-up, squeeze the bag allowing air to escape (be careful not to allow water to overflow out of the tube, if this happens the volume of water will need to be remeasured). Place a finger over the tube opening once the air has been removed. The collection bag assembly is now ready to be installed on the seepage meter to begin the measurement of groundwater–surface water exchange.

Install the collection bag assembly on the seepage meter, making sure that the rubber stopper fits snugly in the vent hole that was drilled in the seepage meter. Be sure to record the time that the assembly was installed since this will be needed to determine the rate of flow between groundwater and surface water.
Once the scheduled time has elapsed, the collection bag is removed so that the volume of water in it can be measured. To remove the collection bag, carefully remove the rubber stopper and vent tube assembly from the top of the seepage meter, placing a finger over the end of the tube. Remove the stopper/bag assembly from the water, and pour the water from the bag into the graduated cylinder. This gives the final water volume (VFinal), which can be used with the starting water volume (VStart) and the elapsed time to determine the rate of seepage:

A positive value of Q means that the direction of flow is upwards from groundwater to surface water. A negative value of Q means that the direction of flow is downwards, from surface water to groundwater. Seepage measurements are often multiplied by a correction factor to account for frictional head loss through the components of the meter. More information on correction factors can be found in Rosenberry et al. (2008; http://pubs.usgs.gov/tm/04d02/pdf/TM4-D2-chap2.pdf).
Combining Mini-Piezometer Measurements with Seepage Meter Measurements to Determine Sediment Hydraulic Conductivity
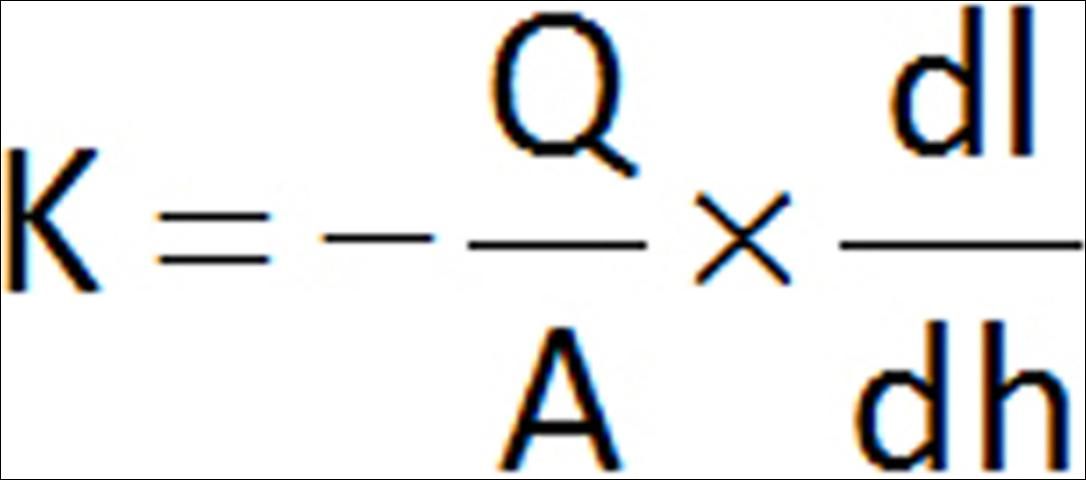
Mini-piezometers are very useful for making measurements of the hydraulic gradient (dh/dl) between groundwater and surface water using readily available materials (see: https://edis.ifas.ufl.edu/AE454). When used together with the seepage flow rate from a seepage meter, they can be used to calculate the hydraulic conductivity of the sediment using Darcy's Law:

Q is the measured flow from the seepage meter, A is the cross-section area of the seepage meter through which flow occurred, and dh/dl is the hydraulic gradient measured using a mini-piezometer. Equation 2 can be rearranged to solve for the hydraulic conductivity. When doing so, be sure to use consistent units.
Some Final Remarks
Seepage meter measurements can only provide information on the direction and rate of flow at the time and location the measurements are taken. Flow rates and directions between groundwater and surface water can be dynamic and change over time and space, particularly in response to seasonal streamflow and weather conditions. To fully characterize the groundwater–surface water exchange that occurs in a particular water body, it is recommended that multiple measurements be made at several locations and under different hydrologic conditions and times of year. Due to their simplicity and low cost, seepage meters can also be useful for educational field demonstrations in the environmental sciences.
References
Lee, D. R. 1977. A device for measuring seepage flux in lakes and estuaries. Limnology and Oceanography 22(1): 140–147.
Lee, D. R. and J. A. Cherry. 1978. A field exercise on groundwater flow using seepage meters and mini-piezometers. Journal of Geological Education 27: 6–10.
Rosenberry, D. O. 2008. A seepage meter designed for use in flowing water. Journal of Hydrology 359: 118–130.
Rosenberry, D. O., LaBaugh, J. W., and R. J. Hunt. 2008. Use of monitoring wells, portable piezometers, and seepage meters to quantify flow between surface water and ground water. In: Rosenberry, D. O. and J. W. LaBaugh (Eds.), Field Techniques for Estimating Water Fluxes Between Surface Water and Ground Water. United States Geological Survey Techniques and Methods, Chapter 4-D2, pp. 39–70. http://pubs.usgs.gov/tm/04d02/
Sanders, L. L. 1998. A Manual of Field Hydrogeology. Prentice Hall, Upper Saddle River, NJ.