Introduction
The climate of Florida is suitable for growing a variety of tropical and subtropical fruits, including passion fruit (Passiflora edulis) (Figure 1). Passion fruit has a distinctive aroma and sweet-sour taste. It has become highly appreciated in culinary and home gardening circles. Passion fruit originated in South America, although it is also grown in other tropical and subtropical regions around the world. The cultivation of this fruit requires a solid understanding of effective propagation methods to ensure the availability of high-quality plant material. This guide covers various sexual and asexual propagation techniques, from traditional seed sowing to advanced methods such as tissue culture, and is written for growers, Extension agents, and home gardeners.

Credit: Ali Sarkhosh, UF/IFAS
Overview of Propagation Methods
From preserving heirloom varieties to mass production of hybrids for commercial sale, propagation is a critical step for successfully establishing a productive passion fruit operation. Each propagation method has specific requirements, advantages, and disadvantages. The appropriate method is an important decision that should consider the goals of the operation, the resources available, and the specific environmental conditions.
The hard outer coating of passion fruit seeds causes slow and uneven natural germination, an important challenge for the sexual propagation of this plant. Seed scarification weakens the seed coat to facilitate water absorption, significantly accelerating germination. Cuttings and grafting are the most popular methods of asexual propagation. Propagation by cuttings generates clones of the mother plant, which ensures genetic consistency and makes selecting and propagating desirable traits easier. On the other hand, grafting helps to provide a strong root system to the selected scion, improving plant resilience and adaptability. This publication describes the most popular sexual and asexual propagation methods that can be used for passion fruit and other plant species.
Sexual Propagation
Step 1: Seed Scarification
Seeds are naturally protected by a hard coat. The hardiness of the seed coat varies among plant species and helps to preserve the plant embryo until the environmental conditions are favorable for germination. However, the seed coat is also a physical barrier that hinders water uptake and gas exchange. Consequently, removing this barrier, in a process known as scarification, can accelerate seed germination. Scarification is a pre-germination technique that hastens the seed coat degradation, which would normally occur in nature. Proper scarification is important for boosting germination rates and ensuring seedling uniformity.
To ensure high germination rates, it is crucial to start the propagation process with healthy seeds. Obtaining pathogen-free seeds from certified companies helps to reduce the presence of potential pests and diseases. On the other hand, if seeds are obtained from fruits directly, it is important to collect them from healthy fruit. To facilitate the removal of the mucilage covering the seeds, it is recommended to remove pulp and seeds from the fruit. Place them into a previously disinfected glass container and cover it with aluminum foil, agitating the content with a clean spoon daily to avoid fungal or bacterial growth (Figure 2). After five to seven days, the mucilage will separate from the seeds. With the aid of a wire strainer, seeds should be rinsed with clean water and then air-dried at room temperature for 24 hours. Finally, seeds should be stored in paper bags or coin envelopes and kept in a cool and dry condition.
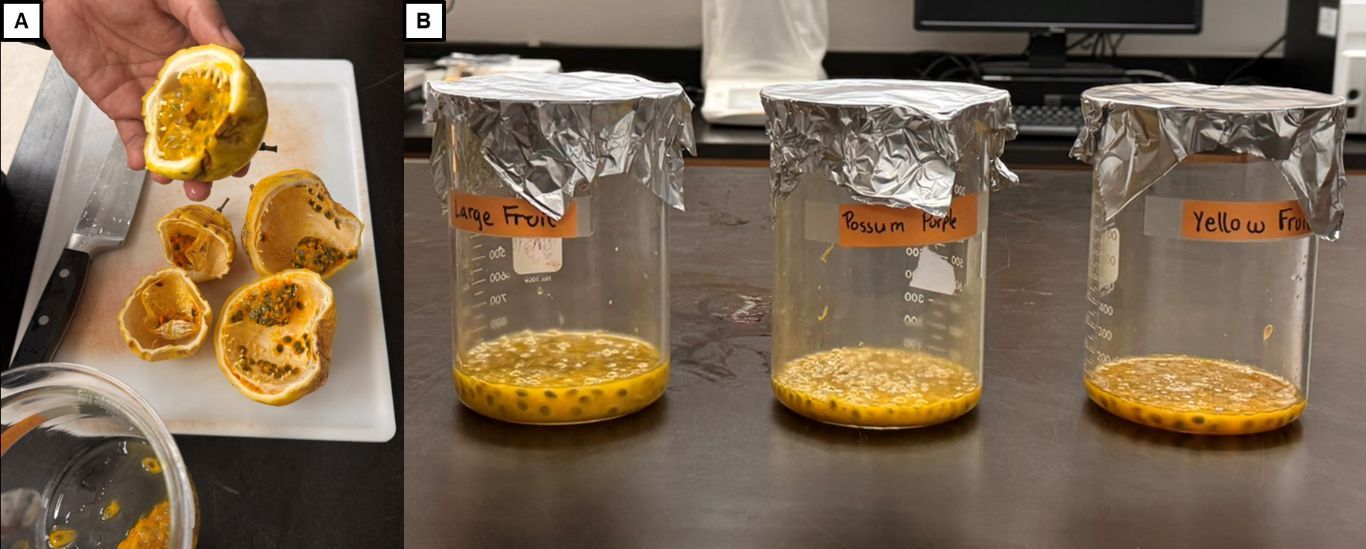
Credit: Jonathan Clavijo-Herrera and Ali Sarkhosh, UF/IFAS
Passion fruit seeds scarified using sandpaper exhibit improved germination rates and faster sprouting compared to non-scarified seeds. To thin the seed coat properly, it is recommended to use commercial-grade sandpaper with a grit size between 100 and 150 (Figure 3). One sheet of sandpaper should be placed facing up on a flat surface with the passion fruit seeds spread in a single layer over the sandpaper. Another sandpaper sheet should be placed with the gritty side facing down, and the seeds should be rubbed gently using moderate pressure for three to five minutes, ensuring each seed comes in contact with the abrasive surfaces. Avoiding over-scarification is important since applying too much pressure can break the seeds and eroding too much of the seed coat can damage the plant embryo. Scarification is complete once scarring of the seed coat becomes visible as abrasions along the seed margins (Figure 4). Then, the seeds are ready to begin the germination process.
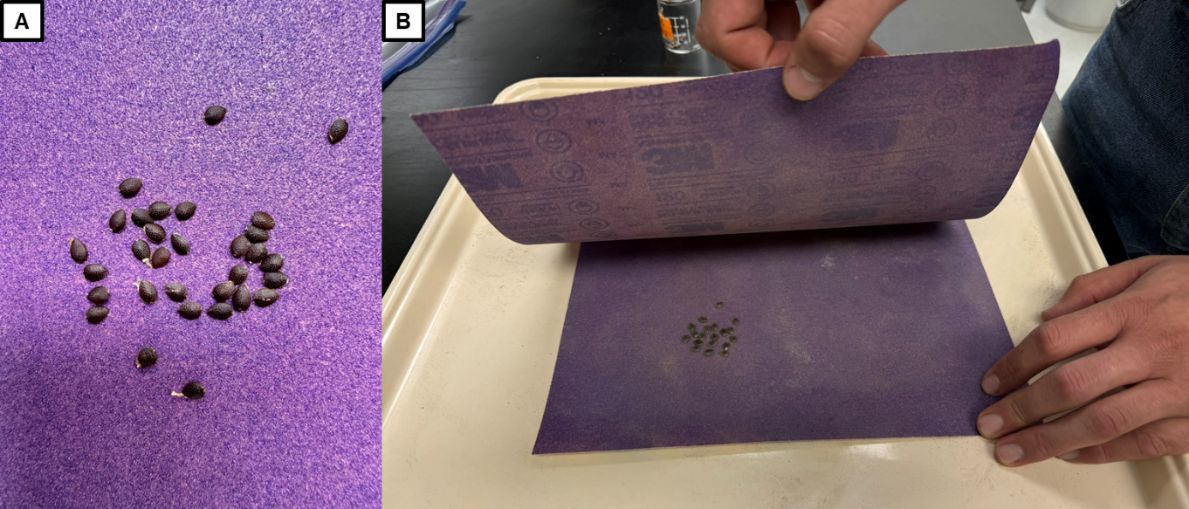
Credit: Jonathan Clavijo-Herrera, UF/IFAS

Credit: Jonathan Clavijo-Herrera and Ali Sarkhosh, UF/IFAS
Step 2: Seed Germination
To initiate germination, scarified seeds should be submerged in distilled water for 24 hours to facilitate seed imbibition (i.e., water uptake) (Figure 5A). This procedure ensures that the embryo absorbs the amount of water required to initiate germination. After imbibition, trays or individual pots filled with high-quality, seed-starting substrate can be used to sow the seeds. It is important to moisten the media evenly and select a substrate with adequate drainage capacity to ensure healthy seedlings. Moreover, maintaining a good moisture level throughout the germination process without over-saturating the substrate is critical to ensure high germination rates. Once the substrate is prepared, seeds should be sown at a depth of 1/3 of an inch (approximately 1 cm) to protect the seed and secure a proper moisture level. Passion fruit seeds have a shape similar to an arrowhead. Sowing the seeds with the tip pointing down is essential since the radicle (initial root) will emerge from the tip (Figure 5B). Ideally, trays or pots should be kept between 77°F and 86°F (25°C and 30°C), and as the seeds start to germinate, indirect sunlight should be available for the young seedlings. Passion fruit seed germination usually begins 10 to 20 days after sowing when using scarified seeds (Figure 5C).
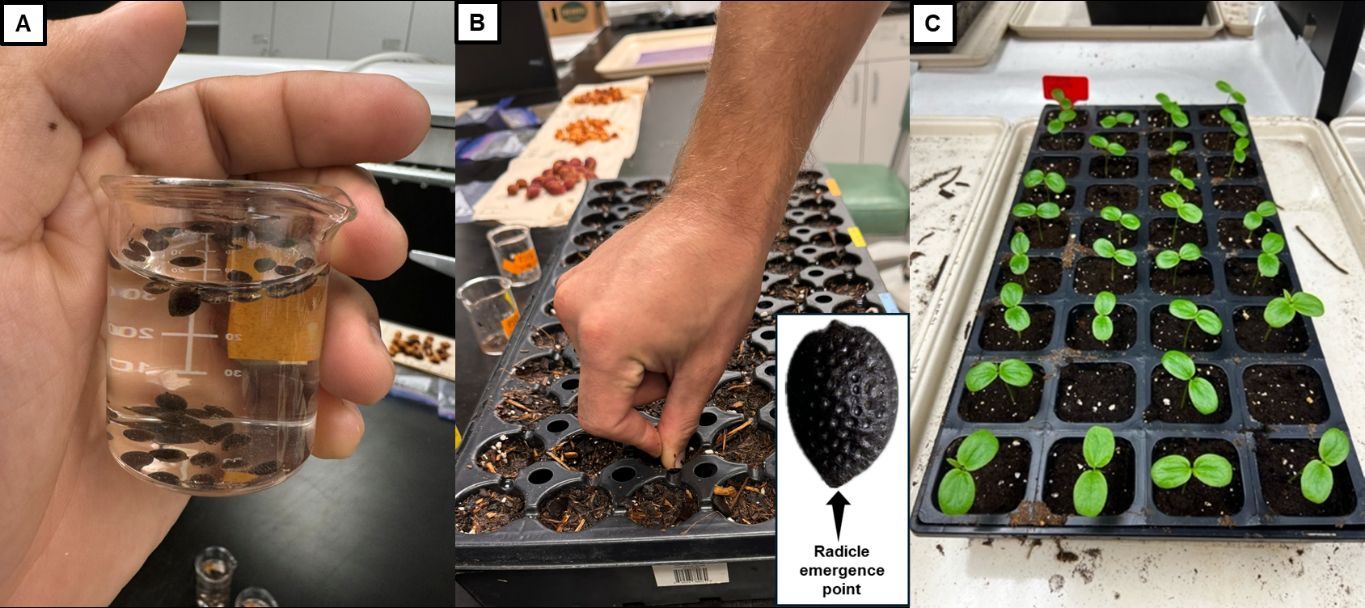
Credit: Jonathan Clavijo-Herrera (A and B) and Juan David Jimenez Pardo (C), UF/IFAS
Asexual Propagation
Cuttings
Propagating passion fruit plants through cuttings is an effective way to generate genetically identical offspring. This method requires less time than growing plants from seeds and generates plants with a shorter juvenile phase. Cuttings can grow into healthy plants in just a few months. Balancing humidity and air circulation is critical for successful propagation by cuttings. Such balance prevents pathogen growth and preserves substrate moisture to promote root development at the bases of cuttings.
For propagation by cuttings, a healthy, disease-free plant actively producing fruits should be selected as the source of plant material. Ideally, the plant should be assessed for viruses before propagation and discarded if infected. Taking cuttings from branches that are blooming or fruiting should be avoided. Cuttings with flower buds consume their energy in reproductive growth rather than in rooting. Selecting one-year-old wood cuttings with new growth is recommended, as these parts are more likely to root successfully.
Before obtaining cuttings, garden clippers should be sanitized in a 10% chlorine solution to prevent disease transmission. Proper cuttings for propagation are obtained by cutting a stem segment at a 45-degree angle just above the bottom node because this method increases the surface area for root development. To encourage root growth, the cuttings should have two to four nodes (Figure 6), tendrils removed, and leaves cut in half, except for the newest leaves. Dipping the cuttings into a fungicide solution before propagation prevents disease development. Additionally, applying rooting hormones (available in powder, liquid, or gel forms) evenly on each cutting’s end surface can significantly promote root development.
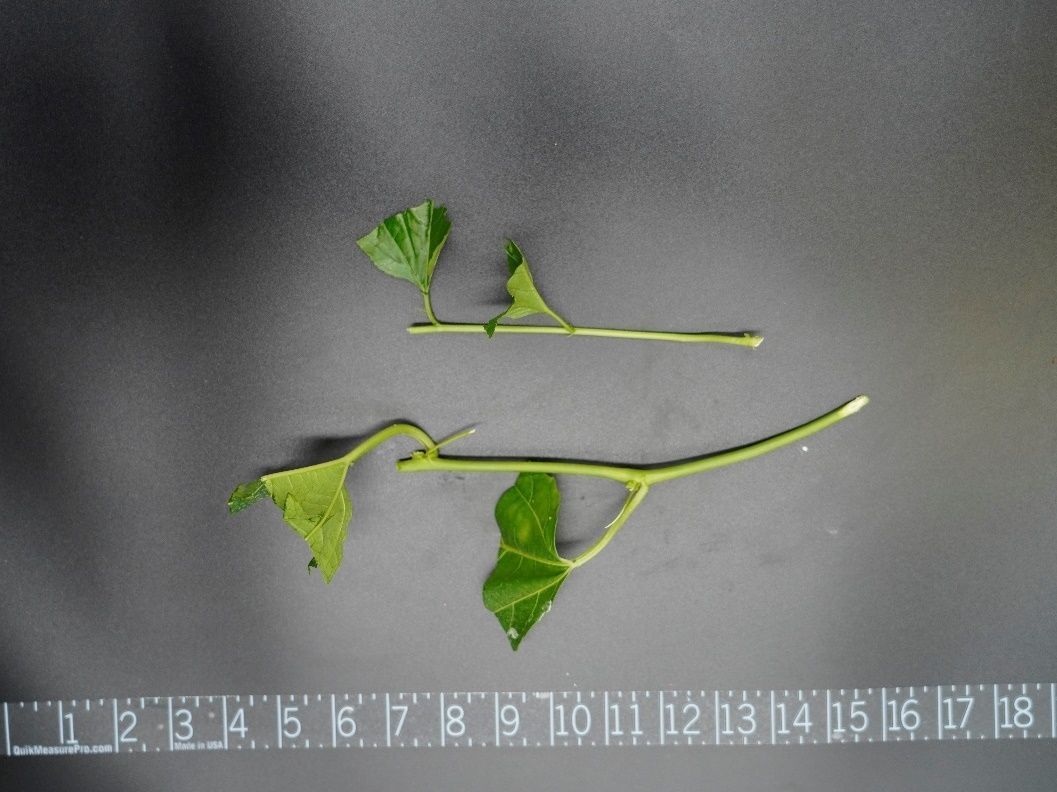
Credit: Jonathan Clavijo-Herrera and Ali Sarkhosh, UF/IFAS
To plant the cuttings, fill a pot or propagation tray with a peat-moss-based potting mix containing perlite, which will provide ideal drainage and moisture levels (Figure 7). Each cutting should be planted in a hole with a depth of 2 to 4 inches (5 to 10 cm), with the angled cut end pointing down, gently packing the soil around it to eliminate air pockets. The substrate needs to stay moist but not oversaturated. The plants should be placed in a high relative humidity environment with temperatures around 85°F (29°C) and should receive indirect sunlight. Propagation boxes with clear covers are ideal for propagating passion fruit cuttings (Figure 7). To avoid disease incidence that may occur in humid conditions, spray the cuttings with fungicide every week. It is important to check the cuttings for new leaf growth and root development every two weeks. Removing flower buds during rooting is also recommended to redirect resources towards rooting. After two to three months and under proper conditions, the cuttings should have developed roots, making them ready for transplant. New leaf growth in the stem is a good indicator of successful root establishment. A noticeable resistance when gently pulling the cutting also means that roots are likely ready for transplant. After verifying those two indicators, the cuttings can be transferred to a new pot with fresh potting substrate. This propagation method offers a consistent and effective way to obtain healthy plant material, ensuring the plants have the desired traits observed in the parent plant while shortening the juvenile phase.
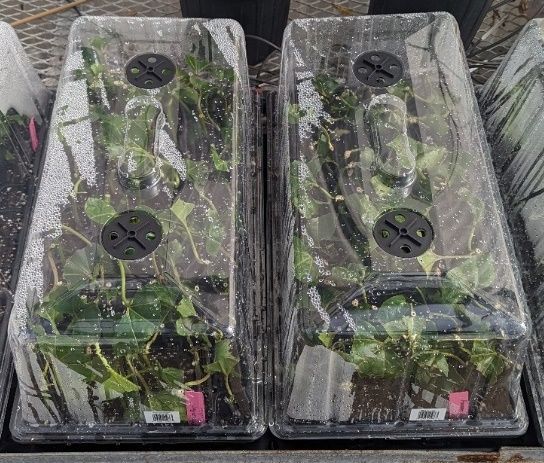
Credit: Uzman Khalil and Ali Sarkhosh, UF/IFAS
Cleft Grafting
Grafting is a propagation technique that allows desired scion cultivars to be attached to a strong and resilient rootstock with desirable traits, improving overall plant performance, adaptability, and resistance to biotic (e.g., fungal) and abiotic (e.g., flooding) stress. Grafting is typically performed during summer, when plants are actively growing, thus facilitating tissue connection and healing of the graft wound.
For passion fruit grafting, scions should be collected from healthy and actively growing plants, preferably not more than one year old, with long internodal distance (i.e., long distance between leaf and tendrils). The rootstock stem/branch with a diameter of approximately 5/16 inches (10 mm) should be cut off about 10 inches (25 cm) above the ground level, just below the leaf node. The cutting selected for the scion should be 2 to 3 inches (5 to 8 cm) long and contain an actively growing tip (Figures 8 and 9). Keeping only small leaves present at the growing tip and removing older leaves is recommended. Two opposite sloping cuts should be made at the base of the scion to make a wedge shape. While grafting, a straight cut should be made in the center on the tip of the rootstock where the scion wedge can be inserted. The cut on the rootstock should be slightly longer than the scion wedge to avoid slipping the scion upward. The scion wedge must be inserted into the cut on the rootstock and tied using grafting tape, starting below the rootstock wound, going upward, passing the scion wound, and back down again. Finally, the tape must be tied around the graft union.
Clean cuts and precise alignment of vascular tissues are critical for a successful union between scion and rootstock. Covering the graft union and scion with a plastic bag helps preserve moisture and increase the success rate (Figure 8). Plants should be kept under shade and high relative humidity conditions for the first three to four days until the tip does not show any wilting signs. The plastic bag can be removed once active growth in the scion is visible.
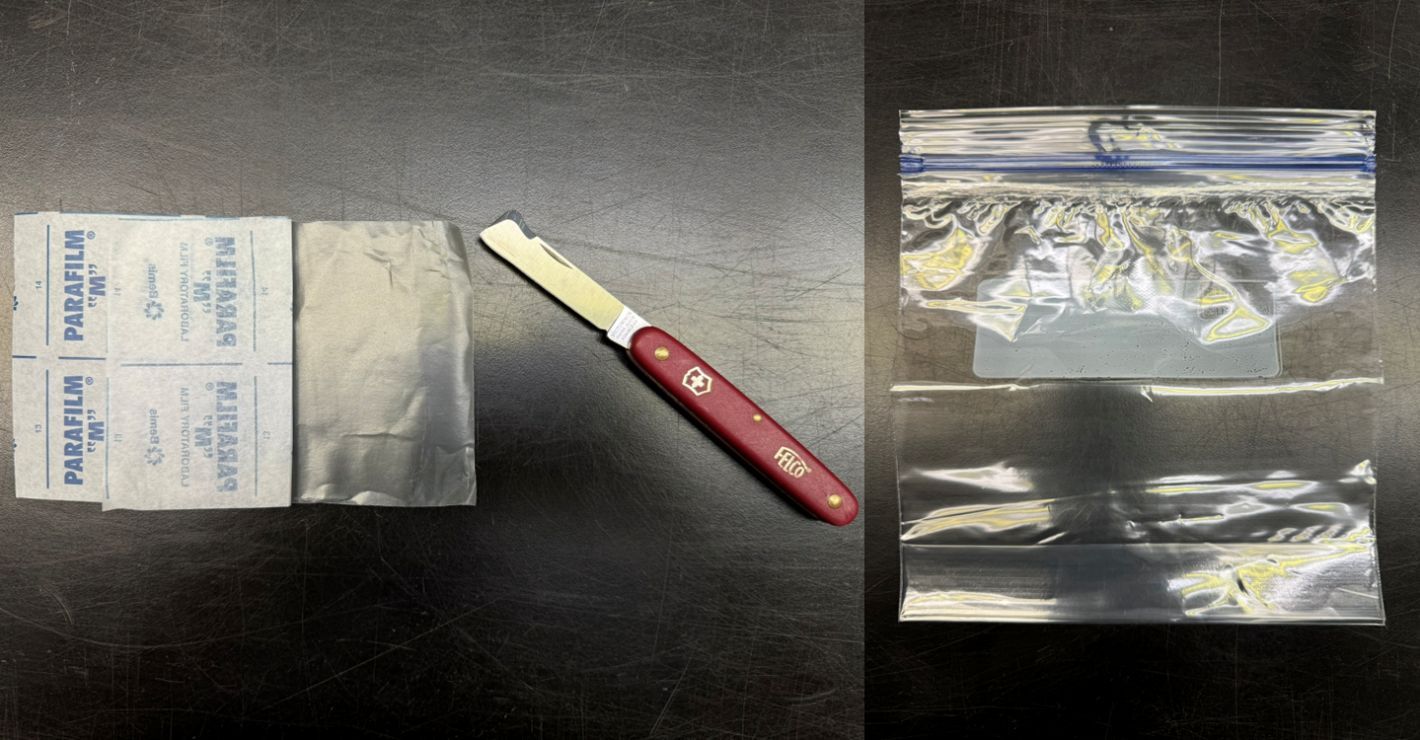
Credit: Jonathan Clavijo-Herrera and Ali Sarkhosh, UF/IFAS
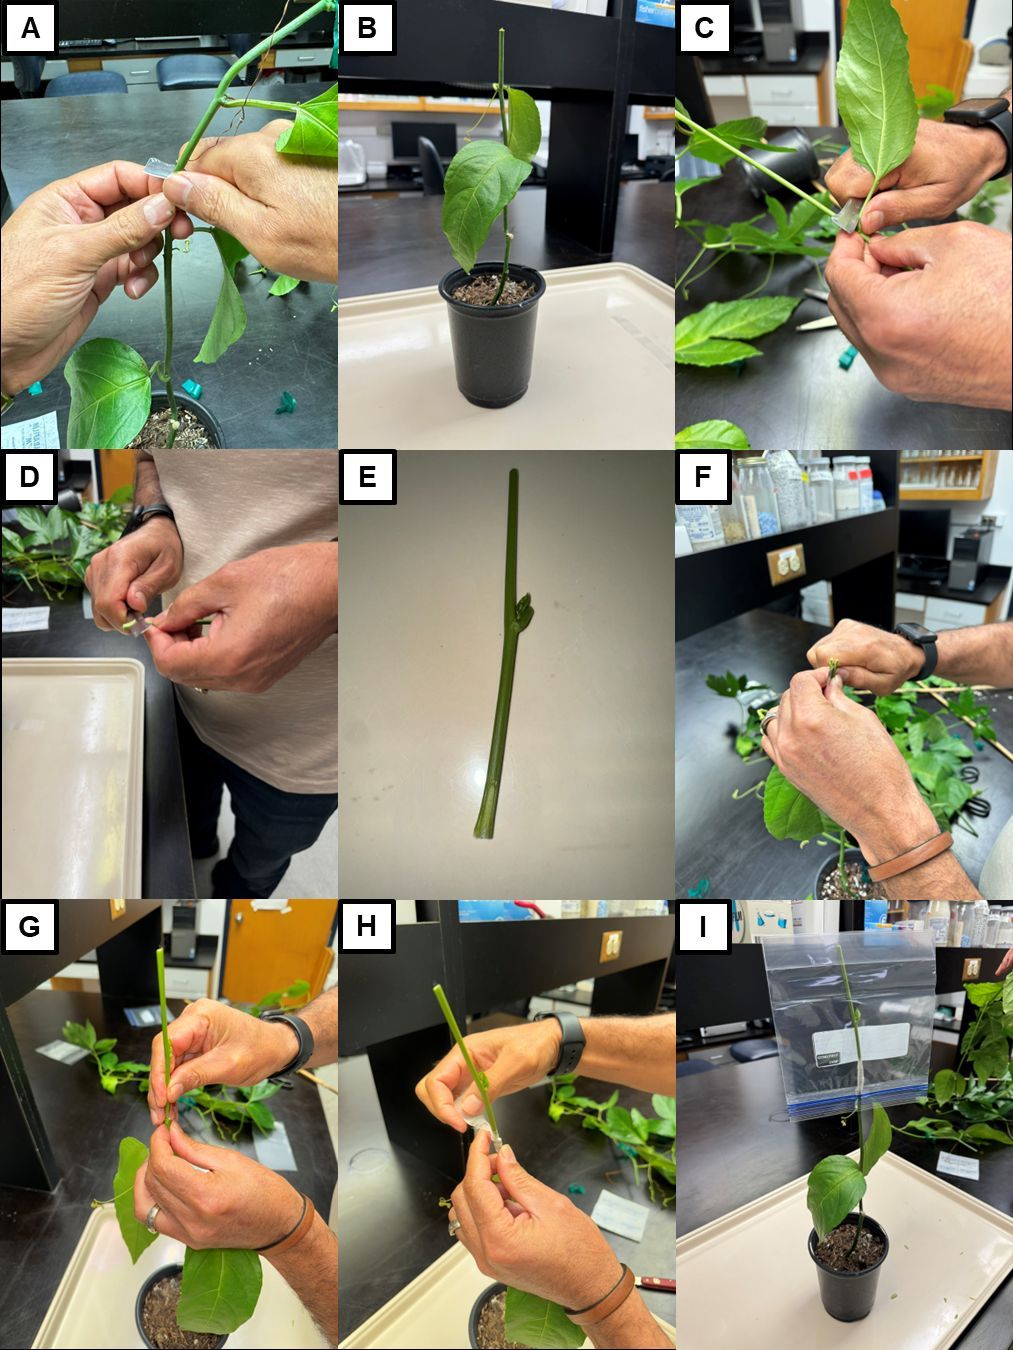
Credit: Jonathan Clavijo-Herrera and Ali Sarkhosh, UF/IFAS
Tissue Culture
Tissue culture, or micropropagation, is an asexual propagation technique that facilitates rapid multiplication of healthy plant material genetically identical to the mother plant. It is a useful tool for multiplying plants that are difficult to propagate by other methods, and it contributes to the preservation of endangered plant species. In breeding programs, tissue culture helps to propagate plant material with desirable traits. One of the main advantages of this technique is the propagation of disease-free plant material, which contributes to the reduced incidence of passion fruit woodiness virus, the most important viral disease in passion fruit production.
There are five important steps to propagating plants by tissue culture. First, the mother plant needs to be assessed for viruses and fungal pathogens. It is critical to verify that the mother plant is healthy and free of fungal, bacterial, or viral diseases. Once a suitable candidate for the mother plant is identified, ideally, it should be kept in a protected environment with proper irrigation and nutrition. Second, small pieces of plant material (explants) from the mother plant should be collected, thoroughly disinfected, and put in a sterile growing medium inside an aseptic container. For passion fruit tissue culture, shoot apices, nodal segments, leaf discs, or hypocotyl segments can be used as explants. At this stage, the growing media (usually adapted versions of Murashige and Skoog medium) should contain nutrients, carbohydrates as a source of energy, and specific concentrations of plant hormones (usually high concentrations of cytokinins and low concentrations of auxins) meant to induce shoot development.
The third step is the multiplication of shoots (Figure 10), in which pieces of the shoot masses obtained in the previous stage are transferred into new sterile containers with enriched growing media. This allows them to develop until the desired number of shoots is obtained. The fourth step is the induction of root development, which requires the transfer of the shoots to a root-inducing medium (typically low in cytokinins and high in auxins). This step is generally performed in vitro, although it can also be done ex vitro, using a pathogen-free medium with adequate moisture and nutrients. Finally, the fifth step is the acclimatization of the rooted shoots to grow in soil media outside the laboratory. This step is generally completed in a greenhouse. Plants generated in the tissue culture laboratory are initially susceptible to intense light and low humidity. Consequently, it is critical to facilitate a slow transition for the young shoots to become strong and healthy plants.
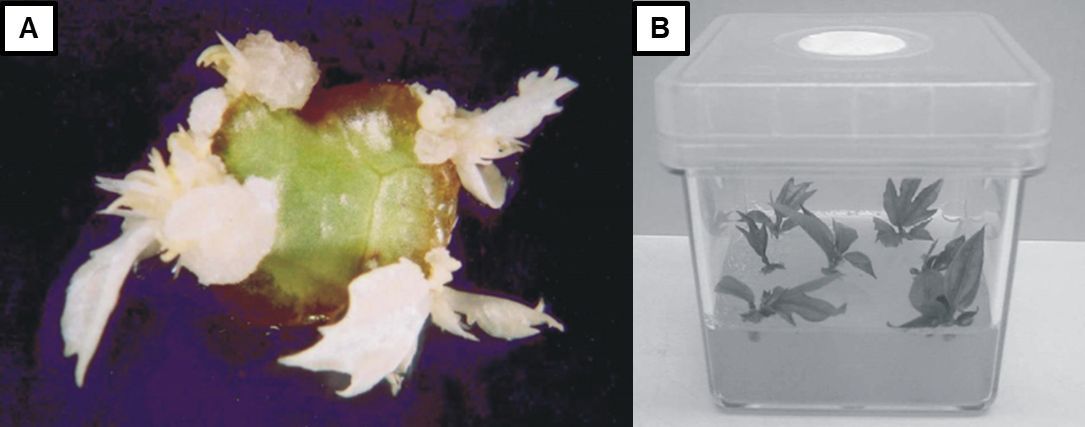
Credit: Adapted from Trevisan and Mendes (2005)
Although tissue culture is typically performed in specialized laboratories, it is possible to do it at home on a small scale, as suggested by Black (2022). The supplies needed are a face mask, gloves, bleach, rubbing alcohol, dish soap, pressure-safe 16-ounce (475-mL) glass containers and lids, a saucepan, a pressure cooker, aluminum foil, tweezers, and razor blades (Table 1). Before starting, it is important to disinfect hands, wear gloves and a face mask, and sanitize the workspace, glassware, and tools with 10% bleach solution first and then with rubbing alcohol. Remember never to mix bleach and rubbing alcohol. It is recommended to avoid breathing directly onto the sanitized materials and surfaces.
The growing medium can be prepared in a saucepan using the ingredients indicated in Table 1, boiling for some minutes until the agar is dissolved. Once ready, the medium should be poured into glass containers and covered with aluminum foil. Another glass container should be filled with water and covered with aluminum foil. To sterilize the media and water in these containers, they must be put in a water bath in the pressure cooker for 15 minutes. Tweezers and razor blades, covered with aluminum foil, can also be sterilized in the pressure cooker. After this, the pressure should be released carefully, and the sterilized media and water should be transferred to clean glass containers. The containers should be capped and kept in a sterile space inside a refrigerator to be used after cooling.
Table 1.Ingredients required to prepare home tissue culture media (Source: Black 2022).
To disinfect the plant material, the selected plant tissue should be handled using gloves and a face mask. The plant tissue should be submerged in 17 ounces (500 mL) of 10% bleach solution, with up to 5 drops of dish soap, in a sterile container. After agitating the sterilizing solution for 15 minutes, the plant material must be rinsed at least 4 times with sterilized water. Any visibly damaged tissue should be trimmed from the rinsed material using a razor blade. Once the plant material is disinfected and rinsed, it can be transferred using tweezers to the sterilized media previously stored in the refrigerator. The tissue should be in contact with the growing media (to facilitate nutrient uptake), placed in the glass container, and then lidded and stored at 75°F (24°C) under a 16-hour light period to develop the new shoots. Any container showing signs of fungal or bacterial growth during this time should be discarded. When the new shoots outgrow the container, it is time to transfer them to pots and initiate the acclimatization process.
Conclusion
Propagation is a critical step for establishing successful fruit production systems. Both seed and vegetative parts can be used for passion fruit propagation. Propagation using scarified seeds significantly accelerates the germination process and increases genetic variability, which could make it possible to obtain plants with desirable new traits, such as larger or sweeter fruit. On the other hand, vegetative propagation methods permit the multiplication of plants genetically identical to the mother plant, enabling the production of plant material with the same traits. Cuttings and grafting are important propagation methods that are not difficult to master. Meanwhile, commercial and small-scale tissue culture requires higher technical skills and resources, although it generates disease-free plants. Each propagation technique has advantages and disadvantages and should be selected considering the resources available.
Acknowledgement
This work was supported by the Southern Sustainable Agriculture Research and Education (S-SARE) Research and Education award number LS23-380.
References
Black, B. J. 2022. Micropropagation at Home—How to Make New Plants with Tissue Culture. University of Illinois Extension. https://extension.illinois.edu/sites/default/files/micropropagation_at_home.pdf
Trevisan, F., and B. M. J. Mendes. 2005. “Optimization of In Vitro Organogenesis in Passion Fruit (Passiflora edulis f. flavicarpa).” Scientia Agricola 62 (4): 346–350. https://doi.org/10.1590/S0103-90162005000400007
Further Reading
Bailey, M., A. Sarkhosh, A. Rezazadeh, J. Anderson, A. Chambers, and J. H. Crane. 2021. “The Passion Fruit in Florida: HS1406, 1/2021.” EDIS 2021 (1). https://doi.org/10.32473/edis-hs1406-2021
Mabundza, R. M., P. K. Wahome, and M. T. Masarirambi. 2010. “Effects of Different Pre-Germination Treatment Methods on the Germination of Passion (Passiflora edulis) Seeds.” Journal of Agriculture and Social Sciences 6 (3): 57–60.
Marostega, T. N., P. B. da Luz, A. R. Tavares, L. G. Neves, and S. de Paiva Sobrinho. 2017. “Methods of Breaking Seed Dormancy for Ornamental Passion Fruit Species.” Ornamental Horticulture 23 (1): 72–78. https://doi.org/10.14295/oh.v23i1.982
Miranda, D., G. Fischer, C. Carranza, S. Magnitskiy, F. Casierra, W. Piedrahíta, and L. E. Flórez, eds. 2009. Cultivo, Poscosecha y Comercialización de las Pasifloráceas en Colombia: Maracuyá, Granadilla, Gulupa y Curuba. Sociedad Colombiana de Ciencias Hortícolas. http://hdl.handle.net/20.500.12324/12824
Rego, M. M., E. R. Rego, L. P. U. Nattrodt, P. A. Barroso, F. L. Finger, and W. C. Otoni. 2014. “Evaluation of Different Methods to Overcome In Vitro Seed Dormancy from Yellow Passion Fruit.” African Journal of Biotechnology 13 (36): 3657–3665. https://doi.org/10.5897/AJB11.1743
Rezazadeh, A., M. Bailey, and A. Sarkhosh. 2020. “Passion Fruit Problems in the Home Landscape: HS1397, 11/2020.” EDIS 2020 (6). https://doi.org/10.32473/edis-hs1397-2020
Royal Horticultural Society. n.d. “Micropropagation.” Advice. Accessed June 26, 2024. https://www.rhs.org.uk/propagation/micropropagation