Introduction
Palms are an integral part of the urban landscape in Florida. The numerous palm species, growing in varied hardiness zones across Florida, contend with their share of abiotic and biotic stresses. Ganoderma butt rot of palms, a disease caused by the wood-decaying white-rot fungus Ganoderma zonatum, is one of the major biotic concerns for the landscape industry. This lethal disease is prevalent across palm-growing regions in the US, and all palm species are believed to be susceptible to this fungus. Ganoderma butt rot is a slow-moving disease, taking six months to a year for the palm to die once the initial symptoms appear. This disease has typically been diagnosed based on the appearance of conks on the palm trunk. But with the availability of a disease diagnostic assay, this fungal pathogen can be detected using saw dust samples collected from declining palms, several months before the conk appears. This publication will serve as a guide for landscapers, homeowners, and other stakeholders, who need to collect and submit saw dust samples from palms to the Palm Mycology Lab for detecting the presence of Ganoderma zonatum. Collecting the sample correctly is a critical first step in ensuring the validity of the results of the diagnostic assay. Collect good quality samples by following these steps and understanding the caveats associated with each step.
Sample Collection
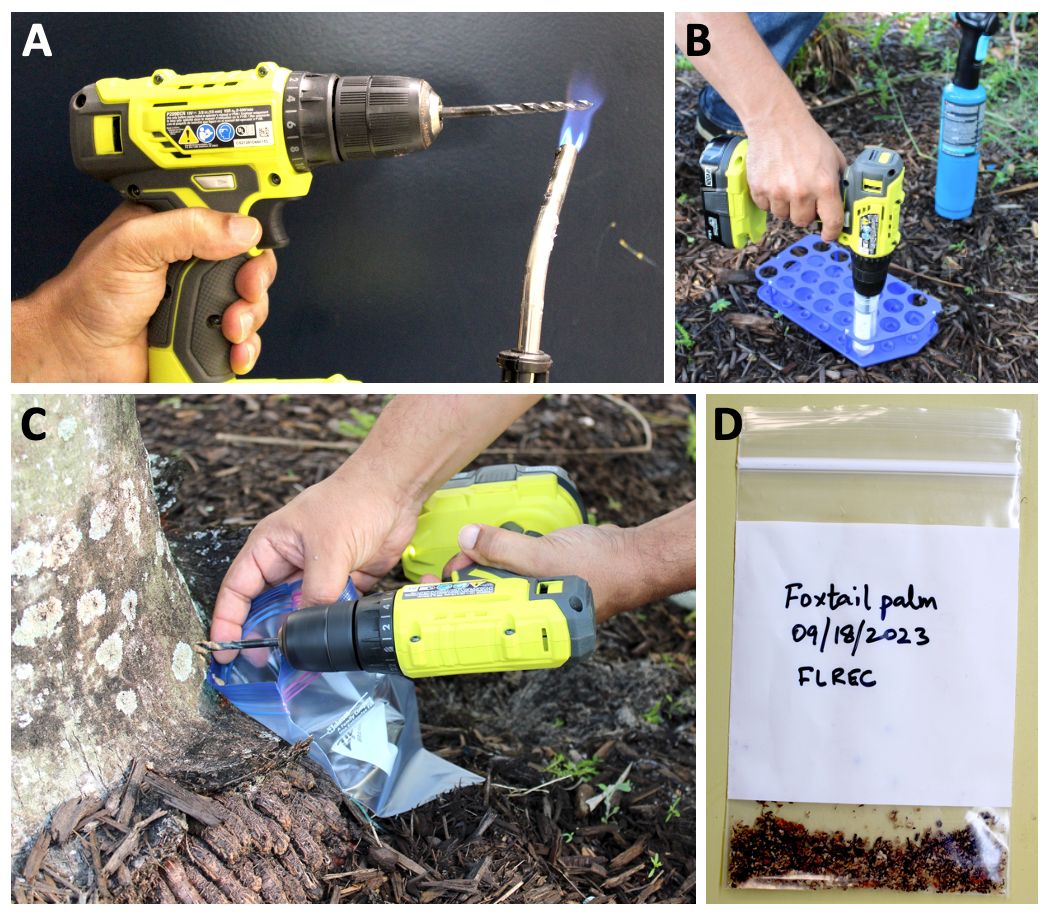
The initial symptoms of palm decline due to Ganoderma butt rot show up as desiccation of fronds starting from the lower part of the canopy. In order to sample a declining palm for Ganoderma, it is recommended to collect the saw dust samples closer to the soil line, above the root boss (Figure 1C). The Ganoderma butt rot pathogen, Ganoderma zonatum, usually enters through the roots and colonizes the trunk, so it is found closer to the soil line. The sampling location on the trunk is the key difference between sampling for Ganoderma versus sampling for phytoplasma.

Credit: Braham Dhillon, UF/IFAS
The following pieces of equipment are necessary for collecting saw dust samples from the palm trunk:
- cordless power drill
- 7/32’’ drill bit, 6” to 8” in length
- propane torch (to sterilize the drill bit)
- distilled, sterile water
- toothpicks (to remove trunk tissue from the drill bit)
- golf tees
- hammer
- sealable plastic bags (for holding the sample)
- permanent marker
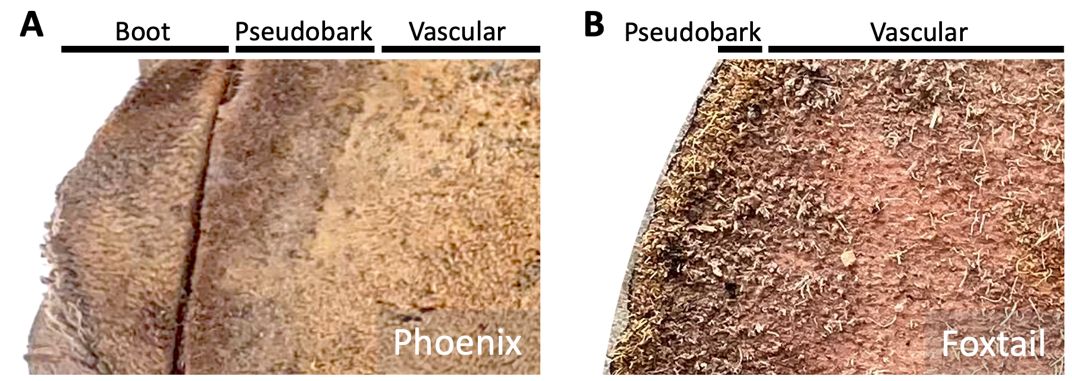
While drilling a hole in the trunk, make sure the drill bit goes past the pseudobark (Figure 2). The outermost part of the trunk in palms is called the pseudobark (Figure 2), which is the dead tissue that covers and protects the living trunk. In smooth trunk palms, like foxtail or queen palms, this pseudobark is very thin and easy to drill through (Figure 2). But in palms where bases of the fronds, also called boots, are left attached to the trunk, like Sabal, Washingtonia, or Phoenix palms, collect the sample from the trunk by either drilling between the boots or past the boot tissue (Figure 2). Once the drill bit goes past the pseudobark tissue, remove the drill bit, clean it with a sterile toothpick, and discard the pseudobark tissue from the drill bit. Then go back to the same drill hole and drill for 1” to 2’’ into the trunk. Hold the sealable plastic bag underneath the drill and collect the tissue as the drill bit is relieved from the trunk. The drill holes in the trunk can be sealed with golf tees.

Credit: John Conroy, Fish Branch Tree Farm Inc., and adapted by Braham Dhillon, UF/IFAS
Collect at least two samples from the trunk: if sample 1 is from one side of the tree, then collect sample 2 from the diagonally opposite side. Both samples can be pooled into the same plastic bag. Around 1–2 tablespoons of saw dust sample is enough to run the assay. Label the plastic bags with the date, palm species, and site name (Figure 1D). Use a cooler to store the samples on ice and away from sunlight. The samples should be stored in a refrigerator until shipping time.
In some cases, drilling a hole to the desired depth is not possible as the trunk tissue may be dense. Drilling at the same spot without increasing the depth causes the tissue to heat up, which is not desirable. In such cases, it is acceptable to ease the drill bit out, collect the sample, and go back to the same drill hole to collect additional sample.
When sampling from multiple palms, it is recommended to flame sterilize the drill bit (Figure 1) to avoid cross-contamination. Make sure to wait and let the drill bit cool down before collecting the next sample. The drill bit can be dipped in sterile water to make it cool faster.
Submitting Samples
When sending the samples, complete and attach a sample submission form with relevant information regarding the sample and the site. The sample submission form is available at the Fort Lauderdale Research and Education Center home page from this link, https://flrec.ifas.ufl.edu/media/flrecifasufledu/palms/documents/palm_submission_form_fungalDiseases.pdf.
Send samples to the following mailing address:
Attn: Palm Mycology Lab
UF/IFAS Fort Lauderdale Research and Education Center
3205 College Ave
Davie, FL 33314