Establishing forages from seeds often requires precision equipment to achieve specific seeding rates for a proper pasture stand. Most pieces of equipment have calibration charts, which are useful guides for making an initial setting. However, due to variations in seed size, purity, moisture content, equipment performance, ground speed, and other factors, calibrating equipment prior to each use is recommended. Settings based on charts can be off by as much as 50%.
Calibration techniques can be simple and usually do not require complicated mathematics. The techniques depend on the type of equipment being used (e.g., drill or broadcast spreader) and are basically divided into two methods: seed count per area or seed weight per area. Both methods are based on a target population of plants per area, which is specific to each species and cultivar. Seed count is the number of seeds spread in a specific area or drilled on a linear foot. By knowing the distance between the rows of the drill, we can calculate how many seeds per acre there are. However, counting seeds can be difficult when overseeding sod or drilling, since most of the drills are equipped with a packing wheel to compact the seedbed. Some drills can be run over a hard surface, which facilitates seed counting.
Weighing is generally easier on drills, where a collecting bag can be attached to the seedbox aperture or corrugated tube. By running the equipment for a known distance and multiplying the distance traveled by the space between rows, we can obtain the area covered in each row. With the weight of the seeds dropped in that specific distance, we can calculate the seeding rate. For pendulum spreaders, the collecting bag can be attached to the spout, or the spout can be removed and the bag tied to its attachment at the base of the cone. The spreader is then run for a specific amount of time. Using the relationship between the speed of the tractor and the effective width of the spreading band, we can calculate the area covered followed by the seeding rate. For a centrifugal spinner spreader, a tarp or trays can be placed on the ground and a broadcaster can be turned on for a specific amount of time. By weighing the seeds, we see the amount dropped per unit of time, and with the speed of the tractor and width of spread, we calculate the area covered. Using trays helps us determine the evenness of distribution across the spreading band and define the amount of overlap needed between passes. It is better to complete this process in a barn so the wind does not affect the seeding rate. Below are a few examples of calibrating broadcast spreaders and continuous flow drills, which are generally used for small grains. Drills used for large grain such as sorghum and corn have different mechanisms and are beyond the scope of this publication.
Example 1: Calibrating a Drill by Seed Weight in the Field
Materials: scale, measuring tape, small bags for collecting seeds.
- Measure 60 ft to be traveled with the drill.
- Fill the seedbox and run the drill or turn the driving wheel to make sure all drive gears are full of seeds and at constant flow. Make sure all other openings are working properly before starting (i.e., no obstruction or broken part that could affect seed flow).
- Fasten seed collection bags (Figure 1) to a few of the openings of the drive gear by removing the corrugated tube. Depending on the drill model, it will be easier to detach the corrugated tube from the planting disk and fasten the bags to the end of the tube. For a 6-ft drill with nine rows, collecting from three lines should suffice.
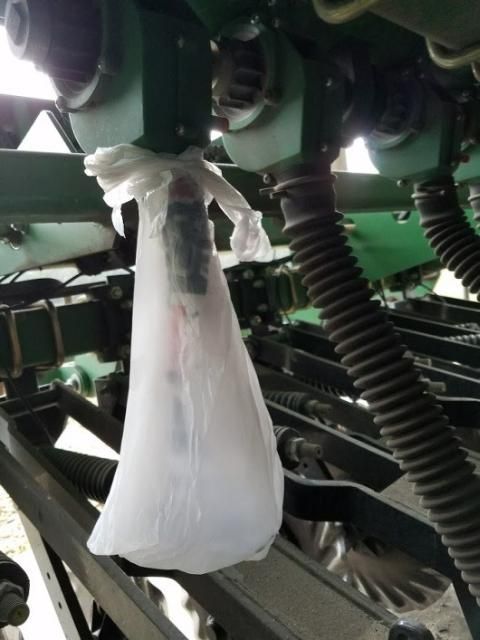
Credit: Marcelo Wallau, UF/IFAS
- Put the drill on the ground, set at field speed, and drive the designated distance.
- Collect and weigh the seed bags individually (make sure you subtract the bag weight).
- Calculate the seeding rate.
Let us use an example of a 6-ft drill with nine rows in an 8-in center for planting rye at 90 lb/acre. When the drill was run for 60 ft, each row covered an area of 40 ft²:
Equation 1
Equation 1.1
Therefore, if we collected 0.125 lb (2 oz) per bag, it means that the drill is dropping 136 lb/acre (rounding numbers may result in a few differences in the calculation; 1 acre = 43,560 ft²).
Equation 1.2
If our target seeding rate is 90 lb/acre, then we need 0.002 lb/ft² or 0.08 lb (or 1.3 oz) in our 40 ft² area. In this case, we need to reduce the aperture of the seedbox opening or gear to reduce seeding rate.
Equation 1.3
Equation 1.4
7. Repeat the process until seeding rate is adjusted.
Example 2: Calibrating a Drill by Seed Weight in the Shop
This method can be used to calibrate equipment in the shop before going to the field. You still need a measuring tape, scale, and collection bag or container.
- Check owner's manual or measure the circumference of the drive wheel to find the distance traveled per revolution. You can also measure the diameter and multiply by 3.14 to get the circumference.
- Fill the seedbox and turn the driving wheel around five times to fill the drive gears with seeds. You may need to jack up the drive wheel (pull-type drills) or lift the three-point hitch to be able to turn the wheel.
- Loosen three of the seed tubes and place a container or bag under the drive gears to collect the seeds.
- Mark a reference on the drive wheel and turn it 20 times.
- Collect bags or containers and weigh seeds (remember to subtract bag or container weight).
- Calculate the seeding rate.
Let us say the circumference of the drive wheel is 3.5 ft. By turning it 20 times, it is equivalent to traveling 70 ft. Using the same drill from the previous example (8-in center rows), we will have covered 46.2 ft² per row in 70 linear ft.
Equation 2.1
Equation 2.2
If we collected 0.07 lb (1.12 oz) per row, then we are seeding at a rate of 66 lb/acre. In this case, we need to open the lever in the seedbox or increase the gear to achieve the desirable 90 lb/acre.
Equation 2.3
Example 3: Seed Count for Drills or Broadcast Spreaders
This method can be used for both drills and broadcast spreaders. It involves counting the seeds dropped in a specific area. For conventional or no-till drills equipped with a disk opener, this can be done over a hard surface, such as a dirt road, to facilitate seed count. However, running no-till drills with scrapers (boots) over a hard surface can damage the equipment. In this case, setting should be done in the field. Necessary materials include a ruler or frame to determine the area, and a tarp (if using a broadcast spreader). You also need to know the target plant population of the crop being seeded, which can vary depending on the cultivar. Always check the seed bag tag for more information.
First, let us determine the number of seeds per area that we need. For rye, there are approximately 18,000 seeds/lb, which means that with a 90 lb/acre seeding rate, we are applying 1.6 million seeds/acre corresponding to 37 seeds/ft².
Equation 3.1
Equation 3.2
For Drills
- Fill the seedbox and run the drill or turn the drive wheel to fill drive gears with seeds.
- Drive the drill over pavement, a clean driveway, or another surface where seeds are visible. It may be hard to count all of the seeds if you are in the field.
- Count the seeds at a specified distance. For our 8-in center rows, 1 ft² will be equivalent to 1.5 linear ft on row (0.67 ft² per linear ft on the row). Therefore, in 1.5 linear ft on the row, our target is 37 seeds (or 25 seeds/linear ft. See Table 1 for conversions).
If you count 12 seeds/ft, then in an 8-in center row (0.67 ft), you have 17.9 seeds/ft². This results in 779,724 seeds/acre.
Equation 4.1
Equation 4.2
For Broadcast Spreaders
Before you start setting your broadcast spreader, make sure the spreader is properly attached to the tractor and the adjustable stabilizer bar is tight to keep it from swaying. Level the spreader by screwing or unscrewing the top link. If the equipment is not level, the effective width and distribution pattern of the equipment may vary. Set the height using the lift arm command on the tractor so the disk or pendulum is at 3 ft from the ground.
- Lay a tarp on level ground or drop seeds onto the pavement, clean driveway, or another surface where seeds can be easily seen and counted. The tarp has to be wider than the spreading width and at least 3 ft long to allow you to check distribution.
- Determine the engine rotation that gives 540 revolutions per minute at the power take-off (PTO) and fix it. Drive the broadcaster over the tarp at a fixed, determined speed. This is important since the speed and the rotation will be major factors in determining seeding rate for broadcast spreaders.
- Using a metal, wood, or PVC frame of known area (ideally a 1 ft x 1 ft square), count the seeds within that quadrat at several distances from the center of the spreader. Alternatively, a tray or baking pan can be used to capture the seeds. To keep seeds from bouncing off, you can place a moist paper towel on the tray. Be aware that the distribution of the seeds is not even, and seed amounts decrease as you move from the center of the spreader. It is important to count seeds at different distances from the center of the spreader.
If our quadrat is 1 ft², the target seeding rate is 37 seeds/ft². Move your quadrat away from the center until you find where seeding rate drops to 50% of the target seeding rate (19 seeds/ft²) and mark that width as your effective spreading band. If that width is 9 ft, it means that each run of the tractor is on 18-ft centers. Thus, there will be sufficient overlap to compensate for the reduced seeding rate towards the edge of the spreading band.
Example 4: Calibrating a Broadcast Spreader by Seed Weight
This can be done in the shop or in the field, but be aware that wind will affect your measurements. You will need a tarp or several trays (the number depends on the effective width of the spreader), a measuring tape, and a scale.
- First, we need to determine the speed at which we will be operating and the effective width of the broadcast spreader. Some tractors have a speedometer or speed charts. Alternatively, you can measure the speed by timing the travel between two stakes 100 ft apart. Divide 100 by the time taken and you will have the speed in fps. An adequate speed would be around 5 mph, or 7.33 fps (1 mph = 1.467 fps). Choose a gear that, at 540 revolutions at the PTO, will give that speed.
- Load some seed, turn the PTO, and open the seed gate. Measure how far the seeds are spread.
- Calculate the area covered in 20 seconds. If the effective width is 21 ft from edge to edge of the broadcasting band and the tractor is traveling at 7.33 fps, then we would cover 3,079 ft² in 20 seconds.
Equation 5
Equation 5.1
- Calculate the amount of seed that needs to be dropped in 20 seconds. If we are seeding at a rate of 90 lb/acre (0.002 lb/ft²), then in 3,079 ft² we need 6.16 lb of seeds.
- For pendulum spreaders, attach a bag to collect the seeds on the spout or remove it and tie it to the base where the spout is attached. Turn on the PTO, set to 540 rpm, and open the seed gate for 20 seconds. Weigh the seeds in the bag. For rotatory spreaders, the best way is to use a tarp held around the spreader or on the ground to collect the seeds. Make sure you have a tarp large enough to hold all of the seeds or you may underestimate your seeding rate. Alternatively, a known amount of seed can be added to the spreader, and time taken to broadcast all seed can be measured. This provides the flow in lb/second. Using the current example, our target flow would be 0.31 lb/second.
Calculating Overlap
Effective width and distribution pattern can vary depending on the type, size, and density of the material being applied (Figure 2). This is true for different seeds as well as fertilizers or lime. Denser materials will be spread farther and more evenly than light seeds or lime. To compensate for variation in the rate at different distances from the center of the spreader, we need to overlap passes (Figure 3). Some user manuals already list the effective width and overlap for different materials, but it is always a good idea to verify them since several factors (e.g., wear of the equipment and grain size) can affect them. To calculate the overlap, we need to test the pattern of distribution: spread around ten 12- to 24-in trays perpendicular to the travel direction at different distances from the center of the spreader and to both sides. Turn on the PTO, open the seed gate, and drive over the trays at the determined field speed. Weigh or count the seeds in each tray and use the central trays as reference (100%). The effective width is at the point where seeding rate drops to 50%. You may also want to check for evenness of distribution (if the trays on both sides of the spreader receive the same amount of seeds). Rotatory spreaders, especially used ones, can throw more seeds to one side than to the other. This should be considered when determining the overlap and application pattern in the field. In that case, the distance between passes can be variable (Figure 4).

Credit: Marcelo Wallau, UF/IFAS
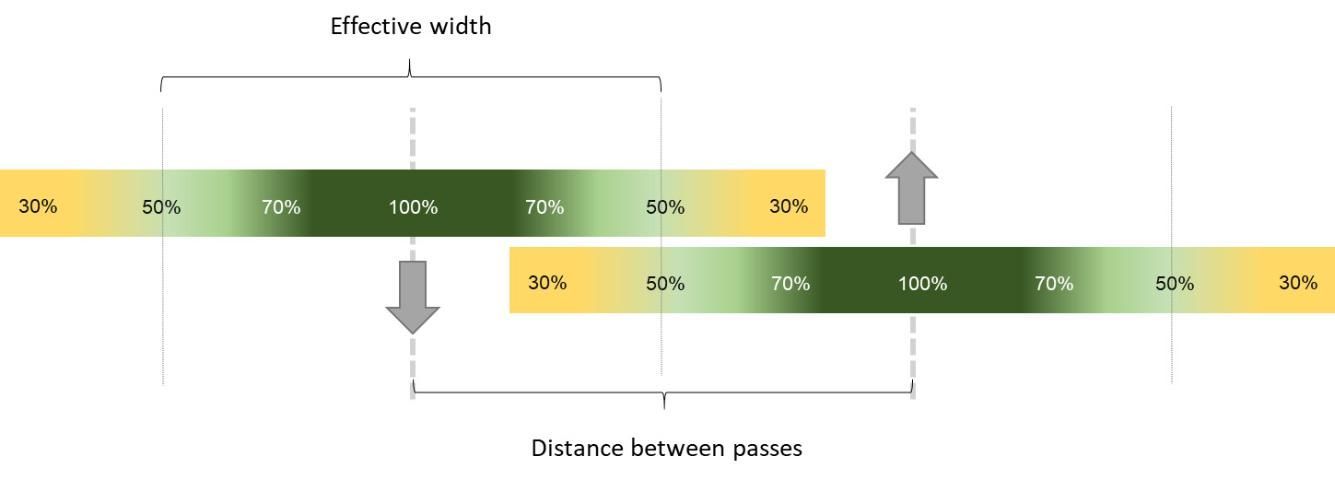
Credit: Marcelo Wallau, UF/IFAS
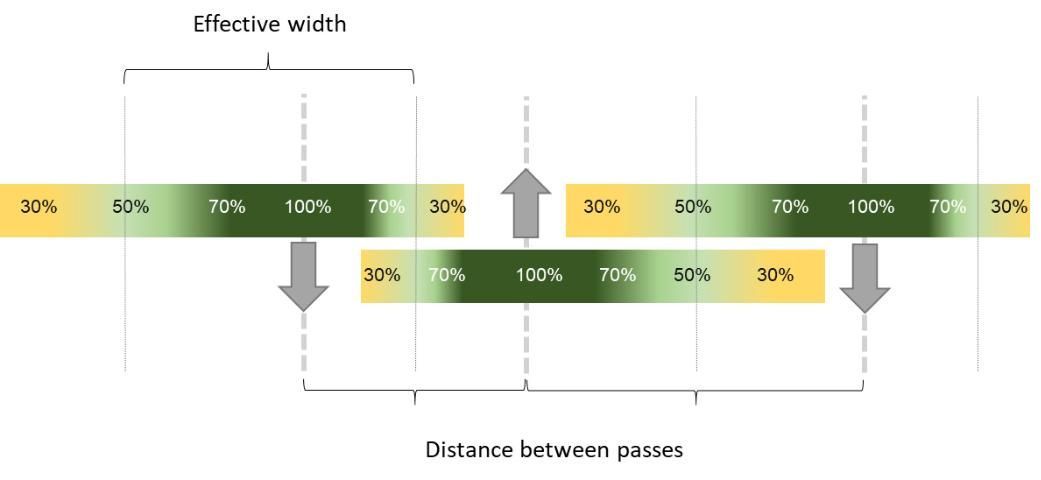
Credit: Marcelo Wallau, UF/IFAS
Additional Tips
- When using mixed seeds, always calibrate. Do not follow seeding rate charts on equipment when using mixed seeds because seeds of different sizes will affect the speed of the flow through the seedbox gate (Figure 5).
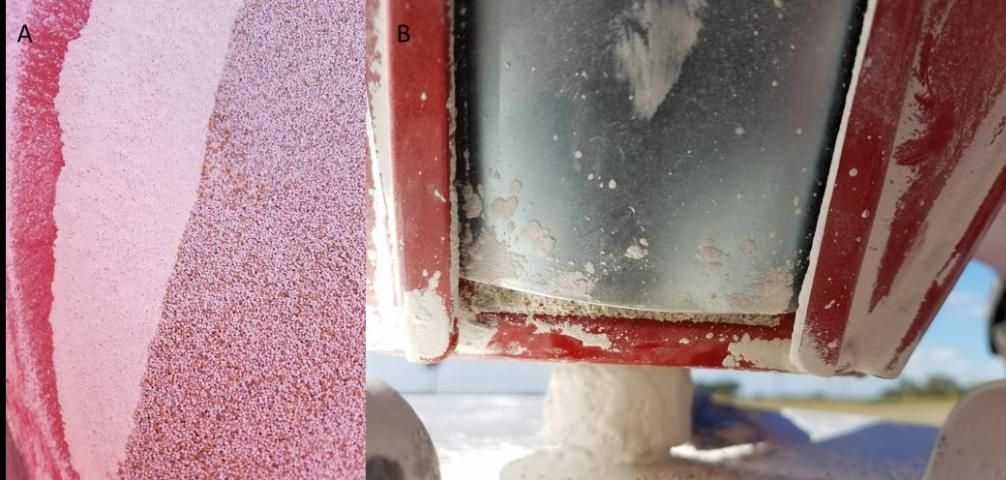
- When using a spreader equipped with an agitator (generally recommended for fertilizers) to seed inoculated legumes, the agitator may scrape the coat off the seeds, clogging the seed gate (Figure 6). It may also reduce nodulation because of the reduced amount of bacteria in contact with the seed.
- Different seed shape and size will have distinct flow, distribution, and effective width. It is important to set your equipment every time you change products.
- Avoid using broadcast spreaders on windy days. The drift will affect your seeding rate.
- Calibration is a trial-and-error process. Always double-check the rate after finishing. Small errors in calculations or measurements can result in important losses of stand or excessive seeding rate.
- Grease the equipment before use and clean it afterward. Seed and especially fertilizer residue can damage the gears and make it harder or impossible to set the seeding rate.
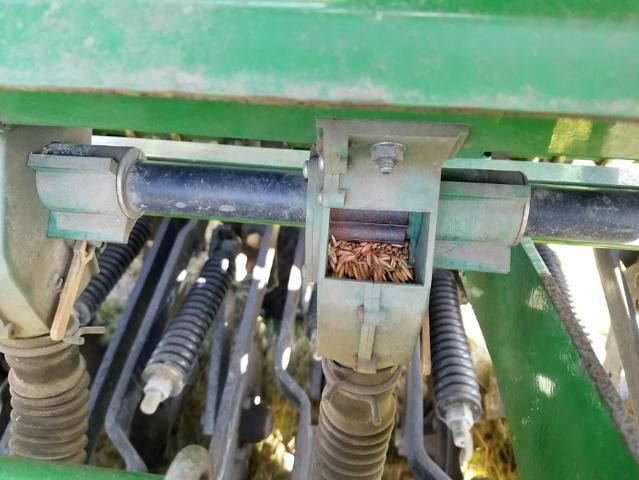
Credit: Marcelo Wallau, UF/IFAS
Credit: Marcelo Wallau, UF/IFAS
Reference
Parish, R. L. 1999. "Granular spreaders: Selection, calibration, testing, and use." Bulletin/Louisiana State University Agricultural Center: 1–68.
Table 1. Seeds per foot of row needed to achieve certain seed densities (15–60 seeds/ft2) from drills with various row widths.