For more lessons in the Third Grade Manatee Curriculum series, go to http://edis.ifas.ufl.edu/topic_series_third_grade_manatee_workbook.
Description
Students will hatch and observe the early life stages of brine shrimp to learn how changes in the environment affect the survival of animals. Since it is not feasible for students to conduct experiments with manatees, brine shrimp are used as a proxy to teach students how to design and conduct experiments.
Objective
By the end of the activity, students will be able to create a hypothesis and describe both independent and dependent variables.
Standards Addressed
Florida—SC.3.N.1.1; SC.3.N.1.3; SC.3.N.1.6
Vocabulary
Ecosystem, invertebrate, crustacean, salinity, independent and dependent variables, estimate, hypothesis, conclusion
Total Time
3–4 days (consecutive)
- Day 1: 50 minutes
- Day 2 or 3: 20 minutes
- Day 3 or 4: 50 minutes
You Will Need
- Four 1-liter bottles
- One vial of brine shrimp (a 6-gram vial is sufficient). Brine shrimp eggs are available through pet stores.
- Artificial sea salt from pet store (for salt water aquaria)
- Petri dishes (four for each group of 3–4 students)
- Plastic cups (bigger than 3 oz; four for each group)
- Graduated droppers (1 ml; four droppers for each group)
- Toothpicks (four for each group)
- Hand lens or magnifying glass
- Masking tape (four pieces for each group)
- Pens/pencils
- Rulers
- Paper
- Balance (for the teacher's use in making salt solutions)
- Copy of "Data sheet—Brine Shrimp Experiment" for each student
- Optional: Microscope
- Optional: Cafeteria serving trays; one for each group)
- Optional: Petri dish layout sheet (last page of Lesson 6; one per group of students)
Teacher Advance Preparation and Supplies Needed
Optimum salinity for brine shrimp hatching is around 15–30 parts per thousand (ppt). Most optimal hatching will occur at 15 ppt but will depend upon the quality of the brine shrimp eggs you purchase come from. You will need to mix up salt solutions for the students ahead of time.
Prepare Salt Solutions
- Use purchased water (distilled, spring, or drinking water is fine). Tap water is not recommended, because it may contain chlorine or chloramines, which will affect hatching of the brine shrimp.
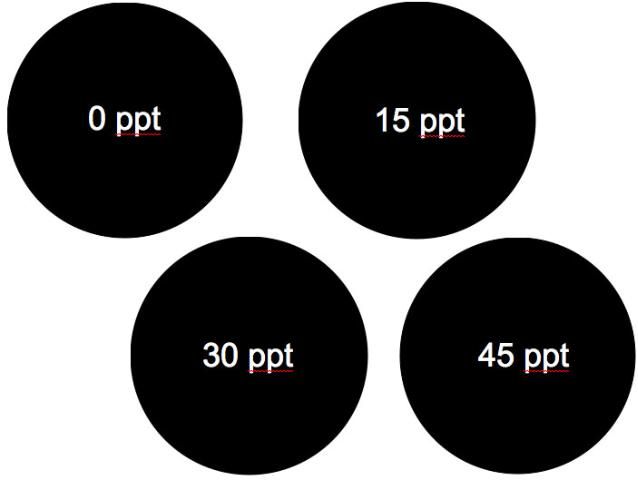
- To one liter (1 L) of water, add the following amounts of artificial sea salt to obtain the desired salinities (you will want 1 L of each):
- 0 ppt = 0 grams salt
- 15 ppt = 15 grams salt
- 30 ppt = 30 grams salt
- 45 ppt = 45 grams salt
3. Although not required, you can use a hydrometer (which is available at pet stores in the aquarium section) to test the salinity. However, you can simply trust the weights to give you accurate solutions.
4. Label cups with 0, 15, 30 and 45 ppt for each group.
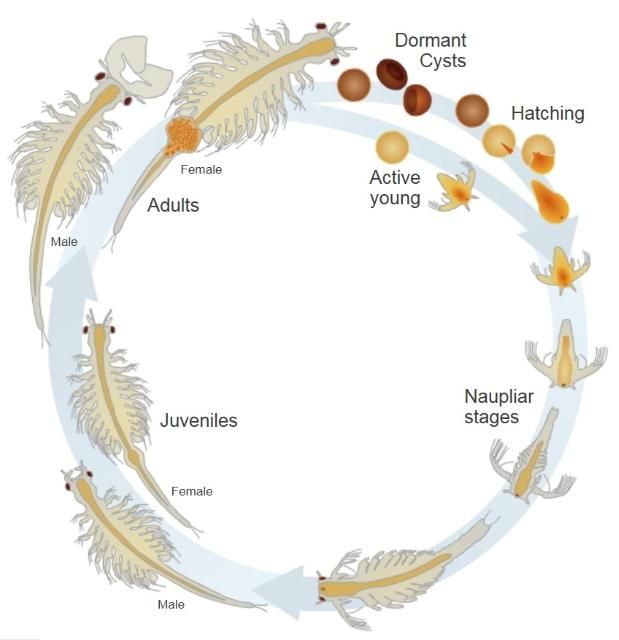
Brine Shrimp Life Cycle

Credit: Genetic Science Learning Center, University of Utah (http://learn.genetics.utah.edu)
Cool Things to Tell the Class about Brine Shrimp
- They can survive a wide range of temperatures: 6°C–35°C (43°F–95°F)
- They can survive high salinities: 70–240 ppt
a. The average salinity of the ocean is 35 ppt.
b. Brine shrimp have efficient systems to regulate salt.
3. Adults are 2–3 millimeters in length (about the size of a sesame seed) and the eggs are 200–300 micrometers (thousandths of a millimeter) in diameter (very small—less than the size of a grain of salt).
4. The very young embryos can live most of their lives inside a capsule in a dry state and without much oxygen.
5. Larvae molt about fifteen times after hatching.
6. By living in harsh environments, brine shrimp can avoid predators (they are very nutritious and delicious to bug-eating animals).
7. Brine shrimp are sometimes called "sea monkeys."
8. And they're not very good-looking.
Strategy
Day 1: 50-minute period
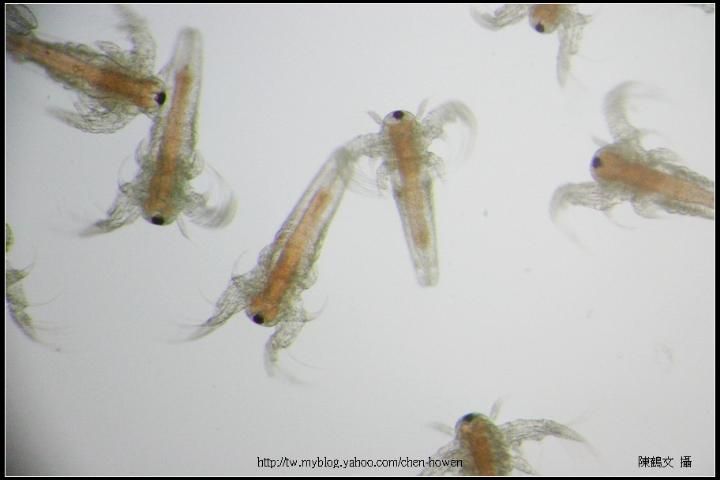
- Start the class by explaining to students that they will be conducting some experiments using animals called brine shrimp. Brine shrimp are very different from the types of shrimp that people eat. Share background information about brine shrimp with the class. You may want to use a projector to show students the picture of brine shrimp in Figure 1.
Background Information
Brine shrimp live and are harvested primarily from natural salt lakes and solar salt operations around the world; popular commercial sources for brine shrimp are the Great Salt Lake in Utah and San Francisco Bay in California. Adult brine shrimp are also called "sea monkeys." Brine shrimp are often used as live food for aquariums.
Brine shrimp (Artemia) belong to the group of animals called crustaceans. Other crustaceans include crabs, shrimp, and lobsters. Like other crustaceans, brine shrimp have an external "shell" that they grow out of several times throughout their life. When they outgrow their shell, they actually remove their body from the old shell, and then a new, larger shell will harden around their body. This process is called "molting."
The brine shrimp life cycle includes the production of cysts that can remain dormant for many years as long as they are kept dry. This is an adaptation for living in desert lakes which can completely dry out. When the cysts are placed in salt water, they are rehydrated and resume their development. After 15–20 hours under ideal conditions, the cysts burst and the embryo leaves the shell. The embryo will grow and progress through fifteen molts before reaching adulthood in approximately eight days. Adult brine shrimp average about 8 mm long, but can reach lengths of 20 mm.
2. Explain that all animals need certain things to grow and survive. The students will learn what brine shrimp need in order to hatch and survive.
3. Ask the students these key discussion questions:
a. What do you need to survive?
b. Do all animals need the same things to survive?
c. What is an ecosystem? How do ecosystems differ?
d. Why is an organism as small as a brine shrimp so important to an ecosystem?
e. What do brine shrimp need to survive?
4. Explain to the students that salinity (how salty the water is) is vital to the hatching and survival of brine shrimp. However, you are not certain what salinity will be the best for the brine shrimp to hatch in. Therefore, the class will conduct experiments to determine which salinity will cause the brine shrimp to hatch and survive the best. Explain to the students that brine shrimp need salty water in order to hatch. Avoid telling them the correct salinity needed for them to hatch.
5. Before conducting the experiment, review how to design an experiment. As a class, answer the following (you may want to keep these up on the board all week; or have them on something that can be projected on the last day):
a. Why are we doing the experiment? What's the PURPOSE? Answer: To show that the environment can affect organisms in an environment.
b. QUESTION: How does the amount of salt in solution affect the hatch rate of brine shrimp?
c. HYPOTHESIS: If I place brine shrimp in salt solutions that contain different amounts of salt, then I think ______________ because________________. (For example, what will happen? Will all the shrimp hatch in all the solutions?)
d. What is the Independent Variable (the thing we are going to change in the experiment)? Answer: The amount of salt used.
e. What is the Dependent Variable (the thing we are going to be able to measure, that should change based on the independent variable)? Answer: The hatch rate of the brine shrimp.
6. Explain that now that the students have an idea of what the purpose of the experiment is, they can begin the experiment.
7. Give each group of four students the following:
- four Petri dishes,
- four pieces of masking tape,
- four toothpicks,
- four droppers,
- four labeled cups (one for each salinity),
- a ruler,
- a pencil or pen,
- a cafeteria serving tray, and
- a copy of the Petri dish layout sheet (optional).
8. Ask students to place tape on the lids of each petri dish and use a pen or pencil to write 0, 15, 30, and 45 on the tape (each number on a different lid).
9. Partially fill the cups with the appropriate pre-mixed salt solution (students need about 4 oz of each).
10. Have students use the droppers to measure 20 mL of the 0 ppt solution into the appropriate petri dish. Students should place the lid on the Petri dish once it has 20 ml of liquid in it. Repeat for each of the solutions—15 ppt, 30 ppt, and 45 ppt. ALL OF THE SOLUTIONS WILL LOOK THE SAME, so it is very important that students put the correct lid on the correct Petri dish!
11. Students should measure and mark 0.6 cm on the toothpicks.
12. Students then dip the toothpick to the 0.6 cm mark in a solution and then dip it into the tube of brine shrimp. (You will bring the tube around for the students to dip into.) They will then take the toothpick (with brine shrimp eggs stuck to it) and dip it into the appropriate Petri dish (the one with the same salinity that was used to wet the toothpick), making sure to remove and replace the lid on the Petri dish. Once the toothpicks are marked, the dipping takes a short amount of time. Students should use a new toothpick for each salinity.
13. Have students write their names on the Petri dish layout sheet (or a blank sheet of paper). Place each group's Petri dishes on this paper in a safe place in the classroom (cafeteria trays work well for moving the Petri dishes around).
14. Have students complete the first section of the data sheet.
Days 2 or 3: 20–25 minutes
- Students will make observations of the brine shrimp in their Petri dishes. The brine shrimp will hatch in 24–48 hours, so the teacher will make a determination when the students should make their first observations (i.e., on day 2 or 3).
- Students should make qualitative (i.e., descriptive—what do they see?) observations on their data sheets during this time. They can work in their groups to observe the brine shrimp with microscopes (if available) and magnifying glasses. Students can remove the lids of the Petri dishes to make their observations, but warn them to make sure they put the correct lid back on the correct dish when they are done looking at it!
- Have the groups share their observations with the class.

Credit: Ho-Wen Chen (Flickr.com)
Day 3 or 4: 50-minute period
- Have the students observe the brine shrimp in their Petri dishes.
- Ask them if they can count the brine shrimp in any of the dishes. They should find that there are too many brine shrimp and that they move too quickly to count!
- Ask students if they can think of a way that they could come up with an estimate of the number of brine shrimp in the dishes. Suggest that if they were able to take a small sample from the Petri dish, they might be able to count the number of brine shrimp, and then use that small number to estimate the total number in the dish.
- Have students open one of the Petri dishes. Ask them to place the lid upside down (so there is a rim sticking up) next to the Petri dish. Have them suck up some of the water with a dropper, then drop ONE drop of this onto the inside of the lid. Ask each student to count how many brine shrimp are in that one drop (using a magnifying glass). Students should record their observations on the data sheet. The three or four counts will be averaged. (For advanced students: One drop is about 0.1 mL, so students can estimate the number of brine shrimp in 20 mL by multiplying the average number counted in the drop by 200.)
- Each group should provide their estimates for a master data table (this could be on the board, or projected so all can see). Discuss the data with the students—were each group's results similar? What factors could make them different? (There are many potential answers. For example, variability in eggs. Some samples may have had more eggs that didn't hatch. Brine shrimp are attracted to light, so if samples were taken from a spot in the dish that had more light, there might have been more brine shrimp there. Different people looking at the same sample could come up with different numbers. The examined drops may not have been representative of the overall dish.) Explain that scientists have many of these same sources of error and this is one reason that experiments should average the results of many trials.
- Have each group of students write a CONCLUSION (i.e., what was the result of the experiment?).
- As a class, discuss the following questions:
a. How does the amount of salt in a solution affect the hatch rate of brine shrimp?
b. Was your hypothesis accepted or rejected? Explain that it is normal for scientists to reject hypotheses; this does not mean that the students are "wrong." A hypothesis is just a guess.
c. What did you learn from conducting the experiment?
d. If you were to do this experiment again, what would you do differently?
e. What questions do you have that are still unanswered?
Note: For brine shrimp, their rapid swimming makes counting difficult. To examine which salinity worked, counting is not essential. Students should still be able to observe overall differences in the hatching Petri dishes. The Petri dish with 0 ppt should have no brine shrimp hatched, 15 and 30 ppt should have the best hatch rates, and 45 ppt should have a lower hatch rate.
Disposal of Brine Shrimp
After experiments are complete, you can freeze to humanely kill the brine shrimp and dispose of them in the trash or you can add them to an aquarium to feed the fish. DO NOT release brine shrimp into lakes, ponds, estuaries, or oceans, as they are non-native organisms to many ecosystems.
Online Resources
DATA SHEET—Brine Shrimp Experiment
Day 1: Fill out this first section of the data sheet
My name:
Other students in my group:
Date experiment was started:
What do brine shrimp eggs look like?
Do the different liquids in the Petri dishes look the same or different?
Day 2 or 3: Observations
Today's date is:
Use the magnifying glass to look at brine shrimp in one of the Petri dishes. Draw a picture of a brine shrimp in the space below.
What do you see the brine shrimp doing? (Are they swimming? Staying still? Eating?)
In which dish or dishes have the brine shrimp hatched?
Day 3 or 4: Counting brine shrimp
In this table, there is a space for your counts and also for the counts made by other people in your team. Write your name next to the word "ME." Write the name of different team members in each blank box under the "Observer" column. Put a drop of water from one of the Petri dishes into the lid from that dish. Use a magnifying glass to count the number of brine shrimp that you see in the drop of water. Write that number in the appropriate box (under the correct salinity). When you are done with all four salinities, work with the other members of your group to fill in the rest of the boxes (copy down the numbers from each person's sheet in the correct row).
Calculate the AVERAGE number of brine shrimp seen for each salinity. To find the average, add all of the numbers in one column (for example, under the 0 ppt). Divide this total by the number of observations (which equals the number of people in your group). Write the result in the Averages row for each salinity.
Discuss with your team: Did salinity affect the number of brine shrimp that hatched? How? Write your answers below as a CONCLUSION:
Our conclusion is that
Student names:
