Introduction
Determining when to dig is one of the most important economic decisions a grower must make. Peanut (Arachis hypogaea L.) poses a unique challenge for maturity determination because it is an indeterminate crop that forms pods underground. Indeterminate crops maintain vegetative growth while in reproductive stages, continually form new reproductive structures throughout the season, and make it difficult to time harvests. Determinate crops, such as corn or wheat, typically cease vegetative growth when they enter reproductive stages and senesce as they mature. As a result, these determinate crops mature evenly throughout the field, allowing for a relatively easy and accurate determination of optimal harvest timing. The continuous setting of new peanut pods throughout the season results in a wide range of pods in various stages of development at harvest. As pods mature, the secondary layer (mesocarp) changes color from white to a dark black (Table 1). The general progression of mesocarp color is similar across peanut market types; however, the associated days between stages may vary based on the maturity range of the particular cultivar. Peanut varieties are often categorized as medium (M: 133–139 days), medium-late (ML: 140–145 days), or late-maturing (L: 146–155 days). The numbers in Table 1 relate predominantly to runner types, since certain market types (e.g., Valencia) require a shorter growing season.
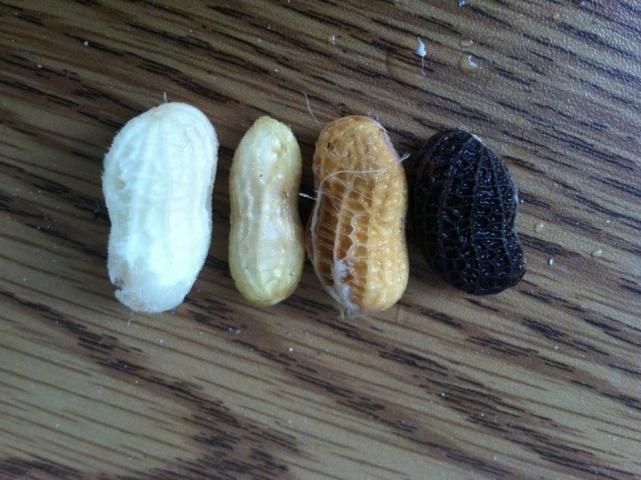
This color change can be observed by removing the outer layer (exocarp) through methods such as hand scraping or pressure washing with water. Color classes range from immature (white, yellow, and orange) to mature (brown and black) (Figure 1).
Credit: Ethan Carter, UF/IFAS
Significant yield, grade, and seed quality losses can occur if the crop is dug too early or too late. Immature pods will not produce the desired yield, grade, flavor, or subsequent crop performance. Overly mature pods may fall off the vine during digging or sprout in-shell in the field. In addition, the risk for aflatoxin contamination can increase with later harvest. Digging a week early or late can decrease yield by 500 lb/acre or more and reduce grade by several points, which would impact the grower's bottom line (Wright et al. 2000). The value of one point in TSMK% (grade) varies by a few cents each year. For the 2019 crop year, one point in grade was worth $4.74/ton for runner type peanuts, and the monetary value associated with a five-point grade difference was $23.70/ton (USDA 2019).
Maturity Assessment Methods
Many growers, Extension personnel, and crop consultants struggle with accurately gauging maturity to determine an appropriate digging date. Common inaccurate methods include digging based on a neighbor's timeline as well as relying solely on days after planting (DAP). Other factors include failure to consider the different developmental rates of crops that are irrigated vs. non-irrigated, differential levels of disease and stress, or inherent differences in the rates of maturity among cultivars.
Peanut maturity is gauged by several methods, including, but not limited to, DAP, the shellout method, arginine maturity index, seed-hull maturity index, thermal time, calculation of a maturity ratio, and the maturity profile board (MPB) (Sanders et al. 1980; Rowland et al. 2006). Of these methods, the shellout, DAP, maturity ratio, and MPB techniques can be easily applied with minimal use of equipment or technology.
The shellout method is one that has been historically used by growers as a general measure of crop maturity. This method involves shelling pods to observe the interior color of the pod (Sanders et al. 1980). Mature pods have darker interiors due to aged veins and cell death. Some coloration of the seed coat may also occur in the most mature pods (Miller and Burns 1971).
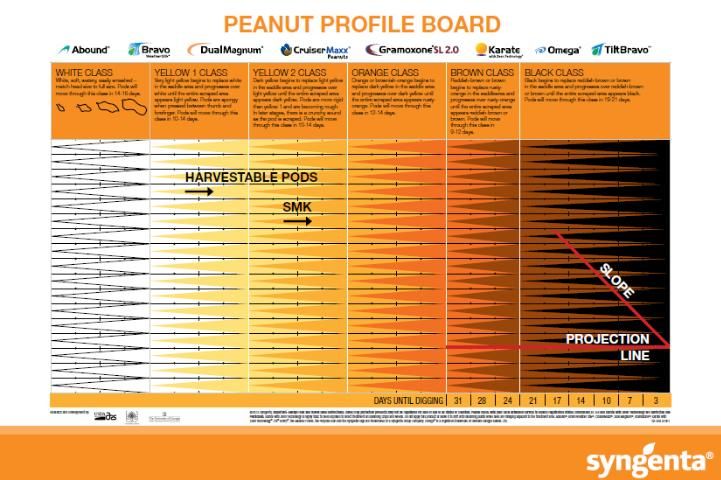
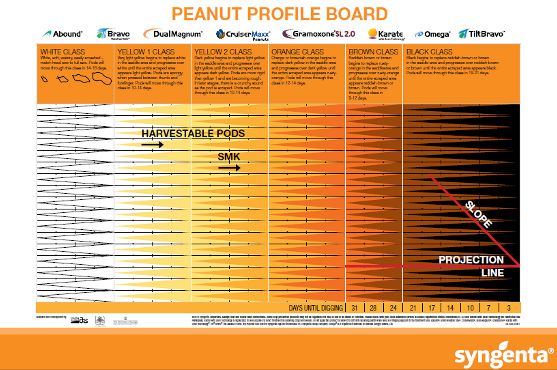
Recently, the MPB, based on the work of Williams and Drexler (1981), has been the most popular and widely used method. The MPB is a visual tool for pod classification that graphically interprets pod maturity. It consists of 25 categories based on mesocarp color variations within the five major color classes (listed from most immature to mature): white, yellow 1, yellow 2, orange, brown, and black (Figure 2).
Credit: Williams and Drexler (1981)
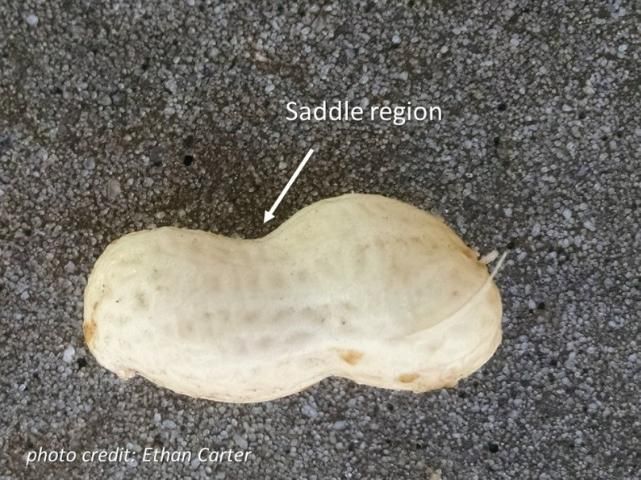
The exocarp must first be removed in order to access the mesocarp and visually classify pods according to their mesocarp color. The exocarp can be removed by pressure washing with water, using abrasion, or hand scraping the hull (Williams and Drexler 1981; Williams 2003). Pods are placed in colored columns corresponding to the color of the saddle region (Figure 3).
Credit: Ethan Carter, UF/IFAS
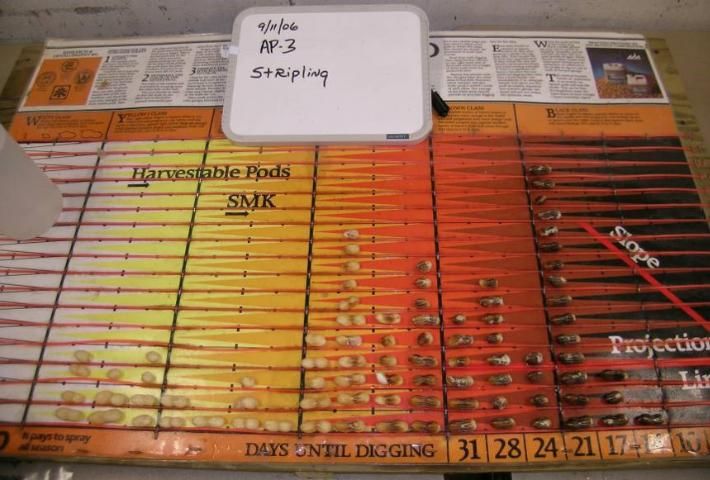
Color changes across the entire pod happen gradually, but they first develop in the saddle region, which is the foundation for the MPB. At the bottom of the columns on the MPB, the estimated days until digging are projected, corresponding to the distribution of pod maturity (Figure 2). After placing peanuts on the MPB, the grower typically determines when to dig by choosing the column on the MPB farthest to the right that has at least three pods categorized as this single color class. The number below this column represents the recommended number of days before digging should commence. For example, in Figure 4, the farthest right column with three pods indicates a recommended harvest in 17 days.
Credit: Wilson Faircloth, Syngenta
The MPB is effective in showing the distribution of pod maturity, i.e., if they are maturing uniformly or have a bimodal distribution. A bimodal distribution occurs when pods mature in two groups with few in-between. One group is typically immature, and the other is more mature. The bimodal distribution or split crop is a condition often caused by drought or other extreme weather events when the maturity of the crop slows or nearly ceases. This can be represented by a peak of pods within the more immature categories (white and yellow) and a peak within the more mature categories (brown and black) (Figure 5). In this type of situation, a grower must decide whether to harvest the more mature group or wait and harvest the second group once it reaches maturity.
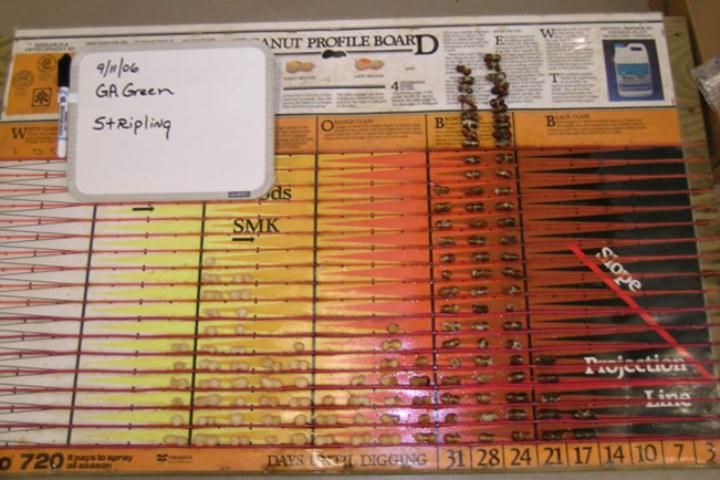
Credit: Wilson Faircloth, Syngenta
Although the MPB is widely used in the industry, it has its weaknesses. It is time-consuming and tends to require several sample collections to accurately predict maturity before the crop is ready for harvest. Separating pods by color is highly subjective because it relies on visual color differentiation that can vary dramatically among individuals. There is also some indication that the MPB may not be applicable to new cultivars because it was designed for the mid-maturing cultivar 'Florunner', a cultivar not commercially produced in the United States for several decades (Rowland et al. 2006).
Less subjective methods for gauging maturity include the calculation of a maturity ratio and thermal time. A maturity ratio can be calculated by adding the combined number of pods from the brown and black classes and dividing the sum by the total number of pods in the blasted sample (not the original number of 180–200, which included match heads). An optimal harvest is considered when a sample has a mature (brown and black) percentage of 70% or higher (Rowland et al. 2006).
It is also possible to accurately predict maturity for peanut cultivars using thermal time because temperature is a major factor that drives plant development (Ketring and Wheless 1989). Thermal time, or growing degree days (GDD), objectively tracks maturity without pod sampling. The value for adjusted GDD (aGDD) is calculated by taking into account the maximum and minimum temperatures as well as rainfall and irrigation received. The study conducted by Rowland et al. (2006) compared ten degree day models using stepwise regression models. This study resulted in the development of a new method to assess maturity through the utilization and modification of existing degree day models and found that yield and net value peaked at about 2500 aGDD (Rowland et al. 2006).
Steps for Collecting and Evaluating a Maturity Sample
The following step-by-step instructions are provided for sampling and evaluating crop maturity through calculation of a maturity ratio as well as use of MPB, because these are the most common methods used by growers.
Maturity Handout
Proper Collection and Evaluation of a Peanut Maturity Sample
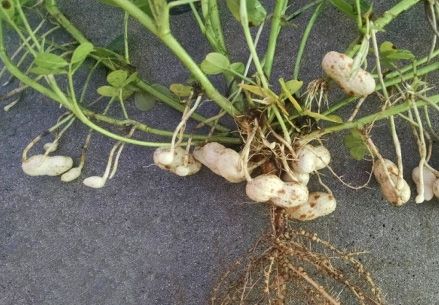
Step 1. Collect and bag 4–5 plants (or enough to produce 180–200 pods) in random places throughout the field. Be sure to collect whole plants as your sample will otherwise be inaccurate. If multiple peanut varieties or soil types are present in the same field, separate samples should be collected. If you know that certain areas of the field have not performed like the others through the season, take separate samples from those locations. Avoid collecting at end or edge rows (first image on right) and deficient areas.
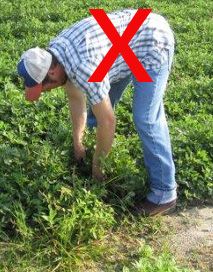
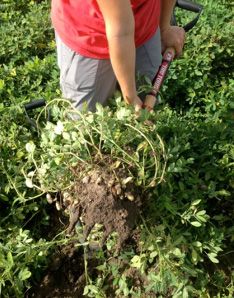
Step 2. Starting with the first plant remove all pods from matchheads (when tip of peg is swollen) to fully developed pods (keeping them separated), and continue with subsequent plants until you have 180–200 pods. If you start a plant you must pick it clean, regardless of the number of pods collected thus far.
Step 3. After reaching 180–200 pods, discard the match heads because they will not be blasted, but be sure to know the total number of pods blasted (this number will be needed if doing a maturity proportion over boarding).
Credit: Ethan Carter
Step 4. Make a wire basket from 1/4 inch mesh hardware cloth to contain the pods during blasting. Fasten the hardware cloth together at the sides with wire or zip ties, it should have a diameter small enough to fit inside a 5 gallon bucket to prevent splashing (drill holes or have it equipped with a drain to prevent it from filling with water). The samples can be blasted with water using a pressure washer to easily remove the exocarp. Hold the nozzle approx. 12 inches from the pods in the basket when blasting, stop and collect the immature pods that have the mesocarp exposed (white and yellow) about 30 seconds into blasting so they are not destroyed, and then finish blasting the more mature pods.
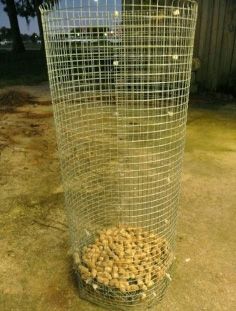
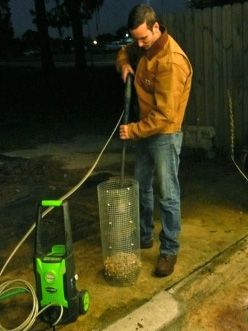
Potential Evaluation Methods for a Peanut Maturity Sample
Maturity Ratio
Calculate one sample at a time by summing the combined number of pods from the brown and black classes, dividing that number by the total number of pods from the blasted sample (not the larger number that included matchheads), and then multiplying by 100 to convert it to a percent. Average ratios from the samples collected in the same field to determine if there is an optimal field maturity of 70% or more.
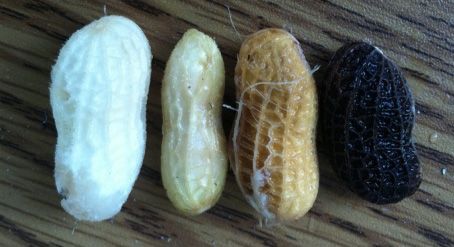
Credit: Ethan Carter, UF/IFAS
Maturity Profile Board
Lay the pods on the board one sample at a time using the color of the saddle to place them within the chart columns to determine the days until digging. This option allows you to see how whether or not the field has a bimodal distribution with many pods being in both the very immature and mature ranges, with few being in the middle. Once the pods have been laid out, an estimated days until digging can be viewed on the bottom right side of the board. Boarding a sample will take about 15–20 minutes.
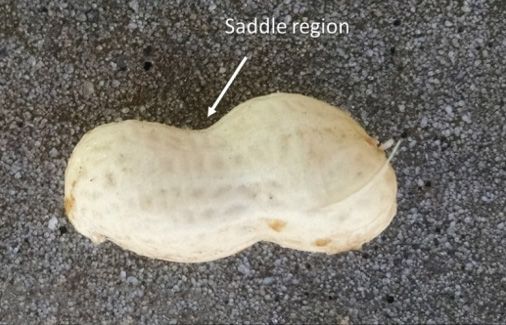
Credit: Ethan Carter
Collecting a Maturity Sample
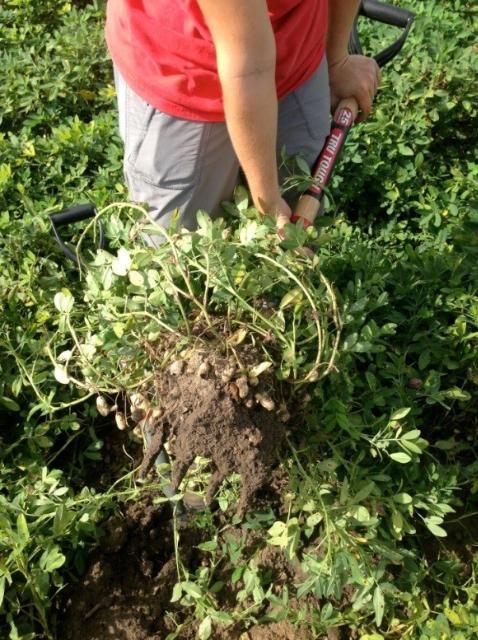
- For each sample, collect and bag four or five plants (or enough to produce 180–200 pods) from random places throughout the field. Be sure to collect whole plants, or the accuracy of your results will be compromised (Figure 6).
Credit: Andy Schreffler, UF/IFAS
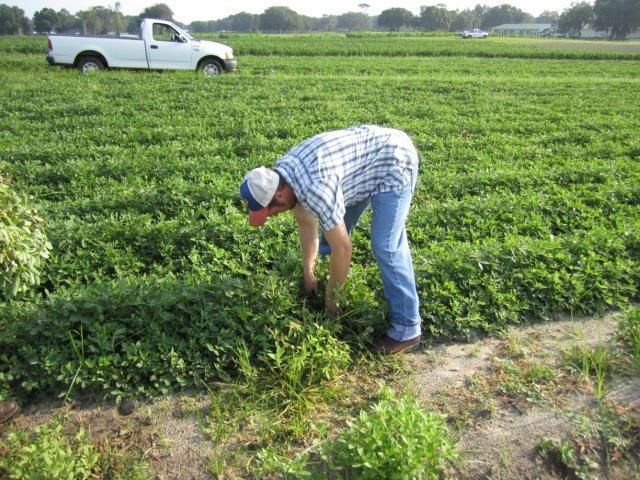
- If multiple peanut varieties or soil types are present in the same field, separate representative samples for each condition should be collected. If you know that certain areas of the field have not performed like the others through the season, take separate samples from those locations. Avoid collecting at end or edge rows and mixing areas of deficient plants with representative ones (Figure 7).
Credit: Andy Schreffler, UF/IFAS
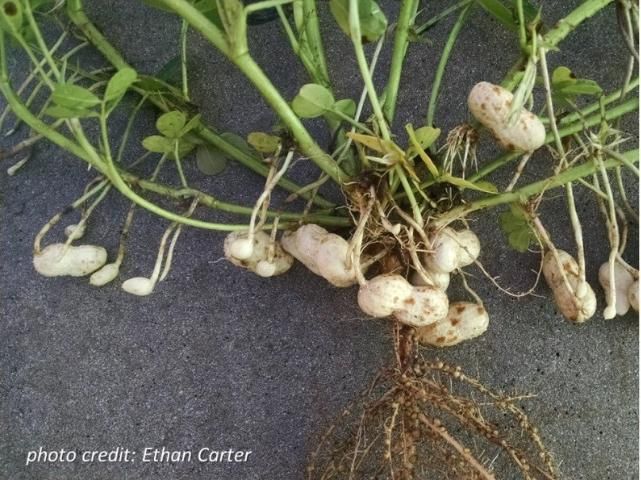
- For each sample, starting with the first plant, remove all pods, from match heads (when tip of peg is swollen) to fully developed pods. Continue with subsequent plants until you have 180–200 pods. If you start a plant, you must pick it clean, regardless of the number of pods collected thus far (Figure 8).
Credit: Ethan Carter, UF/IFAS
- For each sample, once you have reached 180–200 pods, discard the match heads. They will not be blasted.
Removal of Exocarp (Outer Layer)
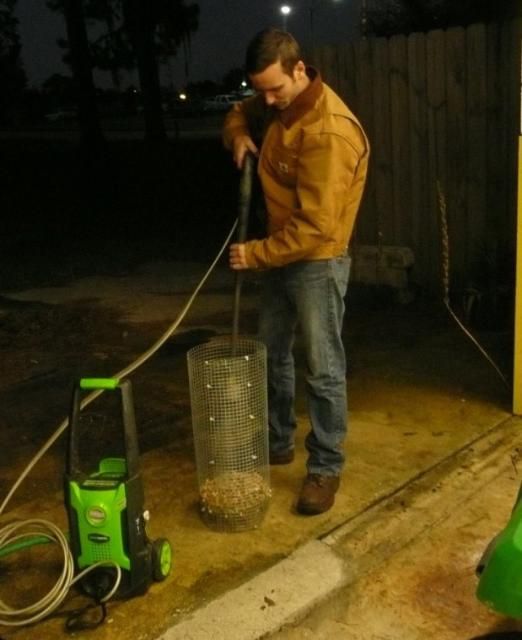
This can be performed in several ways, but blasting with water using a pressure washer and turbo nozzle has become a primary method (Figure 9).
Credit: Kelly Racette, UF/IFAS
It is faster and more accurate than hand scraping the hull. An electric pressure washer between 1000 and 1500 psi is adequate. Models with higher pressure should be used with a pressure regulator or throttle to avoid damaging the pods.
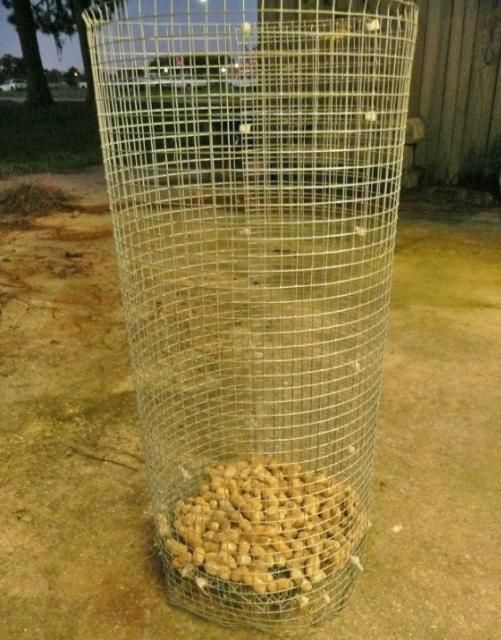
- Make a wire basket from 0.25-inch mesh hardware cloth to contain the pods during blasting. The hardware cloth can be fastened together at the sides with wire or zip ties (Figure 10). It should also have a diameter small enough to fit inside a five-gallon bucket to prevent splashing.
Credit: Kelly Racette, UF/IFAS
- A round container should also be fashioned out of hardware cloth and attached to the body of the basket with zip ties a few inches from the bottom to hold the sample. This basket should be placed in a bucket that has holes drilled in the bottom or a drain to prevent the bucket from filling with water.
- Hold the nozzle approximately 12 inches from the pods in the basket when blasting. Stop and collect the immature pods that have their white and yellow mesocarp exposed about 30 seconds into blasting so they are not destroyed, and then finish blasting the more mature pods.
Evaluating the Sample
There are several ways to determine maturity by evaluating the blasted pods' colors, but each method has limitations. Calculation of a maturity ratio will suffice if the samples taken from a field average 70%, an optimal level of maturity for harvest, or higher. If the average of a field's maturity proportion is under 70%, the samples may need to be placed on the MPB to determine a prediction for harvest date.
- Calculation of the maturity ratio: Add the combined number of pods from the brown and black classes, then divide by the total number of pods from the blasted sample (not the number that included match heads). Only average samples collected from the same field. This will determine if the field has an optimal maturity of 70% or more.
- MPB: Place the pods using the color chart to determine the days until digging. This is most likely the best option if you have a bimodal distribution with many immature and mature pods and few in the middle. Boarding a sample will take about 15–20 minutes.
For more information, contact your local UF/IFAS Extension office.
References
Colvin, B. C., D. L. Rowland, J. A. Ferrell, and W. H. Faircloth. 2014. "Development of digital analysis system to evaluate peanut maturity." Peanut Science 41: 8–16.
Ketring, D. L., and T. G. Wheless. 1989. "Thermal time requirements for phenological development of peanut." Agronomy Journal 81: 910–917.
Miller, O., and E. Burns. 1971. "Internal color of Spanish peanut hulls as an index of kernel maturity." Journal of Food Science 36: 669–670
Rowland, D. L., R. B. Sorensen, C. L. Butts, and W. H. Faircloth. 2006. "Determination of maturity and degree day indices and their success in predicting peanut maturity." Peanut Science 33: 125–136.
Sanders, T. H., J. A. Lansden, R. L. Greene, J. S. Drexler, and E. J. Williams. 1982. "Oil characteristics of peanut fruit separated by a nondestructive maturity classification method." Peanut Science 9: 20–23.
Sanders, T. H., E. J. Williams, A. M. Schubert, and H. E. Pattee. 1980. "Peanut maturity method evaluations. I. Southeast." Peanut Science 7: 78–82.
USDA Farm Service Agency. 2019. "Peanut buyers and handlers program buidelines for 2019 and subsequent crop years." USDA Farm Service Agency. Accessed on January 5, 2019. https://www.fsa.usda.gov/Internet/FSA_File/1ppg-a1.pdf
Williams, E. J. 2003. "A simple, quick, inexpensive peanut blaster." University of Georgia. Accessed on January 15, 2016. http://athenaeum.libs.uga.edu/xmlui/bitstream/handle/10724/33345/A%20Blaster%20Bulletin.pdf?sequence=1
Williams, E. J., and J. S. Drexler. 1981. "A non-destructive method for determining peanut pod maturity." Peanut Science 8: 134–141.
Wright, D. L., B. Tillman, J. Marois, J. A. Ferrell, and N. DuFault. 2000. Management and Cultural Practices for Peanuts. AA258. Gainesville: University of Florida Institute of Food and Agricultural Sciences. https://edis.ifas.ufl.edu/aa258