This publication is best viewed online in pdf format, https://edis.ifas.ufl.edu/pdffiles/AN/AN17300.pdf.
This section includes pages 43–73 of the complete handbook.
- Injection Site Management
- Best Management Practices - Injections
- Residue Avoidance
- Preventative Herd Health Plan
- Best Management Practices—Antibiotic Use
- Best Management Practices—Medicated Feeds
- Best Management Practices—Chemical Residues
- Best Management Practices—Feed Contaminants
- Best Management Practices—Ruminant By-products
- Best Management Practices—Beef Measles
- Best Management Practices—Feed Toxins
- Foreign Object Avoidance
- Best Management Practices—Birdshot/Buckshot
- Best Management Practices—Feed Records
- Best Management Practices—Broken Needles
All sections of the handbook are listed at https://edis.ifas.ufl.edu/collections/book_bsqa
For years, our industry expected feeders and packers to "manage out" many problems created in the cow-calf and stocker segments. Over time, though, we discovered that management and handling by the feeder, packer, purveyor, retailer, and consumer—at best—can only be as good as the product provided. The real impact on beef quality comes from daily decisions made at the cow-calf and stocker levels of our industry. One example of this "it's not my problem" perspective is automatically laying the blame for cattle that don't grade USDA Choice on feedyard management, grain type, days on feed, improper chill time, poor USDA graders, and so on.
Your Role in Quality Management
Carcass characteristics, performance, and eating quality are all established when bulls are purchased and breeding programs designed. That means cow-calf producers have the ultimate responsibility to provide calves and cull cattle that are as free of inherent defects as reasonably possible.
Regardless of the type of cows used in your breeding herd, sires must complement the herd to provide a sound genetic base for health, performance, and carcass characteristics.
It's not possible to utilize management (feed, vaccine, preconditioning, etc.) to overcome poor genetics; therefore, genetic decisions are the first step in quality control.
Stocker cattle operators should purchase calves with the potential to hit targets of the cattle feeding, packing and retailing segments, and manage them to maintain or enhance quality. Cattle purchased and managed in stocker operations should produce feeder cattle with minimal quality defects.
Management practices and decisions at both the cow-calf and stocker levels can influence carcass weight and cause defects. Temperament and behavior created by improper handling can affect feedyard performance, create bruising and dark-cutting carcasses.
Stocker operators and cattle feeders usually cannot directly affect breeding decisions, but their buying decisions affect the demand and price for different types of cattle. These market signals can indirectly affect the breeding and management decisions of calf producers. As an example, the number of "black" calves has increased in the last few years. Why?
Market studies in Kansas and Oklahoma have found that black calves received higher prices at auction. This signal (whether right, wrong or indifferent) is partially responsible for the increased use of sires with black color. This fact isn't an advertisement for black cattle; it simply illustrates how market signals are passed back down the system to cow-calf producers.
Obviously, there are numerous other signals in the market. The key is to recognize what the market is placing value on (or not) and determine what that means to your particular operation.
Identifying Quality Control Points in Cow-Calf and Stocker Operations
Eliminating the possibility of food safety risks by management of critical control points has already been outlined in detail. The same thought and management processes need to be employed in quality management. The points in the production chain that can influence cattle health and performance and the eating quality of beef are referred to as "Quality Control Points."
Without effective genetic, nutrition and health management, cattle are more likely to get sick and require treatment—exposing the operation and industry to potential food safety risks. Therefore, managing quality control points facilitates management of food safety control points.
The challenge is in identifying quality control points that your operation can control and adjusting your management strategies to maintain or enhance quality. Many common points exist for all operations. However, in addition to these common points, listed below, each producer should identify and manage other quality control points unique to his/her particular operation.
Management Approaches for Quality Control Points
Quality concerns fall under these five areas:
- Breeding and genetic selection
- Benchmarking
- Breeding stock selection
- Sire selection
- Replacement females
- Breeding system considerations
2. Utilization of animal health products and practices
- Injection site management
- Vaccine handling and administration
- Implant utilization and recommendations
- Parasite control
3. Processing/cattle handling
- Calf management practices
- Branding
- Cattle behavior and facility design
4. Nutrition
- Immune system
- General health
- Weaning nutritional management
- Nutritional stress
5. Culling management
- Cancer eye
- Horns
- Branding
- Lameness
- Inadequate muscling/excessive fat
- Bruising
Breeding and Genetic Selection
Benchmarking
In developing breeding programs to meet industry and consumer demands for beef, it's first necessary to understand the targets established by the industry. These targets will allow the beef industry, overall, to meet requirements for portion size, different marbling preferences and efficiency in the packing industry. Luckily, these targets are within easy and reasonable reach of the cow-calf sector across a wide array of production areas.
Knowing where to aim is only part of the information necessary to develop a sound breeding program. All cattle do not have to hit one specific target. There are several targets in today's beef production system, including markets for high-yielding cattle, high-quality grading cattle, extra-lean cattle, "all-natural" cattle and other niches.
The majority of cattle needed to fit industry demands will be cattle that hit within desirable ranges for quality, yield and muscling. Producers throughout Texas can produce calves and yearlings that meet these targets. Furthermore, relationships between frame size and harvest weight allow producers to design breeding programs that produce calves for a specific target.
Feedyard industry trends point to an increasing number of fed cattle marketed in a system that values cattle based on carcass weight and USDA Quality Grades and USDA Yield Grades. This system penalizes cattle that don't hit specified targets.
For example, price discrimination is increasing for Yield Grade 4 and 5 carcasses as the industry continues to emphasize red meat yield. Also, cattle producing carcasses that are too large or too small cause problems with retail portion sizes, so they are also discounted. And, obviously, carcasses that grade Standard are discounted.
Genetics vs. Environment
Carcass traits are moderately to highly heritable. Higher heritability implies that predictable and permanent genetic change can result from selection for improved carcass traits. However, "environment" influences the expression of genetic potential. And, although selection can alter the genetic potential for carcass traits, management can influence expression of these traits as the calf moves from the ranch through finishing and harvest.
For instance, the genetic potential for carcass weight, red meat yield and marbling are set at conception. However, the age and weight when a beef animal is placed in a finishing program and the growth promotants used during that time can affect carcass weight. Similarly, cattle can be fed to different degrees of fatness, which affects red meat yield from the carcass.
Marbling is influenced by growth promotants, days on feed prior to harvest, health, genetics and other factors. So, cow-calf producers determine genetic potential with their selection and breeding programs. Management of the calf from birth to harvest then influences the expression of genetic potential; but, it's difficult, and in most cases impossible, to enhance desirable traits through management if cattle lack the genetic potential to do it.
Most selection and breeding programs lack information about the performance and carcass traits of their calves and stocker cattle after they leave the ranch. Many breeding decisions are made without knowledge of what changes, if any, are needed or are the most beneficial to the operation.
To effectively measure change, benchmarks must be established. Benchmarking is accomplished by collecting performance and carcass information on calves and stocker cattle after they leave the ranch.
Networking with calf buyers, stocker operators and feed yards that purchase your calves and feeder cattle is another way to find out how your cattle perform past the ranch gate. In recent years, carcass traits have been the focus of many information feedback programs. However, performance characteristics, such as daily weight gain, feed efficiency and health are also "quality" factors that should be included in your portfolio of information. As the industry adopts electronic ID as a means of tracking animals through the production phases, collection of this performance and carcass information will become common place.
Selecting Breeding Stock
Sire Selection
Practice balanced trait selection when designing breeding programs and purchasing herd sires. With the industry's focus on carcass quality, it's easy to forget the most important characteristic of the cow herd—reproductive and production efficiency.
It's been estimated that the relative economic value of reproduction is five times more important than production (growth) and 10 times more important than carcass merit. With the current emphasis on carcass traits, it's easy to forget that cows must match their production environment.
Sire selection, emphasis should be given to sire selection because of the bull's ability to produce multiple offspring in one year. In mating systems that retain replacement females, 87.5% of the genetics in the cow herd (after three generations) can be traced to the sires utilized.
In a terminal crossbreeding system, bulls should be selected to best match industry targets for growth and carcass characteristics. If replacement heifers are being produced, sire selection should emphasize maternal traits, with secondary emphasis on growth and carcass traits.
Selection emphasis for specific traits should be based upon benchmark data collected by producers and the market for which cattle are targeted. If carcass traits need to be changed, information is available to help select suitable herd sires. For example, most breeds are collecting EPDs (Expected Progeny Differences) for carcass traits, such as carcass weight, marbling, rib eye area and fat thickness.
However, though EPDs are the best indicator of genetic potential, predictability of change depends on the trait, breed and number of progeny records.
Replacement Female Considerations
Although most carcass merit improvement results from sire selection, female selection and management also contribute significantly to uniformity and carcass traits in your calf crop.
Uniformity in a calf crop becomes increasingly important when you can market your calves in multiple-head lots and take advantage of higher prices that are generally paid for load lots.
Narrowing the breeding season, culling extremes in cow size and breed type, and selecting for a consistent color pattern can improve your calf-crop uniformity.
Breeding System Considerations
All breeds have relative strengths and weaknesses. More rapid genetic change can be made by selecting a breed type that generally excels in traits of interest, as opposed to selection within a breed for the same traits. For instance, if you desire to increase the marbling ability of your calves, utilize sires from a high-marbling breed instead of searching for high-marbling sires in a breed that's not noted for marbling.
As a general rule, the following (documented) breed type characteristics allow producers to combine breeds to best suit their production environment. English breeds, on average, will produce calves with a greater propensity to marble. Bos indicus type cows, on average, are more fertile and have greater longevity. Continental breeds produce faster, gaining heavier muscled, larger framed cattle.
In much of Florida, a calf that is produced by a combination of two or three of these breed types can hit carcass targets and produce heifers that fit their production environment. The most appropriate combinations of breed type vary across the state.
As a general rule, logical breed combinations for market calves would include a minimum of ¼ English, maximum ½ Continental, no more than1/4 Bos indicus and no more than ¼ Dairy. Calves with these breed specifications provide an acceptable mix of growth, muscling and marbling and avoid many of the discounts resulting from buyer perceptions.
The Target
Ribeye area 14 sq in
Carcass wt. 775 lb
Live Wt. 1225 lb
Backfat 0.4 in
Yield Grade 2.0
Quality Grade Ch
14 in2 REA/1.8 in2 per cwt carcass = 778 lb
778 lb carcass/63.5 (DP) = 1225 lb live wt.
Utilization of Animal Health Products and Practices
Injection Site Management
The administration of practically all inject able animal health products can cause tissue irritation and result in an injection site lesion. There are three types of lesions that result from injections: active fluid-filled, woody callous, and discoloration.
The first type, an active fluid-filled lesion, is the result of a) an accumulation of white blood cells and fluid (immune response to the product) or, b) an abscess due to improper injection techniques. Public perception often refers to these lesions as "tumors." The incidence of active, fluid-filled lesions has dropped significantly since it was targeted with a national education and awareness campaign in 1991.
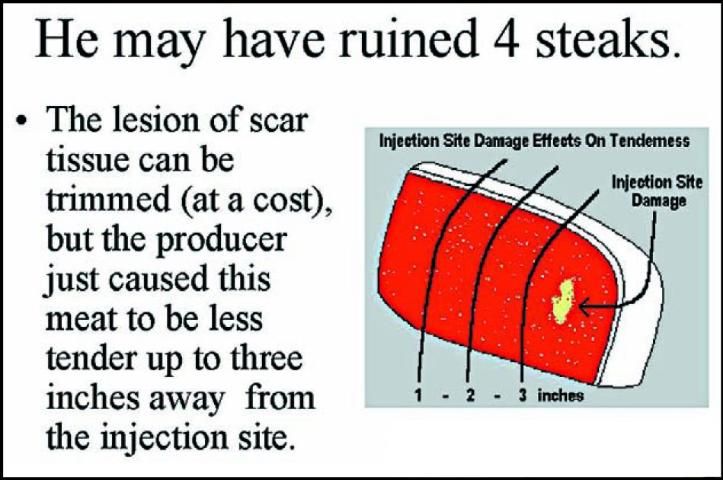
The second type, a woody callous lesion, is a connective tissue scar that remains after an active fluid-filled lesion has healed. These scars are visible for several months to years after the injection was given. Although the scar tissue looks like fat and can be removed by trimming, research has documented that tenderness of the surrounding muscle tissue is reduced significantly.
While the actual lesion may be small, tenderness will be affected in a 3- to 4-inch radius around the lesion. A single injection can negatively affect the tenderness of several retail portions. Injectable antibiotics, vaccines and anthelmintics can produce injection site lesions.
The third type of lesion is actually a discoloration of the muscle tissue. Apparently, components within certain vaccines react with gases in the modified atmosphere packaging used in retail meat cases today. This blemish is not apparent during the fabrication and packaging of retail beef products. Blemishes materialize during transport to the retail store and preclude the product from being displayed in the retail meat case. The primary retail cuts affected are top blade steaks and the beef clod, indicating that injections are being placed in the front or top of the shoulder rather than in the neck.
Injection site lesions are not limited to calves and fed cattle; it's also a significant problem in cull bulls and cows. Annual revaccination of breeding animals exposes them to numerous injections over their productive lives. The good news is that management through employee training can eliminate injection site lesions and related tenderness concerns.
Vaccine Handling and Administration
Calves moving through the production chain must stay healthy. Period. Sickness requires treatment and increases the probability of death loss, poor performance, injection site lesions and residues. Proper handling/administration of vaccines is a critical component of Beef Quality Assurance.
Its not uncommon to hear about ranches having poor results with their vaccination programs. There are numerous explanations for these failures; for example, exposure to high levels of pathogens, stress level, age, nutrition, genetics and vaccine failure. Generally, vaccination failure at the ranch level is the result of improper vaccine handling and administration.
The highest quality vaccine available is useless if it's not handled and administered properly. Even experienced producers overlook many key aspects when preparing and administering vaccines. With the increased use of Modified Live Virus (MLV) and Chemically-Altered (CA) vaccines, you need to re-evaluate how everyone involved with your operation handles products.
Both MLV and CA products must be reconstituted with a sterile diluent prior to being administered. These products are routinely used in the stocker and feeder segments of our industry with excellent response. However, their processing speed is considerably faster than on most cow-calf operations. Their processing facilities are also more likely to be sheltered from exposure to environmental hazards during processing. Most cow-calf operations lack covered or protected working facilities. Therefore, ranchers must exercise more caution when handling and administering MLV or CA products. Many common handling techniques can render MLV products inactive and even greatly reduce the effectiveness of Killed (K) vaccines.
Remember, Vaccination Alone Does Not Guarantee Immunization.
Purchase vaccines from a reputable dealer. A vaccine will be less than100% effective if it has ever been stored improperly. Improper storage includes freezing and/or exposure to heat or sunlight. Maintaining a high level of efficacy is critical to establishing immunity in a majority of vaccinated cattle.
For example, if the vaccine is only 80% effective, and 80% of the cattle respond to the vaccine, then only 64% (80% x 80%) of the vaccinated animals are protected against the targeted pathogen. Management practices can increase the percentage of cattle that respond to vaccine, and greater efficacy of the vaccine greatly enhances immune response. Reducing vaccine exposure, cattle stress and improved nutritional management, along with proper timing of vaccination, will increase the response rate to the vaccine.
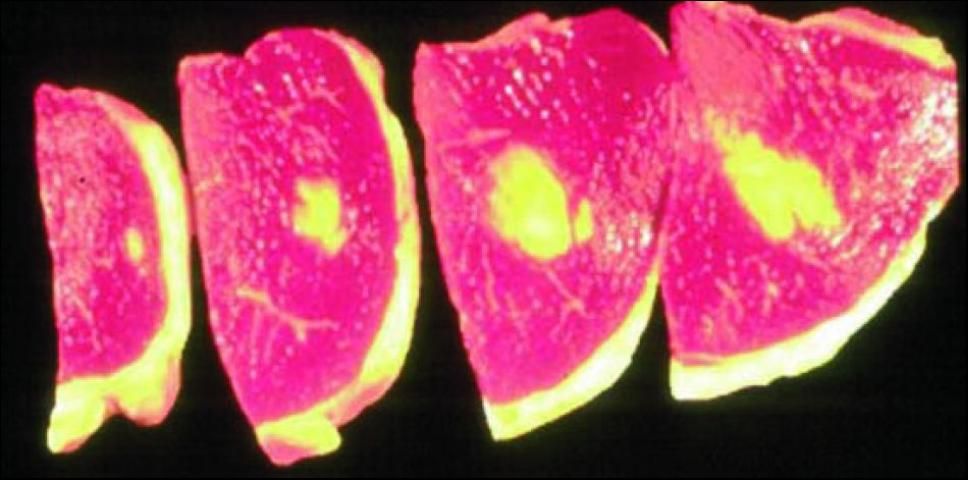
Series of woody or callous lesions
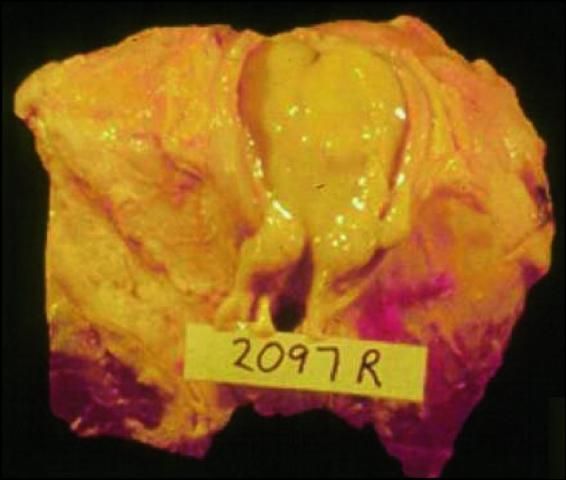
Active fluid filled lesions
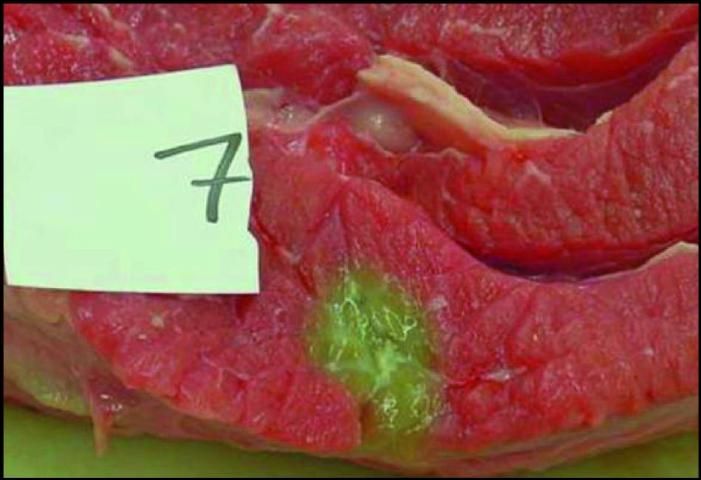
Discoloration lesion
Keep it Cold and in the Dark
When purchasing an animal health product, always transport it in a closed, refrigerated container. Refrigerate your vaccine and shield it from ultraviolet light (UV) at all times until it's administered to an animal. Use cold packs during transport and chute side storage of vaccine. These should be available to you at the point of purchase.
Protect Vaccine Chuteside
Most ranches fail to handle vaccines correctly at the time of vaccination. Always keep the vaccine cool while you process cattle. Keep the working bottle in a cooler with syringes. A working bottle is the mixed product from which the vaccine is drawn into a syringe. Store all unused and unmixed product in a closed, refrigerated container until it's needed.
Never mix either MLV or CA product before it is needed. Mix only enough to be administered within one hour. Mixed vaccine begins to lose effectiveness in a relatively short period of time. On small operations, it's advisable to purchase vaccines in smaller containers (5-10 dose bottles) and mix as needed. Although larger-dose bottles are generally less expensive per dose, their use often results in leftover product. Partially used bottles should not be saved.
Protect Vaccine from Heat and Light
Avoid exposure of vaccine and syringes to heat. Do not allow vaccine or syringes to sit in direct sunlight, even for a short time. Sunlight and ultraviolet light will destroy vaccines. Always cool syringes before the initial draw of vaccine. Carrying syringes in the cooler while going to the working facilities will allow sufficient time for the syringe to cool.
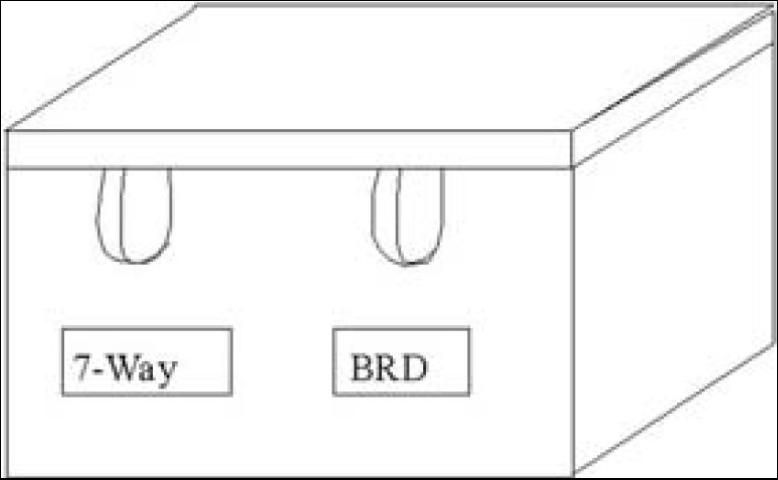
Do not leave syringes on top of working tables, barrels or tailgates while performing other processing chores at the chute. Figure 2 illustrates one method to keep syringes cool and out of direct sunlight while maintaining easy accessibility to them. A cooler, as shown, keeps syringes from prolonged exposure to UV light throughout processing. If any delay occurs in processing, place syringes back in a cooler immediately.
Don't Disinfect with Chemical Sterilants
Do NOT clean/disinfect syringes or needles with chemical sterilants or disinfectants. Many of these products will kill MLV vaccines and cause damage to Killed vaccines. Do NOT use products like alcohol, soap, Lysol, Betadine, Nolvasan, or Chlorox to clean or disinfect the syringe.
Any sterilant other than boiling water will leave a residue in the syringe, altering the effectiveness of the vaccine it contacts. Although this contamination predominately affects the first draw, it could impact the immunization of several animals. A 50cc syringe would impact from 10 to 25 animals, depending on whether it was a 5cc or 2cc dose rate.
Disinfect syringe components in boiling water. Multiple-dose syringes need to be completely disassembled and cleaned after each working. After sterilizing, reassemble syringes and store in a clean, dry environment until needed. If not, resterilize prior to next use. Many continuous-feed syringes cannot be cleaned effectively because they cannot be disassembled and boiled. However, drawing boiling water through the syringes and feeder tubes can clean them.
Syringe Selection, Utilization and Cleaning
Selecting the appropriate syringe is very important to developing a sound vaccination program. Plus, proper syringe handling does not add significant-ly to processing time. Multiple-dose syringes, such as shown in Figure 2, or sterile, disposable syringes, are appropriate for administering vaccines.

To help prevent contamination of the remaining vaccine in your working bottle, never enter a bottle with a used needle. When using multiple-dose guns, the needles should be changed each time the syringe is refilled. This practice prevents contamination of the bottle and ensures that you're using a sharp needle.
Continuous-feed syringes reduce the chance of contaminating vaccines by accidentally drawing product from the wrong bottle. These syringes are harder to clean and it's very difficult to keep all components of a continuous-feed syringe sheltered from exposure to the elements. If continuous-feed syringes are used, the bottle, hose and syringe must be protected from exposure to UV light.
Many times, these bottles and syringes are suspended chuteside in direct sun light and exposed to heat during processing. This deteriorates the vaccine and animals are not immunized adequately. A better use of continuous-feed syringes is for administering less sensitive materials like dewormers.
Sterilized disposable plastic syringes ensure a sterile delivery instrument. These plastic syringes are a very accurate single-dose delivery system. It is best to utilize a syringe size that closely matches the dose, and draw a single dose for each individual animal. Disposable syringes are often used for multiple-dose delivery and result in inaccurate dose delivery.
For example, a 10cc syringe filled with vaccine is not appropriate for administering a 2cc dose to five head. Administering multiple doses in this manner often leads to over- or under-dosing. The problem is magnified when using larger-dose syringes. When using disposable or single-dose syringes for vaccinations, purchase vaccines in the smallest available bottle size to reduce the risk of contaminating product.
Lubricate with First Vaccine Draw (No Petroleum-Based Products)
Use the first draw of vaccine to lubricate the syringe. Do not lubricate syringes with silicone, mineral oil, Vaseline® or any other lubricant. All of these lubricants may inactivate MLV or CA product. These products may also alter the quality of Killed products. If the plunger and stopper are difficult to move without lubricant, replace the syringe, or at least the stopper.
Inspect and Maintain Equipment
Always inspect syringes prior to processing. Check the barrels for chips or cracks that would lead to leakage and under-dosing. Check calibration and dosage setting prior to—and continuously throughout—the process. Some multi-dose syringes are not accurate enough for 2cc dose products.
Even slight changes in working components change dose rates. Dosage gauges on some multi-dose syringes can accidentally change volume settings, leading to under- or over-dosing. Adjust the tension on the plunger to prevent leakage. Always keep spare parts available in case something happens to the working syringe. Keep a supply of extra disposable syringes as a backup delivery system.
Mixing and Drawing Vaccines
When using vaccines that must be mixed prior to use, such as MLV products, mix only as much as can be used in one hour or less. MLV products MUST be used when mixed and CANNOT be stored for later use. Reconstituted Killed vaccines can be stored for short periods of time after initial use, but they should not be kept if anything other than a sterile needle entered the bottle during use.
Use a sterile transfer needle when reconstituting MLV and CA vaccines. Transfer needles can be sterilized and reused. Transfer needles ensure against product contamination during mixing. If a transfer needle is not available, use a sterile syringe to draw the diluent out of the plastic bottle and then place it in the glass vial.
When using a transfer needle, always place the transfer needle in the stopper of the plastic bottle first, then invert the needle and diluent as the other end of the transfer needle is placed in the stopper of the glass vial containing the freeze-dried fraction. After proper mixing, vaccine can be drawn from the glass vial into the dosing gun.
Never refill a syringe using a needle that has been in an animal. This introduces non-sterile matter into the vaccine and contaminates the remainder of the bottle. Adopt the practice of changing needles before filling a syringe to keep needles sharp and prevent contamination of the vaccine.
Label syringes and the cooler box prior to processing to prevent accidental mixing of vaccine when refilling syringes. Accidental mixing will result in under-dosing and may render one or both of the vaccines ineffective. Mixing MLV product with a non-water based Killed product destroys the MLV product immediately.
Never use one syringe to administer antibiotics or dewormers one time, and then MLV, CA or Killed products the next time. Any residue can potentially affect the product.
Read Labels
Always read label and dosing instructions prior to processing to make certain you're administering the proper dose of each product. Many products have changed their dosage rate or approved route of administration. Some products are now administered in low-dose (2cc) volume to reduce injection site reactions.
Other products are formulated to be delivered in a 5cc dose. Some products may be 2cc when administered alone, but 5cc when additional antigens are included in the vaccine. One example is found in the CA products Cattlemaster®4 and Cattlemaster®4-VL5. Cattlemaster®4 is a 2cc product, while Cattlemaster®4-VL5 is a 5cc product.
Booster vaccines as outlined on the label. To establish immunity, almost all products require a second vaccination two to four weeks after the initial vaccination. If a booster is required, one initial dose will not achieve immunity; it will only provide a brief increase in resistance. Increased and sustained levels of immunity can only be established by boosting initial vaccinations. If the initial program is carried out properly, only an annual booster will be required after the first year.
Take time to become familiar with your products. Also, check for side effects and treatment should they occur. If cattle are affected, there may be little time for action before death occurs.
These are the main factors associated with the success or failure of immunization programs. The recommendations outlined above are meaningless unless the nutrition, stress and genetic components of the immune system are in proper balance.
Best Management Practices—Vaccination
- Determine target pathogens.
- Select the most effective vaccine.
- Prevent exposure of vaccine to heat and UV light.
- Draw from bottle with sterile needle.
- Use quality syringes.
- Inspect and maintain all working components.
- Administer proper dose.
- Use proper needle size.
- Administer recommended route (IM or SubQ).
- Administer in recommended site (neck region).
- Change needles often to reduce tissue irritation.
- Always follow label directions.
- Booster all vaccines when label requires it.
- Always read directions before starting.
NEVER
- Leave vaccines in direct sunlight or UV light.
- Leave vaccines unrefrigerated.
- Place a used needle in a bottle of vaccine.
- Place vaccine in hip or round.
- Assume anything—always check the directions for use.
Implant Utilization and Recommendations
When used properly, growth-stimulating implants offer the commercial cow-calf producer a fast, easy-to-use method of increasing weaning weights. Implants have been proven safe and effective through both research and actual use in the beef industry.
As a general recommendation, implant male calves when they are castrated. Do not implant bull calves. Implanting bulls can arrest the development of reproductive organs, causing sterility, and it does not increase efficiency or rate of gain. Always check label directions for age/weight recommendations for the use of specific implants.
Research has shown that there are no benefits to implanting heifers intended to be kept as replacements. However, there are no detrimental effects of implanting replacement heifers with a single implant after 60 days of age and before they are 6 months old.
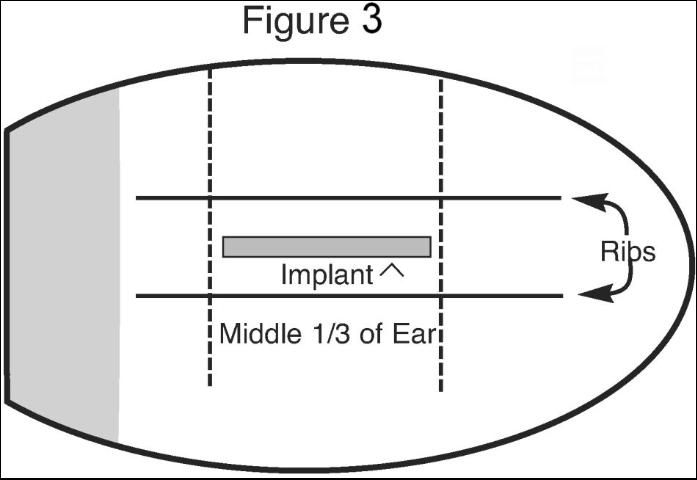
Implants are placed under the skin on the back of the ear (See Figure 3 for proper implant placement). The potential benefit cannot be realized if the implant is administered improperly. For example, if the implant site becomes infected, an abscess can develop. The implant may become walled off—preventing absorption.
The abscess also has the potential to push the implant pellets out of the implant site. To prevent abscesses, the implant needle should be disinfected between animals. Sanitation is important, not from a potential impact on meat quality, but on product effectiveness.
Potential Causes of Implant Failures:
- Improper site (in the cartilage)
- Abscess due to poor sanitation
- Missing implant (through the ear)
- Partial implant due to technique or implant gun failure
- Bunched or crushed pellets
- Improper implant storage (exposure to moisture, refrigeration)
Best Management Practices—Implant Use
- All implants come with instructions for implanting and proper handling. Review all instructions carefully before implanting. There are no withdrawal periods for the implants currently approved.
- Properly restrain the animal. If cattle are caught properly, just behind the ears in an unmodified head gate, no further restraint is necessary to properly place implants. If proper restraint is not possible with the head gate, use a halter.
- Determine which ear you want to implant and adjust the implant instrument so the needle can be positioned next to and parallel to the ear.
- Select the proper implant site on the back of the ear. Place the implant between the skin and cartilage in the middle third of the ear.
- Clean the needle with a disinfectant to reduce contamination of the implant site. Use only sharp needles; burrs increase the chance of tissue trauma and infection.
- Utilize disinfectant to clean the implant site when the site is contaminated with feces, urine or mud. Contamination increases the chance of abscessed implant sites.
- When possible, implant all calves in the same ear to minimize confusion. Avoid placing implants in the same ear used for ear tags, tattoos or ear notching.
- Grasp the ear with one hand while the other hand positions the needle parallel to and nearly flush with the ear. Put the point of the needle against the ear with the beveled part facing outward.
- Use the tip of the needle to prick the skin, lift slightly and completely insert the needle under the skin. Do not allow the needle to gouge or pierce through the cartilage. If you feel resistance as you insert the needle, it is quite probable that the cartilage has been gouged and pellets may be covered with scar tissue and "walled off."
- Depress the plunger of the implant gun and withdraw the needle.
- Palpate the ear to determine if the implant was inserted properly.
- Never sacrifice careful implantation technique for speed.
- Proper employee training is essential. Cow-calf and stocker operators should be aware of the training programs offered by pharmaceutical companies.
- Record the date and type (brand name) of implant administered. Stacking implants causes problems with prolapse in heifers. When implanting calves, transferring ownership or retaining ownership into the feed yard, its important to review your records or inform purchasers or managers about past implant management to avoid future problems.
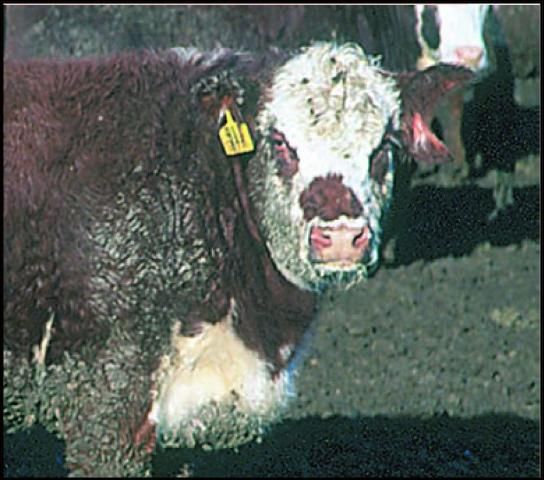
Ear notching can sometimes cause problems for other folks who buy your cattle and want to tag or implant those calves. If a large chunk of one or both ears is missing, as with this red steer, it's awfully hard to put tags and implants where they need to be.
Parasite Control
Both internal and external parasites can have an impact on cattle quality. In part, it will be an impact on nutritional status. But it will also impact condemnation of livers, hide quality and muscle damage through parasite migration.
Internal parasites, such as stomach worms, can cause extensive damage to the digestive tract of cattle. The damage can result in impaired digestive function and suppressed absorption of nutrients, leading to deficiencies in energy and protein. Nutrient deficiencies can lead to suppression of the immune system, resulting in poor animal performance and health.
Credit: Dr. Tom Craig, Department of Veterinary Pathobiology, Texas A&M University
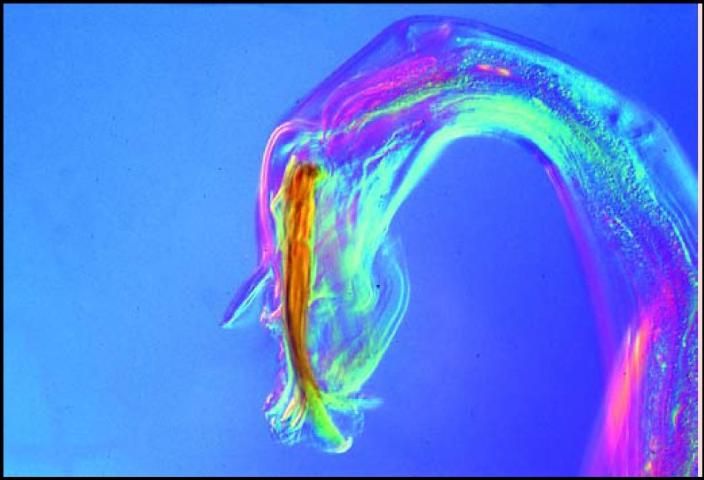
Ostertagia Ostertagi (picture above) can make for a pretty picture under a microscope. However, the damage this parasite can cause to your cattle gets ugly before you can see the outward signs. The bottom photo shows how the worm can grow inside of a cow's gastric gland between day 3 and day ± 15.
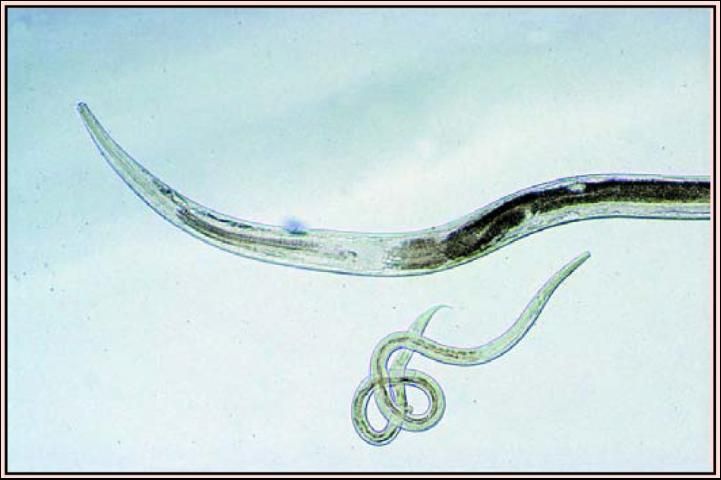
Credit: Dr. Tom Craig, Department of Veterinary Pathobiology, Texas A&M University
Liver flukes are another common internal parasite in Florida. Infection is generally limited to cattle produced in areas that commonly have standing water, such as river bottom pastures and alkaline soils. Additionally, the presence of an aquatic snail is necessary to serve as the intermediary host for the liver fluke.
Many of the major river/flood areas in the southeastern United States are habitat for such snails, and pastures adjacent to these waters are sources of potential infection. A significant number of the stocker and feeder cattle shipped out of Florida originate from fluke-infected areas. A liver fluke infection can reduce animal performance and cause liver condemnation in fed cattle, cull cows and bulls.
External parasites, such as the horn fly and heel fly, are pests that can impact performance and hide quality. Horn fly irritation reduces gains in calves and yearlings and body condition in cows. Horn flies are biting insects that not only affect performance, but can also reduce hide quality due to scar tissue on the surface of the skin. This damage devalues the hide, because it can't be used to manufacture high-quality leather products.
Heel flies also cause annoyance during the spring fly season. Heel fly eggs laid on lower legs of cattle migrate to the skin surface and burrow through the skin. Larvae then migrate through the body and ultimately become encapsulated just beneath the hide, along the back.
At this stage the larvae, or "grubs," require oxygen for further development and burrow through the hide, creating a small hole. Eventually, the larvae migrate through the skin and drop to the ground where they pupate and emerge as heel flies in the spring.
The migrating larvae cause tissue damage, resulting in trim loss and reduced carcass value. The holes in the hides eventually heal, but the scar tissue devalues the hide. Treating cattle one to two months after heel fly activity ceases can control larvae from heel flies.
Processing/Cattle Handling
Processing involves management decisions when working cows or calves, receiving stocker cattle, weaning calves and shipping cattle. Castration and dehorning, immunization, branding, injections and cattle movement are all control points for management.
Not only do these chores need to be done, they must be done correctly. Management practices performed early in life will reduce the chance of stress-related sickness, carcass damage and carcass devaluation.
Calf Management Practices
Castration and dehorning are recommended management practices for cow-calf producers. On a national basis, castration and dehorning are performed routinely prior to the time calves are marketed. In the southeastern United States, its estimated that 50% of calves sold as "steers" are intact bulls.
There is no demand for intact males either in feed yards or stocker operations. Intact bull calves are always castrated prior to grazing or feeding. Intact bull calves gain faster than non-implanted steers, but there is no gain advantage when compared to implanted steers. Management of intact bulls is also difficult due to aggressive behavior. Beef from intact bulls has a coarser texture, lower marbling scores and more variable tenderness.
All bulls that are not herd sire prospects should be castrated as early in life as possible. Early castration is less stressful on bull calves. Preferably, castration should occur between birth and four months of age. Castration of older, heavier animals causes greater stress and increases the chances for surgical complications and bacterial infections. The additional stress can also suppress immune function and increase susceptibility to other diseases.
Regardless of coffee-shop perceptions, there are economic incentives to castrating bull calves prior to marketing. Analyses of auction sales show that lightweight bull calves (under 400 pounds) are discounted less than heavier bull calves and yearlings, but they are discounted.
Research in Texas and Kansas has demonstrated that castration of a 550-pound bull calf reduces weight and increases morbidity (sickness), mortality (death rate) and treatment costs. Based on research, "cutter bulls" should be discounted $6 to $7 per cwt. as compared to the same weight steers-due to lost production efficiency. Heavier (600 pound) or older (yearling) cutter bulls generally receive price discounts of $6 to $12 per cwt.
Dehorning is as stressful as castration. Horn buds should be removed sometime between birth and 4 months of age. Cattle with horns are the cause of a significant amount of bruising in fed and non-fed cattle. Groups of horned cattle have twice as many bruises as groups of non-horned cattle. Bruises from horns are trimmed out, resulting in lost carcass weight, devalued primal cuts and reduced carcass value.
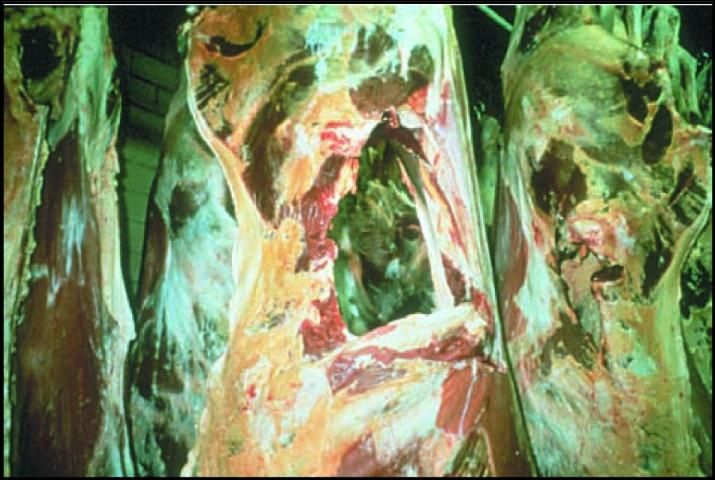
Above, not only do horns cause substantial bruise damage (that has to be trimmed from the carcass) to other cattle in the pen, they often cause the head to be condemned during inspection by USDA-FSIS. Head condemnations result in a loss of approximately $18 per affected animal.
Obviously, the use of polled genetics is the easiest and least stressful way to dehorn cattle. Does that imply all producers should breed polled cattle? No. It means that if calves are born with horns, electric or surgical dehorners should be used to prevent horn growth (before the calves are 4 months old).
The younger the animal is when these procedures are done, the less its stressed. Research has shown that dehorning or tipping older calves and yearlings is one of the most stressful management practices.
Like misconceptions about the reality of discounts for intact bull calves, its also commonly believed that horned cattle do not receive a discount when marketed. Actually, auction market results indicate that horned heifers and steers are discounted $2 to $3 per cwt. As with bull calves, discounts for horns increase with age and weight.
Branding
For centuries, fire branding has been utilized as a method of animal identification. It is still a very acceptable means of permanent identification to establish proof of ownership. Placement of your brand is important because it affects the value of the hide. Ideally, brand placement (freeze brand or hot iron) should be located high up on the hip, close to the tail head.
This allows the brand to be cut away from the hide without a significant loss of the most valuable portions. In many instances, butt-branded hides sell at prices similar to native (non-branded) hides. Rib brands and multiple brands devalue cattle $5 to $25 per head.
Freeze branding can also be used to identify cattle. However, improper freeze branding can scar, similar to a hot iron, which lowers the value of the hide. Improper branding procedures can also create beef quality problems. Brands that are too hot or held too long can result in scar tissue that toughens the underlying muscle tissue. In extreme cases, the brand is visible on the muscle tissue below the hide.
Cattle Behavior and Facilities Design
Cattle handling and facilities design can impact beef quality. Many bruises, dark cutters and other damage to the meat product can be reduced if cattle are handled properly in correctly designed facilities.
Understanding cattle behavior facilitates handling, improves both handler safety and animal welfare, and reduces stress and bruising. Bruising due to improper cattle handling literally costs the industry millions of dollars each year in carcass trim at the packing house.
Low-stress handling decreases shrink and improves the immune system and rumen function, resulting in decreased respiratory disease and lower cost. Mishandling can also develop temperament and behavior problems that are retained throughout the animal's life.
Vision
Cattle have a visual field in excess of 300 degrees. Loading ramps and handling chutes should have solid walls to prevent animals from seeing distractions outside the chute. Moving objects and people seen through the sides of a chute can cause balking or frighten livestock. Solid sides on the crowd pen and alley are especially important if animals are not completely tame or unaccustomed to the facility.
Cattle have a tendency to move from a dimly illuminated area to amore brightly illuminated area, provided the light is not glaring in their eyes. A spotlight directed onto a loading chute that does not glare in the animal's face will improve cattle movement. General soft lighting inside the processing barn/shed will often facilitate entry.
In areas where animals are handled, illumination should be uniform and diffuse. Shadows and bright spots should be minimized. Livestock are sensitive to harsh contrasts of light and dark around loading chutes, scales and work areas. A zebra stripe pattern cast by slatted roof and fences will cause balking.
Cattle have poor depth perception. To see depth on the ground, the animal must stop and lower its head. The pattern of alternating light and dark caused by shadows has the same effect as building a cattle guard in the middle of the facility. Cattle are also likely to balk at sudden changes in color, which can affect depth perception. Handling facilities should be painted one uniform color.
Hearing
Cattle can be handled calmly and moved successfully with minimal amounts of noise. In facilities where cattle are handled, loud noises and other distractions should be avoided. Rubber stops on gates and squeeze chutes reduce noise. The pump and motor on a hydraulic squeeze chute should be located away from the chute. Employees should be encouraged not to vocalize.
Flight Zone
An important concept of livestock handling is the "flight zone." The flight zone is the animal's "personal space." The size of the flight zone depends on cattle disposition and prior handling. Cattle accustomed to frequent handling may have a small flight zone. Extremely tame cattle are often difficult to drive because they no longer have a flight zone.
But the flight zone of range cows may be as much as 300 feet. When a person enters the flight zone, the animals move away. Understanding the flight zone can reduce stress, prevent accidents and injury to handlers, and ease cattle movement and flow (See Figure 4).
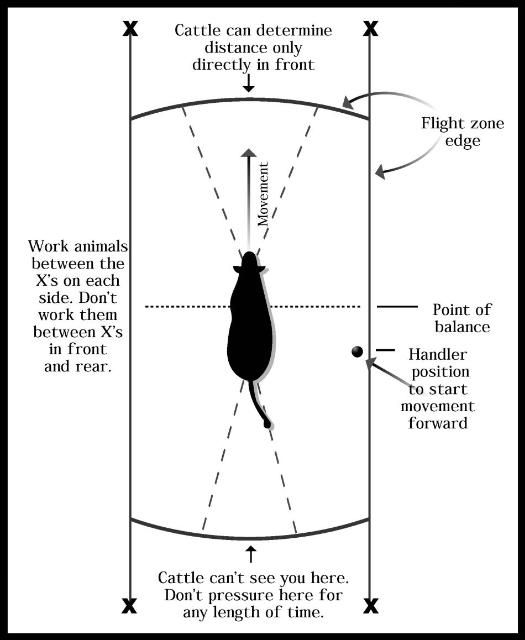
The edge of the flight zone can be determined by slowly walking up to the animal. When the handler penetrates the flight zone, the animal will either bolt and run away, or turn back and run past the person. The best place for the person to work is on the edge of the flight zone. To cause the animal to back up, the handler should stand in front of the point of balance (the shoulder).
Cattle sometimes rear up and become agitated while waiting in a single-file chute. This often happens because a person leans over the chute, invading the animal's flight zone.
Herd Instinct
Cattle are herd animals and they are likely to become highly agitated and stressed when they are separated from their herd mates. If an isolated animal becomes agitated, other animals should be placed with it. This will calm agitated animals as well as facilitate movement. Allow livestock to follow the leader and do not rush them. If animals bunch up, handlers should concentrate on moving the leaders instead of pushing a group of animals from the rear.
Curved Chutes and Solid Fences
Curved, single-file chutes are especially recommended for moving cattle onto a truck or squeeze chute. A curved chute is more efficient for two reasons. First, it prevents the animal from seeing what is at the other end of the chute until it's almost there. Second, it takes advantage of the natural tendency to circle around a handler moving along the inner radius.
A curved chute with an inside radius of 13–16 ft will work well for handling cattle. Livestock will often balk when they have to move from an outdoor pen into a building. Animals will enter a building more easily if they are lined up in a single-file chute before they enter.
Again, solid sides are recommended on both the chute and the crowd pen, which leads to a squeeze chute or loading ramp. Facilities should also be designed to optimize cattle traction. Cattle remain calmer when they are able to obtain solid footing.
Best Management Practices—Cattle handling
- Using their natural flight zone, cattle can be moved quietly. To move forward, move toward their rear past their point of balance (shoulder). To stop or back up in chute, move forward past their point of balance.
- Handling facilities should ideally have curved chutes and round crowding pens.
- Use two or more sorting pens in front of the squeeze chute.
- Never fill a crowding pen more than three-quarters full; cattle need room to turn around.
- Cattle should move easily up the chute. If not, hanging chains, shadows, backstops, noises, dogs or people could be preventing movement.
- Cover the sides of the squeeze chute, especially the back three-quarters, to reduce balking as they enter the chute.
- Minimize your use of cattle prods (electric and others that bruise). Instead, wave sticks with plastic streamers on the end.
- Reducing stress on the animal will reduce animal injuries and sickness, employee injury and increase overall efficiency.