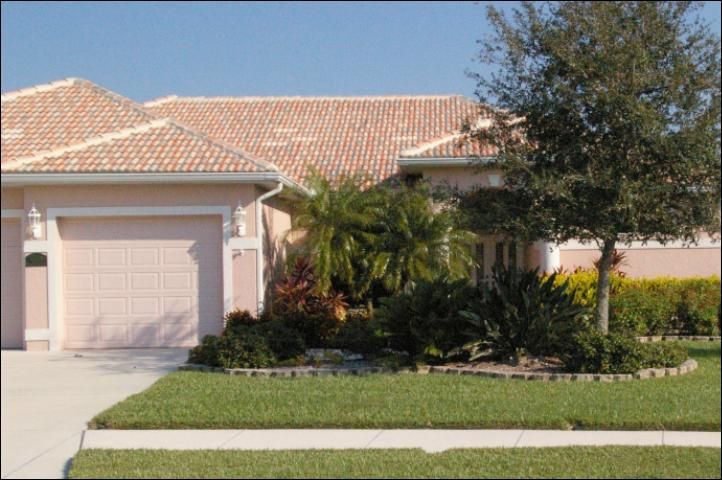
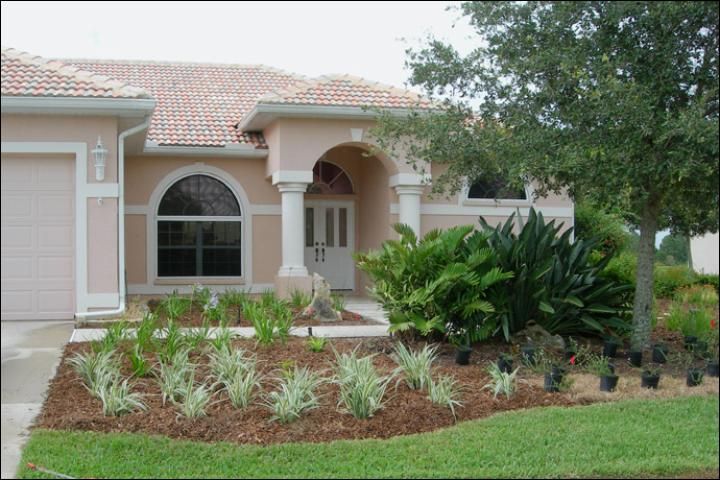
Florida homeowners have many reasons to consider converting their existing residential landscape to a Florida-Friendly Landscape. Most importantly, a Florida-Friendly yard is an environmentally sound yard that conserves and protects Florida's waterways, soil, wildlife, and energy. Using the right plants in the right place can filter harmful stormwater runoff, improve the landscape's soil, provide wildlife habitat, and create shade for energy efficiency in the home. Landscaping also adds beauty and creates pleasant outdoor living spaces to increase the value of residential property (Figures 1 and 2 demonstrate a Florida Friendly landscape renovation in a residential development in Osprey, FL, in 2009).
Credit: Gail Hansen, IFAS/UF
Credit: Gail Hansen, UF/IFAS
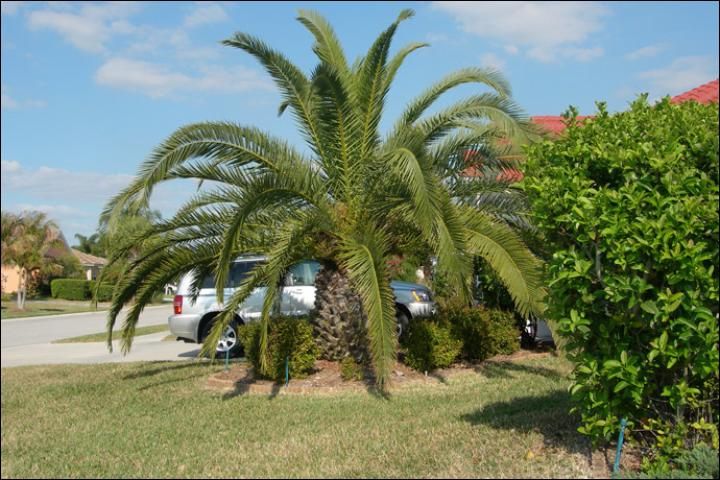
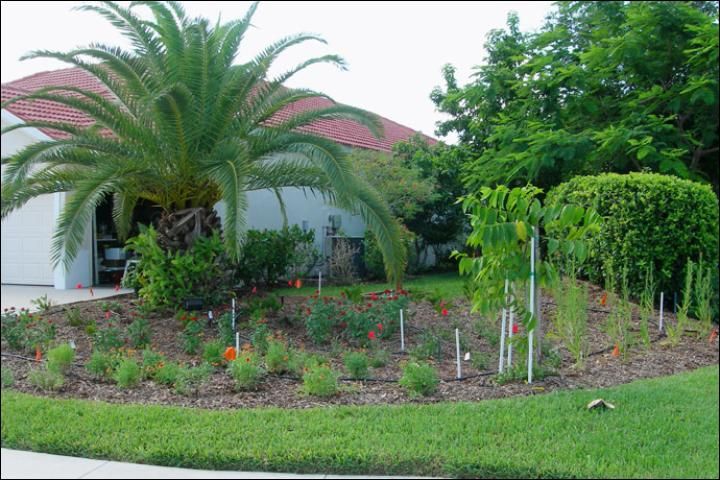
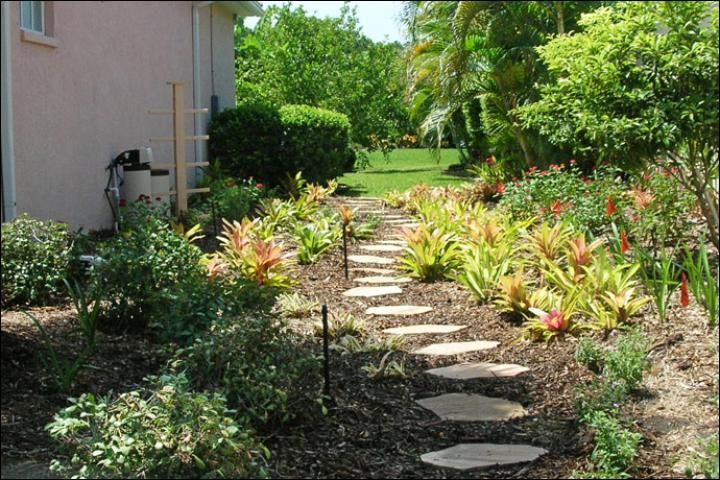
Increased use of strict irrigation ordinances in Florida is another reason many homeowners in the Sunshine State are choosing to use plants that are more appropriate for a Florida landscape. Florida-Friendly plants—which include both native plants and adapted, non-native plants—survive with little maintenance and thrive in the climate and soils of the state's varied regions. Use of these low-maintenance plants in residential landscapes reduces the need for water, fertilizer, and pesticides and also reduces the energy required for landscape maintenance (see Figures 3 and 4).
Credit: Gail Hansen, UF/IFAS
Credit: Gail Hansen, UF/IFAS
Creating a Florida-Friendly yard is not difficult, and such yards do not conform to any particular style. Instead, a Florida-Friendly yard is a type of landscape that is adaptable to many styles and yards and includes plant choices and design that follow the "right-plant/right-place" principle, which entails locating plants in those areas of the landscape that best meet the plants' requirements for growth. (For more on this topic, see Ask IFAS: Florida-Friendly Landscaping Program, https://edis.ifas.ufl.edu/entity/topic/ffl, and see the Florida-Friendly Landscaping™ website at https://ffl.ifas.ufl.edu/.)
The Three-Phase/Seven-Step Process
The process of incorporating more trees and plants can be accomplished in three phases:
Phase 1: Master Plan
Step 1—Conduct a site inventory and analysis
................Select plants
................Draw plant beds and plants
Phase 2: Hardscape and Trees
Step 2—Remove sod for new hardscape and new plant beds for trees
................Correct any drainage problems
................Install new irrigation or re-fit existing system
Step 3—Install new hardscape (patios, decks, walkways, etc.)
Step 4—Install trees and mulch
Phase 3: Plant Beds
Step 5—Install Bed #1
Step 6—Install Bed #2
Step 7—Install Bed #3
Phase 1: Master Plan
Before removing any sod, analyze the site and create a master plan to guide the process. A master plan will ensure that the final design will create a cohesive, organized, and visually interesting landscape. (For more on this topic, see EDIS Publication ENH1112, Landscape Design: Ten Important Things to Consider, https://edis.ifas.ufl.edu/publication/EP375, and see EDIS Publication ENH1110, Design Strategies for a Sustainable Home Landscape, https://edis.ifas.ufl.edu/publication/EP374.)
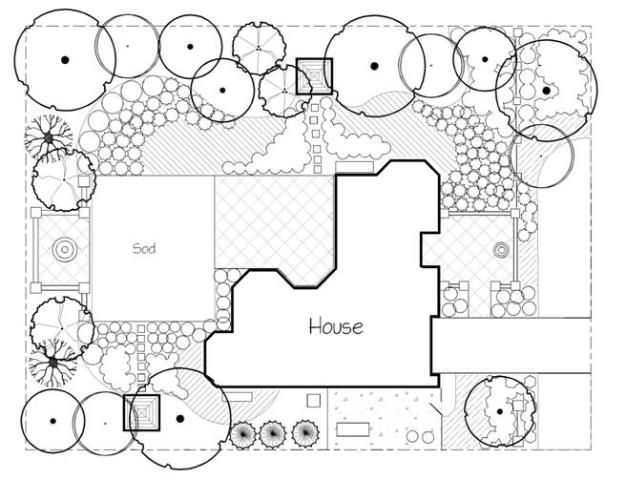
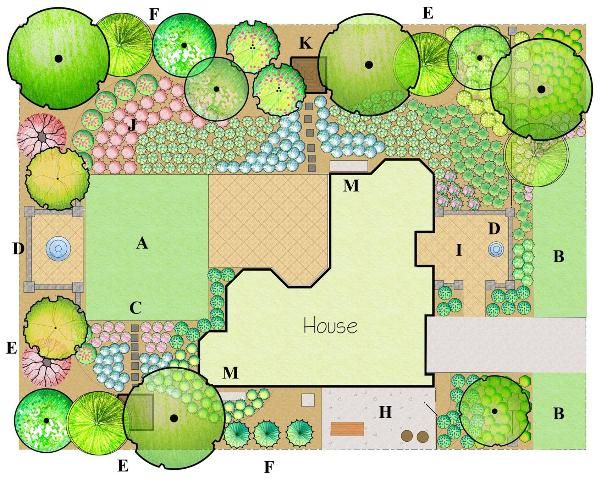
The master plan is a complete plan for the yard and includes all elements and plant material, as well as the locations where these are to be installed (see Figure 5).
Credit: Gail Hansen, UF/IFAS
The plan should be drawn to scale on a large sheet of paper and should include the property boundaries from a certified survey and the location of the house and built elements. Before developing the master plan, conduct a site inventory and note on the plan existing vegetation to keep, as well as areas of sun and shade, low areas that collect water, direction of slopes, good and bad views, and utility locations (both overhead and underground).
Be sure to obtain soil tests of the proposed planting areas. Soil tests indicate the ph and the type of soil, such as clay, sand, etc. Soil-test results are used to determine which plants will thrive in the landscape. (For more on this topic, see EDIS Publication SL281, Soil Sampling and Testing for the Home Landscape or Vegetable Garden, https://edis.ifas.ufl.edu/publication/SS494.)
As a part of this inventory, homeowners should also decide how the yard will be used and maintained. Be realistic about landscape maintenance, including considering questions such as who will maintain the landscape, how often it will need attention, and what methods will be used (hand weeding or machines).
Once the inventory is complete, determine the location and shape of the plant beds. Beds can be located to take advantage of existing sun or shade or in anticipation of creating shade with new trees. Typically the location of plant beds is determined by the shape of the house and its orientation on the lot. Be sure to locate the plant beds before you choose the plant material, so you know the environmental conditions for each bed.
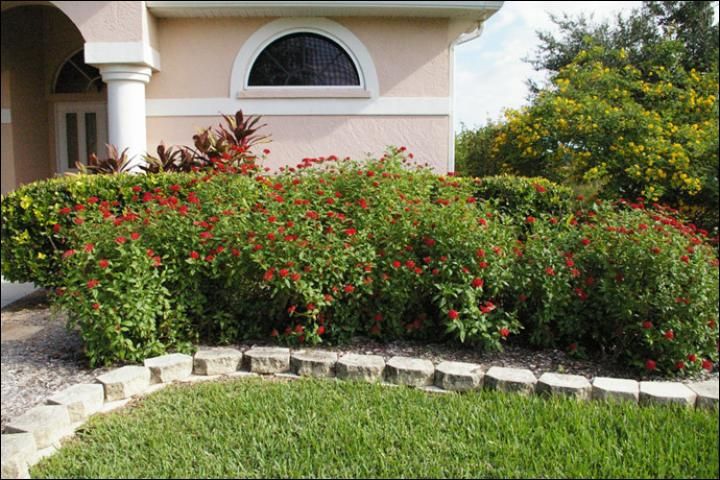
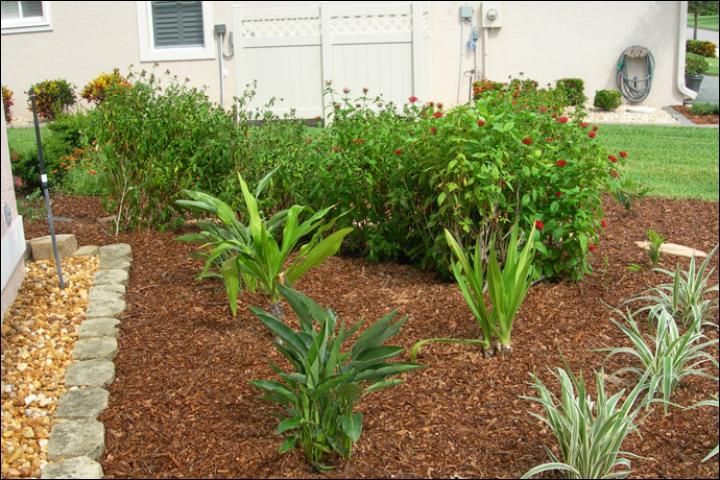
After locating the beds in the master plan, do some research to determine the best plant to use. Keeping in mind the "right-plant/right-place" principle, create a list of plants that are well suited for the particular site conditions and activities in your yard (see Figures 6 and 7.) Helpful lists include the Florida-Friendly Plant Guide (https://ffl.ifas.ufl.edu/resources/apps/plant-guide/) and the Florida-Friendly Plant List 2006 (https://ffl.ifas.ufl.edu/resources/publications/).
Credit: Gail Hansen, UF/IFAS
Credit: Gail Hansen, UF/IFAS
When choosing plants, group them into categories—trees, shrubs, or groundcover. Note, too, whether a plant needs sun or shade, as well as the plant's expected size at maturity (height and spread) and the plant's shape (spiky blades, soft mounds, etc.) and water requirements. Also note any possible pest problems associated with the plant and typical treatments for the pest problem. Depending on the treatment that may be required, you may choose to keep certain plants away from children's play areas or away from the house or from other plants.
Plants should also be chosen for their functional role in the landscape. Plants can provide shade to help create a comfortable microclimate. Plants can also be used to create spaces by visually separating areas for activities such as entertaining, children's play, dog runs or vegetable gardens. Plants also provide buffers or screens for privacy along property boundaries.
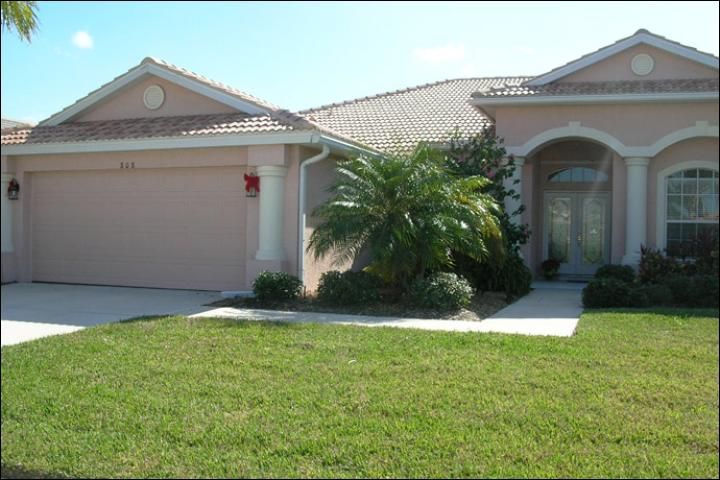
Your landscape plan should also take into consideration aesthetics. The intentional use of color, form, and texture in your residential landscape can add beauty and value to your home, so consider the colors, textures and shapes of the individual plants you select, as well as how these plants will look when combined in your landscape (see Figures 8 and 9).
Credit: Gail Hansen, UF/IFAS
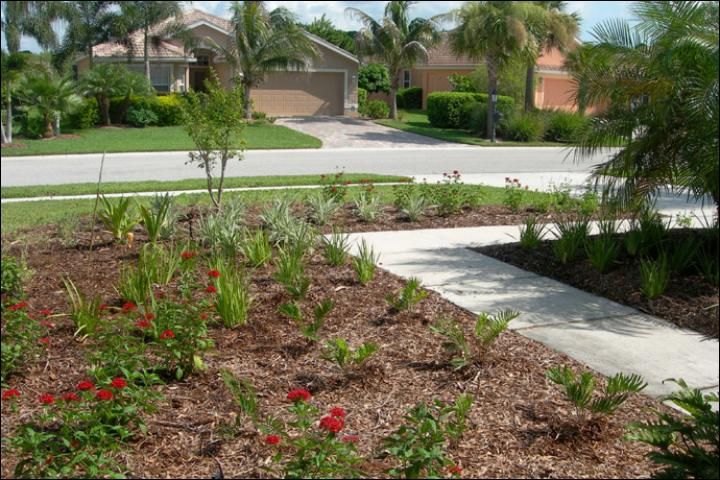
Credit: Gail Hansen, UF/IFAS
Once you have selected appropriate plants for your site conditions and activities, locate the plants in the best possible place for their size, shape, and growing requirements. Draw circles on the plan to represent the plants. Remember to layer plants both horizontally (every group of plants is in front of, behind, or beside another group of plant) and vertically (low-growing plants in the front, medium-high shrubs in the middle, and tall trees in the background). Layering in masses creates variety and interest through a mix of color, texture, shape, and size. (For more on layering plants, see EDIS Publication ENH1112, Landscape Design: Ten Important Things to Consider, https://edis.ifas.ufl.edu/publication/EP375.)
Phase 2: Hardscape and Trees
The next phase in the landscape-conversion process begins with removing a portion of the sod to plant trees and/or install hardscape—such as patios, walkways, or decks.
After removing the sod, but before installing hardscape or planting trees, consider stormwater control and collection in your landscape. Grading (shaping) the soil to create shallow swales (low areas), berms, or rain gardens can add variety and interest to the landscape through use of colorful plants and landscape rocks. A rain garden is a low, planted area that collects and holds stormwater on site, filtering pollutants from the water as it is seeping into the ground to recharge groundwater supplies.
This is also a good time in your landscape makeover to consider irrigation and to decide on the best system for your yard—whether in-ground, temporary above-ground, or hand watering (see Figure 10). The choice to re-fit an existing irrigation system or install a new system will depend on the type and layout of the existing system and the required layout for the new plant beds.
- To learn more about irrigation systems and the best choice for your landscape, see Ask IFAS: Landscape Irrigation and Fertilization (https://edis.ifas.ufl.edu/entity/topic/residential_sprinkler_systems).
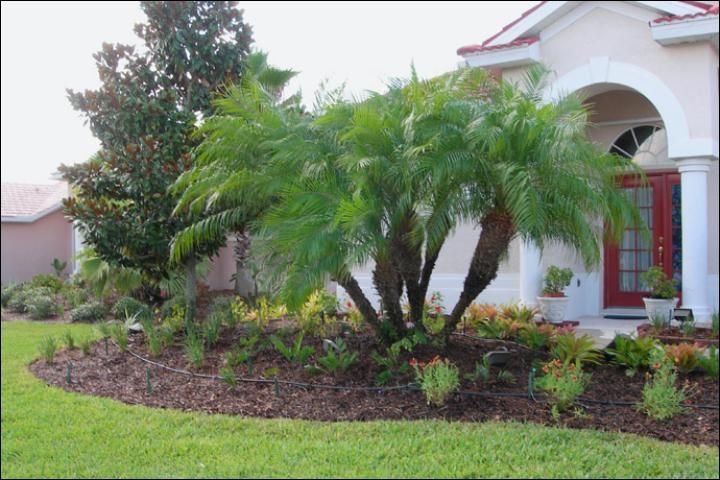
Credit: Gail Hansen, UF/IFAS
Once your plans for landscape irrigation and stormwater collection are complete, install hardscape elements. Design and locate hardscape elements to minimize impact to the ground plane; use piers and stem walls or pervious pavement when possible. To avoid crushing new plants, heavy equipment necessary for installing hardscape elements should be used before plants are installed.
Care should also be taken with heavy equipment to minimize soil compaction; make the travel path as short as possible when moving materials, avoid existing plants, and travel on the same path each time. When feasible, move materials without motorized equipment; use wheelbarrows or pull-carts that weigh less and have smaller tire tracks. Protect existing trees with barricades at the drip line (the outer edge of the tree canopy) or beyond.
Once the hardscape is established, trees should be planted before small shrubs and groundcover are planted because trees require more time to establish, and they provide shade and mulch (leaf litter) for smaller plants (see Figure 11).
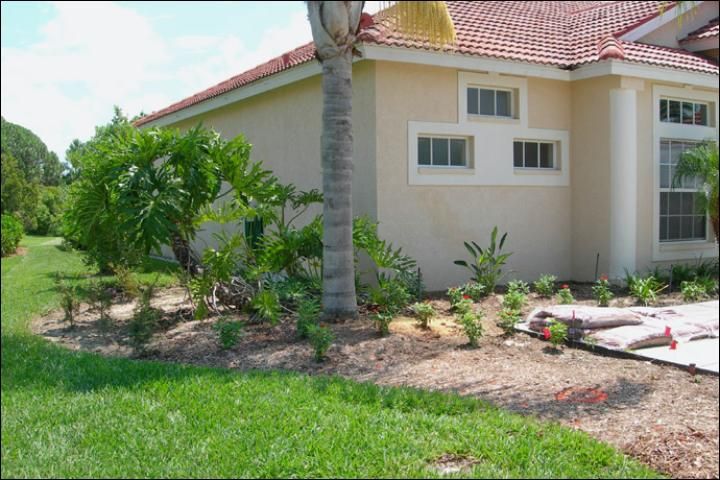
Credit: Gail Hansen, UF/IFAS
Large trees act as structural plants, providing organization in the landscape and creating screens for unwanted views while also adding aesthetic appeal to the property. Planting trees will also help create wildlife habitat and will reduce stormwater runoff.
To learn more about attracting wildlife, such as birds and butterflies, see EDIS Publication CIR1429, Landscaping Backyards for Wildlife: Top Ten Tips for Success, https://edis.ifas.ufl.edu/publication/UW175, EDIS Publication WEC163, A Bird's-Eye View: How Birds Select Habitat, https://edis.ifas.ufl.edu/UW174, and EDIS Publication ENY722, Getting Started in Butterfly Gardening.
Phase 3: Plant Beds
The final phases for your landscape conversion includes removing sod in small sections over time and installing plants and mulch. The order in which the sod sections are removed is based on the master plan layout and the needs and desires of the homeowner. An important consideration in creating the plant beds is the boundary of each newly planted area. The beds should be determined by logical stop-and-start points that will give the garden some organization, even as it is being dismantled and rebuilt in phases (see Figures 12 and 13).
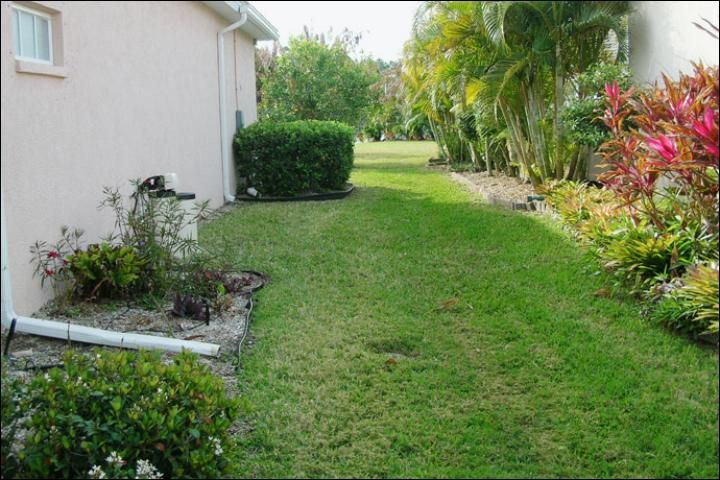
Credit: Gail Hansen, UF/IFAS
Credit: Gail Hansen, UF/IFAS
From Traditional Development Landscape to Florida-Friendly Landscape
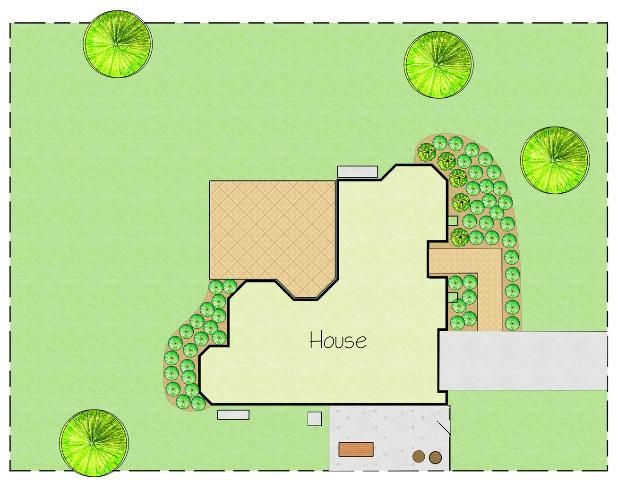
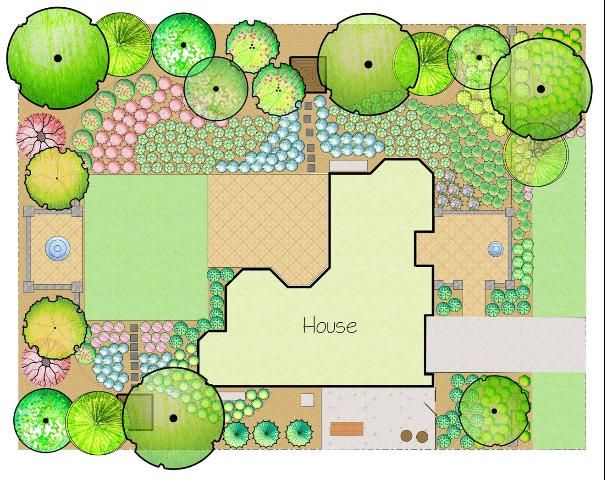
The step-by-step diagrams in this publication illustrate the phased removal of sod and the addition of trees and plant material in mulch beds to convert a typical development landscape into a Florida-Friendly Landscape. Figures 14 and 15 illustrate the differences between a typical development landscape—a near monoculture with a large amount of sod, a few trees, and a small variety and number of plants—and a Florida-Friendly Landscape, which includes more visual diversity and smaller, yet functional sod areas, as well as a greater variety and number of trees and plants located in larger beds throughout the yard.
Credit: Gail Hansen, UF/IFAS
Credit: Gail Hansen, UF/IFAS
Phase 1: Step 1—Develop a Master Plan
Credit: Gail Hansen, UF/IFAS
Design Considerations
The master plan might include the following elements:
- A. Lawn panel. Use hard edging to frame a small, but functional play area.
- B. Functional lawn areas. Wide lawn strips trap and filter rainwater and keep mulch from washing onto the sidewalk. These areas also serve as a design element to give a more formal appearance to the plant material if a mix of natives is used. A neatly mown strip of sod is a design "cue" that the landscape is being cared for, an important element in the perception that a landscape is attractive.
- C. Pathways and small buildings. These provide structure in a large space by dividing it into smaller spaces or "rooms."
- D. Focal points. Organizational elements capture attention and draw the eye to a specific location in the garden. The focal elements (statuary or pottery) are on axis (in line) with the front and back doors.
- E. Energy efficiency. Group trees to create shade on the south, east, and west sides of the house.
- F. Screens and buffers. Locate trees and large shrubs around the perimeter to block views.
- G. AC unit and utilities. Keep areas around the AC unit and meters clear of shrubs that block air flow and prevent easy access to meters. (Trees can be used to provide high overhead shade.)
- H. Work/trash area. Locate the work area and trash receptacles conveniently next to the garage.
- I. Entry. The entry area is a well defined focal point with an entry courtyard.
- J. Wildlife area. Locate plantings that attract wildlife so they can be easily viewed from the patio
- K. Playhouse. Locate the playhouse under trees for shade and for easy viewing from the patio.
- L. Garden shed and compost bin. The compost area is located out of sight from the patio, but in a location convenient to the garden shed and to the side garage door/work area for easy access.
- M. Cisterns or rain barrels. These are located by downspouts to harvest rainwater for later use in irrigation.
Phase 2: Step 2—Remove Sod for New Hardscape and Trees
Credit: Gail Hansen, UF/IFAS
Design Considerations
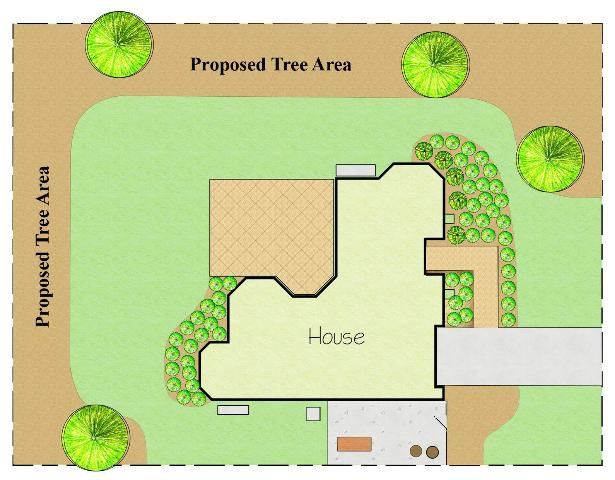
- Locate and mark the proposed tree and hardscape locations on your master plan.
- For more efficient mowing and to make sod removal easier in later phases, remove the sod in wide strips, rather than small circles at the marked location of each tree.
- Make the mulched area wide enough so the existing and installed trees will not be damaged by a mower or rotary trimmer during maintenance.
- The mulched bed is determined by the trunk diameter; the mulch should be about 2 feet in diameter for each inch of trunk diameter and should be increased as the tree grows. (For more on this topic, see Ask IFAS: Planting Landscape Trees.
- To correct any drainage problems on the site, re-grade the new bed before planting the trees. Create shallow swales to collect and direct rainwater, or create low areas for a planted rain garden.
Removal and Installation Considerations
- Mark the edge of the plant bed with a hose or rope and paint with marker paint.
- There are several methods to remove the sod, depending on area and time. The fastest method is to use a sod cutter, which is particularly useful for large areas.
- Another method is to use a nonselective herbicide (glyphosate) in two applications, with the second application 14 days after the first, and then removing the thatch with a sod cutter and power rake or shovel and hand rake (For more on this topic, see Ask IFAS: Establishing a Lawn.
- To protect the soil, lay down a layer of mulch 3-4-inches thick. (For more information, see Ask IFAS: Mulches for the Landscape
The most common mulch choices include pine-bark and pine-straw. Choose mulch based on origin, durability and attractiveness.
Phase 2: Step 3—Install New Hardscape (patios, walkways, decks, etc.)
Credit: Gail Hansen, UF/IFAS
Design Considerations
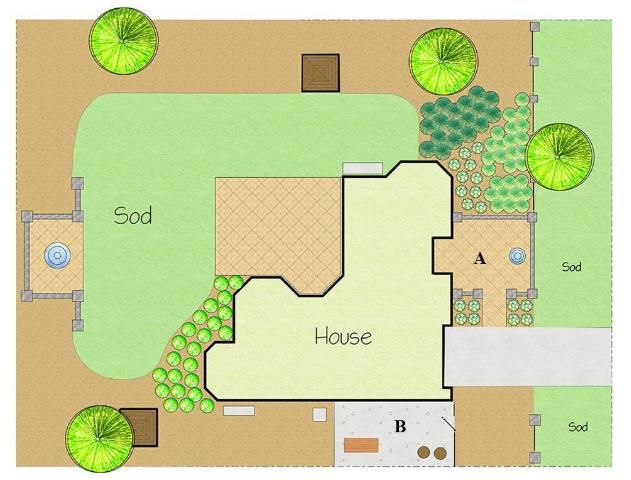
- Use porous pavers (A) or aggregates, such as gravel, (B) when possible to allow stormwater drainage.
- Design hardscape in simple forms that will minimize the amount of cutting and waste of materials.
- Whenever possible use reclaimed, reprocessed, or recycled-content materials (For more on this topic, see EDIS Publication 1110, Design Strategies for a Sustainable Home Landscape, https://edis.ifas.ufl.edu/publication/EP374).
- Use the most durable materials possible. Long-lasting materials will not have to be replaced or repaired as often and will not end up in the waste stream as quickly.
- Choose materials that use green manufacturing processes and sustainable harvesting techniques. Sustainable techniques minimize damage to the environment, using practices that protect water resources and using non-toxic processing solutions, machinery and extraction techniques less destructive to natural habitats.
- Use materials with good reuse or recycling potential and design, so materials can be disassembled and used again.
Installation Considerations
- If possible, install all new hardscape at the same time to save money and ensure that materials from the same lot will be used.
- Minimize the movement of heavy trucks and equipment in the yard to avoid soil compaction.
- Protect trees from equipment damage with barricades set at the drip lines (outside edge of canopy) or farther out from the tree if possible. (For more on this topic, see EDIS Publication CIR1093, How Trees Grow in the Urban Environment, https://edis.ifas.ufl.edu/publication/FR002.)
- Use installation methods that require the least site disturbance (build on piers or stem walls).
- Call your local utility for the location of underground utility lines before digging.
- Consider your landscape irrigation system and install any below-ground conduits under walkways or patios. Install piping and drains on pool decks if needed.
- Slope hard surfaces so water drains away from the house and into planted areas.
Phase 2: Step 4—Install Trees and Mulch
Credit: Gail Hansen, UF/IFAS
Design Considerations
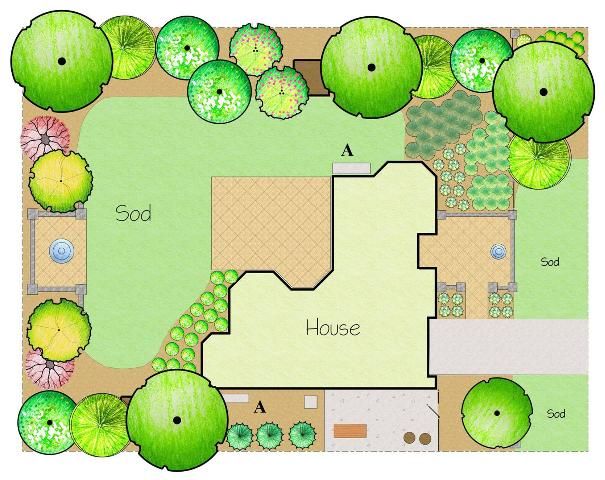
- Give trees room to grow. Locate trees so they will not interfere with overhead or below-ground utility lines. (For more on this topic, see Ask IFAS: Planting Landscape Trees.
- Locate trees to act as a buffer, to screen views, and to shade the air-conditioning unit, patios and play spaces.
- Choose trees that are appropriate for the regional climate, including in regards to wind, moisture, and salt tolerance. (To learn more about trees, see EDIS Publication FC23, Dooryard Fruit Varieties, https://edis.ifas.ufl.edu/publication/MG248, and EDIS Publication ENH995, Checklist of New, Improved and Underutilized Trees for North and Central Florida, https://ufdc.ufl.edu/IR00001776/00001.)
- Wind-proof trees by grouping them closely to deflect high winds (For more on this topic, see EDIS Publication ENH1056, Design Solutions for a More Wind-Resistant Urban Forest, https://edis.ifas.ufl.edu/pdffiles/EP/EP30900.pdf.)
- For energy efficiency, use large shade trees on the west, east and south sides of your home. Deciduous trees will create shade in summer and allow for sun in winter. (For more on this topic, see EDIS Publication EES43, Enviroscaping to Conserve Energy: A Guide to Microclimate Modification, https://ufdc.ufl.edu/IR00004807/00001.)
- Avoid using monocultures (only one type), but also avoid creating a landscape in which every tree is a different type. Use three or four different trees and group them in different combinations to create aesthetic interest.
- Consider the natural shape and size of the tree when choosing its location. Don't plan to force a shape or size by pruning. However, use selective pruning to keep the trees healthy, influence fruit production, and encourage branching and fullness in foliage for aesthetics. (For more on this topic, see EDIS Publication CIR853, Pruning Landscape Trees and Shrubs, https://ufdc.ufl.edu/IR00002901/00001.)
- Install cisterns or rain barrels to use for irrigation. Locate the cisterns (A) next to downspouts and areas where future plantings will be installed. (To learn more about capturing rainwater see Rain Barrels: A Homeowner's Guide, Southwest Florida Water management District, https://www.swfwmd.state.fl.us/sites/default/files/store_products/rain_barrels_guide.pdf.)
Installation Considerations
Call your local utility to locate underground utility lines before digging.
Choose trees carefully at the nursery. Consider the shape, size, and health of the tree. (For more on this topic, see EDIS Publication ENH1060, Selecting Quality Trees from the Nursery, https://edis.ifas.ufl.edu/pdffiles/EP/EP31300.pdf.)
Use proper installation techniques to ensure survival of the trees. (For more on this topic, see Ask IFAS: Planting Landscape Trees.
Install a temporary micro-irrigation system that allows water to seep into the ground (under the mulch), rather than spraying water on each tree above ground, or plan to hand-water until tree is established.
Phase 3: Step 5—Install Plant Bed #1
Credit: Gail Hansen, UF/IFAS
Design Considerations
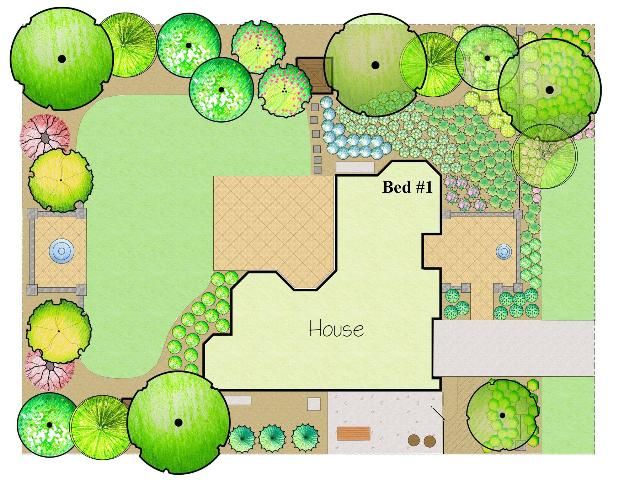
- Consult your master plan to decide where to install the first planted area. Base your choice on the bed organization and the use of different areas. You may choose to begin with the area of the yard you use the most, usually the back yard, or the area most visible to the public, typically the front yard.
- To determine the extent of the planted area, use logical boundaries—walkways, fences, house corners or viewsheds (the visible area) from important viewpoints, such as windows or patios.
- Remove a portion of sod (about 1/4–1/3 of the existing sod) and test the soil prior to planting. (For more on this topic, see EDIS Publication SL281, Soil Sampling and Testing for the Home Landscape or Vegetable Garden, https://edis.ifas.ufl.edu/publication/SS494.)
- Relocate existing plants as noted on your master plan and space and install new plants as indicated in the plan.
Installation Considerations
- If you are not installing the plants, hire landscape contractors certified in Florida-Friendly Best
- Management Practices (BMPs). (For more on this topic, see EDIS Publication ENH1113, Frequently Asked Questions about Florida-Friendly Landscaping, https://ufdc.ufl.edu/IR00003433/00001.)
- If your landscape already has an irrigation system, determine whether the location of sprinkler heads are compatible with the bed shape and turf area. If a separate zone (a group of sprinklers that water at the same time) is in a plant bed, you may be able to refit zones with micro-irrigation (smaller sprinklers that discharge a small amount of water at the base of the plants) in the plant beds.
- If not (and if you choose not to hand-water), install a new underground irrigation system in Bed #1 before installing the plants, or install a temporary, above-ground system after installing the plants. Use sprays on turf areas and use emitters, bubblers or micro-sprays (irrigation heads that release a small amount of water close to the plant base) on plants. (See EDIS Publication ABE355, Home Irrigation and Landscape Combinations for Water Conservation in Florida, https://edis.ifas.ufl.edu/publication/AE287.)
- Use proper installation practices for planting. (For more on this topic, see Ask IFAS: Planting Landscape Trees)
- Mulch newly installed plants to control weeds and reduce runoff. (To learn more about mulches, see Ask IFAS: Mulches for the Landscape.)
- Follow a recommended irrigation schedule until plants are established then reduce irrigation as needed.
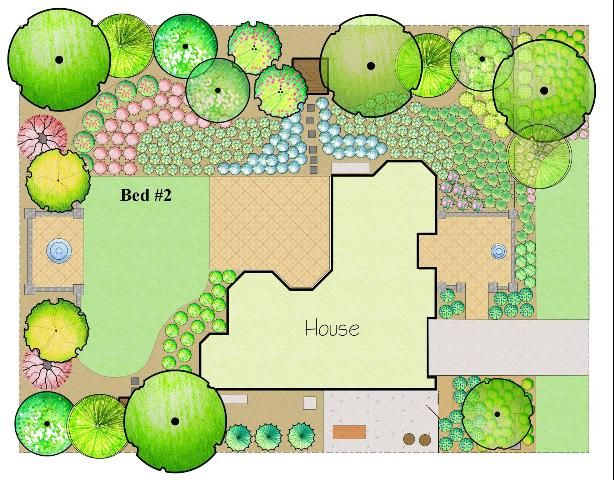
Phase 3: Step 6—Install Plant Bed #2
Credit: Gail Hansen, UF/IFAS
Design Considerations
- Allow time for the plants in Bed #1 to establish before removing the sod for Bed #2.
- Follow the procedure used for Bed #1 to install Plant Bed #2.
- The location of Bed #2 is also determined by bed organization and use. You may choose to plant the area that is contiguous to Bed #1 for continuity and a more finished look, or you may decide to plant another area of the garden that is used more often or used for a different purpose.
- Another consideration for locating Bed #2 may be the size of the trees and the amount of shade they provide.
- In the example plan, the location of Bed #2 was chosen for two reasons—to continue Bed #1 and because the area is highly visible from the backyard patio.
- Remember the plant material in Bed #2 will be smaller than the plants in Bed #1, but the plants in Bed #2 will quickly catch up and fill in the space.
Installation Considerations
- Follow the same installation procedures used for plant Bed #1.
- If a temporary, above-ground irrigation system was used for Bed #1,the system can be relocated to use in Bed #2.
- If using an existing irrigation system, check again to determine whether the sprinkler locations are compatible for the bed size and shape. If yes, it may be possible to refit the zone with an appropriate micro-irrigation system.
- If a re-fit will not provide adequate coverage, use a temporary system or install a new underground system, unless you choose to hand-water.
- See maintenance considerations under Step 7.
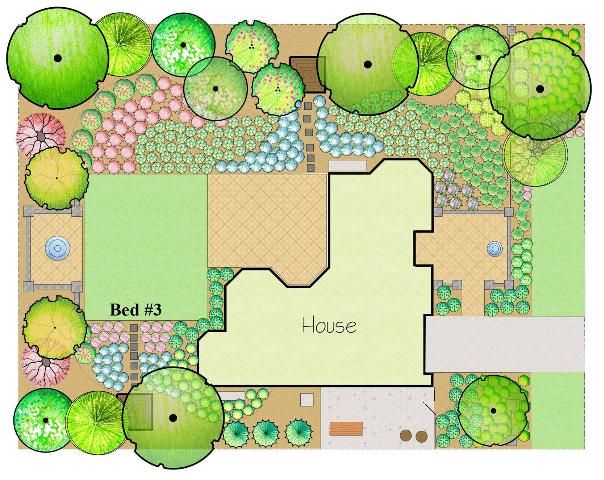
Phase 3: Step 7—Install Plant Bed #3
Credit: Gail Hansen, UF/IFAS
Design Considerations
- Follow the procedure used in Step 6 to install Bed #3.
- The area designated for final installation on the example plan was the backyard corner. This area is not highly visible from the patio and is separated from the rest of the yard by the lawn panel. In addition, the garden shed and compost are located in this area, which is adjacent to the work zone, where the AC unit and storage/trash area are located.
- Remember the plant material in Bed #3 will be smaller than the plants in Bed #1 and Bed #2, but the plants in Bed #3 will also quickly catch up to the size of the plants in beds #1 and #2.
Installation and Maintenance Considerations
Follow the same installation procedures used for Bed #2.
If a temporary above-ground irrigation system was used for Bed #2, the system can be relocated again to use in Bed #3.
If using an existing irrigation system, check to see if the sprinkler locations are compatible for the bed shape to determine whether a re-fit is possible. If a re-fit will not provide adequate coverage, use a temporary system or install a new underground system.
Maintain the entire yard with proper irrigation, pruning, fertilizer, composting, and mulching.
Methods. (For more on this topic, see Ask IFAS: Florida-Friendly Landscaping Program, https://edis.ifas.ufl.edu/entity/topic/ffl.)
Use Integrated Pest Management (IPM), including using the least toxic alternatives for pesticides and natural enemies of pests. (For more on this topic, see EDIS Publication ENY298, Landscape Integrated Pest Management, https://edis.ifas.ufl.edu/publication/IN109.)
If you are not maintaining the landscape, hire a landscape contractor who is certified in Florida-Friendly Best Management Practices (BMPs). (For more on this topic, see EDIS Publication ENH1113, Frequently Asked Questions about Florida-Friendly Landscaping, https://ufdc.ufl.edu/IR00003433/00001.)
Sources for Information
EDIS Publications (https://edis.ifas.ufl.edu/)
Alexander, Amy et al. (2007) A Guide to Florida Friendly Landscaping: Florida Yards and Neighborhoods Handbook. Department of Environmental Horticulture, Institute of Food and Agricultural Sciences, University of Florida: Gainesville, Fla.
Black, R., Gilman, E., Knox, G. & Ruppert, K. (2003) Mulches for the Landscape. (http://ufdc.ufl.edu/IR00005926/00001) Department of Environmental Horticulture, Institute of Food and Agricultural Sciences, University of Florida: Gainesville, Fla.
Duryea, M. (2008) Landscape Mulches: What are the Choices in Florida? School of Forest Resources and Conservation, Institute of Food and Agricultural Sciences, University of Florida: Gainesville, Fla.
Duryea, M. & Malavasi, M. (2009) How Trees Grow in the Urban Environment. (https://edis.ifas.ufl.edu/publication/FR002) Department of Environmental Horticulture, Institute of Food and Agricultural Sciences, University of Florida: Gainesville, Fla.
Gilman, Edward F. 2003. “Irrigating Landscape Plants During Establishment: ENH857/EP113, 12/2002”. EDIS 2003 (9). https://doi.org/10.32473/edis-ep113-2002
Gilman, Edward F. 2002. “Specifications for Planting Trees and Shrubs in the Southeastern U.S.: ENH856/EP112, 3/2002”. EDIS 2002 (6). https://doi.org/10.32473/edis-ep112-2002
Gilman, E. & Black, R. (2005) Pruning Landscape Trees and Shrubs. (https://ufdc.ufl.edu/IR00002901/00001) Department of Environmental Horticulture, Institute of Food and Agricultural Sciences, University of Florida: Gainesville, Fla.
Gilman, E. & Sadowski, L. (2007) Selecting Quality Trees from the Nursery. (https://edis.ifas.ufl.edu/publication/EP313) Department of Environmental Horticulture, Institute of Food and Agricultural Sciences, University of Florida: Gainesville, Fla.
Gilman, E. & Partin, T. (2007) Design Solutions for a More Wind-Resistant Urban Forest. (https://edis.ifas.ufl.edu/publication/EP309) Department of Environmental Horticulture, Institute of Food and Agricultural Sciences, University of Florida: Gainesville, Fla.
Haley, M., Dukes, M, Miller, G. & Haman, D. (2005) Home Irrigation and Landscape Combinations for Water Conservation in Florida. (https://edis.ifas.ufl.edu/publication/AE287) Department of Agricultural and Biological Engineering, Institute of Food and Agricultural Sciences, University of Florida: Gainesville, Fla.
Haman, D., Clark, G. & Smajstrla, A. (2005) Irrigation of Lawns and Gardens. (https://ufdc.ufl.edu/IR00004389/00001) Agricultural and Biological Engineering Department, Institute of Food and Agricultural Sciences, University of Florida: Gainesville, Fla.
Hansen, G. (2009) Landscape Design: Ten Important Things to Consider. (https://edis.ifas.ufl.edu/publication/EP375) Department of Environmental Horticulture, Institute of Food and Agricultural Sciences, University of Florida: Gainesville, Fla.
Hansen, G. (2009) Design Strategies for a Sustainable Home Landscape. (https://edis.ifas.ufl.edu/publication/EP374) Department of Environmental Horticulture, Institute of Food and Agricultural Sciences, University of Florida: Gainesville, Fla.
Hostetler, M., Klowden, G., Miller, S. W., & Youngentob, K. N. (2009) Landscaping Backyards for Wildlife: Top Ten Tips for Success. (https://edis.ifas.ufl.edu/publication/UW175) Department of Wildlife Ecology and Conservation, Institute of Food and Agricultural Sciences, University of Florida: Gainesville, Fla.
Hostetler, M. (2009) A Bird's-Eye View: How Birds Select Habitat. (https://edis.ifas.ufl.edu/publication/UW174) Department of Wildlife Ecology and Conservation, Institute of Food and Agricultural Sciences, University of Florida: Gainesville, Fla.
Knox, G. (2007) Checklist of New, Improved and Underutilized Trees for North and Central Florida. (https://ufdc.ufl.edu/IR00001776/00001) Department of Environmental Horticulture, Institute of Food and Agricultural Sciences, University of Florida: Gainesville, Fla.
Meerow, A. & Black, R. (2003) Enviroscaping to Conserve Energy: A Guide to Microclimate Modification. (https://ufdc.ufl.edu/IR00004807/00001) Department of Environmental Horticulture, Institute of Food and Agricultural Sciences, University of Florida: Gainesville, Fla.
Scherer, C., Koehler, P., Short, D. & Buss, E. (2006) Landscape Integrated Pest Management. (https://ufdc.ufl.edu/IR00002797/00001) Department of Entomology and Nematology, Institute of Food and Agricultural Sciences, University of Florida: Gainesville, Fla.
Shober, A. & Mylavarapu, R. (2009) Soil Sampling and Testing for the Home Landscape or Vegetable Garden. (https://edis.ifas.ufl.edu/publication/SS494) Department of Soil and Water Science, Institute of Food and Agricultural Sciences, University of Florida: Gainesville, Fla.
Smajstrla, A.G., Zazueta, F.S., & Haman, D.Z. (2005) Lawn Sprinkler Selection and Layout for Uniform Water Application. (http://ufdc.ufl.edu/IR000043) Agricultural and Biological Engineering Department, Institute of Food and Agricultural Sciences, University of Florida: Gainesville, Fla.
Sprenkel, R. (2008) Getting Started in Butterfly Gardening. Entomology and Nematology Department, Institute of Food and Agricultural Sciences, University of Florida: Gainesville, Fla.
Trenholm, Laurie E. 2010. “Establishing Your Florida Lawn: ENH-03/LH013, Rev. 1/2010”. EDIS 2010 (2). https://doi.org/10.32473/edis-lh013-2010
Trenholm, L., Momol, E., Shober, A., Denny, G. & Nell, T. (2009) Frequently Asked Questions About Florida-Friendly Landscaping. (https://ufdc.ufl.edu/IR00003433/00001) Department of Environmental Horticulture, Institute of Food and Agricultural Sciences, University of Florida: Gainesville, Fla.
Williamson, J.G., (2009) Dooryard Fruit Varieties. (https://edis.ifas.ufl.edu/publication/MG248) Horticultural Sciences Department, Institute of Food and Agricultural Sciences, University of Florida: Gainesville, Fla.
Suggested Readings
Calkins, M. (2009) Materials for Sustainable Sites: A Complete Guide to the Evaluation, Selection, and Use of Sustainable Construction Materials. John Wiley & Sons, Inc.: Hoboken, NJ.
Scarfone, S. (2007) Professional Planting Design: An Architectural and Horticultural Approach for Creating Mixed Bed Plantings. John Wiley & Sons, Inc.: Hoboken, NJ.
Smith, C., Clayden, A. & Dunnett, N. (2008) Residential Landscape Sustainability: A Checklist Tool. Blackwell Publishing: Oxford, UK.
Southwest Florida Water Management District, (Watson, G.), (n.d.) Rain Barrels: A Homeowner's Guide, https://www.swfwmd.state.fl.us/sites/default/files/store_products/rain_barrels_guide.pdf.
Wichman, Tom et al. (2006) Florida-Friendly Plant List 2006. (http://fyn.ifas.ufl.edu/pdf/FYN_Plant_Selection_Guide_v090110.pdf). Department of Environmental Horticulture, Institute of Food and Agricultural Sciences, University of Florida: Gainesville, Fla.