MENU

AskIFAS Powered by EDIS

Conducting a Blue Dye Demonstration to Teach Irrigation and Nutrient Management Principles in a Residential Landscape

George Hochmuth, Laurie Trenholm, Esen Momol, Don Rainey, Claire Lewis, and Brian Niemann

This publication is part of a series developed to assist Florida homeowners with managing their landscapes to reduce environmental impacts. This is a joint publication of multiple departments and programs in UF/IFAS, including the Florida-Friendly Landscaping™ program, the Department of Soil and Water Science, the Environmental Horticulture Department, and the Center for Landscape Conservation and Ecology. This fact sheet was produced with support from the Florida Turfgrass Association through a Florida Department of Agriculture and Consumer Services Specialty Crops Block Grant.

For the rest of this series, visit https://edis.ifas.ufl.edu/topic_series_environmental_landscape_management.

Introduction

Proper irrigation management is critical to proper nutrient management in the home landscape. How lawns and landscapes are fertilized and irrigated can directly impact the natural environment through nutrient runoff and leaching. Landscape maintenance professionals and homeowners should adopt environmentally-friendly approaches to irrigation and nutrient management. After selecting the right plant for the right place in the landscape, water is the next critical factor in maintaining a healthy landscape. If plants receive too much irrigation, water and nutrients pass below the root system and are unavailable to the plant. These practices of over-irrigating and fertilizing can lead to leaching soluble nutrients into groundwater.

This publication discusses the "blue dye" test, which is one way that Extension professionals can show homeowners how water and nutrients move through the soil following irrigation. The information should be useful for county agents to demonstrate basic irrigation and nitrogen management practices and their effects on nitrate-nitrogen (N) leaching.
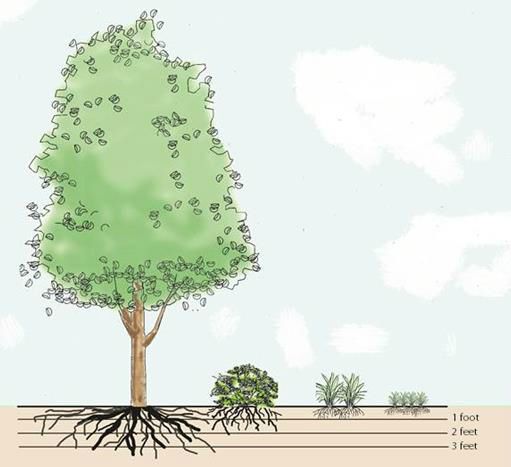
 

Figure 1. Plants have different root zones. Knowledge of the plant's root zone helps to determine how long to operate the irrigation system to avoid moving the irrigation water past the root zone.
Figure 1.  Plants have different root zones. Knowledge of the plant's root zone helps to determine how long to operate the irrigation system to avoid moving the irrigation water past the root zone.
Credit: Claire Lewis


Blue Dye Test

Extension professionals are often looking for new tools to teach nutrient and water management principles to homeowners. One new tool is a water-soluble marking dye that can demonstrate how water and nitrogen fertilizer move through the soil profile following irrigation. This blue-dye test has been used to demonstrate irrigation management in field-grown vegetables (Simonne et al. 2011; Simonne et al. 2012). The same approach can be used in home landscapes to demonstrate water and nitrogen movement in the soil beneath lawns and landscapes.

Method

Careful planning is required for a successful dye demonstration. The following table summarizes the main components of setting up and completing the demonstration in a turfgrass landscape area.

Education Program

If you plan an education program to accompany a blue dye test, you should do the following:

  • Discuss the importance of irrigation and nitrogen fertilizer in the landscape.

  • Present the UF/IFAS recommendations for irrigation and nitrogen management using the Florida-Friendly Landscaping™ principles (http://fyn.ifas.ufl.edu/homeowners/nine_principles.htm).

  • Discuss the role of soil type in water management (for example, water easily moves in sandy soils).

  • Discuss the concept of the root zone and how irrigation is managed to keep the water and nutrients in the root zone.

Key Points and Questions

  • Are there any differences in the depth of the dye relating to the amount of irrigation applied?

  • Can you see the root system and the depth of the root system relative to the dye movement?

  • Explain the potential environmental challenges presented when the dye moves below the root system.

  • Describe the soil texture at the site and how texture relates to water movement. Use the EDIS publication MG451/SL268 Soils and Fertilizers for Master Gardeners: Soil Physical Properties to discuss soil texture (Shober 2012; https://edis.ifas.ufl.edu/mg451).

An Example Dye Demonstration

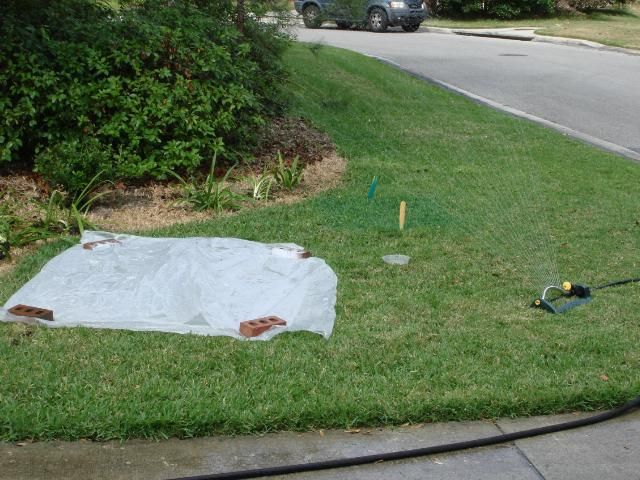
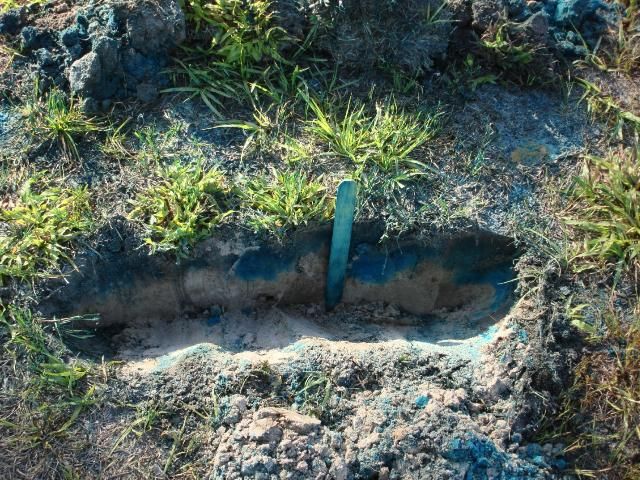
The following photos illustrate the main steps in conducting a dye test (Figure 2–Figure 5). These photos are from a dye demonstration conducted in Gainesville, Florida.


Figure 2. Irrigation is applied to the turf after dye was applied to two areas (each 3 sq ft) marked by the stakes. Notice that a container is catching the irrigation water to measure the amount of irrigation applied.
Figure 2.  Irrigation is applied to the turf after dye was applied to two areas (each 3 sq ft) marked by the stakes. Notice that a container is catching the irrigation water to measure the amount of irrigation applied.
Credit: George Hochmuth


Figure 3. More irrigation is applied to the second treatment area so that it receives a higher amount of irrigation, while the first area is covered with the tarp so that it receives a lower amount of irrigation.
Figure 3.  More irrigation is applied to the second treatment area so that it receives a higher amount of irrigation, while the first area is covered with the tarp so that it receives a lower amount of irrigation.
Credit: George Hochmuth


Figure 4. Digging the dyed areas allows you to see how the dye moves in sandy soils.
Figure 4.  Digging the dyed areas allows you to see how the dye moves in sandy soils.
Credit: George Hochmuth


Figure 5. This photo shows a comparison of the depth that the dye moves in clay soils (left) versus sandy soil (right).
Figure 5.  This photo shows a comparison of the depth that the dye moves in clay soils (left) versus sandy soil (right).
Credit: George Hochmuth


Summary

When water moves through the soil, nitrogen and other nutrients move with it. The sandy soils of Florida are especially prone to nitrate-N leaching. Extension agents can teach this concept using a blue dye demonstration. During the dye demonstration, you can apply varying amounts of irrigation to show how excessive irrigation causes the water and dye to move below the root zone. This test illustrates how water and nitrogen move in the soil. Excessive irrigation leads to fertilizer loss, resulting in economic loss and leaching that pollutes water bodies.

References

Shober, A. L. 2012. Soils and Fertilizers for Master Gardeners: Soil Physical Properties. SL268. Gainesville: University of Florida Institute of Food and Agricultural Sciences. https://edis.ifas.ufl.edu/mg451.

Simonne, E. H., D. W. Studstill, M. D. Dukes, J. Duval, R. C. Hochmuth, G. McAvoy, T. Olczyk, and S. M. Olson. 2011. How to Conduct an On-Farm Dye Test and Use the Results to Improve Drip Irrigation Management in Vegetable Production. HS980. Gainesville: University of Florida Institute of Food and Agricultural Sciences. https://edis.ifas.ufl.edu/hs222.

Simonne, E. H., D. W. Studstill, R. C. Hochmuth, J. T. Jones and C. W. Starling. 2012. On-Farm Demonstration of Soil Water Movement in Vegetables Grown with Plasticulture. HS1008. Gainesville: University of Florida Institute of Food and Agricultural Sciences. https://edis.ifas.ufl.edu/hs251.

Tables

Table 1. 

How to develop and complete a successful blue dye test1

When to complete:

Step No.

What you need to do:

Comments

Before the day of the dye test

1

Locate a suitable demonstration area; turfgrass is easiest to work with.

The area selected could be a part of a large homeowner yard or community common area. If there is a homeowners association, make sure to get the association involved in the demonstration. Select an area for the test that is away from traffic. This ensures residents do not have to walk through the dyed areas, preventing people from picking up the dye and staining items.

2

Assemble all the needed supplies and equipment.

The area should have a permanent irrigation system, or a portable irrigation sprinkler can be used. For this test, you will need blue dye, and there are several available on the market. Dyes are highly concentrated and should be used with care.

You also will need the following supplies:

- hose and water source

- plastic tarps

- signs and plot stakes

- measuring stick

- shovel

- 5-gallon buckets

- hand pump sprayer

- rain gauges

- camera

3

Plan the demonstration and accompanying educational program.

Demonstrations should include a small educational program with presentations and discussions about irrigation and nitrogen management. This activity should teach the basics illustrated by the demonstration.

4

Decide which areas will receive treatments. For example, three areas could be marked to receive varying amounts of irrigation, including an excessive level. This approach will demonstrate how excessive irrigation can move the water below the root system by taking the dye with it.

Practice with the irrigation system to calibrate the application rate. Know the recommended application rate from the UF/IFAS recommendations. A good starting point is the Florida Automated Weather Network (FAWN) Irrigation Scheduler Tool (http://fawn.ifas.ufl.edu/tools/urban_irrigation/). Include the recommended irrigation program as one of the treatments. Use rain gauges to demonstrate the amounts of water applied.

On the day of the dye

test

5

Mark the areas where you are applying the treatments. This will help you identify where you apply the different amounts of irrigation. For example, use an area of 20 ft by 20 ft that can be irrigated separately. Start in the morning for an afternoon educational program to give time for the dye to move.

The dye-treated areas do not need to be large in size, so you will not use a lot of dye. Mark an area approximately 3 ft by 3 ft within the irrigated area where you are applying the dye.

6

Apply the dye.

Using a bucket, carefully mix the dye concentrate with water to dilute it. A 50:50 solution is usually enough. Use the sprayer to apply dye uniformly over the dye area. Be sure to apply a uniform amount; approximately 0.5 gallon of dye mix is enough for one square yard.

7

Run irrigation for the allotted length of time.

Apply the dye and irrigate each treatment plot according to plan. If you are using an irrigation system that irrigates a large area, cover the plots receiving lower levels of irrigation using plastic tarps while the other plots receive higher levels of irrigation.

8

Dig into the sod to expose the soil profile.

Allow at least two hours or more for the water to penetrate into the soil. Dig holes deep enough to expose the lowest penetration of the dye. A final "shaving" of the side of the hole with a flat blade shovel gives the best view of the dye pattern in the soil. As the soil dries on the face of the dug area, the contrast in color improves.

9

Place a measuring tape or ruler into the hole to demonstrate the depth that the dye reaches. Place signs at each treatment plot.

Show the depth of the root system relative to the depth of the dye movement. Describe the irrigation treatments that led to the various resulting dye movements. Ask questions about the relationship of irrigation management and mobile nutrient movement.

During the education program

10

You may decide to include a short education program in conjunction with the demonstration.

Reserve a pavilion or other suitable area in the community, or put up a tent for shade.

After the dye test

11

Remove any equipment and supplies, and backfill all the holes.

The dye test should not have any effect on the turfgrass.

1The dye used in this demonstration was Alligare Super Marking Dye, available from Alligare LLC, Opelika, AL 36802.


Publication #SL392

Release Date:December 22, 2016

Reviewed At:October 19, 2021

Related Experts

Hochmuth, George J.

Specialist/SSA/RSA

University of Florida

Trenholm, Laurie

University of Florida

Lewis, Claire

Specialist/SSA/RSA

University of Florida

Momol, Esen A.

Specialist/SSA/RSA

University of Florida

Rainey, Donald P.

Specialist/SSA/RSA

University of Florida

Niemann, Brian

University of Florida

The use of trade names in this publication is solely for the purpose of providing specific information. UF/IFAS does not guarantee or warranty the products named, and references to them in this publication do not signify our approval to the exclusion of other products of suitable composition.

Fact Sheet

About this Publication

This document is SL392, one of a series of the Department of Soil and Water Sciences, UF/IFAS Extension. Original publication date November 2013. Visit the EDIS website at https://edis.ifas.ufl.edu for the currently supported version of this publication.

About the Authors

George Hochmuth, professor, Department of Soil and Water Sciences; Laurie Trenholm, professor, Environmental Horticulture Department; Esen Momol, director, Florida-Friendly Landscaping™ Program; Don Rainey, Extension agent, UF/IFAS Extension Sarasota County; Claire Lewis, senior information specialist, Florida-Friendly Landscaping™ Program; and Brian Niemann, Extension agent, UF/IFAS Extension Pinellas County; UF/IFAS Extension, Gainesville, FL 32611.

Contacts

  • Eban Bean
  • George Hochmuth