Background
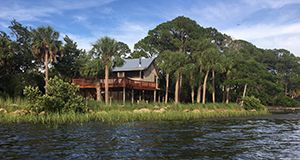
"Living shoreline" is a catch-all phrase that describes a riparian area managed with restoration techniques that use natural material such as oyster reef, mangroves, and marsh grasses to stabilize the area, prevent erosion, and protect property. The construction or placement of materials typically occurs within state waters, which include public lands located waterward of the mean high-water line. Therefore, the Florida Department of Environmental Protection (DEP), among other entities, regulates the placement of living shorelines through a permitting and submerged-land-authorization process. This process ensures that project activities do not conflict with the public interest, defines actions that must be taken when a project is expected to have negative impacts, and grants permission for the project to be constructed on state-owned submerged lands.
In the interest of streamlining the approval process for environmentally beneficial projects such as living shorelines, the DEP has defined an exemption for small-scale living shoreline projects that meet certain criteria, such as where the work extends no more than 10 ft beyond the mean high water line. See Appendix for details about criteria for exempt projects, outlined by Florida Administrative Code 62-330.051(12) (e)). A permit exemption allows qualified projects to move ahead without a full permit review, greatly simplifying the process for homeowners.
If you are a homeowner who is considering installing a living shoreline on your property and you believe your project is exempt, this guide will assist you in submitting a complete Request for Verification of Exemption form to DEP. If approved, this request will result in an official Verification of Exemption and State Land Authorization letter from DEP.
Filling out the form and obtaining the Verification of Exemption is required because it will help you ensure that you are meeting regulatory requirements. It will help you avoid penalties and fines and obtain a Submerged Lands Authorization from DEP. Remember, DEP staff at your regional regulatory office are willing to meet with you or talk with you over the phone about your project. DEP highly encourages you to schedule a "pre-application" meeting before you submit any documents, especially if you are new to the process.
While this process may appear daunting, requesting a Verification of Exemption from DEP is straightforward. You probably already have the required information at your fingertips. As a regulatory agency, DEP's goal is to ensure your project follows the rules for exemption. It is necessary to provide enough detail so DEP staff can assess compliance, but lengthy explanations are not required.
What This Guide Covers
For each application section, the guide provides example text that you can adapt to your needs. The example text covers all required details but is still no longer than one paragraph for each section. You may hand-draw site drawings or produce them using widely available software that you probably already have on your computer. As long as you have all the information and drawings handy, completing and submitting the form should take roughly 30 minutes.
You have two main options for completing the DEP Request for Verification of Exemption form: online submission through the DEP Business Portal or submission of the PDF form by mail or email. The first section of this guide covers submission through the Business Portal. The second section covers submission using the PDF form. Both methods require the same information and a processing payment of $100, but the former method integrates all of the steps and may be more convenient to use.
The glossary provides definitions for several key terms you will need to understand when preparing your application.
How to Use This Guide
Steps to complete the Verification of Exemption Request form are presented below. Each step includes explanatory text followed by a screenshot that illustrates the important points for each step. Pick which method you will use to submit the exemption request, either Method 1—Online Portal or Method 2—PDF form, and jump to that section to get started.
After You Submit
Approval of the Verification of Exemption Request typically takes about 30 days. Your DEP regulatory office will notify you during the review process of additional information and/or permitting requirements that may be needed. Currently, many projects that are exempt under DEP's rules may be eligible for expedited permitting by the US Army Corps of Engineers (Corps) rules. However, if your project has certain features—such as extending past neighboring shorelines or occurring within essential habitat for an endangered species—it may also require separate review and approval from the Corps. If you are notified by DEP that you need Corps approval, see Part 2 of this guide for help preparing a permit application for the Corps (https://edis.ifas.ufl.edu/publication/SG189). Both the DEP and the Corps applications require very similar information, so do not be daunted by this extra step. There is no fee to submit a permit application to the Corps, and the waiting period for approval is typically 60 days. The benefits of installing a living shoreline along your property are worth the initial investment.
Method 1—Online Portal
Step 1: Navigate to www.fldepportal.com/go and create an account. Once you have confirmed your email address, return to the portal home page and click "Apply."
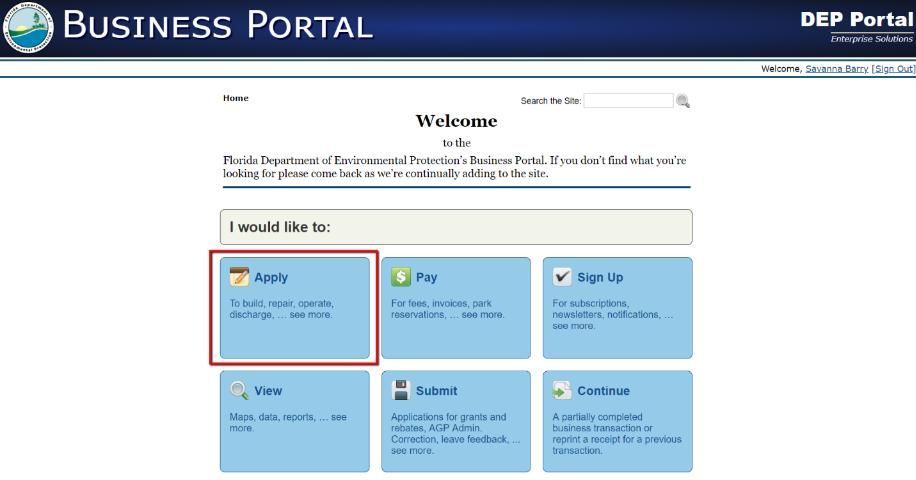
Step 2: On the next page, click "Build."

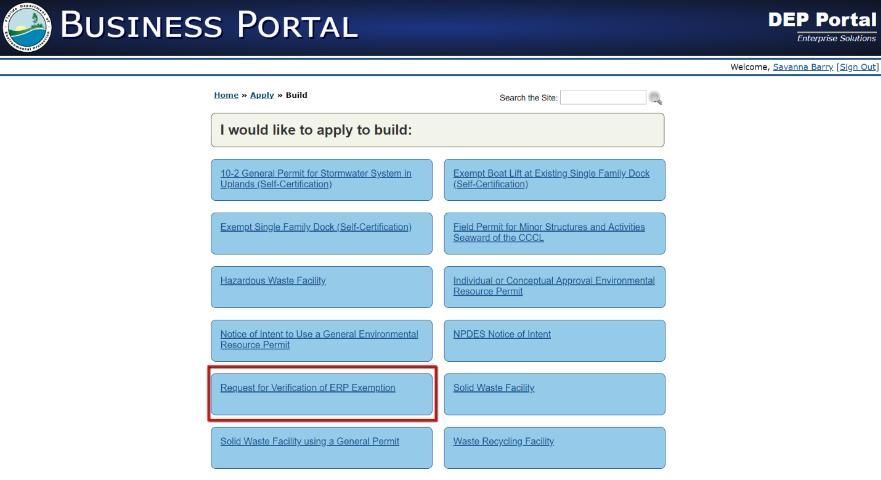
Step 3: Then, select "Request Verification of ERP Exemption." The abbreviation "ERP" stands for Environmental Resource Permitting.
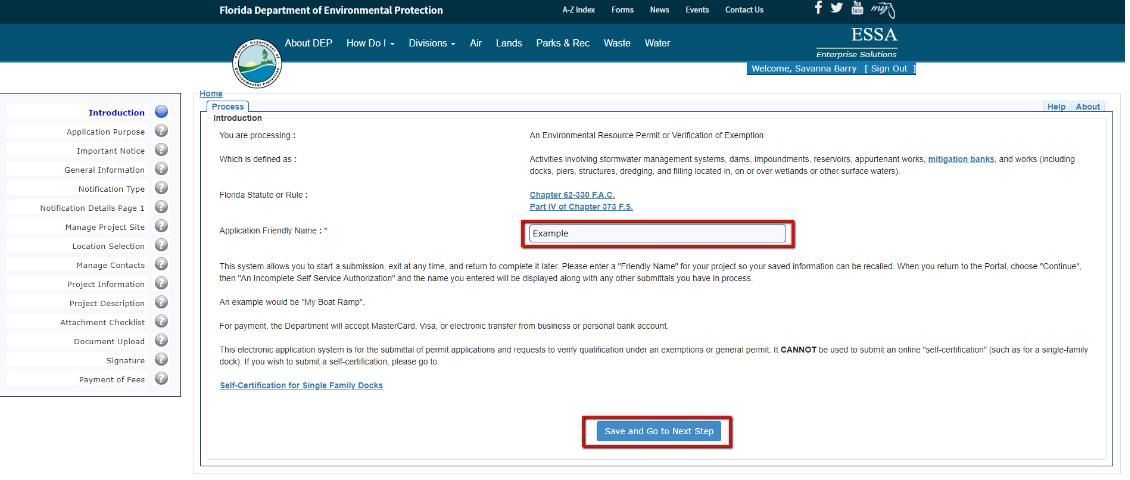
Step 4: Give your project a name and click "Save and Go to Next Step" to advance.
Step 5: Select the option for "Request Verification for Exemption from Permitting."
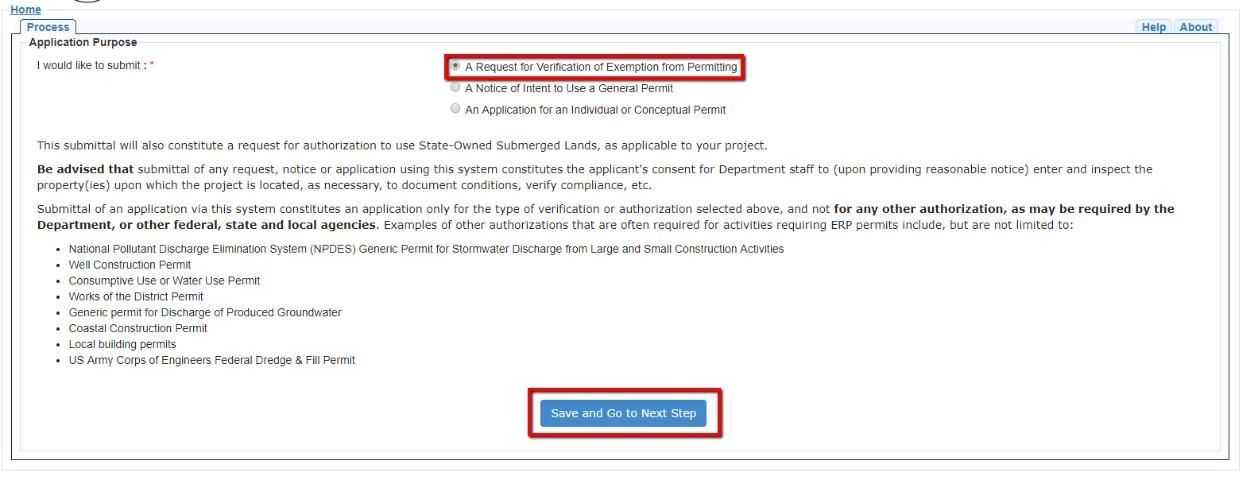
Step 6: The next page shows an important notice regarding federal permits that may be required. If your project does not fit the requirements for streamlined permitting, you will need to submit an application to the Corps (covered in Part 2 of this guide). You will be notified during the review process by the state permitting authority (DEP) if this is the case.

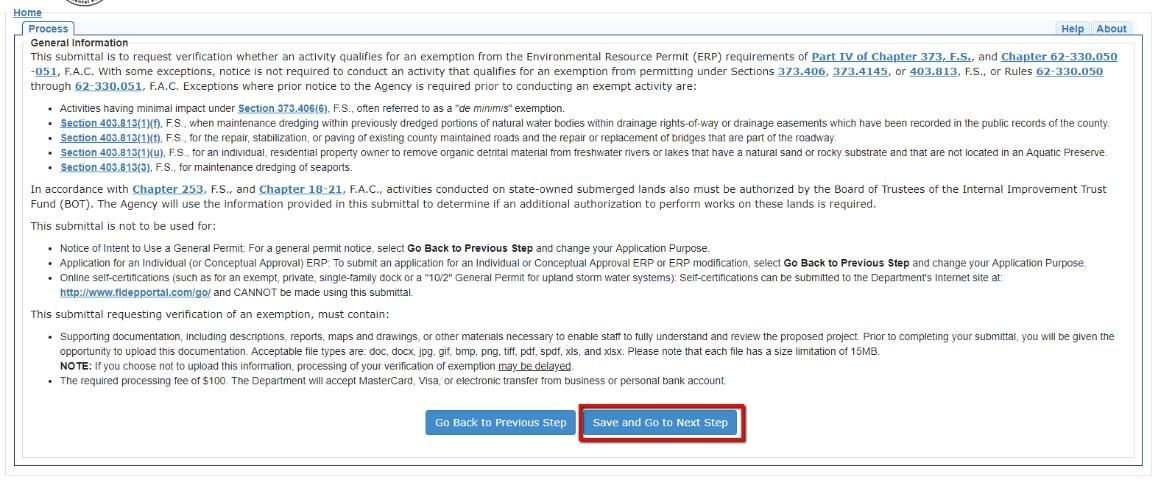
Step 7: The next page is a notice that you are applying for the Verification of Exemption and lists the acceptable file types for your supporting documentation (doc, docx, jpg, gif, bmp, png, tiff, pdf, spdf, xls, and xlsx). It also lists the processing fee of $100.00.
Step 8: On the next page, click the check box next to "Shoreline stabilization."
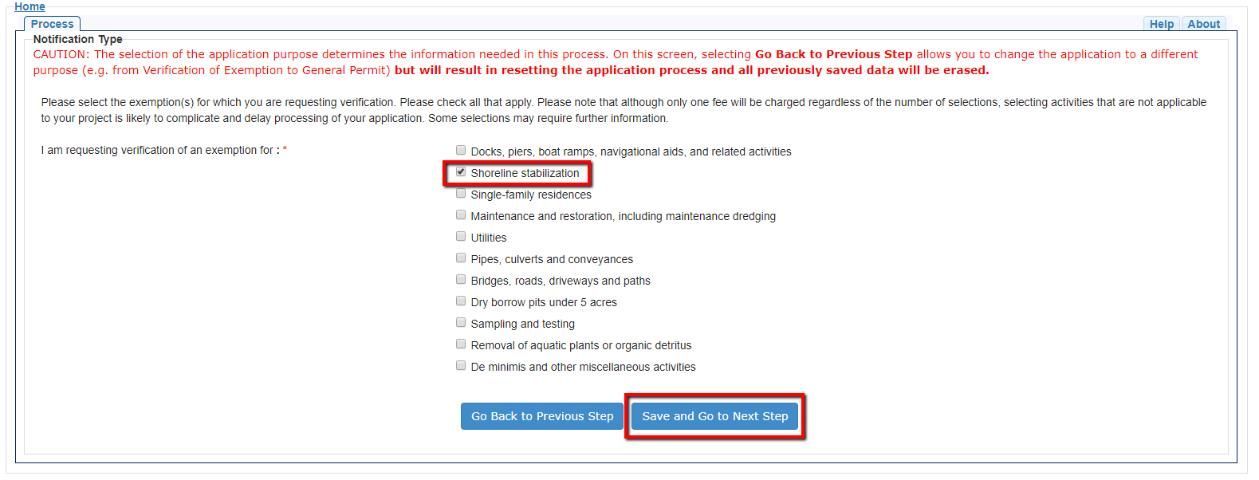
Step 9: Select the check box next to "Naturalized shoreline restoration." If your project includes addition or improvement of riprap or a seawall, you must also check the boxes pertaining to those. However, this guide addresses living shoreline projects that do not include these elements. Additional steps and fees may be required if seawalls and/or riprap revetments are included.

Step 10: The next page requires you to enter your street name (do not include street number), zip code, and city in order to determine whether your project site is already in the system. Enter this information and click the "Search and Continue" button. If you have never applied for a permit with DEP before, then it is likely that your site will not be in the system. However, it is possible that a previous homeowner or contractor has applied in the past.

Step 11: If your site (home) is in the database already, select the property by clicking the radio button next to it and advance to Step 12 by clicking "Continue."
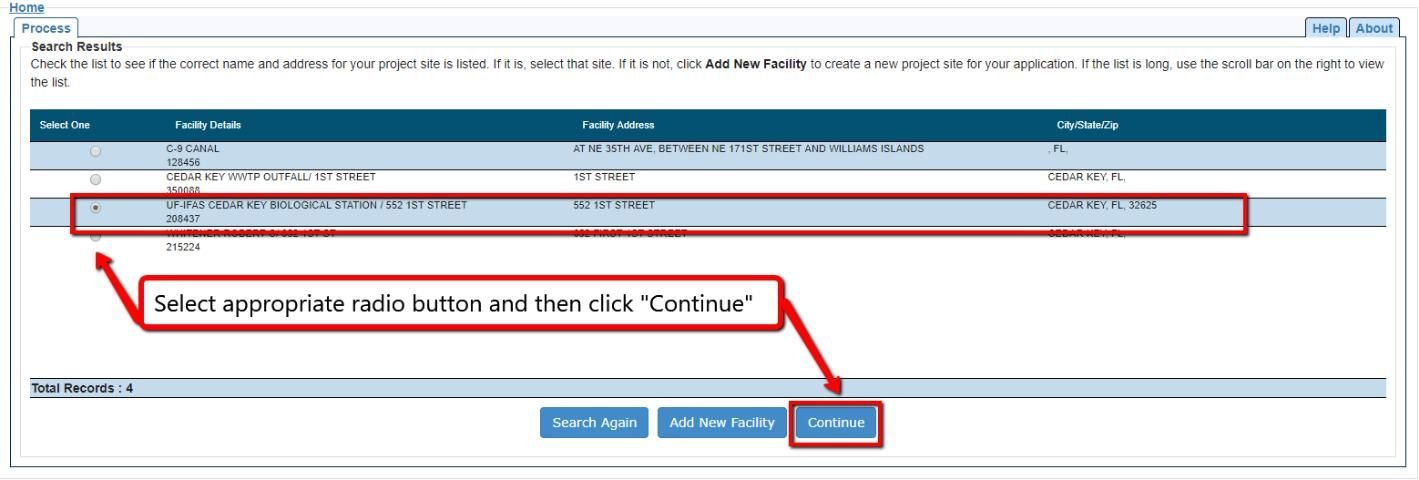
If your site (home) is not in the database already, you will need to click the "Add New Facility" button and follow the prompts.

Enter your address and indicate whether or not it is a mailing address.
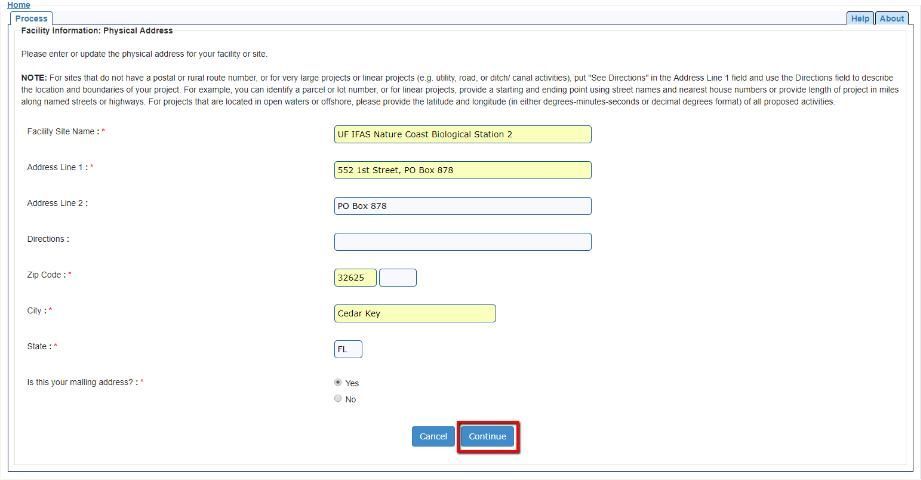
Step 12: On the next page, confirm that all information about your site has been provided (look for a green check mark icon under the "Status" column). If more information is needed, then click the pencil icon and provide missing information. Once status is green, click "Done with All Facilities" to continue.

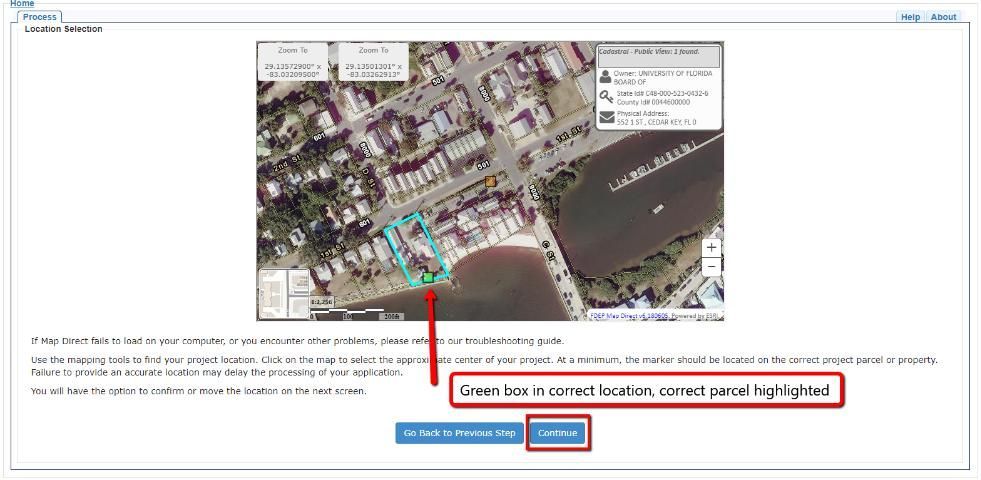
Step 13: The next page will load a mapping tool where you will be asked to select the approximate center of your project. Use the tool to navigate to your site (home), hover the cursor over where you will install the living shoreline, and click. A green box should appear where you clicked, and a blue highlighting should appear around your parcel. Click "Continue."
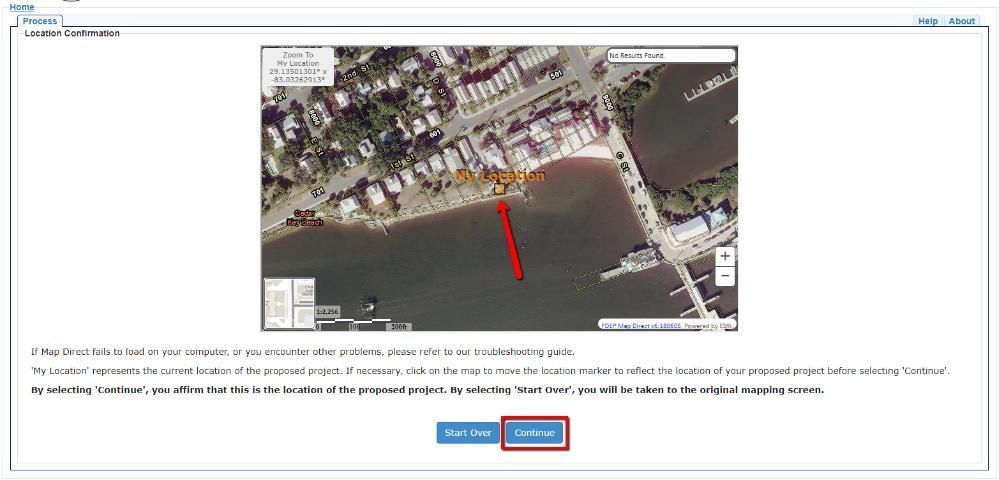
Step 14: The same mapping tool will load again, and you should confirm that the correct location is highlighted with an orange box and the words "My Location." If everything is correct, click "Continue." Click "Start Over" to go back to the first mapping screen and try again.
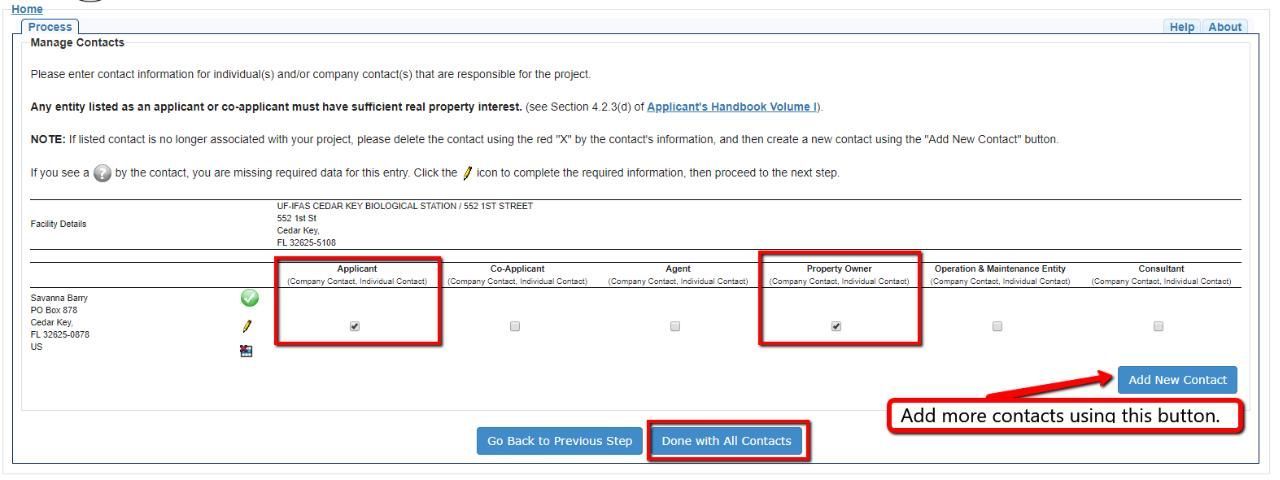
Step 15: On the next screen, you will be able to add contacts for the project. This includes any co-applicants, authorized agents, or contractors, etc. At a minimum, there must be one contact listed who is both the applicant and the property owner, which is likely to be your situation. But if you are working with a contractor or other organization, such as a non-profit or homeowner's association, you may need/want to list them here. To add a contact, click "Add New Contact" and follow the prompts. When you are done adding contacts, click "Done with All Contacts" to continue.
Step 16: To complete this step, you will need to know your tax parcel identification number. You can find your tax parcel ID number by looking at your most recent tax bill, visiting your tax collector's webpage, or by contacting your local tax assessor's office. If you choose to input dates, be sure to allow time for permit approval (generally, at least 30 days for DEP approval, and up to 60 days for US Army Corps of Engineers approval).
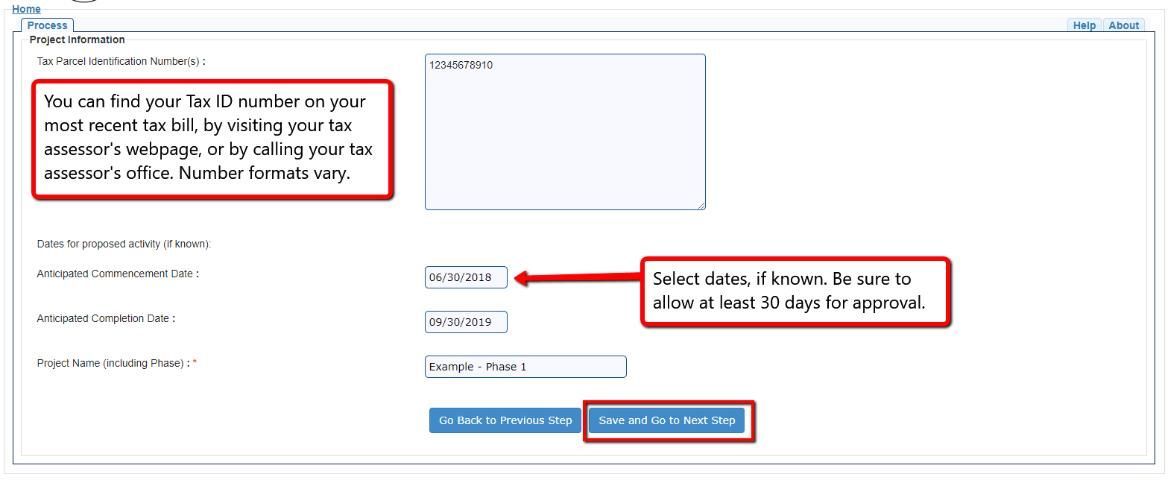
Step 17: In this step, you can choose to enter your descriptive text directly in the box, upload a separate document, or both. See below for some example descriptions of two different project types: planting only, and breakwater/sill with planting. Feel free to adapt the example text below for your own use. See the glossary at the end of this document for definitions of important terms.
NOTE: The figures given in the text below are only examples. You should consult with a local expert to determine the appropriate plant species, oyster reef heights, and materials to use in your project. Useful resources can be found at www.floridalivingshorelines.com, www.flseagrant.org, or your local UF/IFAS Extension office.
Example Text
Plantings Only
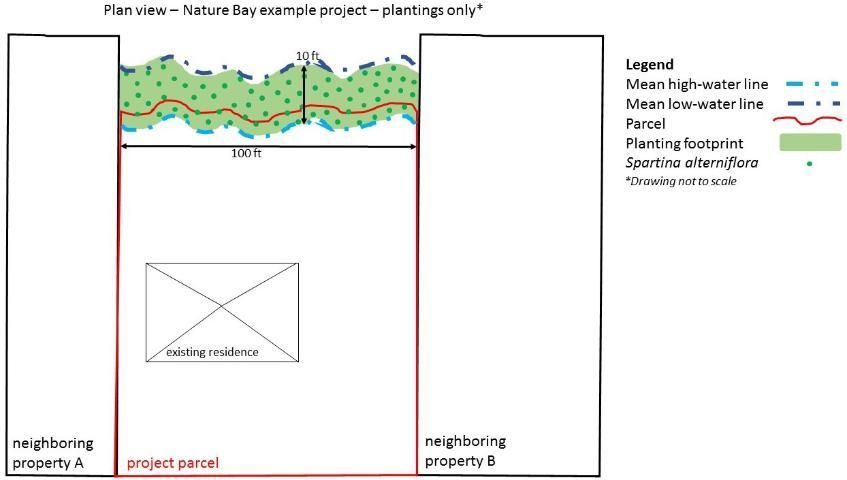
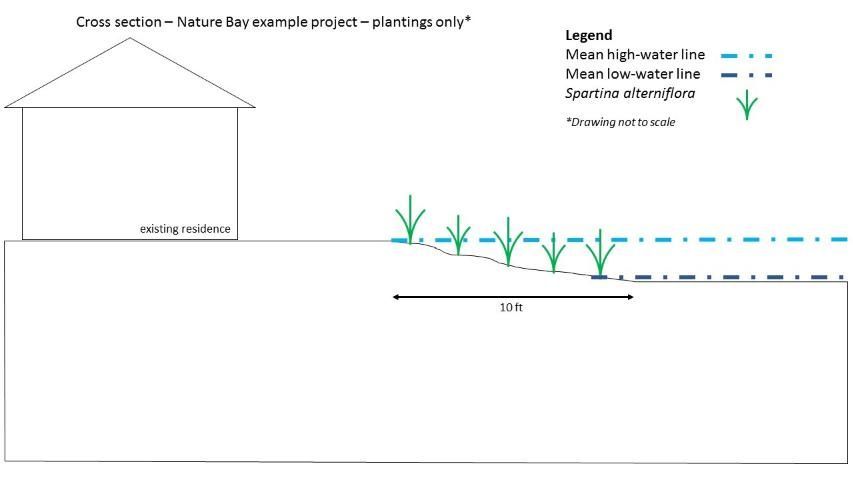
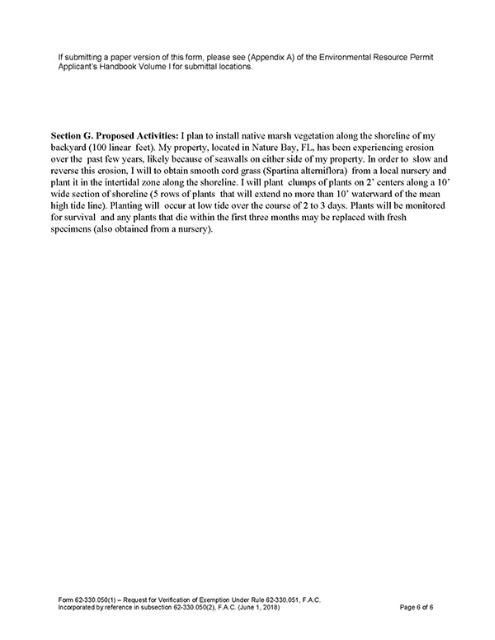
I plan to install native marsh vegetation along the shoreline of my backyard (100 linear feet). My property, located in Nature Bay, FL, has been experiencing erosion over the past few years, likely because of seawalls on either side of my property. In order to slow and reverse this erosion, I will obtain smooth cord grass (Spartina alterniflora) from a local nursery and plant it in the intertidal zone along the shoreline. I will plant clumps of plants on 2-foot centers along a 10-foot-wide section of shoreline (5 rows of plants that will extend no more than 10 feet waterward of the mean high-water line). Planting will occur at low tide over the course of 2 to 3 days. Plants will be monitored for survival, and any plants that die within the first three months may be replaced with fresh specimens (also obtained from a nursery). There is currently no submerged aquatic vegetation in the project vicinity.
Breakwater/Sill and Plantings
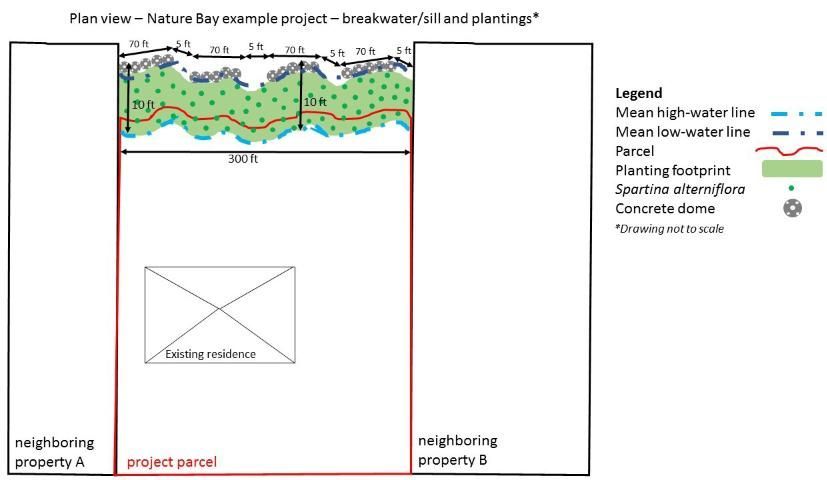
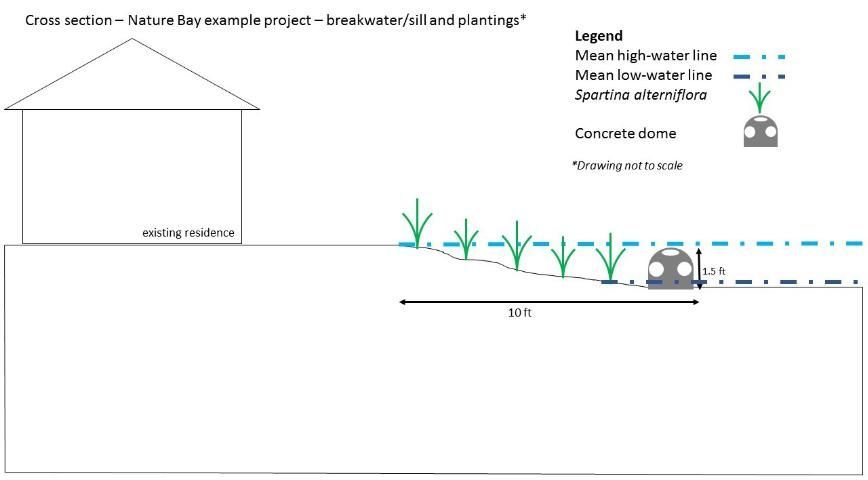
I plan to install a concrete dome breakwater in front of my property in Nature Bay, Florida, to protect my shoreline (300 linear feet) from further erosion. The erosion is likely being caused by seawalls on either side of my property. Domes will be deployed by professional contractors in the intertidal zone with the waterward toe of the concrete domes occurring no more than 10 feet waterward of the mean high-water line. Domes will be approximately 1.5 feet tall, placing a high percentage of the surface area within the ideal zone for oyster recruitment and growth. Domes will be deployed continuously regardless of tidal stage using hand-carry/float methods over the course of 1 week. There will be four 70-foot-long breakwaters with 5-foot gaps in between each. After installation of the domes, the shoreline behind the breakwater will be planted with native vegetation to further reduce erosion and increase habitat value. I will obtain smooth cord grass (Spartina alterniflora) from a local nursery and plant clumps of plants on 2-foot centers behind the 10-foot-wide section of shoreline protected by the breakwaters (5 rows of plants that will extend no more than 10 feet waterward of the mean high water line). Planting will occur at low tide over the course of 2 to 3 days. Plants will be monitored for survival, and any plants that die within the first three months may be replaced with fresh specimens (also obtained from a nursery). There is currently no submerged aquatic vegetation in the project vicinity.
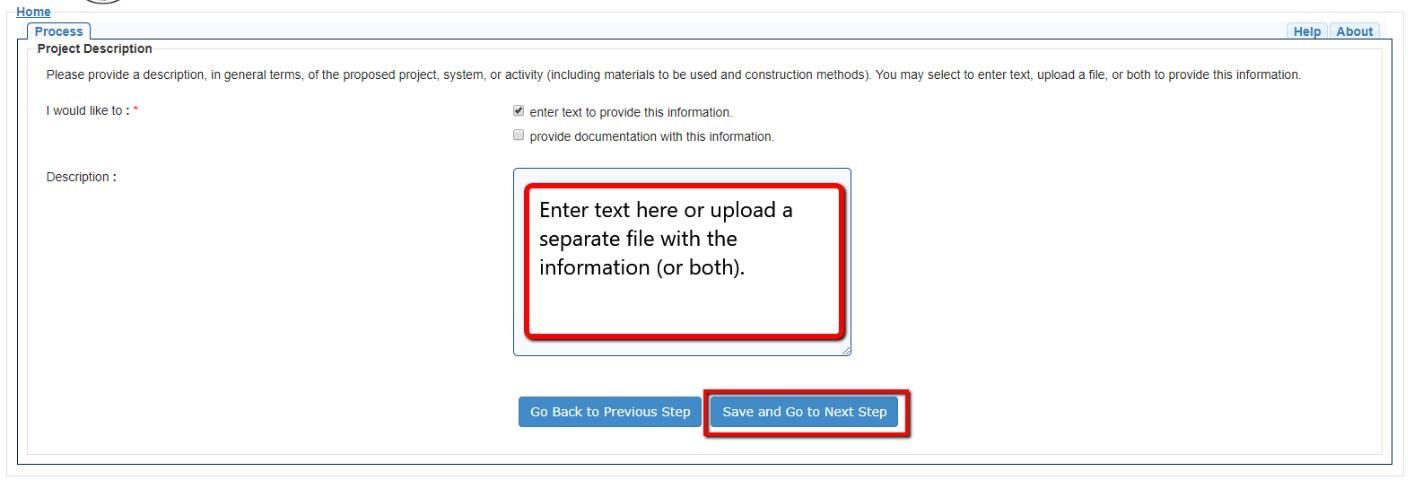
Step 18: Select "Yes" in this step because the living shoreline project will occur within state waters if it is below mean high tide, which is almost always the case. You may have special conditions at your site that do not fit the norm, but in this guide we will focus on the typical case. Usually, living shorelines are used to build new wetlands or restore wetlands that existed previously. Therefore, there are usually no negative impacts to wetlands, but we still must check "Yes" at this step.

Step 19: As in Step 17, you can choose to enter your descriptive text directly in the box, upload a separate document, or both. See below for some example descriptions of exemption compliance. Feel free to adapt the example text below for your own use, but keep in mind that you should consult with an expert for help choosing the best method for you.
Example Text
Plantings Only
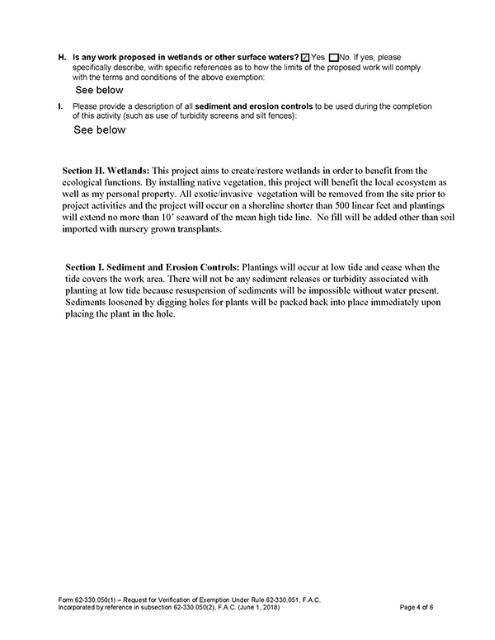
This project aims to create/restore wetlands in order to benefit from the ecological functions. By installing native vegetation, this project will benefit the local ecosystem as well as my personal property. All exotic/invasive vegetation will be removed from the site prior to project activities, and the project will occur on a shoreline shorter than 500 linear feet. Plantings will extend no more than 10 feet seaward of the mean high-water line. No fill will be added other than soil imported with nursery grown transplants.
Breakwater/Sill and Plantings
This project aims to create/restore wetlands in order to benefit from the ecological functions. By installing native vegetation and oyster-recruitment substrate, this project will benefit the local ecosystem. All exotic/invasive vegetation will be removed from the site prior to project activities, and the project will occur on a shoreline shorter than 500 linear feet. Plantings will extend no more than 10 feet seaward of the mean high-water line, and the waterward toe of the breakwater will likewise extend no further than this line. No fill will be added other than soil imported with nursery-grown transplants. The breakwater will not encroach upon and will not be placed anywhere within 3 feet of any existing submerged or emergent native vegetation. The coastal area behind my home is a mudflat, and there are no seagrass meadows within 0.5 mile of my home. The breakwater will be constructed of stable materials (concrete domes) and will be secured using fiberglass stakes. Rows of domes will have 5-foot-wide gaps every 70 feet along the shoreline. Domes will be deployed using hand-carry and float methods by professional contractors, and, thus, no equipment with the potential to damage the shoreline will be used.
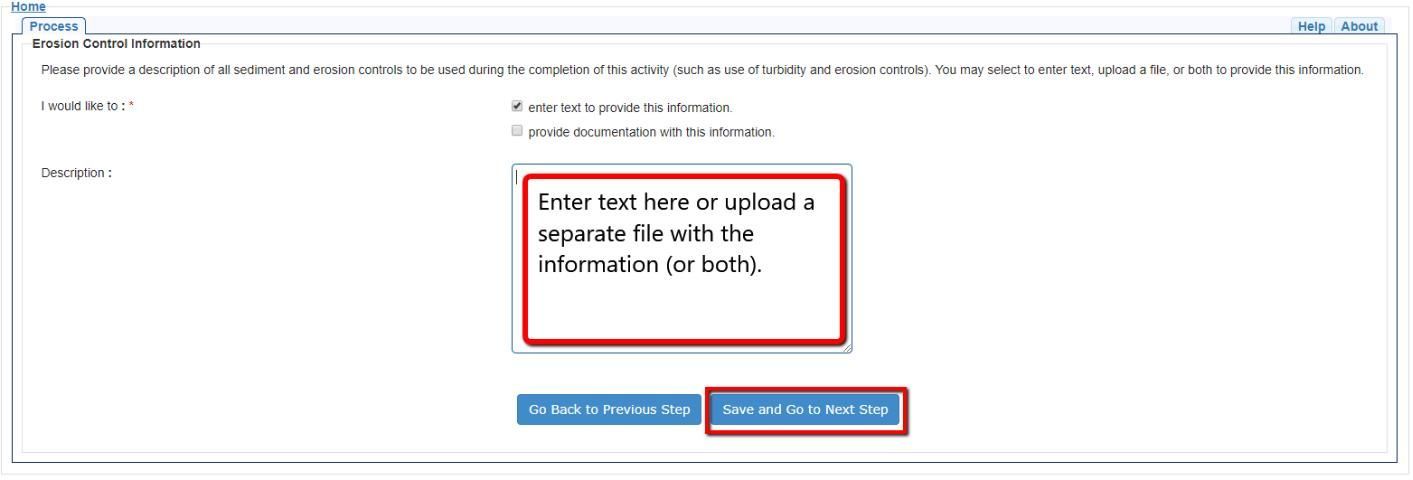
Step 20: As in steps 17 and 19, you can choose to enter your project description text directly in the box, upload a separate document, or both. See below for some example descriptions of sediment and erosion control. Feel free to adapt the example text below for your own use, but keep in mind that you should consult with an expert for help choosing the best method for you.
Plantings Only
Plantings will occur at low tide and cease when the tide covers the work area. There will not be any sediment releases or turbidity associated with planting at low tide because resuspension of sediments will be impossible without water present. Sediments loosened by digging holes for plants will be packed back into place immediately upon placing the plant in the hole.
Breakwater/Sill Only
The breakwater will be installed at low tide and all activity will cease when the tide covers the work area. There will not be any sediment releases or turbidity associated with deploying oyster bags/gabions at low tide because resuspension of sediments will be impossible without water present at the site. No heavy equipment or tools (other than a hammer to drive in rebar stakes) will be used in this project.
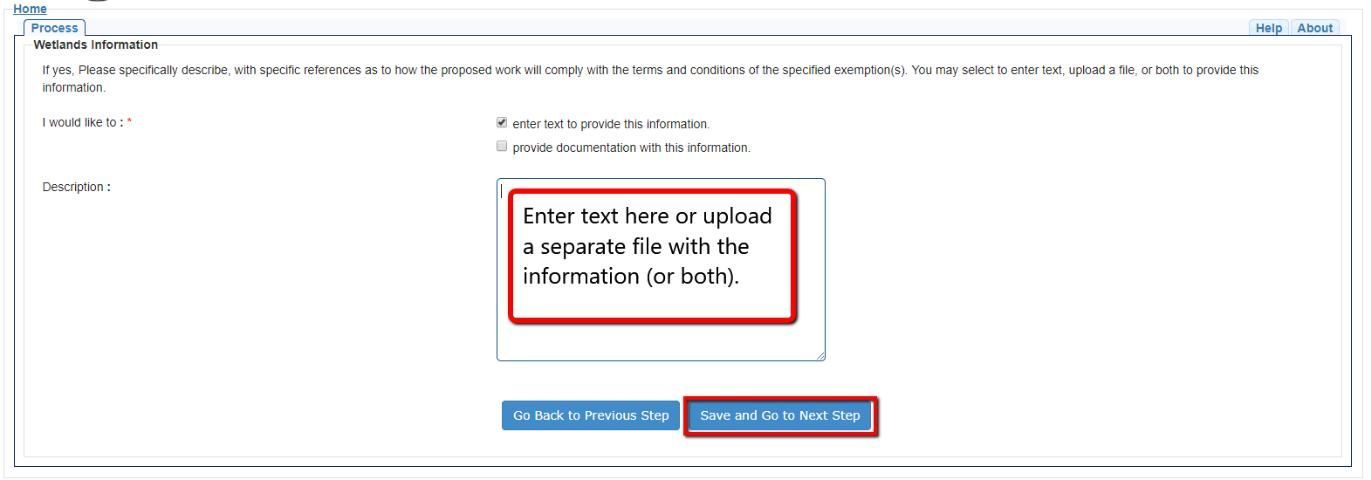
Step 21: As in previous steps, you can enter descriptive text directly in the box, upload a separate document, or both. In this step, you are asked to provide any additional information or justification that may apply to your project. This step is not mandatory but may help your chances of swift approval if you are able to provide additional details that assure your compliance with the exemption. For example, you might make the case that you understand the exemption well because you have been involved with living shorelines before; you have taken a class (such as the Florida Master Naturalist Program's Coastal Shoreline Restoration module); or you have consulted with your local UF/IFAS Extension Florida Sea Grant agent. Add whatever information you may wish.
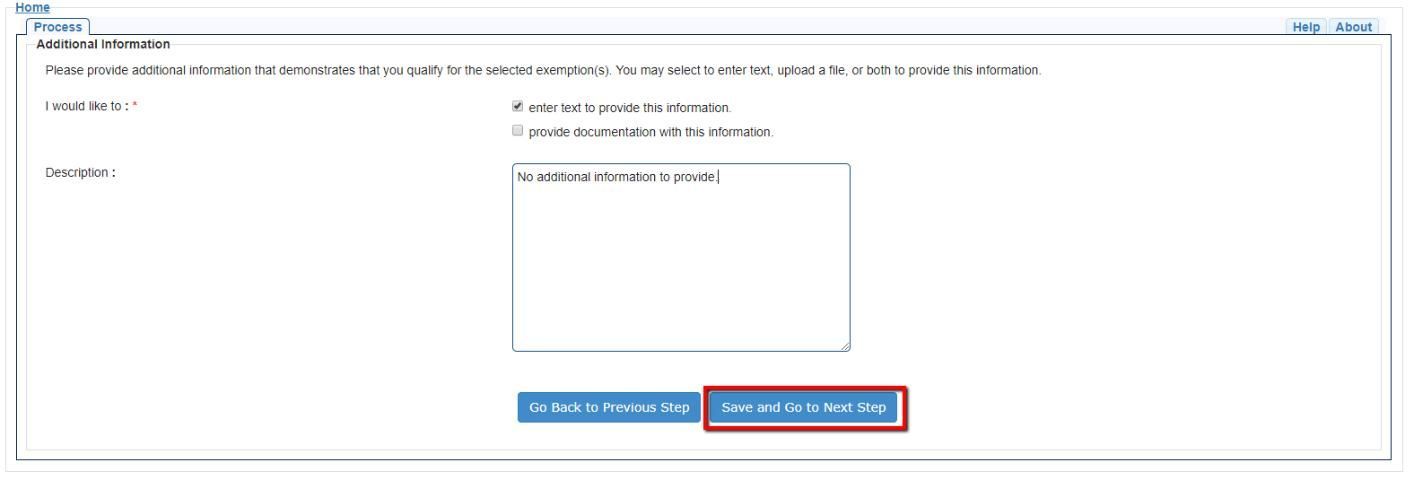
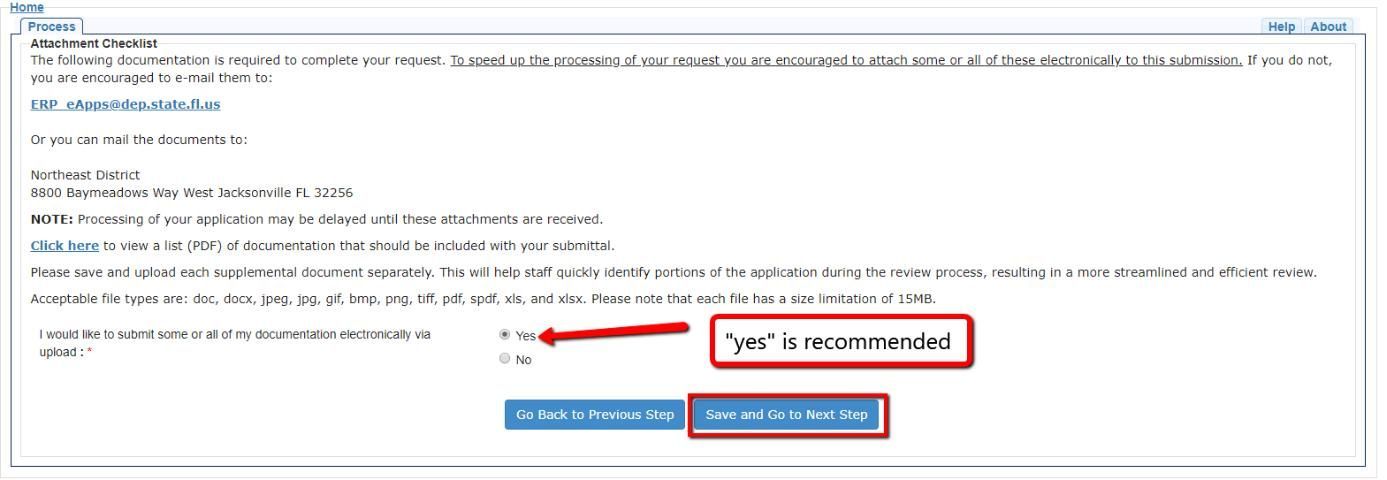
Step 22: In this step, you must indicate whether or not you will include attachments that provide additional details about your project. These attachments are required for approval of your exemption verification. If you elect not to upload your attachments electronically, you will need to email or mail the documents to the address provided on the screen (note that the email and mailing addresses for your area may be different than those in the screenshot). Uploading your documents to the DEP portal gives you the best chance of a shorter processing time.
Step 23: You must provide, at a minimum, a detailed set of drawings that depict both a cross-section of the project and an overhead (plan) view. These drawings must show: 1) the location of the mean high-water line/ordinary high-water line and the mean low-water line (see glossary for definitions and tips for measuring); 2) the linear distance along the shoreline covered by the project; 3) the linear distance the project will extend into the water as measured from the mean high-water line/ordinary high-water line; 4) planned spots for placement of plants, breakwater elements (oyster bag, gabion, concrete dome), and gaps in breakwaters with linear distances and/or heights noted; 5) existing structures; and 6) any nearby habitats and the approximate locations of the shorelines of neighboring properties. You may produce these drawings yourself, either by hand or using simple shape illustrations available in computer programs such as Microsoft PowerPoint. Drawings need not be to scale, as long as this is noted on the drawing. It may be helpful to include extra photographs of the site to aid in your explanation. Of course, you always have the option of hiring a contractor that will provide the drawings as part of the contract, but this is typically not necessary for simple projects. To give you an idea of the level of detail required, see the example cross section and plan view drawings below. We have provided an example for each of the two basic project types mentioned above: plantings only, and breakwater/sill and plantings.
Plantings Only
Breakwater/Sill and Plantings
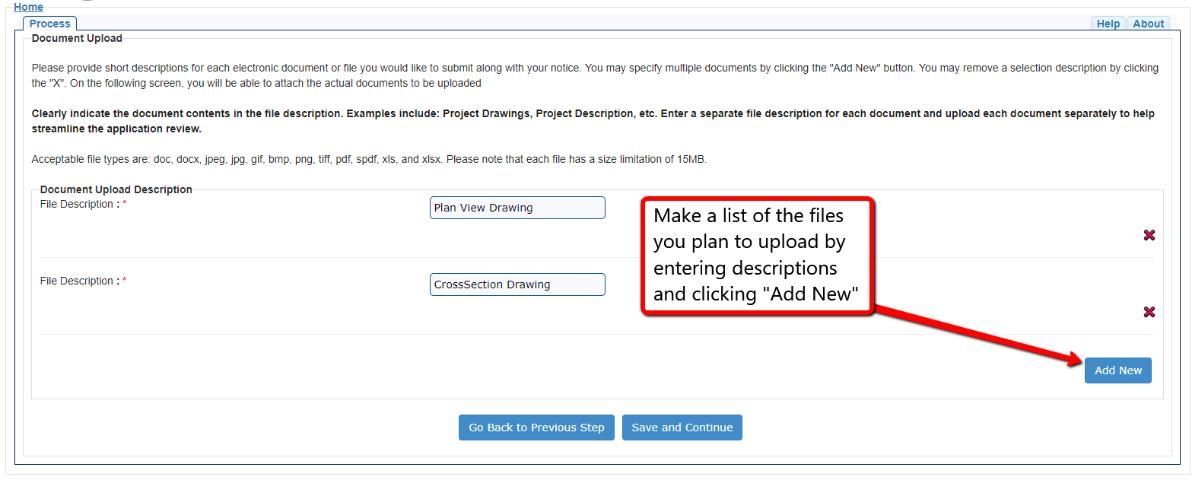
Upload as many files as are necessary to satisfy the requirements by adding a file description and clicking "Add New" for every file. At a minimum, you should list two documents: a plan-view drawing and a cross-section drawing. You may add supporting information as needed or desired.
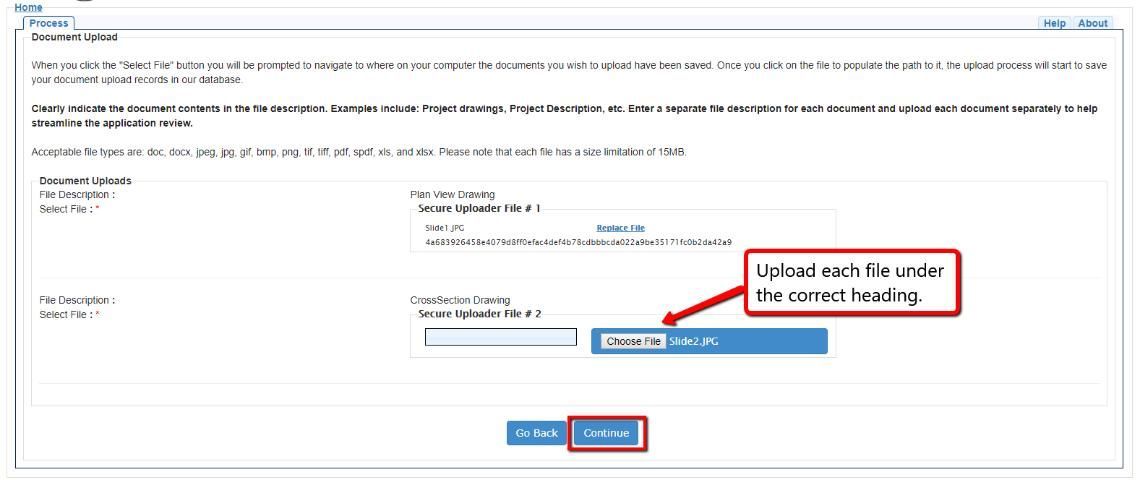
Step 24: You will see the list of files you made in the previous step with a "Choose File" button next to each one. Click the "Choose File" button under each heading and ensure you upload the correct file under each one. Double-check your file choices and then click "Continue" if everything is correct.
Step 25: Review your submission and accept the electronic certification of the details you provided. Scroll to the bottom of the window and click "I have reviewed my submission" to view the compiled application the system will generate. Check over all details and select the circle next to "I accept the electronic certification" if all details are correct. You will not be able to move to the next step until you click this button. Your application will be final and will be submitted to DEP once you click "Save and Go to Next Step."

Step 26: You must pay the $100.00 processing fee. You may be taken to the payment page directly or you may be asked to wait for a confirmation email from DEP. If you are taken directly to the payment page, complete the online payment and save your confirmation details for your records. You are now finished.
If you have to wait for a confirmation email, you will need to navigate back to the portal at http://www.fldepportal.com/go/ and login when you receive it. You can then select "Pay," then "Balances Due," then "Previously Submitted Application."
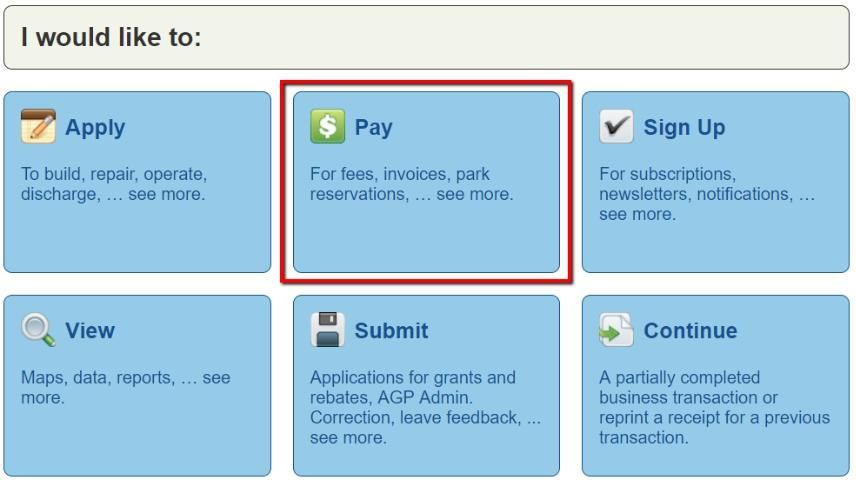

On the next screen, you will need the Application ID assigned to you in your confirmation email. Have your payment details handy. You can then follow the prompts to submit your payment online.

Method 2—PDF Form
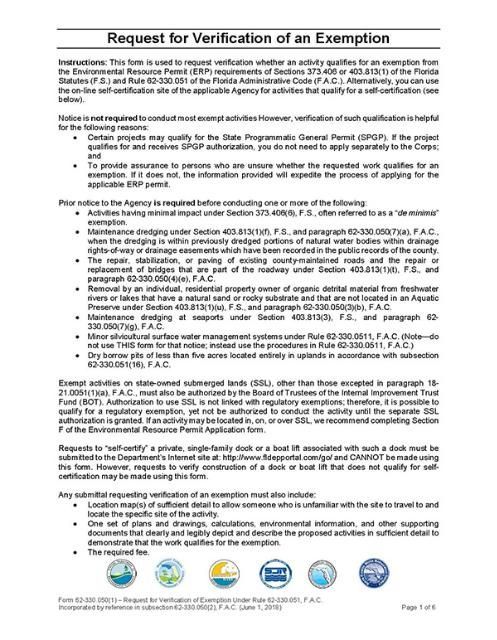
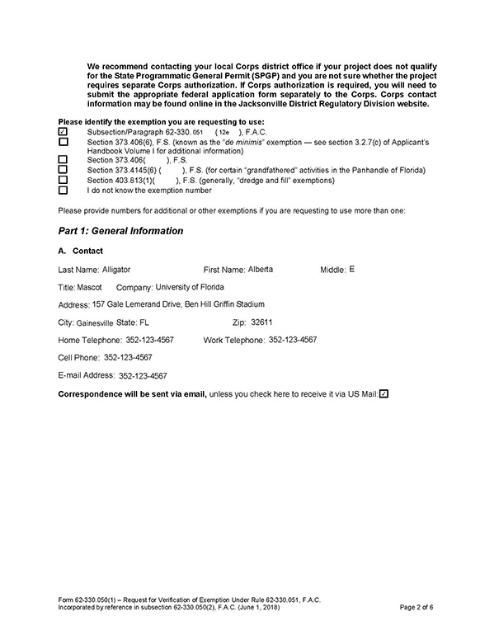
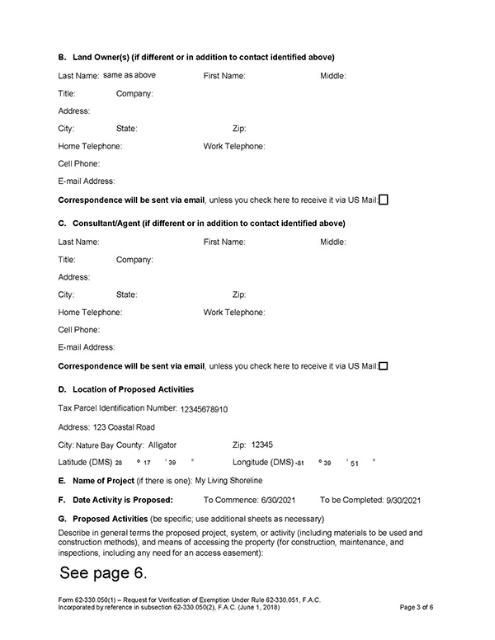
The Request for Verification of an Exemption PDF form can be downloaded at https://floridadep.gov/sites/default/files/62-330_050_0.pdf. You can fill out this form electronically using Adobe Acrobat, or you may wish to print it and fill it out by hand. The steps below will guide you through each page of the form and are followed by an example of a filled-out form. Note: the example form below is an older version of the form but the instructions refer to the new version of the form.
Pages 1 and 2: These pages outline the instructions and sections of the Florida Administrative Code that define where exemptions apply. If you are applying for a living shoreline project, then you should check the first box on page 2 and fill in the blanks to read "051(12e)." See example of Page 1 below.
Pages 2 and 3: On these pages, you will need to provide general information such as your contact information, information about your property (location, tax parcel ID, and GPS coordinates), and a description of the activity you are proposing. It is important that you are thorough and provide enough information for DEP to assess whether or not your activity is exempt. Incomplete information in any of the sections on this or other pages will result in delays. Some specific tips and points to consider for Pages 2 and 3:
- Your Tax Parcel ID Number can be located via several methods: Look for it on your most recent property tax billVisit the website of your local tax assessorCall your local tax assessor's office and request the information
- You can locate the coordinates for your property using free tools such as Google Earth or https://www.latlong.net/. Important: When entering coordinates for your project, make sure you provide them in the requested format (DMS = degrees, minutes, seconds). If the tool you use to locate the coordinates does not provide them in DMS format, then you can use a free online coordinate converter such as http://www.earthpoint.us/Convert.aspx.
- If you enter project start and end dates, then be sure to allow time for permit approval (generally, at least 30 days for DEP approval and up to 60 days for Corps approval).
- You may append as many extra sheets to the project description as needed, so feel free to provide as much detail as possible. You can find examples of several acceptable project descriptions under Step 17 of the Method 1 section. The example form below is filled out using the "Plantings Only" example.
Page 4: On this page, you will need to provide more detail about your project. Almost all living shoreline projects will occur below the mean high-water line. Therefore, you need to check "Yes" under section E, and below you will need to provide descriptions of how your project meets the exemption. For living shorelines, this pertains to the criteria outlined in FAC Ch. 62-330.051(12)(e). These criteria are described in detail in the resource located at https://edis.ifas.ufl.edu/sg155. See Step 19 and Step 20 in the Method 1 section for several examples of acceptable responses to the requests on this page. You will also need to print your name, sign, and date the application at the bottom.
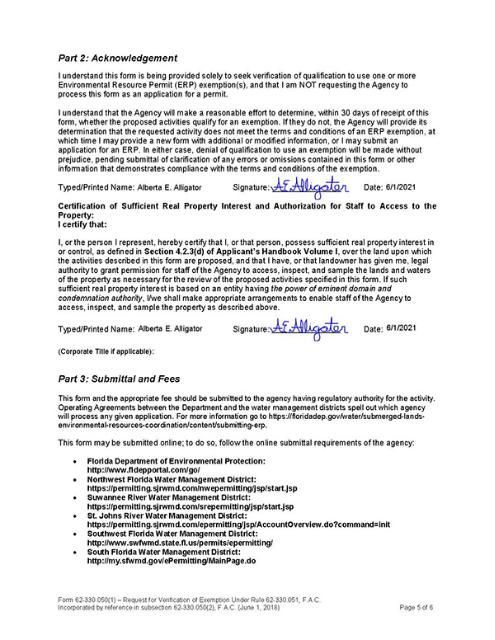
Pages 4 and 5: The final pages ask for your acknowledgement of two important paragraphs and describe instructions for submitting the form. The procedures you must follow will differ depending where you live in the state. Explore https://floridadep.gov/districts or http://www.dep.state.fl.us/water/wetlands/erp/wmd.htm to determine where you must send the form and the mandatory $100.00 fee. You may need to contact your regional office to determine this.
NOTE: when you submit the PDF form, you must also include a map with enough detail to allow someone to find the project, an overhead (plan) view, and cross-section drawings of your project. You can easily export a directional map using free software such as Google Maps. See Step 23 in the Method 1 section for examples of acceptable plan view and cross-section drawings.
Conclusion
If you provided complete and correct information on your application, within 30 days you should receive confirmation that your project qualifies for the state permit exemption. Confirmation will come in the form of a Verification of Exemption letter from DEP. The letter will notify you that your project meets the criteria for permit exemption and will include a Submerged Lands Authorization, allowing you to conduct the work on the section of public land that intersects with your project. Be sure to read the letter you receive from DEP thoroughly, and make note of any additional permits or follow-up information you may need to provide. To avoid fines, fees, or other regulatory action, make sure you construct your project exactly as planned. If you find you need to make changes to your project, notify DEP before you make them to verify that the change will not jeopardize your exempt status.
Helpful Resources
Florida Sea Grant Living Shorelines: https://www.flseagrant.org/news/tag/living-shorelines/
Florida Living Shorelines Project Example Page: http://floridalivingshorelines.com/florida-sampler/
Florida Living Shorelines Resource Database: http://floridalivingshorelines.com/resources/
NOAA Understanding Living Shorelines: https://www.fisheries.noaa.gov/insight/understanding-living-shorelines
NOAA Climate Resilience Toolkit: https://toolkit.climate.gov/topics/coastal-flood-risk/coastal-erosion
NOAA Living Shorelines: https://www.habitatblueprint.noaa.gov/living-shorelines/
NOAA Tools for Planning: https://www.habitatblueprint.noaa.gov/living-shorelines/applying-science/tools-for-planning/
NOAA Guidance and Training: https://www.habitatblueprint.noaa.gov/living-shorelines/applying-science/guidance/
NOAA Consultations and Permits: https://www.habitatblueprint.noaa.gov/living-shorelines/consultations-permitting/
StormSmartCoasts - Erosion Control Structures: http://ms.stormsmart.org/before/mitigation/only-as-a-last-resort-flood-and-erosion-control-structures/
StormSmartCoasts - Non-Structural Shore Protection: http://ms.stormsmart.org/before/mitigation/non-structural-shore-protection/
Contact information for professionals working on living shorelines in your region can be found at http://floridalivingshorelines.com/contacts/ or your local UF/IFAS Extension Office.
Glossary of Terms
Breakwater—generally, a structure built to provide a barrier to or protection from waves. There are many definitions of the term "breakwater," but usually they are offshore structures designed to reduce incoming wave energy, resulting in calmer water between the shoreline and the structure. Oyster reef breakwaters are built at intertidal heights (submerged at high tide) out of materials conducive to colonization by oysters. In Florida, breakwaters built as part of small-scale living shorelines are only exempt from permitting if they are built no higher than the mean high-water line.
Clean oyster shell—Oyster shell used in living shorelines must be clean of disease and pests in order to be a safe material. There are several sources of clean oyster shell, including recycled shell and fossilized shell, from both non-profit and for-profit organizations. Recycled shell that comes from seafood restaurants must be cured outdoors in a sunny area in piles that are routinely turned for at least 6 months. This prevents the spread of oyster pests and disease. The DEP will usually request information about the specific source of the shell when reviewing an application for Verification of Exemption.
Concrete dome—concrete forms in the shape of domes. This method of oyster reef construction uses molded, pre-cast concrete forms designed to mimic the attributes of the natural three-dimensional structure of oyster reefs. In some cases, the concrete mixture is fortified with an additive to increase oyster recruitment. There are many commercially available forms.
Cross-section drawing—A depiction of your living shoreline project in cross-section, including information about the slope of the shoreline, approximate mean low-water and mean high-water locations, breakwater heights, spacing of plants, location of existing structures, etc.
Erosion—process of sediment being carried away from an area. In coastal environments, the major driving processes of erosion are storms, flooding, wave action, sea level rise, and human activities (i.e., boating, seawall construction, development). Erosion is a natural process in coastal ecosystems, but it becomes an issue when homes and other infrastructure are threatened.
Environmental Resource Permit—a type of permit required before beginning any construction activity that would affect wetlands, alter surface-water flows, or contribute to water pollution in Florida. This is the permit from which homeowners are exempt for small-scale living shorelines meeting certain criteria.
Emergent vegetation—wetland plants that are rooted with stiff or firm stems, like cattails. Emergent vegetation usually stands above the water surface, but in some cases can be found submerged during occasional periods of high water. Lily pads and many marsh plants are considered emergent plants.
Exotic/invasive species—exotic species are those that are not native to an ecosystem. Invasive species are those that are not native to an ecosystem and cause harm to native species and/or ecosystem functions. Examples of invasive plants in Florida's coastal environments include the invasive Brazilian pepper and Phragmites australis marsh grass. You can check to see if a plant is invasive at https://assessment.ifas.ufl.edu/assessments/.
Intertidal—Describes the area that is above water at low tide and under water at high tide (in other words, the area between tide marks), commonly inhabited by oysters.
Gabion—a wire framework container that provides a structured foundation for shell material. Made of a material similar to chain-link fencing, gabions are filled with shells and ballast, then stacked and wired together to construct sturdy, three-dimensional structures.
Marsh vegetation—herbaceous (non-woody) plants that thrive in wetlands. A wetland is an area that is inundated or saturated by surface water or ground water at a frequency and a duration sufficient to support, under normal circumstances, a prevalence of vegetation typically adapted for life in saturated soils. Most living shorelines deal with the creation of low and middle marsh that are more frequently inundated by water than the upper marsh zone.
Mean high-water line (MHWL)—The line on a chart or map that represents the intersection of the land with the water surface at the elevation of mean high water (the average of all the high water heights observed over the period of time defined by the National Tidal Datum Epoch). Homeowners can roughly estimate the MHWL using physical markers like stakes or flags placed at high tide over a period of weeks, or by observing and marking the location of the tidal wrack lines (lines formed by debris washing up at high tide), or by looking at aerial photos. DEP suggests erring on the upland side instead of the waterward side when approximating the MHWL. The MHWL can also be determined by a licensed surveyor.
Mean low-water line (MLWL)—The line on a chart or map that represents the intersection of the land with the water surface at the elevation of mean low water (the average of all the low water heights observed in the period of time defined by the National Tidal Datum Epoch). Homeowners can roughly estimate the MLWL using physical markers like stakes or flags placed at low tide over a period of weeks or by observing aerial photos. The MLWL can also be determined by a licensed surveyor.
National Tidal Datum Epoch—The specific 19-year period adopted by the National Ocean Service as the official time segment over which tide observations are taken and reduced to obtain mean values (e.g., mean lower low water, etc.) for tidal datums. It is necessary to standardize mean tide level in this way because of periodic and apparent trends in sea level.
Native vegetation—plants that occur naturally in an area.
Ordinary high-water line (OHWL)—the analogue of the mean high-water line for freshwater bodies such as rivers, streams, and lakes. The OHWL is typically determined by using the best evidence available, including water marks, soil and vegetation indicators, and historical aerial photos.
Oyster-recruitment substrate—structure such as shell or concrete deployed in the intertidal zone of the coast for the purpose of increasing oyster attachment opportunities.
Plan-view drawing—A depiction of your living shoreline project from an overhead perspective, including information about the approximate mean low-water and mean high-water lines, breakwater/sill placement and spacing, spacing of plants, locations of existing structures, locations of parcel boundaries, etc.
Sill—material deployed at the base (toe) of a vegetated zone for the purpose of reinforcing and protecting the area from moderate energy waves and currents. Sills can be constructed out of materials such as shell, concrete, or coconut fiber logs. Sills differ from breakwaters in that they are constructed directly adjacent to the vegetated area.
Submerged aquatic vegetation (SAV)—Grasses that grow to—but not above—the surface of shallow water. This includes seagrasses and freshwater aquatic grasses.
Turbidity—the measure of suspended solids, which influence water clarity. Murky water has high turbidity.
Waterward toe—the bottommost portion of the offshore side of a structure such as a sill or breakwater.
Sources
Florida Administrative Code 62-330.051(12)(e)
Florida Master Naturalist Program—Coastal Systems Manual
Florida Master Naturalist Program—Coastal Shoreline Restoration Manual
https://aquaplant.tamu.edu/plant-identification/category-emergent-plants/
https://chesapeakebay.noaa.gov/submerged-aquatic-vegetation/submerged-aquatic-vegetation
https://shoreline.noaa.gov/glossary.html
https://tidesandcurrents.noaa.gov/datum_options.html
https://www.swfwmd.state.fl.us/business/epermitting/environmental-resource-permit
https://toolkit.climate.gov/topics/coastal-flood-risk/coastal-erosion
Appendix
LIVING SHORELINE EXEMPTION CONDITIONS
62-330.051(12)(e) Exempt Activities for the Construction, Replacement, Restoration, Enhancement, and Repair of Seawall, Riprap, and Other Shoreline Stabilization.
The activities meeting the limitations and restrictions below are exempt from permitting. However, if located in, on, or over state-owned submerged lands, they are subject to a separate authorization under chapters 253 and 258, F.S., as applicable.
(12) Construction, Replacement, Restoration, Enhancement, and Repair of Seawall, Riprap, and Other Shoreline Stabilization ‒
(e) Restoration of an eroding shoreline with native wetland vegetative enhancement plantings, provided:
- The length of shoreline is 500 linear feet or less;
- Plantings are native wetland plants appropriate for the site obtained from commercially-grown stock;
- Plantings extend no farther than 10 feet waterward of the approximate mean high water line (MHWL) or ordinary high water line (OHWL);
- All invasive and exotic vegetative species along the shoreline is removed in conjunction with the planting to the extent practicable;
- Biodegradable natural fiber logs or mats that are secured in place, such as with the use of wooden stakes, may be used if necessary to support the vegetative plantings; and
- No fill is placed other than that needed to support the vegetative plantings, except that a breakwater is authorized to be installed concurrent with the planting if permanent wave attenuation is required to maintain the shoreline vegetation, provided:
- The waterward toe of the breakwater extends no more than 10 feet waterward of the approximate MHWL or OHWL, with a top height of no more than the mean or ordinary high water elevation;
- The breakwater is composed predominantly of natural oyster shell cultch (clean and fossilized oyster shell) or other stable, non-degradable materials such as oyster reef, reef balls, boulders, clean concrete rubble, riprap, rock sills, or triangular concrete forms. Oyster shell cultch, if used, shall be enclosed in mesh bags having openings of no more than three inches, or securely fixed to matting prior to placement in the water. Oyster bags and mats must be anchored to prevent movement of shell from the project area;
- The breakwater shall not be placed over, or within three feet (in any direction) of any submerged grassbed or existing emergent marsh vegetation;
- The breakwater shall be placed in units so that there is at least one opening measuring at least five feet in width located every 75 linear feet along the breakwater, with a minimum of one opening, to allow the flow of water and the passage of fish and aquatic wildlife;
- All equipment used during construction shall be operated from, and be stored in uplands; and
- All work is conducted in compliance with subsection 62-330.050(9), F.A.C.
Rulemaking Authority 373.026(7), 373.043, 373.4131, 373.4145, 403.805(1) FS. Law Implemented 373.406, 373.4131, 373.4145, 373.415, 403.813(1) FS. History–New 10-1-13, Amended 6-1-18.