Establishment is commonly the most expensive and crucial management practice for the success of any pasture, whether annual or perennial. The significant investment in money and time requires a well-thought-out plan from preparation of the area until first grazing or cutting, which can span a couple of years. The goal is to achieve a uniform stand in the shortest amount of time, avoid competition from weeds, and have the pasture ready for use as quickly as possible. Several aspects must be considered to successfully establish a pasture. This publication provides practical information on forage planting on prepared seedbeds to producers or anyone interested in establishing pastures. Independent of the size of the operation, most principles apply. Small operations, however, might face some challenges in terms of equipment availability. Some operations can be contracted out (third party), but might not be economically viable. The publication will address those aspects and present alternatives when possible. Most of this discussion deals with establishment on a clean-tilled seedbed. For information about overseeding (sod seeding), consult publication SS-AGR-175, Overseeding Warm-Season Perennial Grasses with Cool-Season Forages (https://edis.ifas.ufl.edu/publication/AG178). An overview of this topic is available in the Cow Talks podcast (https://tinyurl.com/CowBitesEstablishment), and a more comprehensive lecture on the topic is available on the UF/IFAS Forages YouTube channel (https://tinyurl.com/establishmentpasture).
Choosing the Right Forage Species and Cultivar
There are many annual and perennial forage species options that can be used in Florida, including grasses, legumes, and forbs. Forages can be planted as monocultures or in combination and can be used to fulfill different needs of the production system. There are a few important questions to address before planting your pasture. First, what is the purpose of that forage? Will it be the base of your system, or is it meant to fill a specific gap? Is the forage meant for winter grazing, hay production, wildlife feeding, or silage? It is important to think in a systems perspective when considering your species and see how the different combinations of forages can fit your needs. Generally, when talking about grazing systems, the goal is to have a year-round forage supply. The main criteria for forage species selection must be the adaptation of the selected forage to your soil and climatic conditions. Several areas in Florida are subject to temporary floods, so choosing species adapted to those conditions is important. Beyond the forage species selection, it is also important to learn about the different cultivars available within each forage species. Are there any specific cultivars developed for your region? What level of input you are willing to use, in terms of fertilizer, herbicide, and other management practices? Some forages have higher requirements (e.g., bermudagrass hybrids) for sustaining higher productivity than others (e.g., bahiagrass). UF/IFAS has many resources that can help you in choosing the right variety to plant. Ask IFAS publication SS-AGR-84, Cool-Season Forage Variety Recommendations for Florida (https://edis.ifas.ufl.edu/publication/AA266), is updated annually based on multi-state variety trials. The UF/IFAS Forage Team in partnership with multiple seed companies tests a large number of corn and sorghum hybrids every year, in two planting seasons (spring and summer). Trial results and more information are available through the Corn Silage Field Day website (https://animal.ifas.ufl.edu/extension/courses/csfd/) and our Silage Hybrid Decision Tool (https://devfel.github.io/forage-hybrid-table/). Ask IFAS publications on bahiagrass, bermudagrass, limpograss, perennial peanut, and others provide information on variety selection (see https://edis.ifas.ufl.edu/entity/topic/forage_varieties).
Land Clearing and Preparation
Establishing a pasture on native or undeveloped land requires, many times, removal of trees, stumps, and brush. Several types of machines and methods are available to clear and prepare those areas, including everything from very large and expensive tree and stump removal equipment (like bulldozers) to the tractors and disk harrows used for final seedbed preparation. If the land is to be used only for grazing, some stumps and roots can be left in place; however, this makes cultural practices such as fertilizing and spraying difficult. Ideally, some of the large trees or groups of trees can be left in place to serve as shade for livestock. For pastures dedicated to harvesting hay or silage, or that could potentially be turned into cropland afterwards, all stumps and roots must be removed. Alternatively, stumps can be left to rot, but that might take several years. If land is left in fallow or unmanaged after clearing, it might return towards original vegetation. Soils under native vegetation or planted pine usually have low pH and fertility and may require special care.
Renovation
When renovating an old perennial pasture, especially if planting the same species but a different variety, it is advisable to plant one or two cycles of annual crops before reestablishing the perennial pasture. This is also a good practice in areas with heavy weed pressure, especially when planting forages with restricted options for herbicides such as perennial peanut. By cultivating the land with annual crops, it is possible to reduce the weed seed bank or vegetative material (i.e., stolons and rhizomes) of the previous forage crop or weeds. If the plan is to plant a legume crop, using an intermediate grass crop will allow the use of broadleaf herbicide to target plants that can later be problematic on a legume pasture. The same applies when planting a grass pasture: to use an intermediate legume forage to control other undesirable grasses in the interim.
Liming
Having the soil tested early to determine the need for lime is important. The lime reaction in the soil may be slow; therefore, it can take several months to raise soil pH to the target levels. Target soil pH depends on which species is being planted. Legumes generally require higher pH (above 6) compared to grasses (most of which can grow well between 5.5 and 6.5). When needed, lime should be applied before the first tillage and preferably 6 months before planting. It should be incorporated into the soil whenever possible for a faster reaction. For no-till systems, when broadcasting or direct drilling cool-season forages into existing sod, lime can be applied on the surface, but it will take longer for the soil to react with the liming material. In this case, some forage species can be used to increase movement of lime and nutrients to lower layers of the soil, such as oat, radish, and turnips. Either calcitic or dolomitic limestone can be used; however, if a soil test shows magnesium to be medium or low, then dolomitic limestone is the best choice.
Seedbed Preparation
Plan on having a well-prepared seedbed in advance of the planting date: leveled, firm, and free of residues and weeds. A first complete kill of the current pasture or weeds can be achieved with an application of glyphosate up to 128 oz per acre. This will facilitate tilling and reduce weed pressure or resurgence of previous pasture. Once herbicide is applied, wait a minimum of two but ideally three weeks for the herbicide to effectively kill the plants before disking. Broadcasting herbicides can be done with a variety of spraying equipment. For small farms without access to a large boom sprayer, 40–100 gallon electric sprayers with 3- to 6-foot booms can be obtained in many local hardware stores and mounted on ATV, UTV, or the back of a tractor or truck.
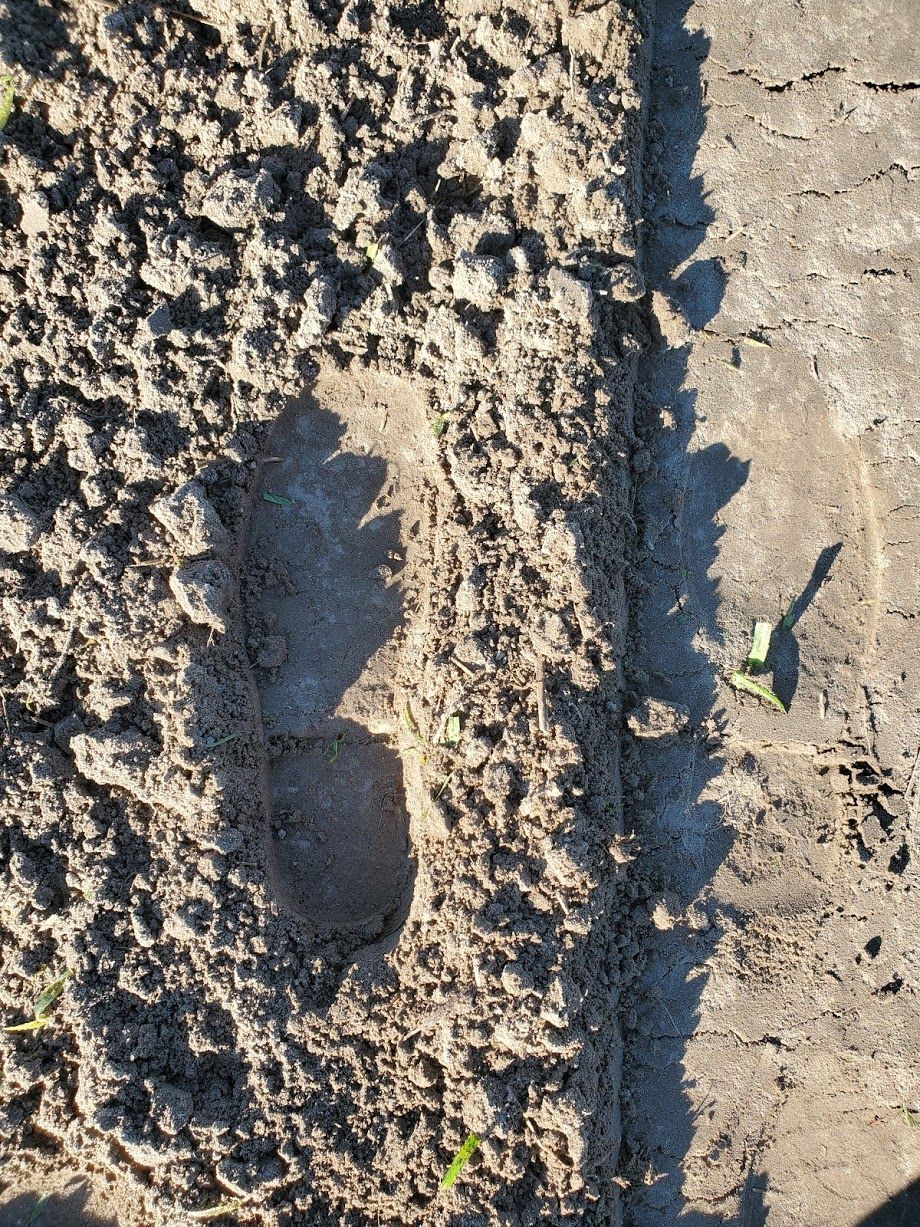
Repeated disking or tilling, in combination with repeated applications of broad-spectrum herbicide, can be used to kill the weeds before planting at a cheaper cost than using selective herbicides later. In a situation where land has been plowed just before planting and has not had time to settle (i.e., firm; Figure 1), disking and cultipacking or rolling may be needed to firm the seedbed before planting small-seeded forage crops such as clovers and bahiagrass. Planting into a loose seedbed increases the risk of placing the seed too deep, reduces germination and creates more surface area for water evaporation resulting in a dryer soil. It is important to have good seed-to-soil contact.
Credit: Marcelo Wallau, UF/IFAS
There is a variety of tillage equipment available and suitable for different practices. Primary tillage can be accomplished using a heavy disc harrow (plowing disk) or a moldboard plow. A moldboard plow is useful to invert the soil and bury weed seeds. Use a moldboard plow or heavy disk to renovate old perennial pasture, and use only a disk harrow on land where stumps might be present to avoid damage to equipment. Secondary tillage uses a finishing disk or leveling harrow to level the field. A drag can be used behind the harrow to help level and smooth the surface. A tandem disk harrow can be used for both primary and secondary tillage; it may be a versatile implement, although it might require several passes to obtain desirable seedbed preparation. Each pass should be done in a different direction (i.e., diagonal or perpendicular to the previous cut) to achieve better soil preparation. Cultivators, tine, and chisel harrows are commonly used on land preparation following annual crops or as secondary and final tillage. The final disking should be done just ahead of planting to destroy any germinating weeds. Be aware that disking will increase the rate of drying of the soil, as it pulverizes aggregates and exposes more soil, and will reduce soil organic matter, which is already low in Florida soils.
Small operations frequently do not have the heavy implements ideal for primary tillage, and contracting out might be too expensive. However, most have a three-point hitch disk harrow that can be used on a small tractor for land preparation. It will take several passes, which should be done in perpendicular and diagonal directions, but similar results can be obtained. Extra weight can be added to improve performance, and increasing gang angle (i.e., “opening” the gangs, or “increasing the bite”; Figure 2) can improve penetration in the soil. If available, a drag behind the disk can help in breaking clumps of soil and leveling the area on the final pass.

Credit: Marcelo Wallau, UF/IFAS
Fertilization for Establishment
Fertilization practices vary according to soil analysis and the crop being planted. For annual grass, a starter fertilizer should be applied at planting or right after emergence. Starter fertilizers normally contain a small rate of N (about 30 lb/A) and about half of the P and K recommended on the soil analysis. A second N application will follow anywhere between 30 and 60 days after planting, depending on the crop, where the remainder of the P and K can be applied. High-yielding and fast-growing crops such as corn and sorghum have greater nutrient requirements and more specific and intensive fertilization protocol. Information for those can be found in Ask IFAS publication SS-AGR-69, Silage Crops for Dairy and Beef Cattle (https://edis.ifas.ufl.edu/publication/AA250). For perennial grasses, and especially on sandy soils, it is recommended that producers wait until the new shoots emerge and develop some roots before fertilizer application. Much of the planting is done in the summer rainy season and on sandy soils where leaching of nutrients out of the root zone can occur. Therefore, it is desirable to have some roots in place, ready to take up nutrients when the fertilizer is applied. Initial N fertilization is extremely important for annual crops because tillering is determined at early stages of plant development. Skipping initial fertilization can reduce production potential significantly, and even a later application of N might not recover the productivity lost. The type, amount, and timing of fertilizer application during establishment can be obtained from the Ask IFAS publication SL-129, UF/IFAS Standardized Fertilization Recommendations for Agronomic Crops (https://edis.ifas.ufl.edu/ss163).
Planting Dates
Cool-season forages are planted at the beginning of the cool season (fall); warm-season forages are planted at the start of the warm season (spring and summer). Species that are vegetatively propagated can be planted during the dormant season (for those propagated with rhizomes/sprigs) or during the growing season (for those propagated with stolons or stems/tops). See Tables 1 and 2 for specific planting dates. Soil moisture is usually the most critical factor in determining when to start planting and whether establishment will be successful. Always plant in a moist seedbed when sufficient soil moisture can be expected to continue for several weeks. Planting a perennial grass in April in Florida may be risky because of the expected April/May drought. Warm-season forages are generally planted at the start of the warm season (spring and summer), but forages planted by rhizomes in north Florida, such as bermudagrass and rhizoma perennial peanut, may be planted in late winter (February–March) when plants are still dormant. In South Florida, most of the bermudagrass is planted using tops rather than rhizomes; therefore, it is essential to wait for proper conditions during the summer unless it is irrigated land. Cool-season forages are generally planted from mid-October to mid-December, depending on the location in the state. Early planting (i.e., prior to the first frost of the winter, especially for overseeding perennial pastures) can result in higher weed pressure or competition from summer grass (sod-seeding) or other weeds, and increased disease pressure due to high temperature and humidity. Nevertheless, this period is also generally dry in many parts of the state; if planting without irrigation, it is important to wait for cool temperatures to reduce the growth of warm-season grasses and rain for guaranteed germination.
Seed and Propagation Material Purchase
Plan the purchase of seed or secure planting material well in advance. Supplies can be limited depending on the species and cultivar as planting season approaches. Scout the market for price and availability, verify whether the seeds are certified, and check germination and purity. When buying seeds in advance, it is better to collect the seeds or have them shipped closer to planting time to reduce issues with storage. Humid and hot storage can reduce seed viability, especially when seeds are left over from the previous year. Variety or even species availability in local feed and hardware stores might be limited, but seeds can be ordered from other dealers or online and delivered to your operation. Even though shipping might add to the already higher cost of certified seeds and improved cultivars, it generally pays off with higher-quality material and greater productivity.
Choose certified seeds when available and check seed tags for germination and purity (percentage of pure seeds and contamination with other seeds or weeds). Ideally, seeds must have over 80% germination and be free of noxious weeds. “Brown bag” seeds (i.e., not certified and often not tested) may not be pure, have low vigor, and can contain undesirable weeds. When purchasing name-brand cultivars, always purchase from the parent company and do not purchase alternatives, such as “second generation” seeds, which may violate plant variety patent protections and will not generally have the same quality standards as certified seeds. When buying legume seeds, note that many come pre-inoculated with Rhizobia bacteria, which will be essential for nitrogen fixation. Note that the coating (pre-inoculation) process adds weight to the seeds, and seeding rates need to be adjusted to pure seed (seeding rate x % coating on the label). Even when using pre-inoculated seeds, we recommend re-inoculating them with specific rhizobia, to ensure bacteria is present and viable. For more information, check the Ask IFAS publication SS-AGR-154, Inoculation of Agronomic and Forage Crop Legumes (https://edis.ifas.ufl.edu/publication/AA126).
When planting vegetative material, it is recommended to fertilize the plant material and harvest with advanced maturity (over 8 weeks). It is usually difficult to purchase properly managed plant material. Therefore, it is recommended that the producer establish a small seedbed and produce their own plant material. Early- to mid-summer is generally the best planting time, once rainfall patterns are steady, unless the area is irrigated. Late-summer material has high accumulation of reserves, but planting at that time can be risky because there will be little time for the plants to establish well before the winter, especially in North Florida. In South Florida, limpograss can be planted in early fall, with expected full establishment in the subsequent spring. This practice is used because many areas destined to be established with limpograss may be flooded during the summer months.
The period of higher concentration of reserves for rhizome-propagated materials is winter, before plants break dormancy, and that is the ideal time to plant. Alternatively, rhizomes can be dug and planted mid-summer when energy reserves are restored after being used for spring growth.
Planting Methods for Seed-Propagated Forages
Several methods and types of machines have been developed over the years to seed forage crops—from manually broadcasting the seeds to very sophisticated precision vacuum planters. The available equipment and the crop to be seeded will affect method selection. Some crops such as small grains perform better when drilled or incorporated, while other crops such as clover and ryegrass can be broadcast and rolled. Nevertheless, it is important to obtain a good seed-to-soil contact. Many ranchers choose broadcast spreaders because they are inexpensive to purchase and operate. These are also frequently used on small farms for broadcasting seeds and fertilizer. The broadcast spreaders need to be calibrated for better seeding outcomes. If the seedbed is very loose or uneven, firm it by rolling or cultipacking before broadcasting small seeds to avoid excessive seed depth. After broadcasting the seeds, the soil can be harrowed very lightly (or “dragged”) to cover the seeds with approximately 1/4 to 1/2 inch of soil. A cultipacker or roller is used to pack and firm the soil around the seed. For small seeds, such as white clover, any disking (harrowing) can cover the seeds too deeply; therefore, rolling should be sufficient. With large-sized seeds broadcast on loose seedbed, rolling or cultipacking after spreading the seeds should be enough to achieve adequate depth. See Table 1 and Table 2 for recommended seeding depths.
Continuous flow (i.e., grain drill, conservation drill, or no-till drill) and precision (e.g., vacuum) seeders are generally more expensive to purchase and operate, but they allow more precise seeding rates and depths. With correct seed depth and good compaction from the packing wheels, lower seeding rates can be used compared to broadcasting. Precision vacuum seeders will be the best choice when establishing large-seeded species, such as corn and sorghum, and are more frequently found in a row crop setup. The conventional grain drill with a small seed-box attachment can be used for planting small-seeded grasses and legumes and may be the most common type of precision planter used. Excellent results have been obtained planting bahiagrass with a conventional grain drill when the soil was rolled before planting. Rolling or firming the soil before planting allows the drill to place the bahiagrass seed uniformly at the correct depth. A cultipacker-style or drop seeder, used on clean-tilled seedbeds, is popular with some producers when planting small-seeded crops. This planter consists of two corrugated rollers pulled in tandem, with a seed box mounted between the rollers. The first roller makes shallow furrows. The seed drops in the furrows and is covered by the second roller. This is the ideal planter for small-seeded forage crops in a clean-tilled seedbed. This planter should only be used on land that is completely free of tree roots, rocks, or other obstructions. For more information on calibrating seeding equipment, consult Ask IFAS publication SS-AGR-90, Calibrating Forage Seeding Equipment (https://edis.ifas.ufl.edu/publication/ag158).
Planting Methods for Vegetatively Propagated Forages
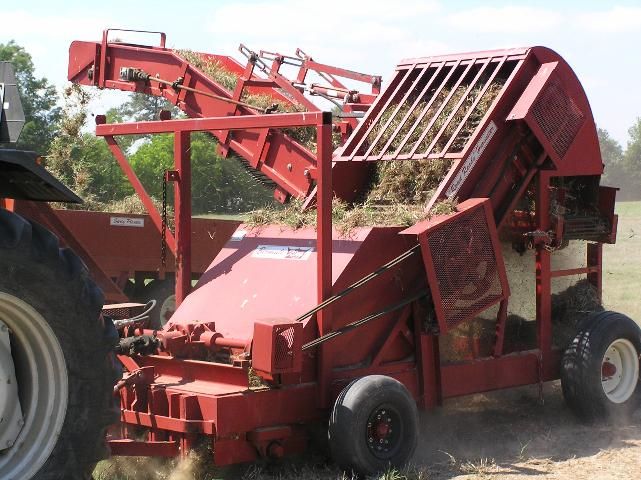
Some forage species, such as bermudagrass, limpograss, and rhizoma peanut, need to be established using vegetative material, because seed production is unviable or nonexistent. There are two types of planting material: rhizomes, or sprigs, and tops (stolons or stems), also called runners. Propagation using sprigs is generally done near the end of the winter when plants are dormant, and right before the start of the growing season, when concentration of reserve carbohydrates is highest. Alternatively, an early- to mid-summer planting is possible, after plants have had time to replenish reserves from the spring growth. Rhizomes are dug with a sprig digger (Figure 3) or a spring-tooth harrow and raked to be loaded and transported to the planting site, preferably within the same day. If more than a day passes between digging and planting, the planting material can overheat, which can reduce establishment potential.
Credit: João Vendramini, UF/IFAS
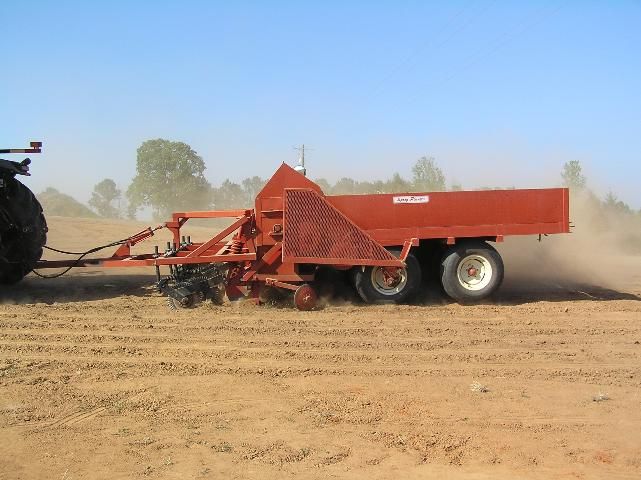
The whole operation can be custom hired. For small farms, it is possible to buy planting material and spread by hand. Operators usually supply the sprigs and have all of the equipment needed, plus they have plenty of valuable experience. The planting material is usually sold and planted on a volume basis. For bermudagrass, a minimum of 20 bu/acre (1.25 cubic feet per bushel) and preferably 30 to 40 bu/acre is recommended. The bermudagrass sprigs can be drilled (Figure 4), broadcast on the prepared seedbed by hand or with a spinner-type spreader, then disked in and rolled. The preferred method is to use a specially constructed bermudagrass sprig planter. Rhizoma peanut is planted to 80 bushels of loosely packed rhizomes per acre. More information on bermudagrass and rhizoma peanut establishment can be found in Ask IFAS publications SS-AGR-60 (https://edis.ifas.ufl.edu/aa200) and SS-AGR-349 (https://edis.ifas.ufl.edu/ag358), respectively.
Credit: João Vendramini, UF/IFAS
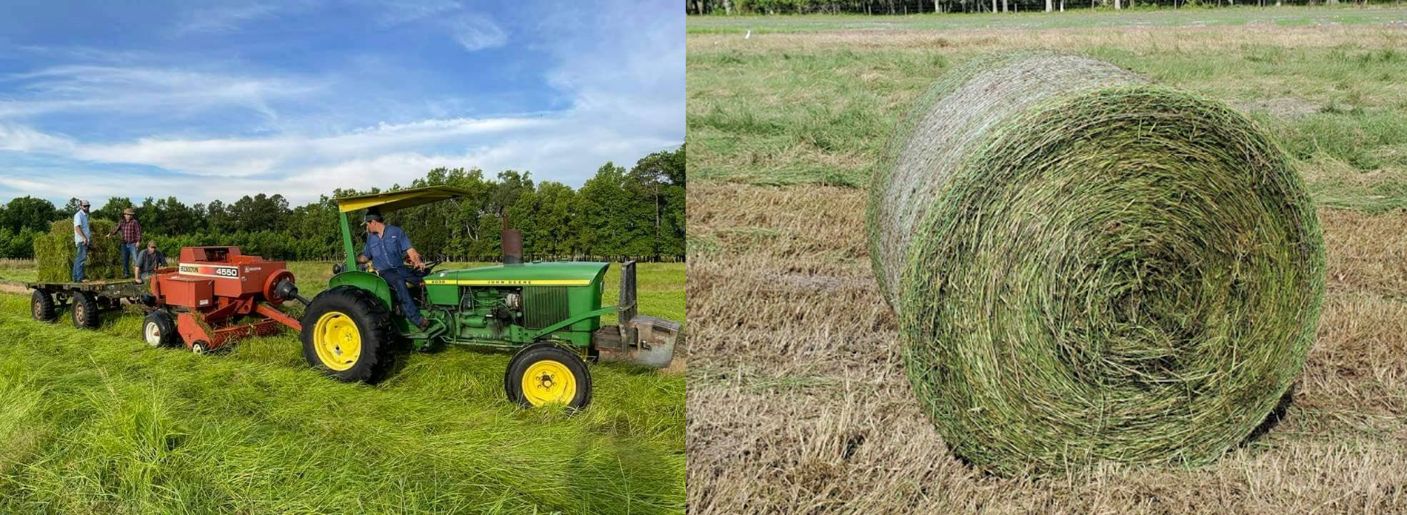
Other grasses such as limpograss (Hemarthria), stargrass, and digitgrass (Pangola) are established using tops (stems or stolons). Hybrid bermudagrasses can also be planted using tops, and different varieties have variable success. Tops should be pure, free of weedy grasses, well fertilized, and relatively mature (8 weeks old or older). Depending on the type of planting equipment available, the planting material can be harvested and handled loose; formed into small, 50-pound rectangular bales by a conventional hay baler; or formed into large, round bales (1,000 to 1,500 lb; Figure 5). It is recommended to remove the tension of the baler to produce loose and lighter bales (especially if handling by hand). The baled material must be planted as quickly as possible (i.e., same day) because it will start fermenting and overheating very quickly, especially in densely packed and large bales. This will reduce germination and pose a high risk of fire. These grasses should be planted at a rate of 1,000 to 1,500 pounds of planting material (tops) per acre. Use the lower rate on new ground and the higher rate on land that has been in cultivation for several years and may have a buildup of weeds, because pasture will close canopy quicker. Even higher rates can be used if the planting material is nearby, abundant, and inexpensive.
Credit: Jose Dubeux (left) and Marcelo Wallau (right), UF/IFAS
The planting material can be broadcast on the soil surface by hand or with machines. A homemade spreader (Figure 6) can be put together in local shops and consists of a spinner or fan mechanism to throw and scatter the planting material. It is pulled behind a flatbed truck or trailer loaded with the planting material. Those machines still require four to five workers to run efficiently. Alternatively, plant material can be unrolled or distributed in rows with a truck and spread using a hay tedder. Some farmers have also adapted a hay buster for round bales that chops and blows the planting material in a 50- to 60-foot swath.
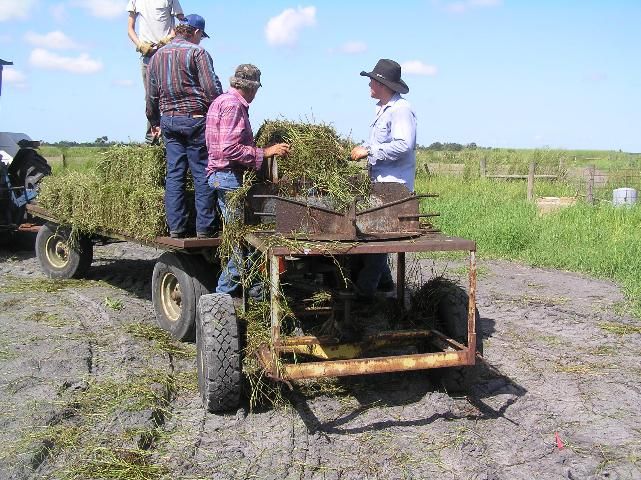
Credit: João Vendramini, UF/IFAS
Once the planting material is on the ground, it should be covered or rolled immediately to avoid drying out. A disk harrow with the blades set straight (i.e., long gang angle, or less “bite”) can be used for this purpose. A "fairway roller" (“pizza cutter”) or "crimper" that has 8- to 10-inch-deep flanges with blunt edges can be used to push the planting material into the soil (Figure 7). This tool works well on moist sand. The crimper may not work well on chopped planting material or excessively high planting density. The soil should then be firmed around the planting material by pulling a cultipacker or heavy land roller over the land at least twice. The land rollers are usually filled with water to give them added weight.
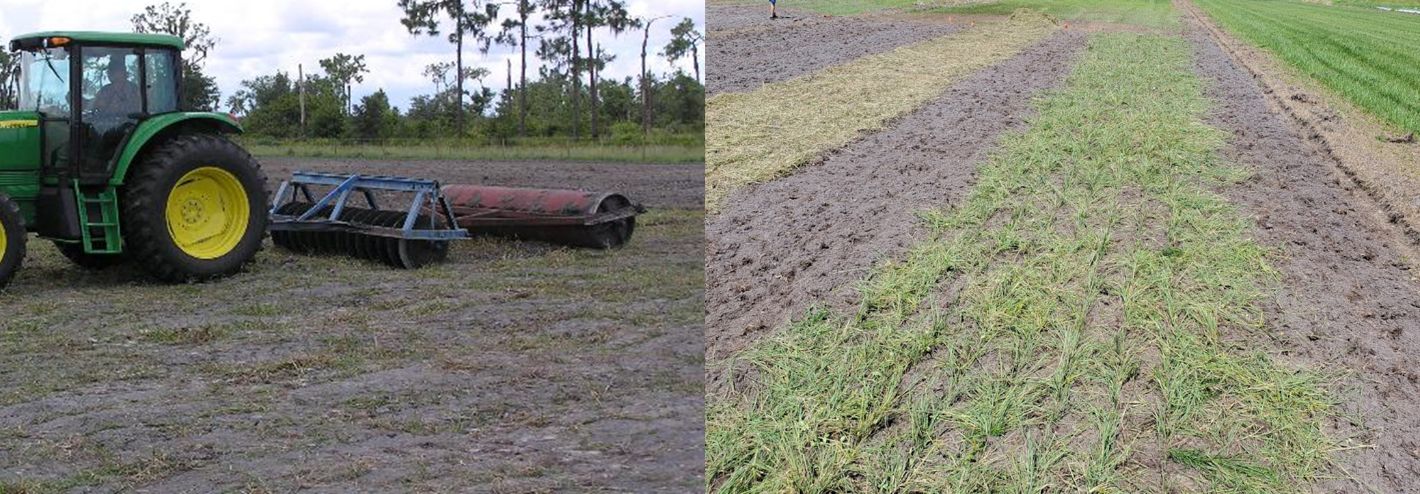
Credit: João Vendramini (left) and Marcelo Wallau (right), UF/IFAS
Planting material can be very expensive and have limited availability. Producers can establish their own nursery and use it to expand their plantings. This practice reduces the cost of planting material as well as time spent between harvesting and planting, increasing the chances of better establishment. However, it is essential to have a weed-free area before establishing a nursery and to keep it well fertilized and clean for production of high-quality material. Rate of increase depends on management, variety, and planting material. A fivefold to tenfold increase in area can be expected for limpograss and bermudagrass when using tops for each cutting. Two to three cuttings per year can be obtained, depending on the region and management (fertilization and irrigation).
Weed Control during Establishment
The choice of herbicide is very dependent on how the crop is planted as well as the species. For example, diuron is used when planting bermudagrass rhizomes (sprigs), but not for planting tops. Certain postemergence herbicides, such as 2,4-D, dicamba (e.g., Banvel®), or a combination of the two (i.e., Weedmaster®), can be used on bermudagrass and stargrass. Dicamba (Banvel®, others) can be used on limpograss, but neither limpograss nor bahiagrass tolerates 2,4-D and Weedmaster® during establishment. Timing of application is crucial to avoid injuring pasture crop and to promote more efficient weed control. Sedge seedlings can be controlled with Weedmaster® 7 to 10 days after planting, or sulfosulfuron (Outrider®) 14 days after planting. Herbicides with long residual effects can affect subsequent crops and should be used with caution when rotating annual crops. If herbicides are not available, mechanical control by mowing at appropriate times provides some control of annual weeds or at least prevents them from shading out the newly planted grass. For establishing clovers, some postemergence herbicides require plants to have a minimum of two trifoliate leaves. For more specific information, consult Ask IFAS publication SS-AGR-08, Weed Management in Pastures and Rangeland (https://edis.ifas.ufl.edu/wg006). There are multiple publications on weed management for specific forage crops. Consult your local UF/IFAS Extension agent or access additional publications on Ask IFAS (https://edis.ifas.ufl.edu/topics/weeds). Always follow instructions on the label.
When to start using?
One of the most frequent issues related to failed pasture establishment is grazing or cutting it too early, along with lack of fertility. It is absolutely essential to remove animals from the pasture during the establishment phase and wait for the plants to be well established before putting the pasture to use. Timing between planting and full establishment depends on the forage species, going from about 45 days in well-fertilized annual grasses (e.g., small grains, sorghum, millet) to between 1 and 2 years in perennial rhizoma peanut and bahiagrass. It also depends on fertility and weather conditions. The important consideration here is that plants need to close canopy, i.e., cover the ground fully and intercept most of the solar radiation, and have developed a strong root system to survive. For most perennial pastures, we recommend a period of 3 to 4 months before a first light grazing or cut, but waiting longer (6 months) is best. It is often said to “give the first year to the pasture” to ensure it is well established. Regardless, avoid intensive grazing and hard defoliations during establishment, especially close to the end of summer or fall when warm-season perennials generate reserves for the dormant period. A good rule of thumb is to wait for the minimum grazing heights to be achieved before starting to graze, with the caveat that for perennial pastures, that height might be achieved before they fully close canopy, and it is advisable to wait longer before use.
Summary
Establishment is the one of the most expensive and critical phases of pasture management and should be planned accordingly. Depending on the land situation, crop, and objectives, this can be a process that takes two years or longer, starting with land clearing and preparation, liming, weed control, and establishment well before grazing or haying. Failures are normally related to improper land preparation, poor weed control, poor planting material or seed quality, lack of fertility or inadequate soil pH, and grazing or cutting too early. Selection of pure, high-quality seed or planting material and good seedbed preparation provide the first line of prevention against weed invasion, which is commonly associated with establishment failures.
Here is a quick general checklist for the 5 “P” of pasture establishment:
- Planning: plan ahead; decide what to plant that fits the environment, needs and management. Secure high-quality seeds or planting material ahead of time.
- Prepping: prepare the land well before the expected planting date; this involves taking soil samples for pH and nutrient analysis, controlling weeds, and incorporating lime if needed. Prepare a smooth, firm, and weed-free seedbed.
- Planting: before planting, make sure soil and weather conditions are proper. Plant during the time of year when rainfall is plentiful and temperatures are appropriate for the forage crop being planted. Use appropriate equipment, and ensure seed or material distribution and placement are adequate.
- Priming: give the plants a chance to survive, ensure that fertility is proper and fertilize accordingly. Nitrogen is often needed shortly after planting when plants emerge, but at small rates. Control weeds early on.
- Putting to use: last, wait until the pasture is ready to use before grazing or cutting. Premature use can jeopardize establishment and long-term persistence. A pasture is ready to use when is starts closing canopy (e.g., when most of the ground is covered) and plants reach the minimum grazing height.
Table 1. Planting dates, seeding rates, and planting depths for common forage crops planted from seed in Florida.
Table 2. Planting dates and rates for common forage crops in Florida planted from vegetative material.