4-H Fashion Revue Objectives
Youth will
- construct or repurpose an outfit for competitive evaluation in one of several categories.
- model their ensemble with chosen accessories for a “Total Look.”
- apply their knowledge and skills in STEM (Science, Technology, Engineering, Mathematics) through the operation and programming of sewing equipment, identification of materials and their characteristics, and the application of various art techniques which include, but are not limited to, mixing and combining materials/chemicals for use in outfit design.
- gain self-confidence by developing and understanding line and design concepts in expression of personal style.
Youth will learn to
- plan and create suitable, becoming clothing and accessories for different occasions.
- problem solve by creating new garments from unwanted or unused materials and supplies.
- compare costs of constructed and ready-made garments.
- communicate and think critically through oral and written presentations.
- accept constructive criticism and develop good listening skills.
- develop good personal habits and hygiene.
- develop technical skills by operating and maintaining equipment and machinery, combining ingredients to design styles, and following instructions for proper usage of design ingredients.
Fashion Revue Guidelines and Categories
All Categories
- The outfit must be created, coordinated, and modeled by the 4-H member.
- Outfits are subject to review for modesty and appropriate attire. Formal wear may be strapless or have spaghetti straps. No backless dresses, excessive visible cleavage, visible undergarments, lingerie, or swimsuits. Please follow 4-H dress code.
- Each participant may only enter one category.
- Interview, garment photos (before and after for repurposed and embellished categories) of the participant wearing the garment, and modeling are required for all participants at each level of competition.
- Each participant must submit a script commentary regarding their outfit.
- Project reports and skillathon/learning lab requirements are at the discretion of the county or state competition coordinator.
- The Florida 4-H Fashion Revue consists of the following categories:
- Individual
- Group
- Personally Sewn: Traditional Clothing
- Personally Sewn/Constructed: Cosplay
- Wearable Art-Embellished
- Repurposed
- Needle Arts
- Each of the categories have specific criteria. Read on for more details.
- No living specimens may be used for the Florida 4-H Fashion Revue at the county or state level. This includes all vertebrates and invertebrates (i.e., insects, crustaceans, fish, amphibians, reptiles, birds, or mammals).
- If receipts are not included or items are not listed with an educated consumer price estimate in the report, the individual will be disqualified.
1. Personally Sewn: Traditional Clothing
- Project will showcase the member’s sewing skills and their ability to coordinate an outfit.
- Garment(s) must be sewn by the 4-H member.
- As skill levels range from beginning to advanced, entries in the Personally Sewn category will also vary. The entry might be a one-piece outfit or a number of coordinated pieces.
- There is no separate category for wool or cotton. If the outfit is sewn, regardless of fabric content, it is considered personally sewn.
- Photo of member wearing the completed garment must be included.
2. Personally Sewn/Constructed: Cosplay
- Costume must be sewn/constructed by the 4-H member.
- As skill levels range from beginning to advanced, entries will also vary. The entry might be a one-piece or a number of coordinated pieces.
- Entry in the cosplay category can include up to five youth from the same age group with a coordinated theme.
- Cosplay entries will be given up to 2 minutes for a creative performance. Performance must be in good taste; no offensive language/actions or unruly behavior is allowed.
- Actions or the removal of costume parts that may startle the audience are not allowed.
- Photo of individual/group wearing the completed costume(s) must be included.
3. Wearable Art — Embellished
- Decorate a garment(s) using arts and crafts techniques.
- The member may purchase or construct a garment(s) and then using arts/crafts techniques, embellish to taste. The main entry must be an embellished garment (coat, dress, pants, shirt, etc.). Embellished accessories like shoes or a hat may complete the outfit but should not be used as the primary garment.
- This category focuses on creative techniques and workmanship, as well as fit and coordination of the outfit.
- Photos of the garment BEFORE and AFTER embellishments must be included.
- Receipts should be included with the list of purchased items for everything, such as fabrics and notions, bought specifically for the outfit being presented.
- Receipts for accessories or materials purchased before the current 4-H year are not required, but those items must be included in the purchased list and given an educated consumer price estimate.
4. Repurposed
- The member designs and sews a wearable garment from previously used materials. The completed garment is different from its original use.
- This category focuses on creativity as well as sewing skills.
- The original garment is not yardage, like a bedspread or sheet, but an actual garment. The original may even consist of two or more garments. Additional fabric and trim may be added to complete the new garment.
- The new garment must show at least 50% change in construction. Be creative! For example, it cannot just be a t-shirt dress cut in half to construct a tank top and elastic-waist skirt. It could be
- a pair of jeans made into a skirt and apron with calico fabric and trim added.
- a large dress made into a skirt to fit a smaller person with the dress collar cut down to fit onto a new blouse.
- two old shirts re-made into shorts and a light jacket with trim from a man’s tie.
- an old prom dress made into a new blouse with dress pants cut down from a pair of men’s slacks.
- A photo of the original garment(s) used and a photo of the youth wearing the completed repurposed garment must be included.
5. Needle Arts
- The member demonstrates their ability to knit, crochet, or weave a garment and coordinate an outfit around that garment.
- Garment must be constructed by the 4-H member.
- It must be an entire garment like a poncho, skirt, shirt, dress, etc.
- Scarves, hats, or belts are accessories, not garments. Accessories made using needle arts may be added to complete the outfit but by themselves do not count in this category.
- Photo of member wearing the completed garment must be included.
- Receipts should be included with the list of purchased items for everything, such as yarn and notions, bought specifically for the outfit being presented.
- Receipts for accessories or materials purchased before the current 4-H year are not required, but those items must be included in the purchased list and given an educated consumer price estimate.
Interview Tips
The member will have an opportunity to participate in a 5- to 10-minute interview regarding their project. The criteria used during the interview process includes:
- Project Knowledge…50%
- Experiences and Accomplishments Through 4-H Activities…25%
- Interview Skills...25%
Sample Questions That Could Be Asked During the Interview:
- What do you enjoy about the 4-H clothing project?
- What was one of your goals for the year relating to this project?
- How does the outfit you chose express your personality?
- How is the color, fabric, style, or fit of this garment/outfit a good choice for your size or your body shape?
- Why do you think the fabric is a good choice for the garment design and features?
- How does this garment/outfit show/reflect current fashion trends?
- In what way did the design elements and principles found in this garment/outfit help you to choose this garment/outfit?
- What occasions, purposes, or activities did you have in mind when you selected or constructed this garment/ outfit? Why do you think this garment is appropriate for this occasion, purpose, or activity?
- What functional characteristics did you want in your garment/outfit, and how does this garment/outfit match your intent?
- How do the accessories you have chosen add to your overall appearance?
- How have you changed or embellished this garment/ outfit in any way since choosing/purchasing it?
- Where did you purchase your outfit?
- Would you consider shopping at garage sales, consignment stores, or thrift shops in the future? Why or why not?
- How much did this garment/outfit cost?
- Explain how this garment/outfit and its coordinated accessories enhance or expand your wardrobe?
Posture and Modeling Positions
This section includes posture tips and modeling positions, turns, and poses for you to consider when taking part in the 4-H Fashion Revue.
Posture
Demonstrating good posture will help you show confidence. Remember to keep your back straight and your shoulders up. This will help you avoid slouching. In addition to keeping your back and shoulders straight, remember to pull in your stomach muscles, as this will help you naturally stand straighter. When standing still or posing, bend your knees slightly to keep them from locking.
Modeling
When modeling, use comfortable, natural movements that show off your garment and your personal style. Here are several positions for you to incorporate into your modeling experience.
“T” Position
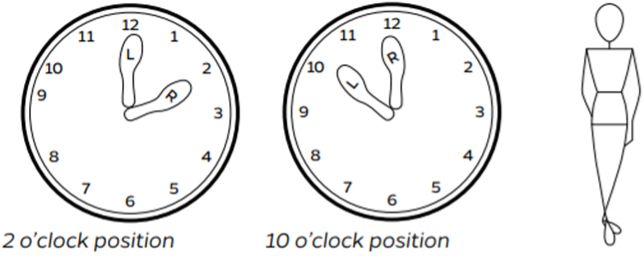
The “T” position is the base position for most models and for anyone who wants to stand correctly and attractively. It allows natural alignment of muscles, bones, and organs, while giving the body a pleasing visual dimension. For a “T” pose, place your left foot with your toe pointing straight ahead as though it were the large hand on the clock. Your right foot should be drawn back with the inside of your instep touching the heel of your left foot and your right toe pointing as though it were the small hand of the clock at the 2 o’clock position. You also can reverse the position of your feet and place them in the 10 o’clock position (Figure 1).
Credit: UF/IFAS
Settle your weight on your back foot, relax, and slightly bend the knee of the forward foot. Your posture should be natural and easy. Take a deep breath and let it out to relax. Then pull your stomach muscles tight and in as you raise your diaphragm up. Your shoulders will fall in line naturally.
You can pose your hands in a variety of ways. Try clasping them behind your back or letting your fingertips rest at your side seams. You can cup your hands together in front of you at your waistline or put one hand on your hip or in your pocket. Be careful not to throw your weight to one side and put your hips off balance. The hip line should always be even for a healthful, becoming posture.
You can practice in front of a mirror until you find thepositions that are most attractive for you. Soon these positions will become familiar to you, and you will find yourself very comfortable and relaxed. Your posture will contribute to your overall fitness and poise, whether you are visiting with a friend or giving a speech.
Modeling Turns
Half Turn
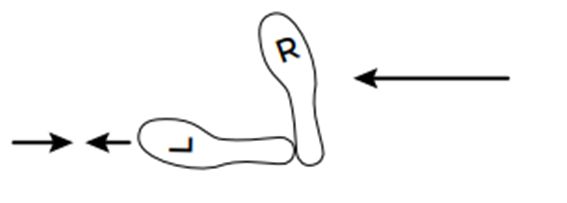
Beginning in the 2 o’clock “T” position, step off with your left foot, walk forward until you are ready to turn, and take a half step with your right foot. The toe of your left foot should be mostly aligned with your right heel (Figure 2).

Credit: UF/IFAS
Raise your heels slightly off the floor, shifting your weight to your toes, and pivot a half turn (180°) to your left. You will finish with your feet in 2 o’clock position, pointing the opposite direction from where you started (Figure 3).
Credit: UF/IFAS
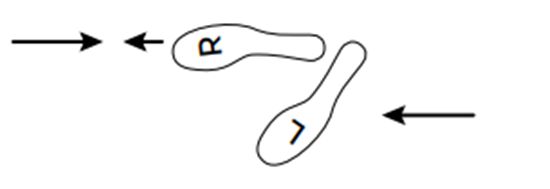
To begin in the 10 o’clock position, step off with your right foot, walk forward until you are ready to turn, and take a half step with your left foot. The toe of your right foot should be mostly aligned with your right heel (Figure 4).

Credit: UF/IFAS
Raise your heels slightly off the floor, shifting your weight to your toes, and pivot a half turn (180°) to the right. You will finish with your feet in 10 o’clock position, pointing the opposite direction from where you started (Figure 5).
Credit: UF/IFAS
Settle your weight on your back foot: you are in model stance. You can hold your pose and when you are ready, step off with your front foot.
Quarter Turn
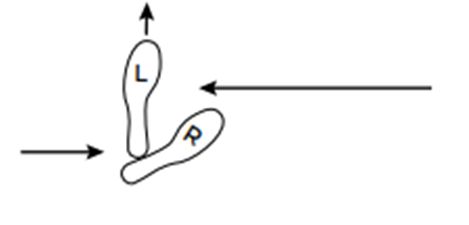
Beginning in the “T” position, step off with your front foot, walk forward until you are ready to turn, and take a regular step with your left foot and a half step with your right foot. The toe of your left foot should be mostly aligned with your right heel (Figure 6).

Credit: UF/IFAS
Raise your heels slightly off the floor, shifting your weight onto your toes, and pivot a quarter turn (90°) to your left. You will finish in the 2 o’clock “T” position, facing the direction perpendicular to your path (Figure 7).
Credit: UF/IFAS
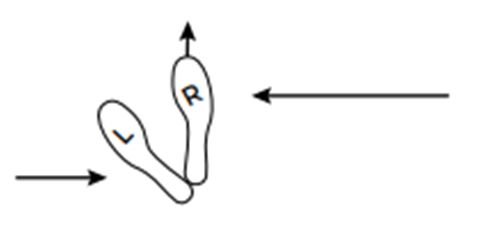
If you wish to make a turn to the right, take a regular stepwith your right foot and a half step with your left foot. Thetoe of your left foot should be mostly aligned with yourright heel (Figure 8).

Credit: UF/IFAS
Raise your heels slightly off the floor and pivot a quarter turn (90°) to your right. You will finish in the 10 o’clock “T” position, facing the direction perpendicular to your path (Figure 9).
Credit: UF/IFAS
Settle your weight on your back foot: you are in model stance. You can pause for a moment, and when you are ready, step off with your front foot first. With practice, you will no longer even think about what your feet are doing. You’re on your way to modeling with ease.
Mannequin Poses
The “T” position is the basic mannequin pose and is appropriate for all types of clothing.
The other mannequin poses you will learn are not as versatile as the “T” but are attractive when modeling garments for Fashion Revue. They can add variety and interest to a show or photo, enhancing both the model and the outfit. Alter these standing positions by varying your hand placements.
The position described and illustrated are frozen positions in which the model looks like a store mannequin. Sometimes, Fashion Revue begins with four or five models walking on stage, posing in a mannequin position, and holding that position until their names are called and the commentary is read. At that time, the models “come to life” and show the garments.
“A” POSE
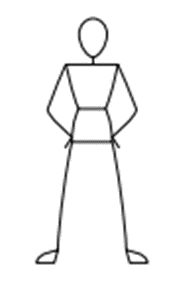
In the “A” pose, you stand with your feet hip-width apart and your toes pointed out at about a 45° angle. Keep your knees fairly stiff and your ankles “cracked inward.” Rest your hands on your hipbone or slightly below in a relaxed position. Turn your hands so the audience sees a side view (outside edge of hands and little fingers)(Figure 10).
Credit: UF/IFAS
“I” Pose
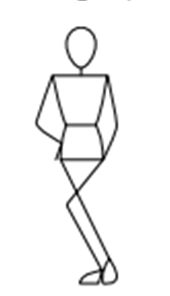
The “I” position is a very slenderizing pose. Place your weight on your right leg with your toe pointing at a 45° angle to the right. Bend your left knee, swing to the right, and squeeze against your right knee. Your left toe points straight ahead and your left heel is lifted off the floor. You can rest your right hand on your hip as in the “A” position. Your left hand can brush along the seam line. Try changing hand positions for varied looks (Figure 11).
Credit: UF/IFAS
Sidestep Pose
To begin a sidestep pose, stand in a “T” position and move your front foot to the side, allowing your weight to remain on the opposite foot. You can raise the hand of the weighted foot to your hips, waist, collar, or hair. Keep your other hand in a lower position to add interest and aesthetic appeal (Figure 12).

Credit: UF/IFAS
“C” Pose
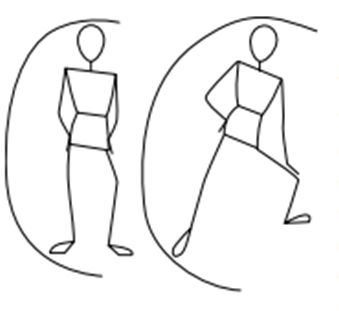
The “C” pose begins with the sidestep position. Bend at the waist so your body curves—like a “C”—toward the extended foot. The curve can be gentle or extreme, depending on the desired effect. As you bend sideways at the waist, your body weight transfers to the extended foot. Lay the hand above the extended foot on your midthigh or knee, depending on the degree of body curvature. Rest your other hand on your hip (Figure 13).
Credit: UF/IFAS
Crossover Pose
The crossover is an easy, attractive pose. Cross one leg either in front of or behind your other leg, with your toe pointed toward the floor and your heel up. Place the hand on the side of your weighted foot in a position higher than the other hand, giving an artistic line to your body (Figure 14).

Credit: UF/IFAS
Walk and Run Poses
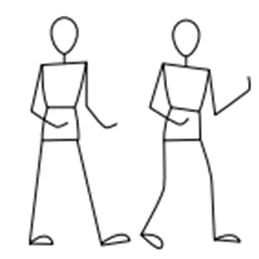
Walk and run poses are used to illustrate action. To simulate a walk, begin in the “T” position, keeping your weight on your back foot. Extend your forward foot and point your toe up. A run pose involves shifting your weight to your forward foot and lifting the heel of your back foot off the floor. Try a variety of hand positions to give your body the illusion of movement (Figure 15).
Credit: UF/IFAS
Optional Props
It is fun to use a prop when modeling for an audience. It adds flair and sometimes helps tell the story of where you might wear your outfit. It also helps put you, the model, at ease. We are often more comfortable in front of others if we have something in our hands. These are a few suggestions of props you might carry with you when you are modeling:
- sports equipment
- umbrella
- flowers
- books
- sunglasses
- purse
- notebook
- mixing bowl
- backpack
- clipboard
- equestrian riding equipment
Finishing Touches
Here are some final reminders to help you appear well-groomed, fresh, and appropriately accessorized for an attractive, finished you.
Cleanliness
Cleanliness and freshness are of major importance in the impression you make. Below is a grooming checklist for you.
- I am freshly bathed.
- I have freshly shampooed hair. My hair is styled and combed.
- My teeth are brushed.
- My nails are filed and clean.
Clothing
You’ve worked hard on your new garment, and you want it to look its very best. Below is a garment prep checklist for you.
- My garment is clean (freshly washed and absent of stains).
- I have pressed my garment carefully.
- I have clipped any loose threads.
Makeup
The whole point of makeup is to make you look fresh, vital, and capable. 4-H members who usually do not wear makeup need not wear any for Fashion Revue. If you normally wear makeup, apply it as naturally as you can. Do remember, though, that at a distance your makeup fades, so you may want to intensify your blush, lip, and eye colors. Always blend carefully. Be aware that you do not want to look like you’re wearing a mask. Below is a makeup checklist for you.
- My makeup has been freshly applied.
- My makeup is well-blended.
- My makeup is appropriate for my age.
- My makeup is appropriate for my outfit. (For example, evening wear allows for more makeup than daytime.)
Accessories
Choose accessories that are appropriate for the garment you will be wearing. Keep them well-proportioned to your size and of complementary colors that either blend or contrast. Ladies may wish to wear neutral panty hose or apply lotion to their legs for a sleek, well-put-together look. Hosiery can make walking in heels easier, make your legs more attractive, and help garments lay smoother. Remember the lights on stage are brighter than room lighting; make sure you wear appropriate undergarments for your outfit (such as a slip) to prevent a see-through effect. A good rule for shoe color is to choose the same color as the hem of the garment or darker. Also, neutrals (tans, gray, black) are always acceptable. Wear jewelry if it is appropriate for your garment. Gold and silver are classic, versatile choices. Hats are a fun addition, too, as long as they complement or complete the total look. Study fashion magazines and catalogs to see how professionals put it all together. Below is an accessories checklist for you.
- My accessories are in proportion to my body size.
- My accessories complement my garment.
- The colors of my accessories contrast or blend with my outfit, completing the total look.
- I am wearing appropriate undergarments (slip, panty hose, dress socks, etc.).
- My shoes are clean, polished, and fit appropriately.
- I am comfortable standing and walking in my shoes. (Practice your model walk in the shoes you will be wearing for the Fashion Revue.)
Remember the most important finishing touch is a positive attitude. Take a couple of deep breaths, relax, and smile!
Writing a Fashion Revue Script Narrative
4-H Fashion Revue script narratives present the 4-H’er and their project to the audience. The narration should introduce the 4-H’er, describe special features of the garment, and highlight interesting information about the project. The following are guidelines to help 4-H’ers write descriptions of their garments for Fashion Revue. Keeping the narration under 100 words which will allow the member to come on stage, make one or two turns, and then exit. Bear in mind that the Fashion Revue committee reserves the right to rewrite or revise narrations.
The purpose of the 4-H Fashion Revue activity is to
- Build self-confidence and poise.
- Develop skills in planning, selecting, and making clothing for different occasions.
- Select appropriate accessories.
- Develop good posture, grooming, and punctuality habits.
- Complete applications clearly and submit them on time.
- Acquire knowledge and skills in planning, presenting, and participating in fashion revues.
The specific objectives of a narration are
- To introduce the member and their project.
- To focus on skills learned in the clothing and textile project.
- To express challenges, fashion trends, and cost savings.
- To interest the audience in 4-H activities.
- To display the garment attractively.
Before You Begin
- Analyze the garment. What is special about it? Be sure to include color descriptions!
- List major features you want to describe, along with a few comments that relate to the garment and how it will be worn. Create an appealing mental picture with descriptive words.
- Study mail order fashion catalogs, magazines, the pattern envelope, and advertisements to see how they describe similar features. This is especially useful for beginning projects such as skirts that do not have a lot of details.
- Describe the garment by starting with the obvious, then call the audience’s attention to details such as accessories that relate directly to the garment.
- Write. Get down all you want to say. Do not worry about the length—yet.
- Use alliteration (words beginning with the same sound; i.e., “flirty flounce” for ruffle).
- Use action words as much as possible (e.g., as belt circles the waistline; a flaring hem swings; etc.)
- Tell the biggest problem you encountered in sewing the outfit or what new sewing technique you learned. For example, saying you put on the sleeve six times can encourage some of your audience who are less skilled to keep on trying.
- If there are two parts to your outfit, such as a coat and dress, mention the outer layer first.
- Edit. Polish your narration by cutting out repetitious phrases or ideas. Keep sentences short and avoid tongue twisters. Aim for clear, concise phrases that create audience interest. Make it as bright, crisp, and informative as possible. The audience is there to learn about new fashion as well as to be entertained.
- Read your narration aloud to a friend. Does your friend know what you are talking about? Practice modeling with your narration. Do you think of other things that you might say? Re-edit and re-read. Be sure to write in the third person.
- Add one sentence that talks about you, the model! Be sure to include your name and county, or city, either at the beginning or closer to the end of the narration.
- Finally, cut the narration down to 100 words or less. Hyphenated words count as separate words.
- Print off your finished commentary on an 8 ½ x 11 in. piece of paper in size 14 font.
- Complete your narration form, personal data form, and all other forms required for your category and submit them to your county 4-H Extension office. Important life skills learned in 4-H are how to complete forms accurately and managing your time to submit them by deadline.
Examples of Narrations
Example #1
Gleaming in her sequined skirt, Kathleen Mitchell is modeling a stylish denim look. It is hard to believe, but this cloth was once a lonely remnant just waiting to be snatched up! This remnant now has a multipurpose. For example, it will be this year’s Easter outfit, and then be worn as a casual around-the-town skirt. It has a light and airy feeling, with its slit in the back. Her biggest challenge was matching the sequins as she cut out the fabric. This 11-yearold homeschooler loves Irish Dancing and sketching her fashion ideas. Kathleen is in her second year of sewing with the Pleasantville 4-H Club. She is enjoying every minute of it!
The above narrative is 115 words.
- What would you change to get this down to fewer than 100 words?
- What terminology would you change?
- Do you think this narrative provides interesting information for the audience?
Example # 2
Christina Williams will be warm and stylish in her new wool jacket and skirt. The black, 100% wool jacket is fully lined, with princess seams and a front, center zipper. She used a “New York Collection” Vogue pattern to sew her jacket and shortened it to fit her own personal style. The light blue, 100% Pendleton wool skirt is lined at the yoke and has an invisible zipper on the side. Christina designed the pleats herself because she could not find a pattern that she liked. To put a finishing touch to the outfit, Christina designed and made her blue Australian Crystal earrings. Christina has been in the Highland 4-H Club for 9 years and has been a Junior Leader for the sewing project for four years. Christina will enjoy wearing her new fashionable outfit.
The above narrative is 135 words.
- What would you change to get this down to fewer than 100 words?
- What terminology would you change?
- Do you think this narrative provides interesting information for the audience?
Helpful Words for Writing Your Fashion Revue Narrative
- accent
- design
- festive
- coordinate
- embellish
- compliment
- create
- chic
- sew
- construct
- accessorize
- unique
- gleaming
- outfit
- challenge
- modeling
- sparkly
- flounce
- rare
- wear
- closure
- appeal
- enhance
- highlights
- fashionable
- stitch
- pastel
- classic
- decorate
- elegant
- shimmering
- molded
- adds to
- stylish
- modern
- trendy
- casual
- bold
- unusual
- textured
- flatter
- trendy
- special
- lines
Fashion Revue Entry Forms
The Fashion Revue Entry Form is best viewed in the pdf version of this publication. Its sections include space for participant information, entry photos, the fashion revue script, garment details, and the affirmation of work statement.
4-H Project Reports
You can download the 4-H Project Report for your age by clicking the appropriate link:
MY JUNIOR 4-H Project Report (https://edis.ifas.ufl.edu/publication/4H033)
My INTERMEDIATE 4-H Project Report (https://edis.ifas.ufl.edu/publication/4H034)
My SENIOR 4-H Project Report (https://edis.ifas.ufl.edu/publication/4H035)
4-H Project Financial Summary Report and Receipts
Attach copies of all receipts showing the cost and place of purchases for notions and materials used to make your garment.
- Everything visible must be included in the purchased list including jewelry, shoes and socks, hair bow, etc. Undergarments are, therefore, not included.
- Include receipts for everything listed that was purchased specifically for the outfit being presented. If a receipt is missing, provide an educated consumer estimated price.
Complete the Financial Summary Report, which is best viewed in the pdf version of this publication.
Financial Revue Scoresheet
The Fashion Revue Scoresheet is best viewed in the pdf version of this publication.
References
Dedic, B.J., et al. (1996). Fashion magic wardrobe planning: 4-H clothing selection project series. 4JD-10PA. University of Kentucky Cooperative Extension Service. Retrieved March 2011, from http://www.ca.uky.edu/agc/pubs/4jd/4jd10pa/4jd10pa.pdf
Heaton, L.M., & Burden, E. (1988). Fashion magic in the marketplace: 4-H clothing selection project series. 4JD-11PO. University of Kentucky Cooperative Extension Service. Retrieved March 2011, from http://www.ca.uky.edu/agc/pubs/4jd/4jd11po/4jd11po.pdf
Iowa State University Extension. (2023). 4-H Youth Development Awardrobe clothing event. Retrieved from Awardrobe Clothing Event | 4-H Youth Development (iastate.edu)
K-State Research and Extension. (2021). Kansas 4-H effective presentation tips. 4H984. https://bookstore.ksre.ksu.edu/pubs/4H984.pdf
Los Angeles County, University of California Cooperative Extension. (2023). County fashion revue. Retrieved from https://celosangeles.ucanr.edu/4H_Youth_Development_Programs/Events_and_Activities/Fashion_Revue/
Oregon State University Extension Service. (2006). 4-H Fashion Revue. 4-H 9202. Retrieved from https://extension.oregonstate.edu/sites/default/files/documents/4-h9202.pdf (Original work published 1986)