Welcome to the Apiary!
This book was designed to introduce you to the art of beekeeping. The purpose of this publication is to offer a follow-up 4-H curriculum to Chapter 1: Welcome to the Hive! The text is most appropriate for junior-, intermediate-, and senior-aged youth (about 8–18 years old) and may serve as a guide for prospective and beginner beekeeping. Here you will find out
- why so many people choose to keep bees,
- how to work safely around them,
- what kind of equipment is needed,
- how to choose and prepare an apiary location, and
- how to keep the colonies healthy.
This book contains what you need to know to start your first honey bee colony. Before you dive in, take a minute to think about why you want to keep bees in the first place. Your answer will help in the goal-setting process and in preparing your colony for that specific purpose. You do not have to be a beekeeper to use this resource. You just need a curiosity about how to keep honey bees. Follow the “Beeline” through each section on your own or with the help of your leader. Some activities you can do by yourself, but most are made for you and a group of friends. You will learn a lot of new vocabulary from the world of beekeeping. These words are in bold font when they are first introduced. If in later sections you forget a definition, you can look back to previous sections or use the glossary at the end of this chapter. The end also includes a blank copy of the first activity and an answer key for all other activities. When you get to the end of the “Beeline” in each section, you will have learned lots of new and interesting things about beekeeping.

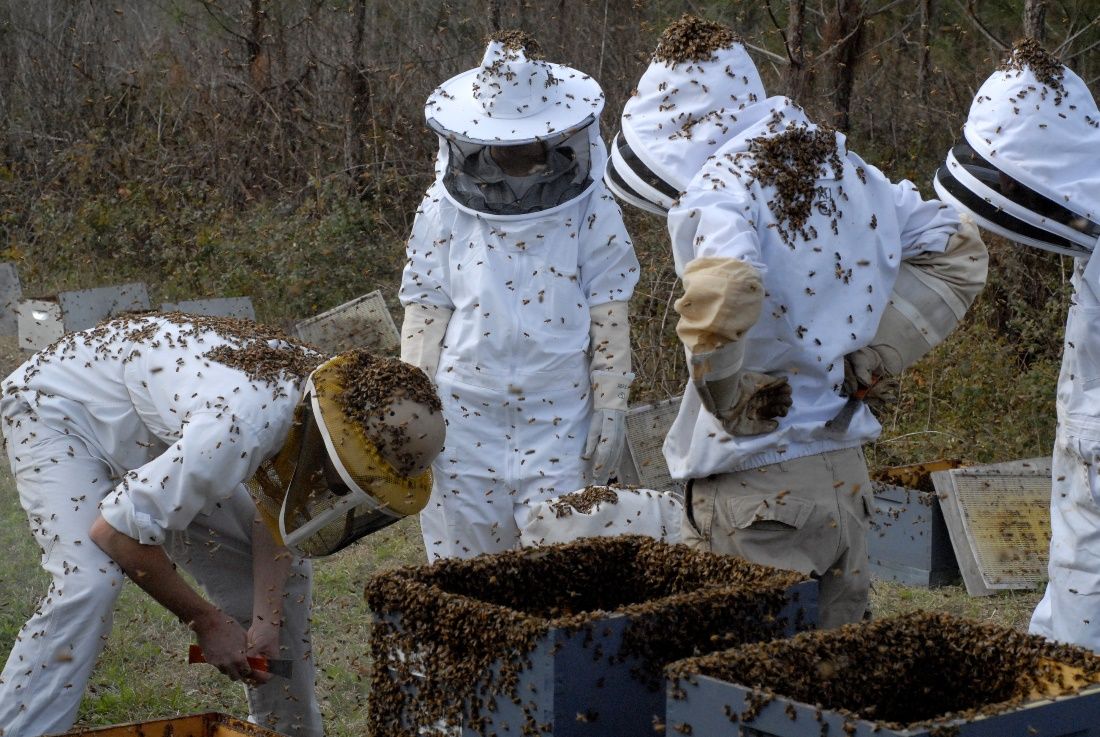
Credit: UF/IFAS Honey Bee Research and Extension Laboratory
Follow the Beeline!
- Just like honey bees follow a beeline from the hive straight to the nectar, you can follow the bees in these symbols to lead you straight through the activities in this project book as you learn more about beekeeping.
What’s the Buzz?
To get things going with each section, a brief introduction to the topic will be given. New vocabulary words will be in bold font. When you see this buzzing bee, take a few minutes and read this section on your own or with your leader so you will be ready to complete the activities in the section.
Foraging for Nectar
Just as honey bees must leave their hive to go out and search for nectar, this bee signals there is an activity to get you up and doing something. When you see this bee, it is your chance to explore the world of beekeeping either with a learning experience or another fun, hands-on activity. Some you can do on your own. For others, you will need your friends.
Return to the Hive
Once honey bees find nectar or pollen, they take it back to the hive and share it with the colony. When you see this beehive, it is time for you to return and bring back what you have learned. Reflect on your experience by answering some thoughtful questions.
Taste the Honey!
Bees do not make honey for nothing—they eat it! Tasting the honey is how bees enjoy the fruits of all their hard work! When you see this pot of honey, this is your chance to see the fruit of your efforts. Take a few minutes to ponder these questions and see what you have learned about beekeeping and how you can use the information in your own life.
The Bees’ Knees
When something is neat or interesting people will say it is “the bees’ knees.” These sidebars offer more information and other interesting facts about honey bees and the things they do.
Pollen Patties
Many beekeepers will give their bees pollen patties as a food supplement to help strengthen the colony. This bee signals closing activities that can be fun and offer deeper learning to strengthen your understanding about a topic. You are not required to complete these activities. They are optional.
Chapter 2.1 Why Keep Honey Bees?
What’s the Buzz?
Credit: UF/IFAS Honey Bee Research and Extension Laboratory
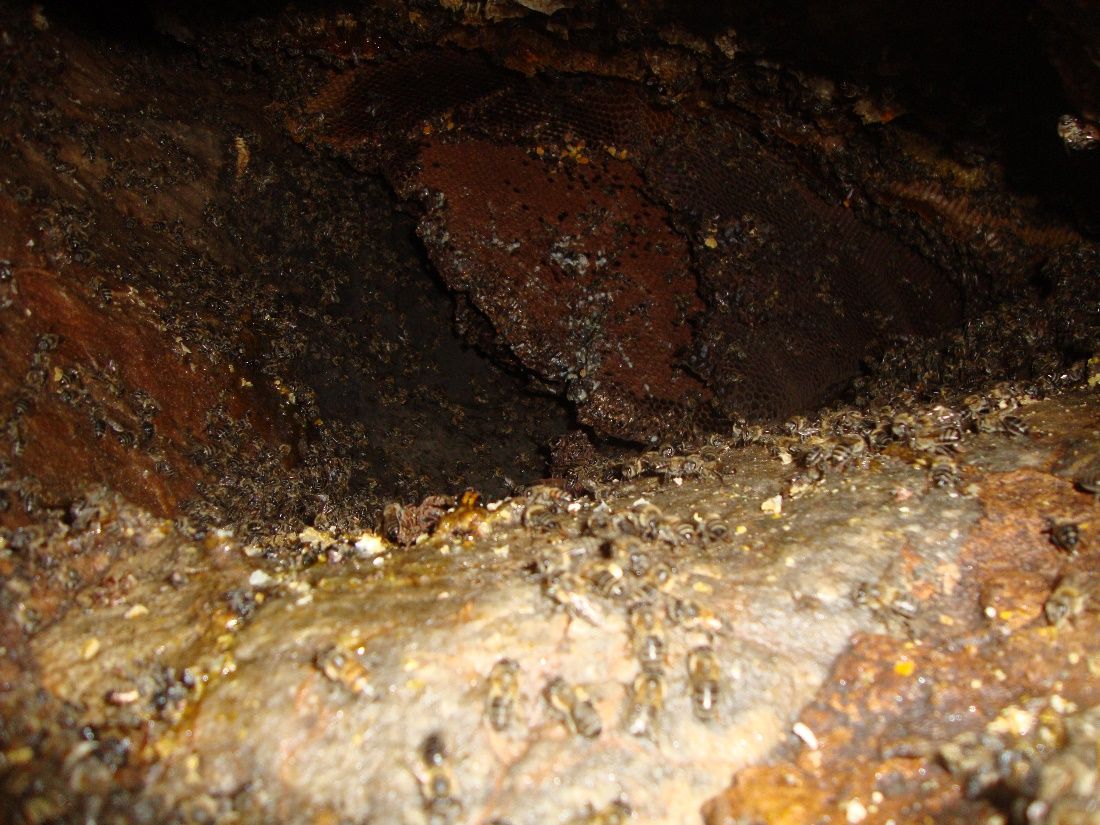
Long before people kept honey bees in boxes, they were honey hunters. They would follow honey bees back to their nest in the wild (Figure 2), then they would harvest the honey and other hive products, destroying the nest in the process. This was not very good for the bees.
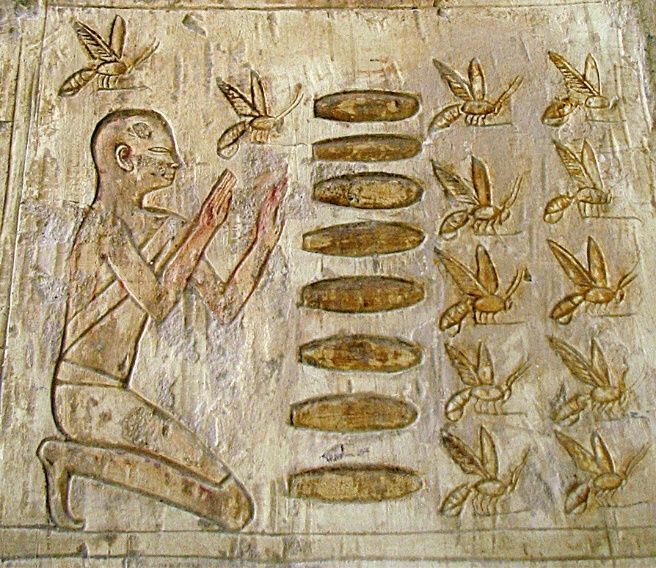
Ancient Egyptians are the first beekeepers that humans have on record. Images on stone walls, dating back to 650 BCE, show humans keeping or managing hives of honey bee colonies in clay cylinders (Figure 3). Ever since, beekeepers all over the world have been working to improve the lives and products of bees.
Credit: Gene Kritsky, used by permission
There have been many different containers used to host honey bees throughout the centuries, but the oldest had to be destroyed to harvest the honey. Beekeepers improved the hive designs so they could remove the frames of honeycomb without having to destroy the hive. The Langstroth hive (Figure 4) has become the most popular type of hive body used today. This type consists of stackable boxes with removeable frames, allowing beekeepers to keep colonies year after year in the same hive. Today, there are many reasons people become beekeepers. Harvesting honey is only one of them.
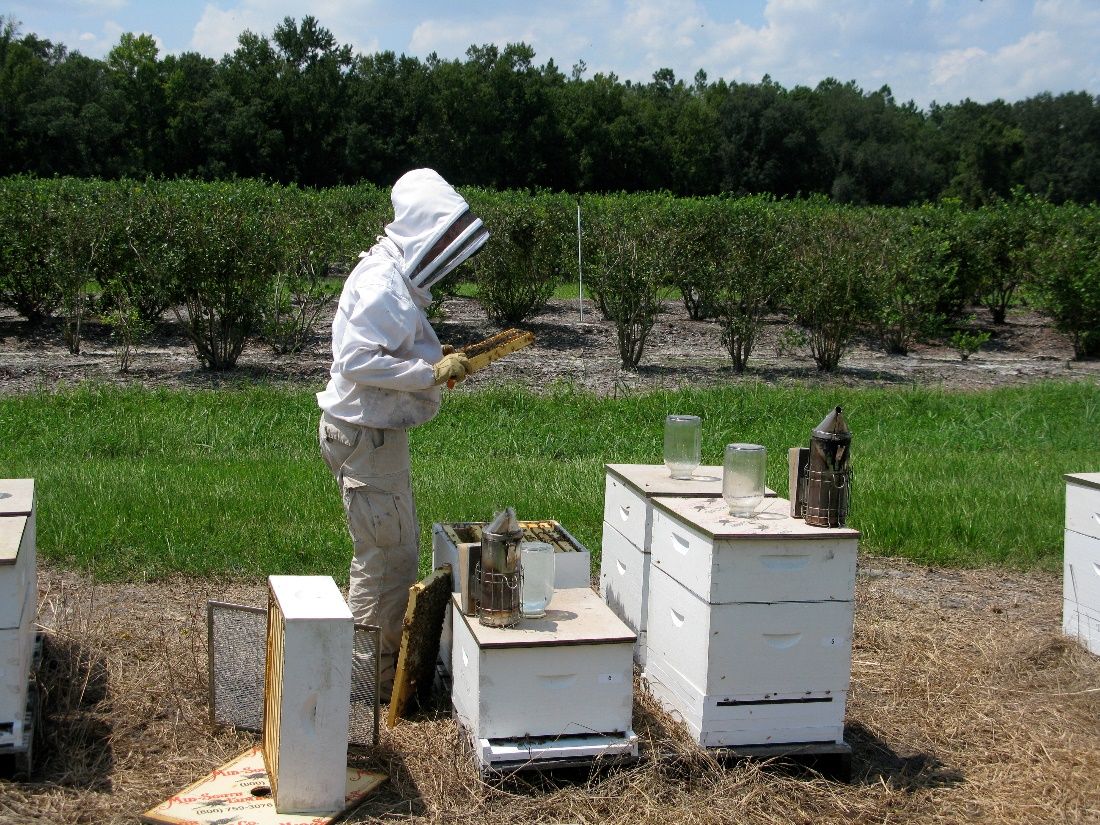
Credit: UF/IFAS Honey Bee Research and Extension Laboratory
Are You in It for the Products?
Honey is the most popular product from a honey bee colony because it is a delicious treat that can be eaten as liquid honey, chunk honey, comb honey, or creamed honey (Figure 5). Beeswax, which bees use to build honeycomb on the frames, is made into products such as candles, lip balms, soaps, crayons, polishes, and much more. Some less common products from bees which may have human health benefits include propolis, royal jelly, and bee venom.
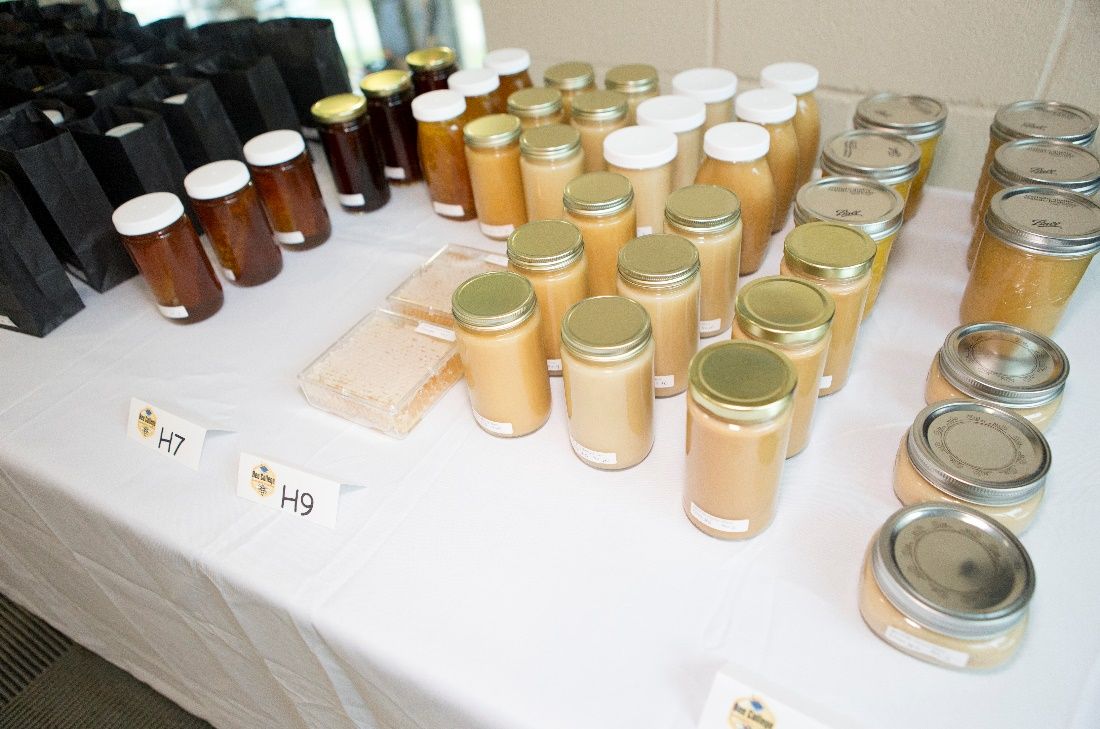
Credit: UF/IFAS Honey Bee Research and Extension Laboratory
Are You in It for the Pollination?
Honey bees are wonderful pollinators (Figure 6). Some people keep honey bees so they can boost pollination in their own flower and vegetable gardens or on their fruit trees.
Others build a business out of beekeeping and provide pollination services to farmers to help pollinate their crops. This requires managing many colonies at a time, often moving them across the country wherever pollination services are needed.
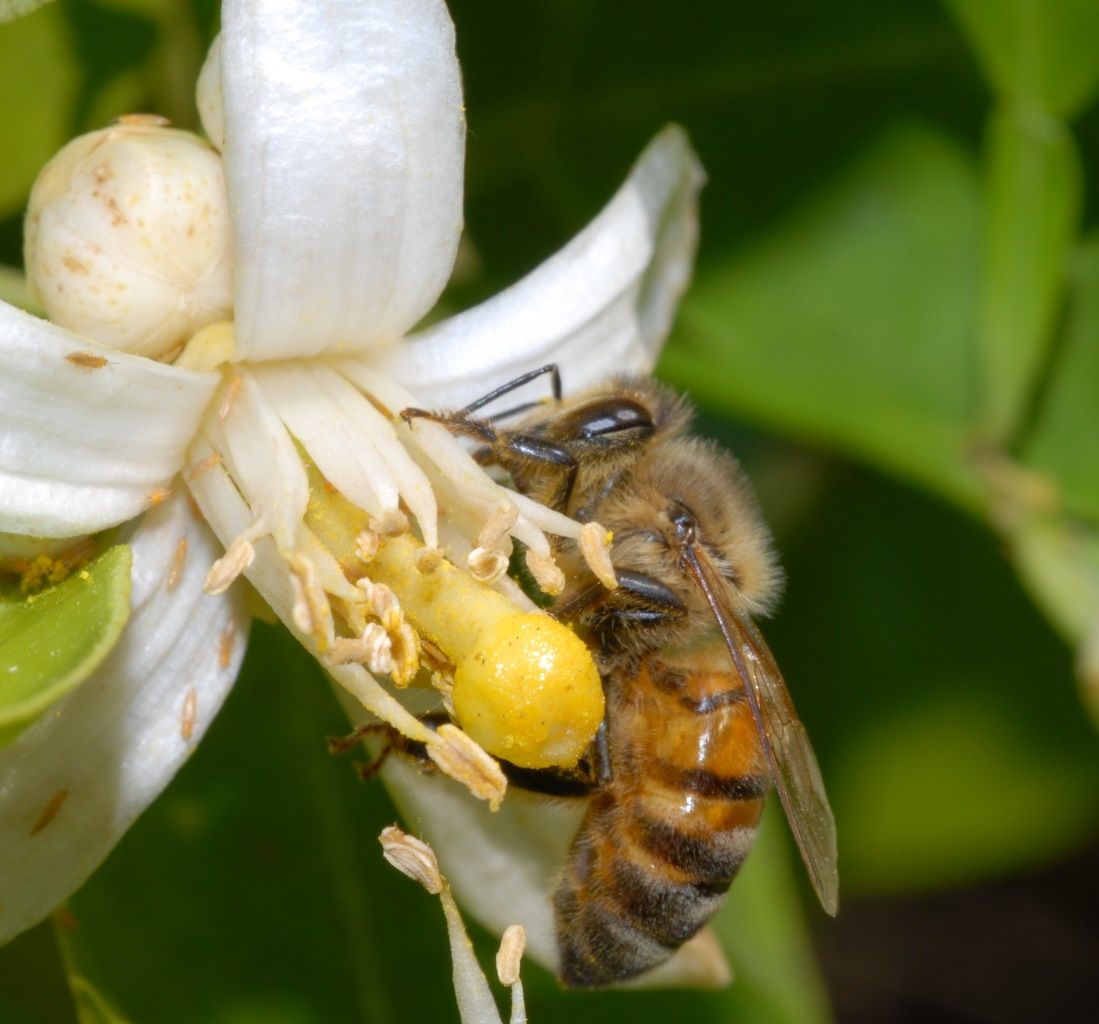
Credit: UF/IFAS Honey Bee Research and Extension Laboratory
Are You in It for the Knowledge?
Beekeepers and scientists have studied these fascinating little creatures up close for many years. These observations have led to understanding honey bee behavior and how humans, pests, and the environment affect it. We have also learned how to better manage and care for honey bees. Scientists and beekeepers around the world have published their findings for others to understand the best ways to keep honey bee colonies strong and healthy (Figure 7).
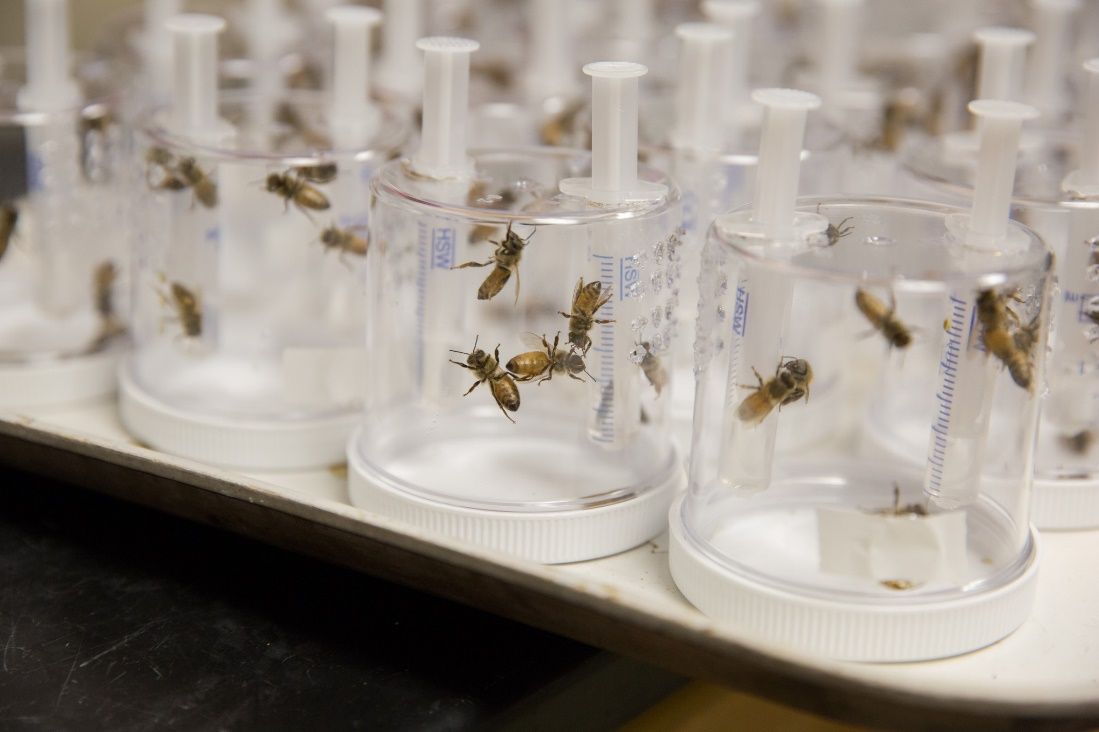
Credit: Geena Hill, formerly of UF/IFAS Honey Bee Research and Extension Laboratory
Are You in It for the Tradition?
There are many generations of beekeepers who continue the tradition that has been passed down by relatives (Figure 8). These beekeepers say, “I’m a beekeeper like my mother was and her father before her.” It is a good hobby or business that allows family members to work together and use their different skills to keep healthy honey bee colonies.
Credit: Geena Hill, formerly of UF/IFAS Honey Bee Research and Extension Laboratory
Are You in It to Save the Bees?
In recent years, the health issues and decline of honey bee populations have become a critical concern to many beekeepers and scientists. This increased awareness of the threats faced by honey bees has caused humans to take action (Figure 9). Many feel the need to help by becoming beekeepers themselves. By taking care of their colonies as best they can to increase honey bee health, many new beekeepers are helping boost bees’ well-being as a species.
Credit: Baylee Carroll, formerly of UF/IFAS Honey Bee Research and Extension Laboratory
Table 1. Types of Beekeepers in Florida
Some people become beekeepers because it is something they enjoy doing in their spare time. Others become beekeepers because observing and working with fascinating creatures is rewarding. Some become beekeepers to make a living (Table 1). Whatever the reason, there are many things to learn about before becoming a beekeeper. Why do you want to keep bees? What do you hope to gain from this experience?
Foraging for Nectar

Credit: Tyler Jones, UF/IFAS Communications
Activity #1 Who Needs a Pollinator?
Many of the food crops grown by humans rely on insect pollinators for pollination (Figure 10). In many cases, the wild pollinators naturally found near a crop field cannot provide enough overall crop pollination. Many farmers rely on managed honey bee colonies to supply pollination services for their crops. Commercial beekeepers often keep or manage thousands, and even tens of thousands, of honey bee colonies for this purpose. These colonies are transported all over the country to supply essential pollination services. There is a good chance that bees helped produce the food that you eat every day (Figure 11), including many fruits, vegetables, nuts, and even cocoa! Honey bee pollination also supports crops fed to livestock, such as alfalfa or clover. As a result, honey bees are partly responsible for many dairy and meat products as well. Beyond farming and agriculture, pollination is also vital in natural, unmanaged ecosystems. It leads to the production of seeds and fruits, on which many animals in the food web depend.
It is time to brainstorm! With the help of an adult, use the internet to do a search for foods pollinated by honey bees. Try to find at least 26 different kinds of foods that need to be pollinated by honey bees (Table 2). Look over your list and circle the foods that you have eaten. Are you surprised how many there are?

Credit: Tyler Jones, UF/IFAS Communications
Table 2. Who needs a pollinator?
Activity #2 Chalk Pollination

Credit: UF/IFAS Honey Bee Research and Extension Laboratory
How Pollination Works
Pollen is the powdery substance that contains sperm cells on the male parts of plants. Pollination is successful when pollen is transferred by pollinators, such as honey bees, from the stamen (male reproductive organ) of a flowering plant to the pistil (female reproductive organ) (Figure 12). After the pollen reaches the pistil, fertilization can take place. This happens as pollen travels down the long portion of the pistil to the ovary where it joins with the ovule or egg (Figure 13). The fertilized egg then grows into a fruit or seed of the plant.
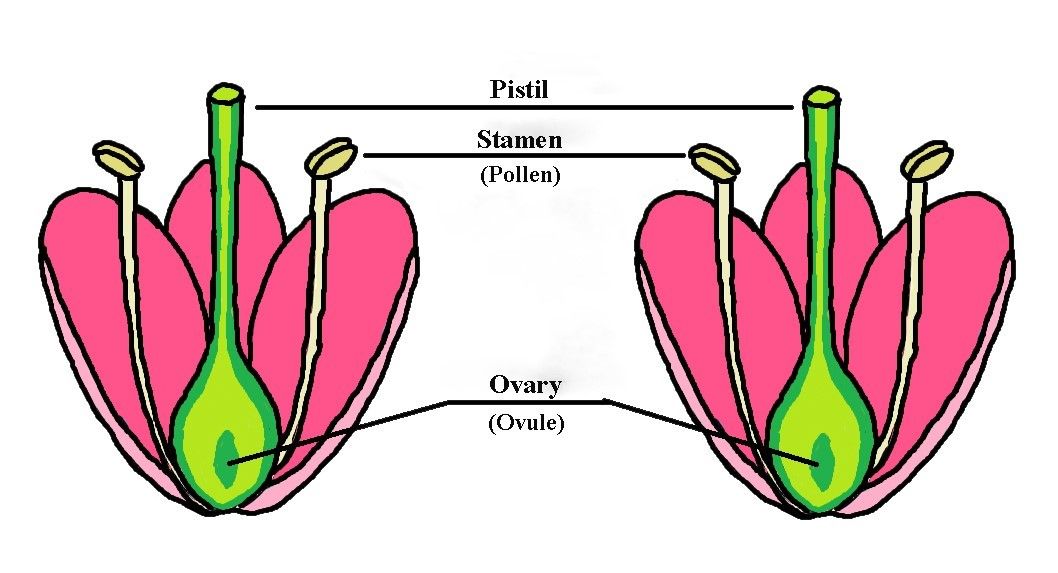
Credit: UF/IFAS Honey Bee Research and Extension Laboratory
In many cases, fruit and seeds will fail to form without enough pollination. Pollination is an essential part of the reproduction of many species of plants. Some plants such as wheat and corn are pollinated by the wind. Many plant species require an animal pollinator, like a honey bee, to physically move grains of pollen from one plant to another. Many of these plants work very hard to attract honey bees and other pollinators to them with bright, showy flower petals, sweet scents, and the presence of nectar, as shown in Figure 14.
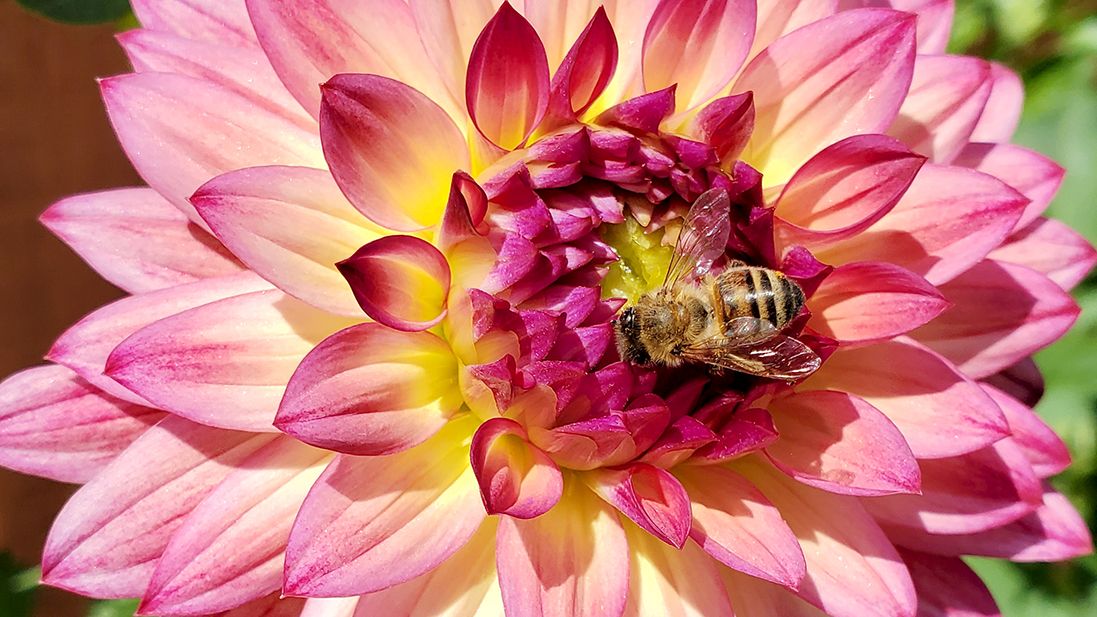
Credit: Kristen Lang Designs, used by permission
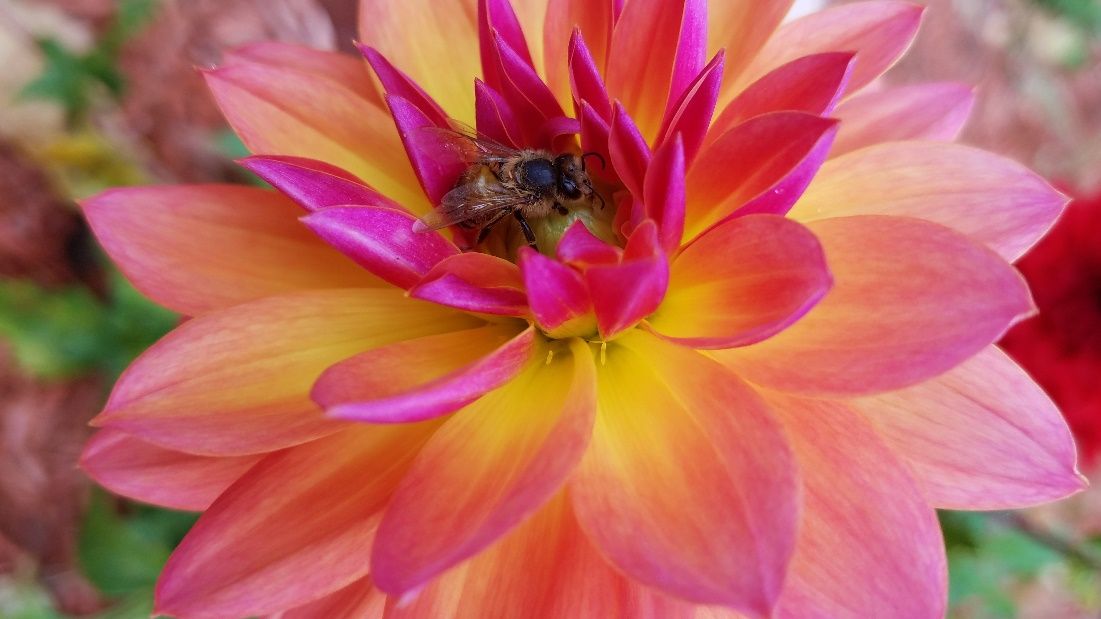
These characteristics draw in pollinators, who then touch the flower’s pollen-covered stamens. When the bee travels to another flower for more resources, the pollen from the previous flower often contacts the pistil of this new flower, allowing pollination to occur. The plant provides important nutritional resources such as nectar and pollen that benefit the honey bee in exchange for the pollination services she provides. While feeding the colony is the reason that bees collect pollen, their flower visits are also important for the plant’s long-term survival. This win-win situation where both organisms help each other is known as a mutual symbiotic relationship.
In this activity, you will see how honey bees pollinate flowers through direct physical contact.
Step 1. Collect the following materials for this activity:
flower worksheet printout (see page after glossary)
- crayons
- scissors
- cotton balls
- chalk of assorted colors
Step 2. Take the flower worksheets and color the petals with crayons.
Step 3. Use scissors to cut out the flower (Figure 15).

Credit: Emily Helton, formerly of UF/IFAS Honey Bee Research and Extension Laboratory
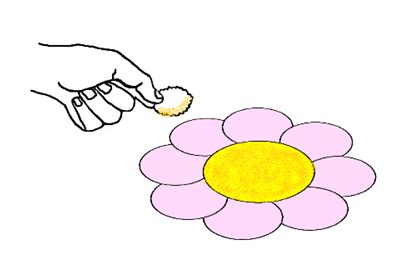
Step 4. Each person uses a different color piece of chalk to color the center of their flowers. Press down hard enough while coloring to create chalk dust in the center. The chalk dust will represent the pollen.
Step 5. Once everyone has finished coloring the flowers, carefully place them around the room without spilling the chalk off the flower.
Step 6. Hand each person a cotton ball. The cotton ball will represent their honey bee. Everyone “buzzes” around the room with their bee to visit each of the flowers by gently tapping their cotton ball onto the center of the flowers (Figure 16).
Credit: Emily Helton, formerly of UF/IFAS Honey Bee Research and Extension Laboratory
Step 7. After visiting all the flowers, have everyone observe all the assorted colors on their honey bees. Notice that they picked up various “pollen samples” from all the different flowers they visited (Figure 17).

Credit: Emily Helton, formerly of UF/IFAS Honey Bee Research and Extension Laboratory
Step 8. Find a flower in the room that displays an array of colors showing that it was visited by multiple bees and was successfully “pollinated” (Figure 18).

Credit: Emily Helton, formerly of UF/IFAS Honey Bee Research and Extension Laboratory
The Bees’ Knees
Credit: Dr. Michael Bentley, used by permission
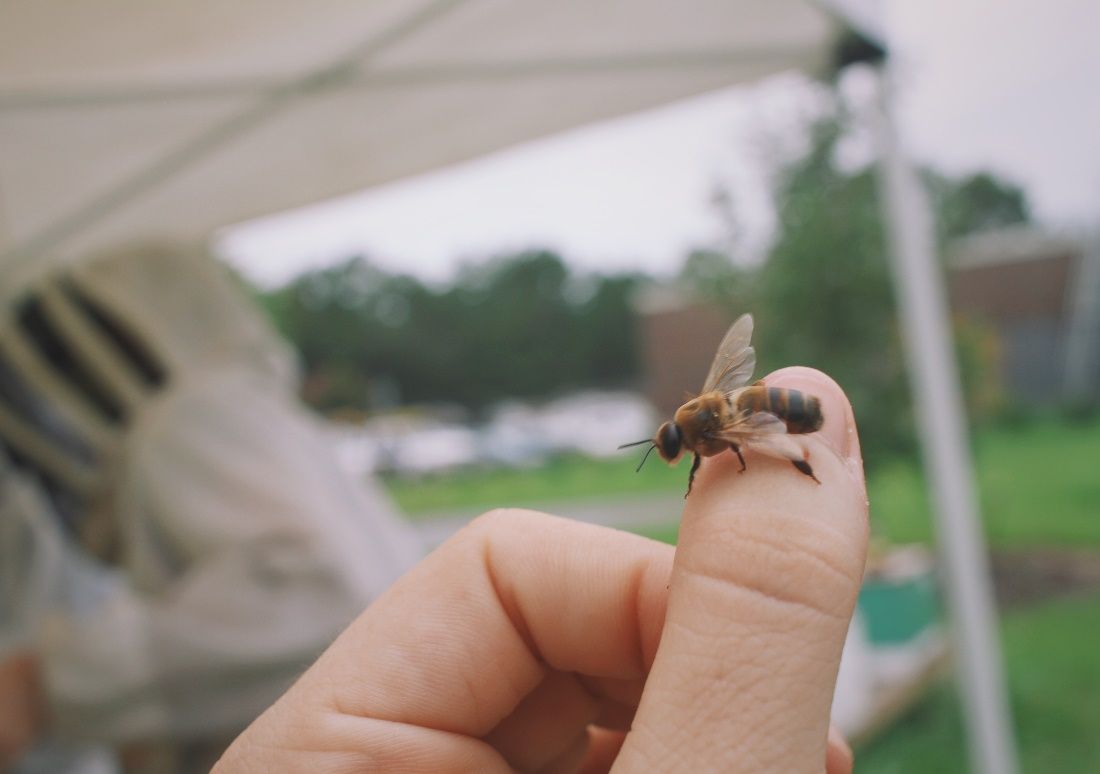
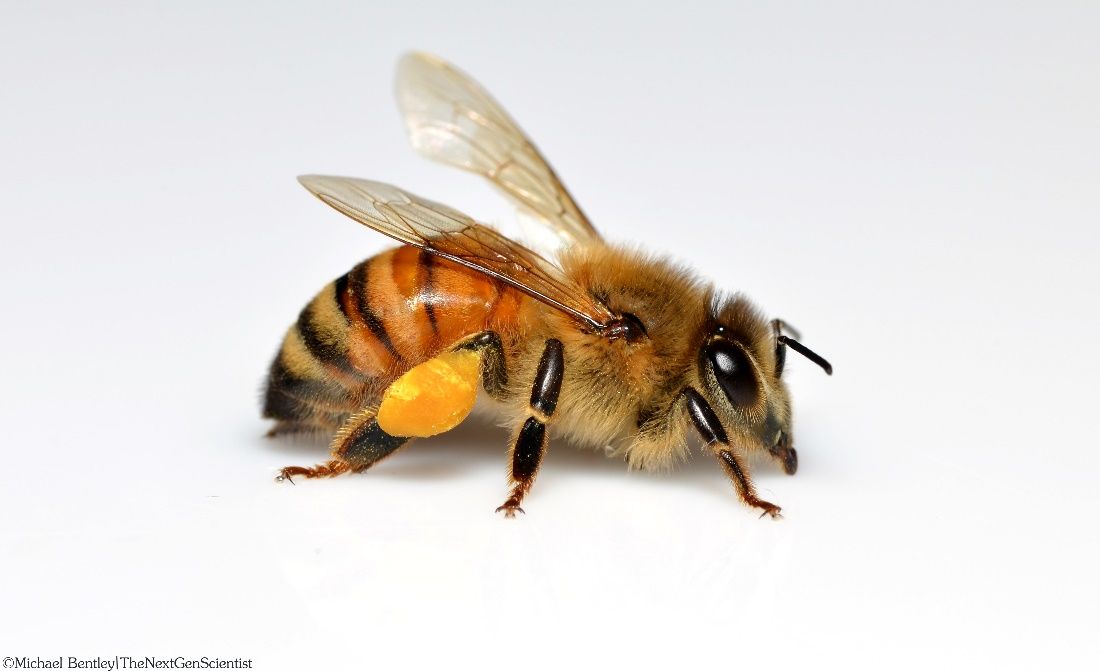
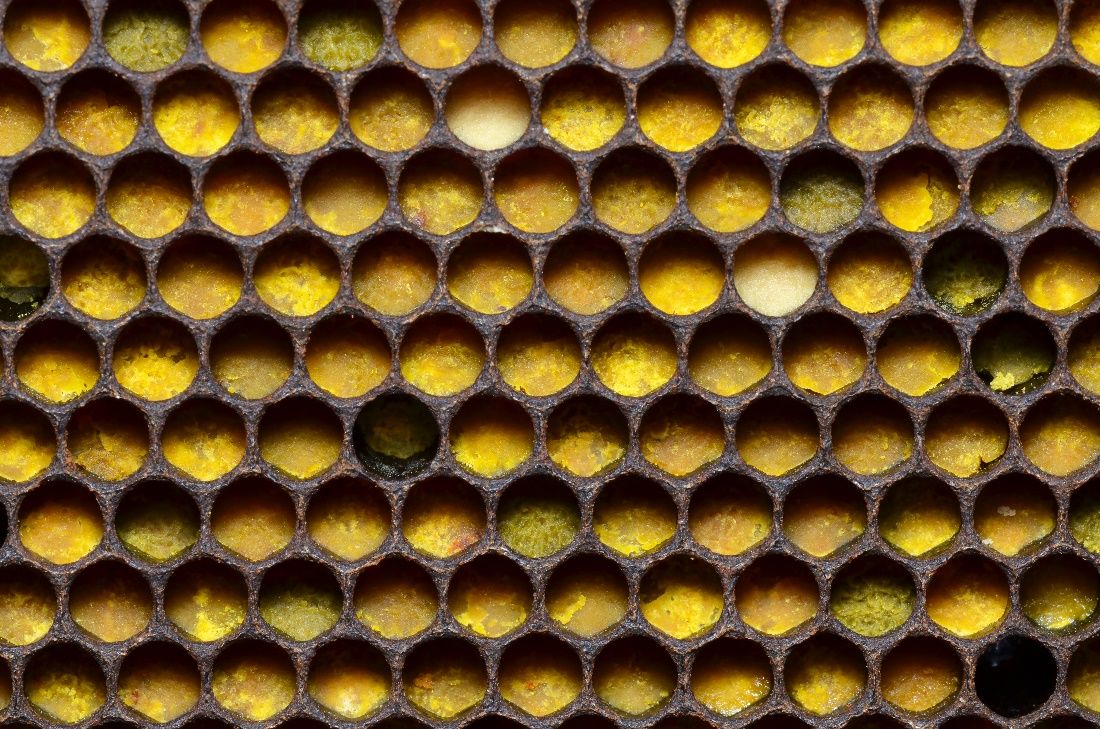
Pollen is important for growth in the honey bee diet. It is their main source of protein, as well as a source of vitamins, minerals, and fats. How do they collect tiny grains of pollen? The tiny, branched hairs that cover honey bees’ bodies help them. As a forager bee lands on a flower, grains of pollen attach themselves to these hairs. This happens because of static electricity, which is produced during the honey bee’s flight. This electrical charge pulls pollen grains to the hairs of the bee. As the forager continues to buzz from flower to flower, she moves the pollen down into her pollen baskets, located on her hind legs (Figure 19). When her baskets are full, she returns to the hive where workers make pollen into bee bread and store it until it is fed to the colony (Figure 20).
Credit: Dr. Michael Bentley, used by permission
Return to the Hive
Credit: Kristen Lang Designs, used by permission.
1. Name the three types of beekeepers and why they keep honey bees.
2. (Fill in the blank.) Pollen is the main source of (blank) in the honey bee diet.
3. In your own words, explain how flowers are pollinated by pollinators.
4. Honey bees have a mutual symbiotic relationship with flowering plants (Figure 21). How does each organism benefit in this relationship?
5. How does pollination affect humans?
Taste the Honey
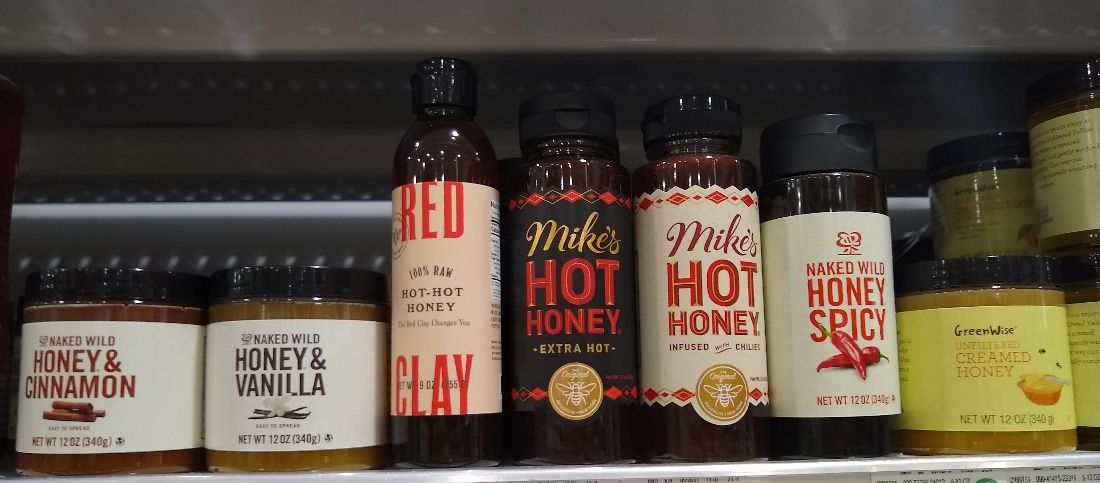
Credit: Megan Hammond, formerly of UF/IFAS Honey Bee Research and Extension Laboratory
1. What are some foods that you would miss if the plants did not get pollinated by honey bees?
2. What kinds of foods or groups of foods do humans need to eat for proper health and nutrition in their diet?
3. Why are you interested in beekeeping?
4. What types of honey have you tried (different flavors, creamed, chunked, etc., as in Figure 22)?
Pollen Patties
How does static electricity help honey bees collect pollen? See how it works with this simple experiment using black pepper and a plastic spoon. The pepper granules are positively charged, while the spoon gains negative electrons from the cloth. Opposite charges are attracted to each other, so the pepper will jump up and stick to the spoon. This is like how a honey bee builds up static electricity in the tiny hairs of its body as it flies from flower to flower. When it lands on a flower, the grains of pollen will stick to the honey bee’s body.
Step 1. Collect the following materials for this activity:
- plastic spoon
- black pepper
- piece of cloth
- small plate
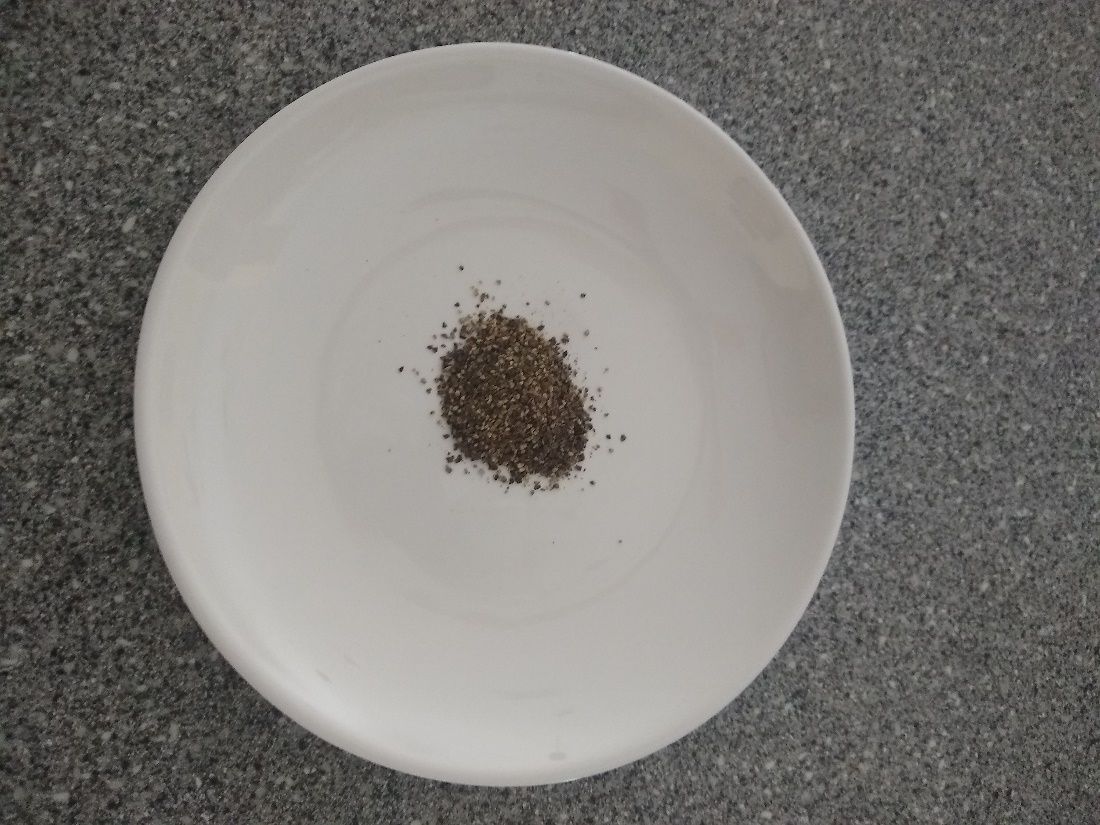
Step 2. Pour 1 teaspoon of black pepper into a pile at the center of a small plate as shown in Figure 23.
Credit: Megan Hammond, formerly of UF/IFAS Honey Bee Research and Extension Laboratory
Step 3. Rub the spoon with the cloth for 40 seconds to build up static electricity (Figure 24).

Credit: Megan Hammond, formerly of UF/IFAS Honey Bee Research and Extension Laboratory
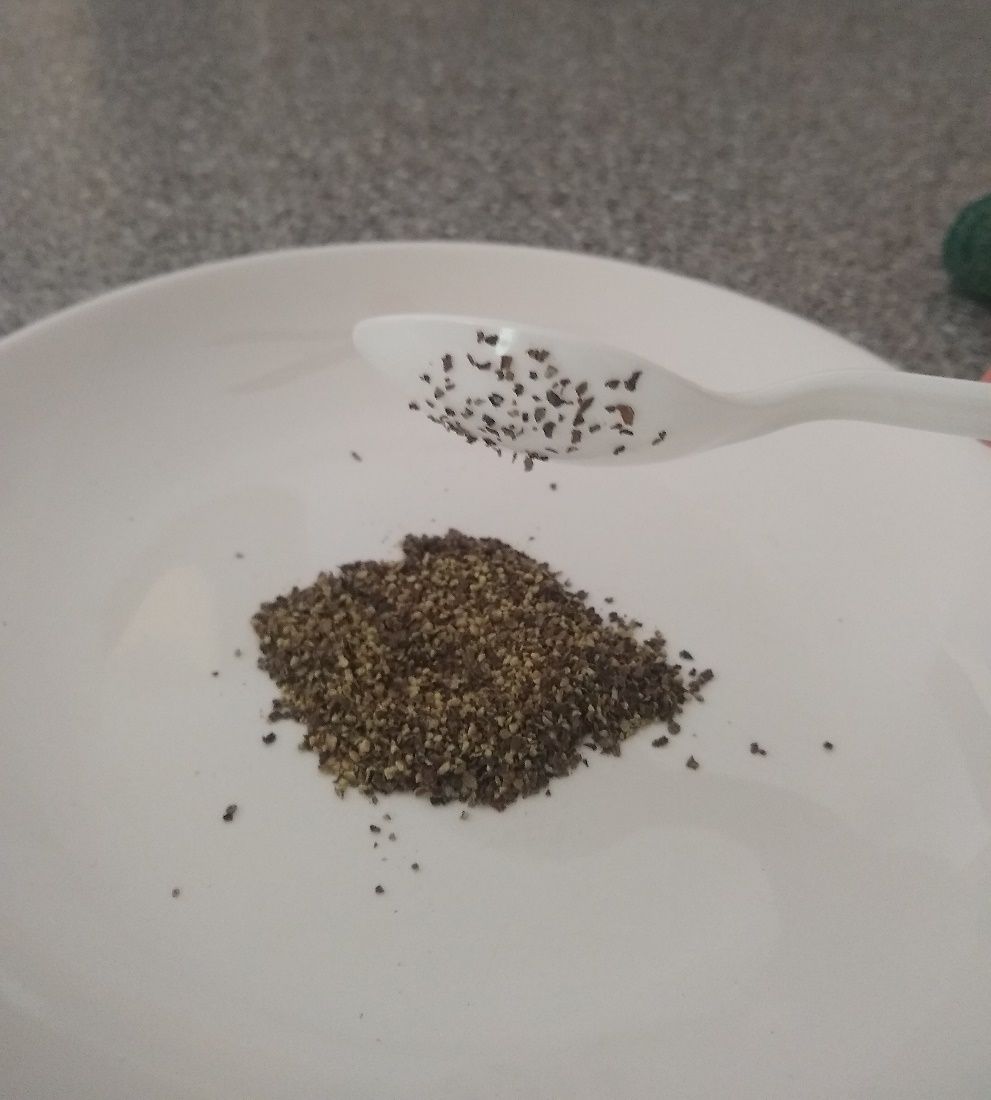
Step 4. Hold the spoon over the pepper (Figure 25), and watch it jump up and stick to the spoon.
Credit: Megan Hammond, formerly of UF/IFAS Honey Bee Research and Extension Laboratory
Chapter 2.2 Beekeeping Safety
What’s the Buzz?

Credit: M. K. O’Malley, formerly of UF/IFAS Honey Bee Research and Extension Laboratory
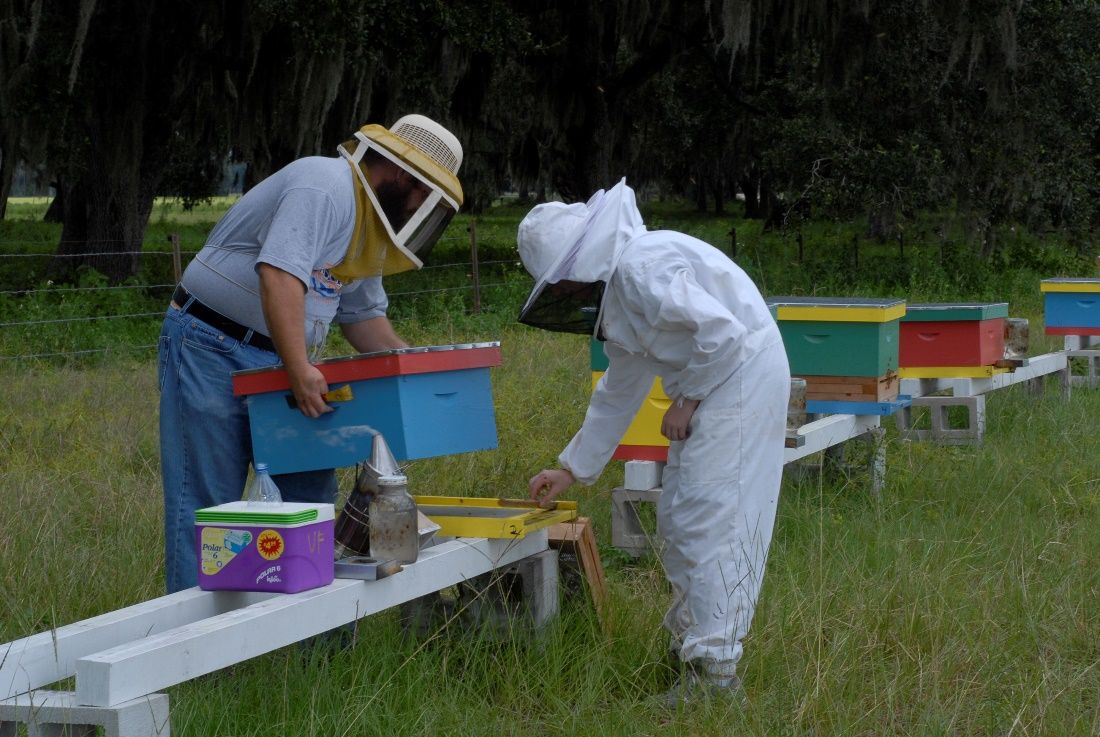
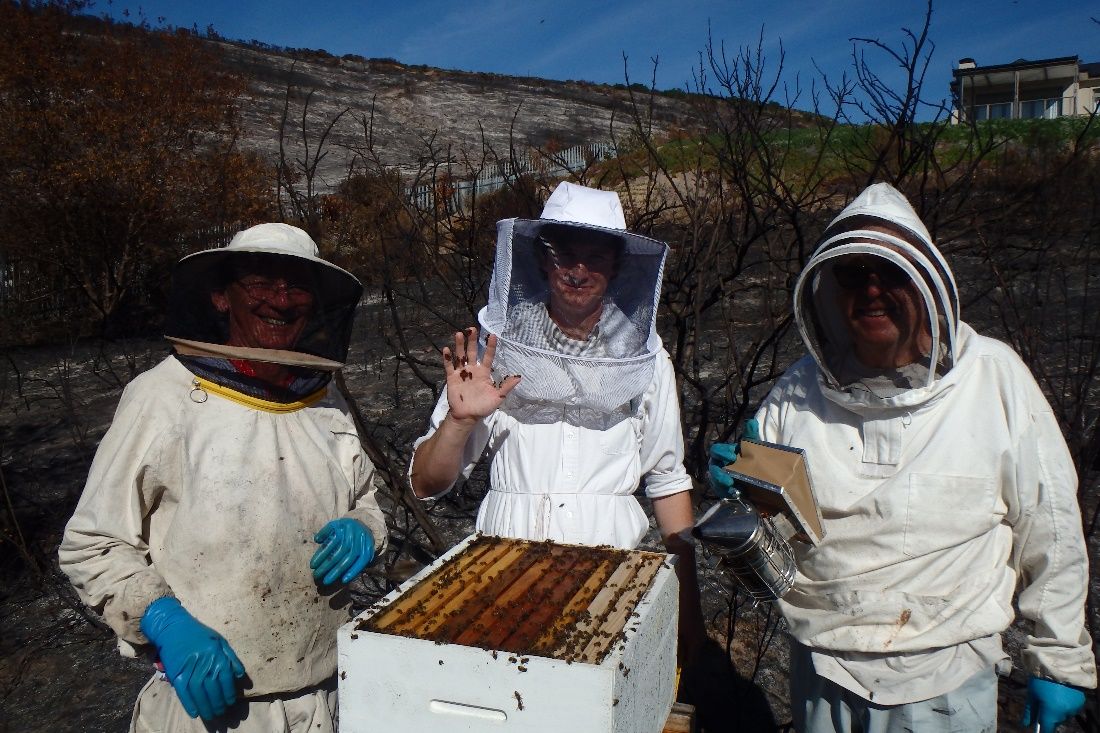
The first thing to understand before you begin your journey in becoming a beekeeper is learning how to work safely around honey bees. Many states have established best beekeeping practices and rules for the safety of the beekeeper as well as the public. You can learn more about these practices by contacting your local UF/IFAS Extension office. These important practices include wearing personal protective equipment (PPE; shown in Figure 26), understanding bee sting reactions and how to treat them, and choosing a safe location for your apiary or bee yard.
PPE is special clothing recommended for all beekeepers because it helps reduce the fear and risk of being stung so they can focus on learning the art of beekeeping. PPE for beekeepers is at least a veil but may also include a bee suit or jacket, gloves, and closed-toe shoes.
The Veil
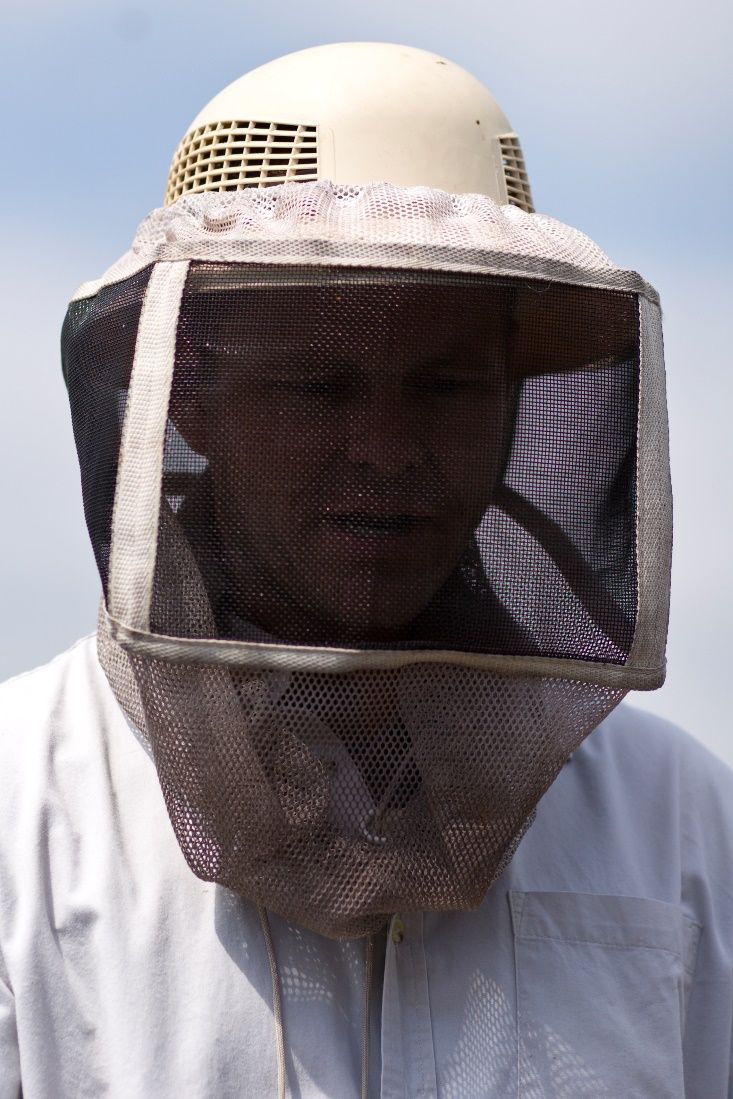
The veil is the most important piece of PPE (Figure 27). A veil is a hat with netting that covers and protects the head, face, and neck. The veil is important because bee stings in those areas are not only very painful but can be dangerous. A bee sting to the eye can cause blindness, and a sting near the throat or mouth can cause swelling and make it difficult to breathe. Honey bees, like many other insects, are attracted to the smell of carbon dioxide in the air, which we breathe out from our noses and mouths. So, it makes sense to be extra protective of this area. New beekeepers who are starting their first hive, and longtime beekeepers who have practiced for decades, should always wear at least a veil any time they approach a honey bee colony.
Credit: UF/IFAS Honey Bee Research and Extension Laboratory
Bee Suits and Jackets
Bee suits and bee jackets can be connected to a veil to provide protection to the arms, legs, and torso. Bee suits are made of a durable cloth material that makes it difficult, but not impossible, for a bee to sting the skin directly. Full bee suits with a veil will cover you mostly from head to ankle with only your hands and feet exposed (Figure 28). A jacket with a veil only covers the head, arms, and torso. Some may choose to wear the jacket instead of the full bee suit, especially if it is hot outside.
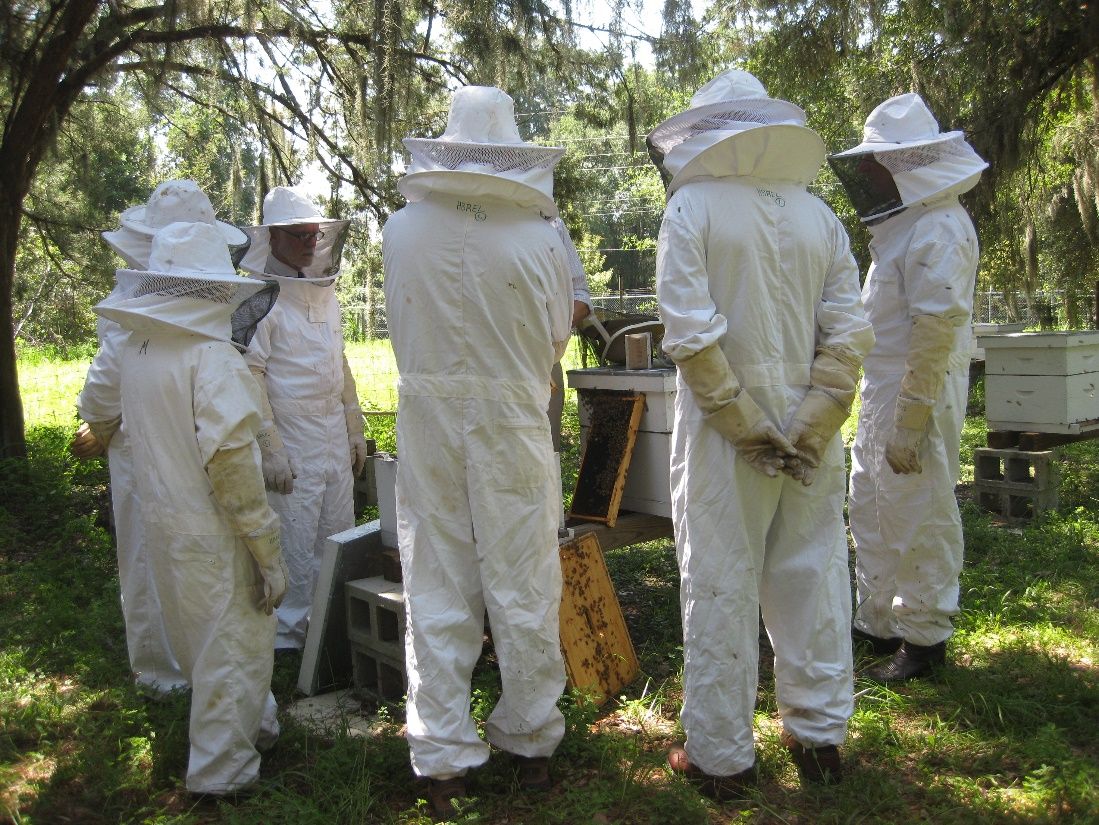
Credit: UF/IFAS Honey Bee Research and Extension Laboratory
Hands and Feet
Beekeepers must also protect their hands and feet. Anyone approaching a honey bee colony should always wear closed-toe shoes, such as sturdy tennis shoes or boots, to keep their feet from being stung. When beekeepers stick their hands into hives to pick up frames covered with honey bees, there is always a chance they may get stung. There are special bee gloves made of thick, but flexible, leather that is difficult for bees to sting through (Figure 29). From the veil to the shoes, a beekeeper can be mostly protected, depending on what he or she prefers to wear in the apiary.
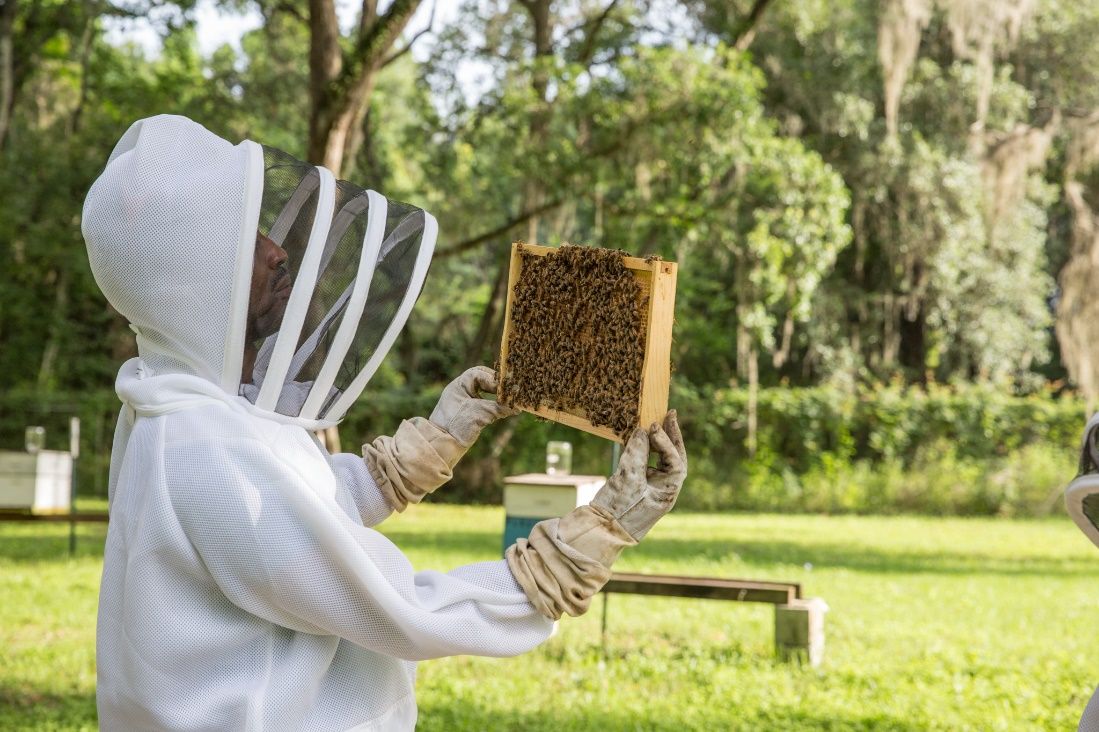
Credit: Geena Hill, formerly of UF/IFAS Honey Bee Research and Extension Laboratory
The Sting
Honey bees will sting, but only when they feel threatened (see Figure 30 for a close-up of a honey bee stinger). Those who decide to become beekeepers should expect stings to happen. Many people believe they are allergic to stings because they have a reaction at the sting site. This is a normal, non-allergic reaction. A true allergic reaction is when the body reacts to the sting away from the sting site, especially around the face or throat. It is good to know how to tell the difference between the various kinds of sting reactions and symptoms as well as how to treat them.
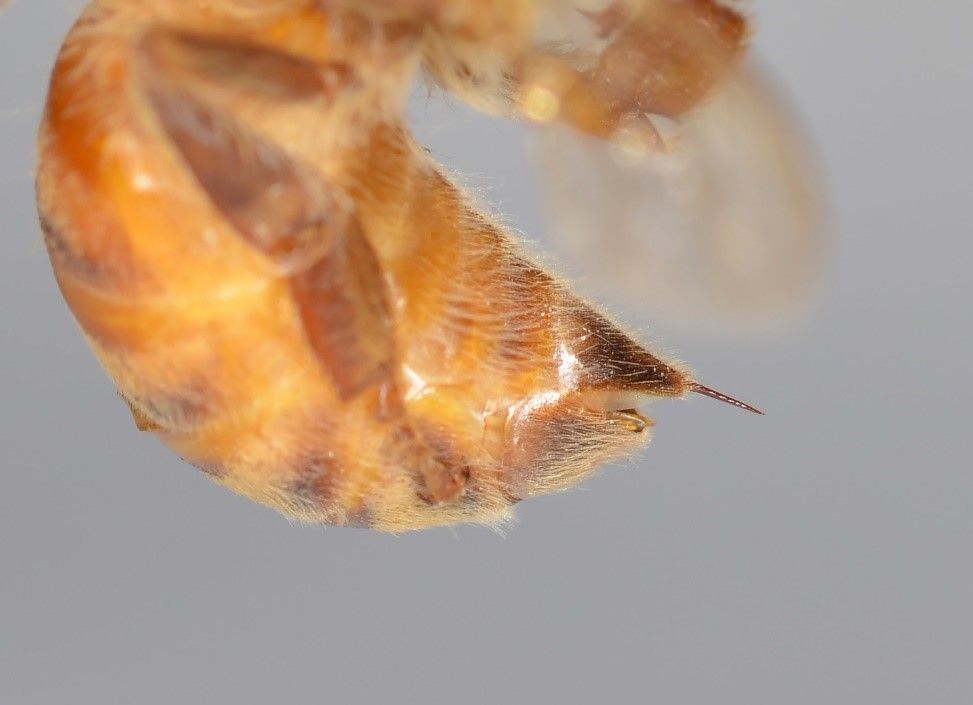
Credit: Dr. Michael Bentley, used by permission
Table 3. Types and symptoms of bee sting physical reactions.
After receiving a sting, the stung person should leave the apiary and get indoors, if possible. Once the person is safely away from the apiary, the person should remove the stinger as soon as possible, if not done already. The longer the stinger remains, the more venom enters the body. If a sting victim experiences one of the first three reactions (Table 3) around the sting site, they should wash the area and apply a cold compress or ice. Taking an antihistamine by mouth and applying a hydrocortisone cream to the area can help reduce the itching and swelling at the sting site. If a sting victim experiences one of the last three reactions away from the sting site or on the face, it is important to seek medical attention immediately.
Apiary Location Safety
There are many things to consider when setting up an apiary (sometimes called a bee yard) to make it as safe as possible for the beekeeper as well as the public. The Florida Department of Agriculture and Consumer Services provides safety guidelines for beekeepers to follow. Honey bee colonies must be located more than 15 feet from a property line or behind a flyway barrier at least 6 feet in height. A flyway barrier may be a wooden fence or dense bushes or plants, which is placed around a hive and forces the honey bees to fly upward and away from people. This reduces the risk of honey bees interfering with people and stinging them (Figure 31).
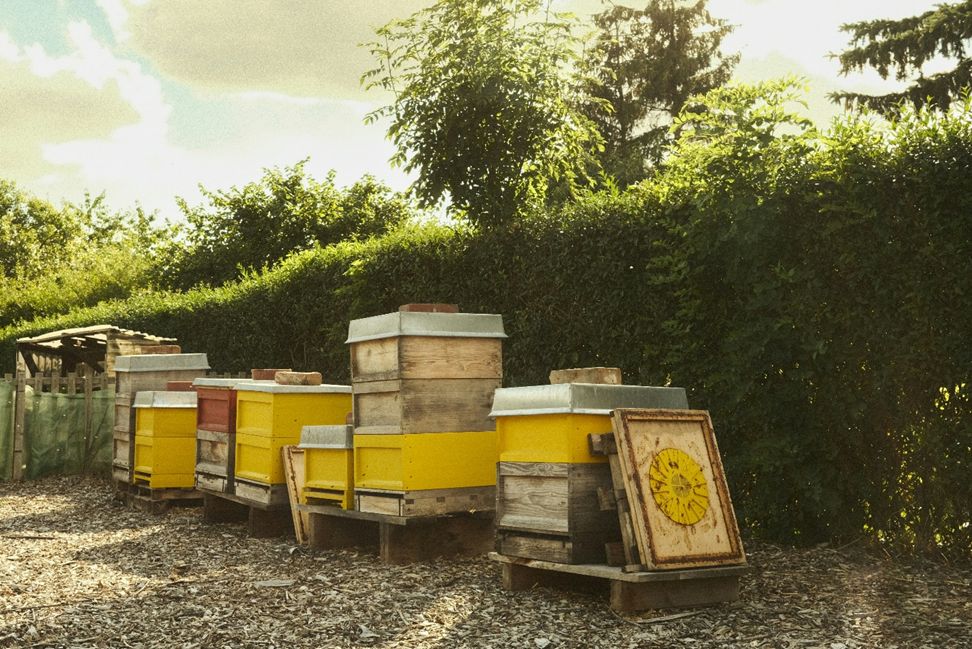
Credit: Nico Knaack on Unsplash
Another important guideline for apiaries in Florida is that bees must have access to a convenient water source nearby. This is so they do not have to fly off into other areas where they may not be welcome, such as neighborhood pools. Care should be taken to prevent honey bees from drowning in water sources by placing rocks or floats where they can land. Other safe sources could be a dripping faucet or hive top or front entrance feeders (for example, glass jars with tiny pinholes in the lids as shown in Figure 32).
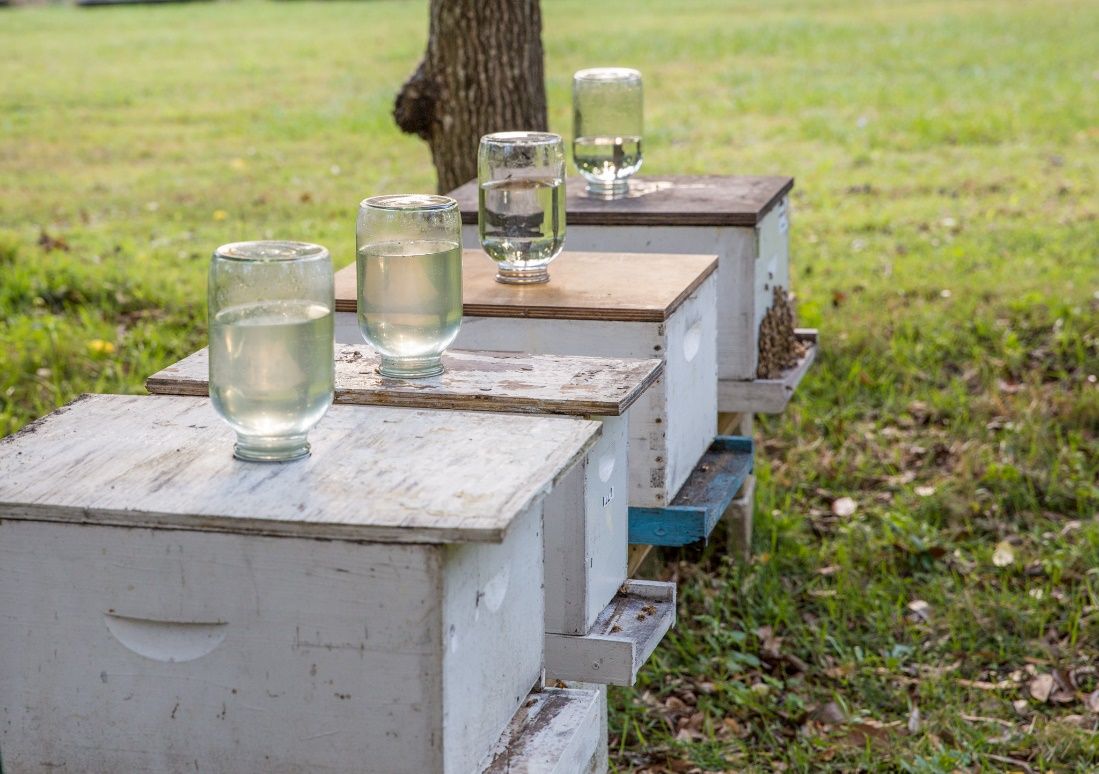
Credit: Geena Hill, formerly of UF/IFAS Honey Bee Research and Extension Laboratory
Beekeepers should take all precautions to prevent honey bees and people or other animals from interacting with one another. Apiaries should not be located near public places, such as schools, where there will be lots of people passing by regularly. Apiaries must not be within 150 feet of tied or fenced in animals. This is because the animals would not be able to get away if bees became upset and thought the animal was a threat. Finally, make sure the location you choose for your apiary is not in a neighborhood with rules against beekeeping. Always check with a responsible adult to make sure your apiary will be in a safe location.
The Bees’ Knees
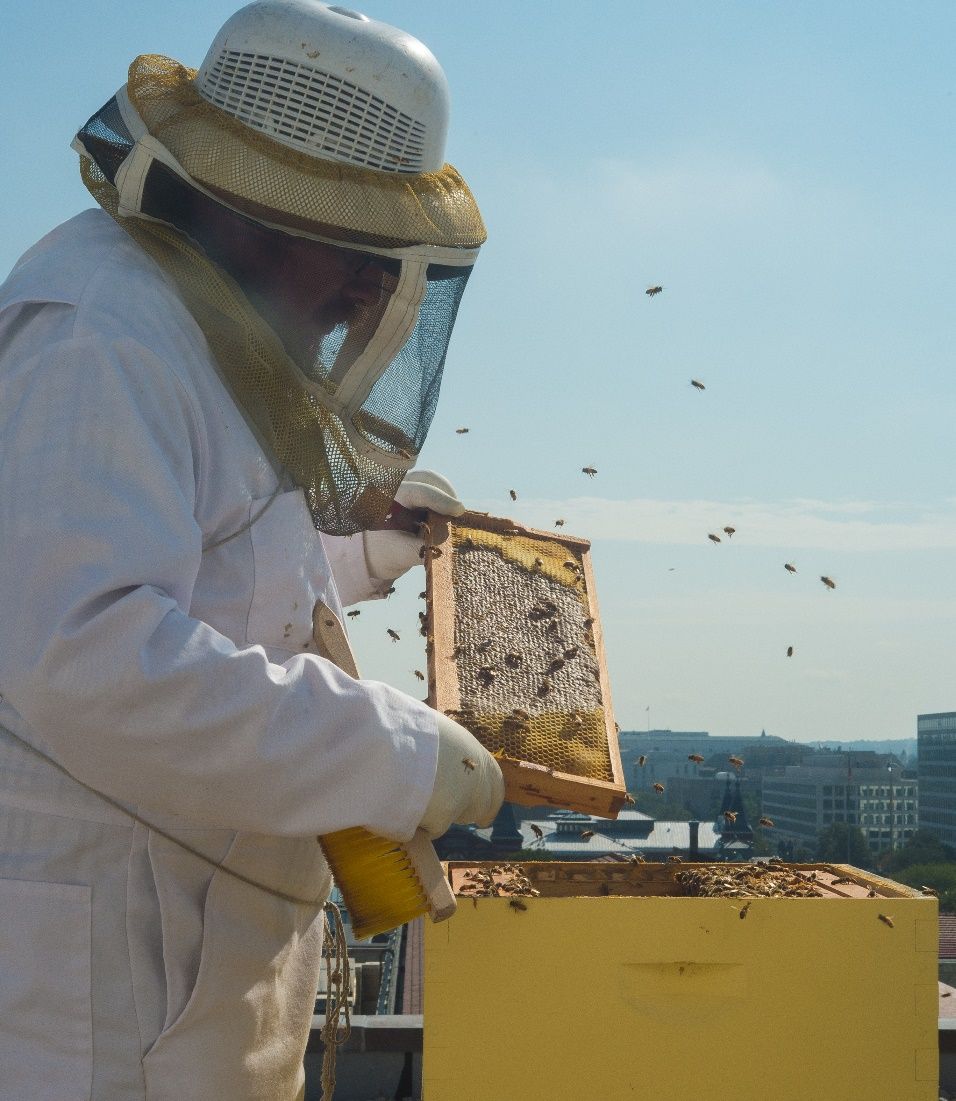
Credit: Lance Cheung, USDA,
Did you know that rooftop beekeeping is becoming extremely popular around the United States in some cities because there are so many flowers available (as shown in Figure 33)? Keeping honey bee colonies on the rooftops of tall buildings is one option for a safe location where the bees can easily be separated from the public or other animals. Rooftop beekeepers still must follow guidelines for safe beekeeping.
Foraging for Nectar
Activity #1 What is Wrong with this Apiary Location?
When a beekeeper chooses a location for their apiary, they have a lot to think about: the safety of colonies from predators and the safety of the public. In this activity, read each description and look carefully at the picture. You will need to decide what could be unsafe about the location and what ways you could make it safer.
Apiary Location #1 (Figure 34)
A beekeeper decides to place his apiary in his backyard where there are tall trees and shrubs between his apiary and his neighbor's house. However, he has not provided a water source for his honey bees.
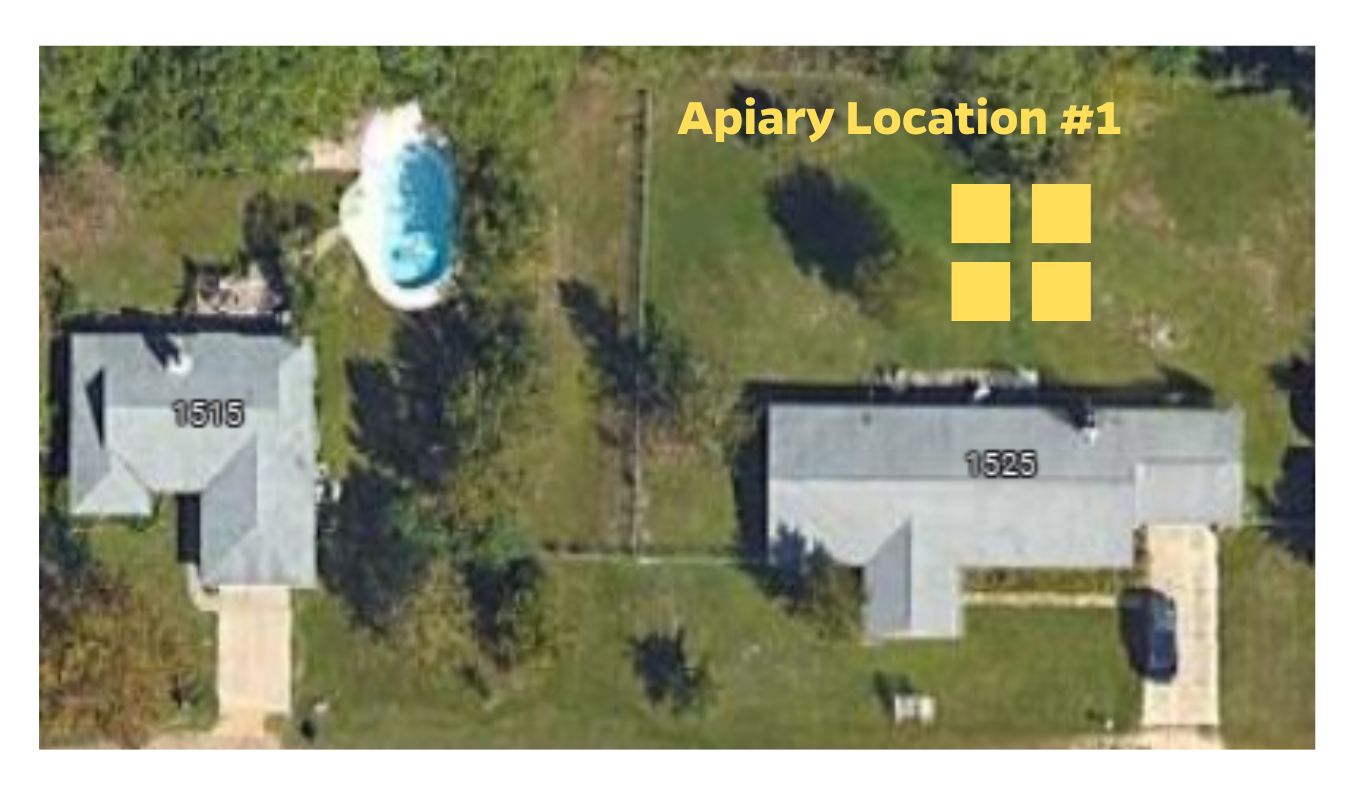
Credit: Google Earth; copyright Airbus, Maxar Technologies. Map Data copyright 2024.
What could be unsafe about this location?
What are some ways the beekeeper could make the site safer?
Apiary Location #2 (Figure 35)
The zookeeper decides to place an apiary on zoo property. The apiary site is within 150 feet of the monkey cages on one side and the bear exhibit on the other side. The zoo has many visitors each day.

Credit: Google Earth; copyright Airbus, Maxar Technologies. Map Data copyright 2024.
What could be unsafe about this location?
What are some ways the beekeeper could make the site safer?
Apiary Location #3 (Figure 36)
A beekeeper lives across the street from an elementary school. She chooses a location for her apiary on her property that is within 10 feet of a sidewalk where children must pass to get to school each day. There is a chain-link fence that is 4 feet tall that separates her property from the sidewalk.
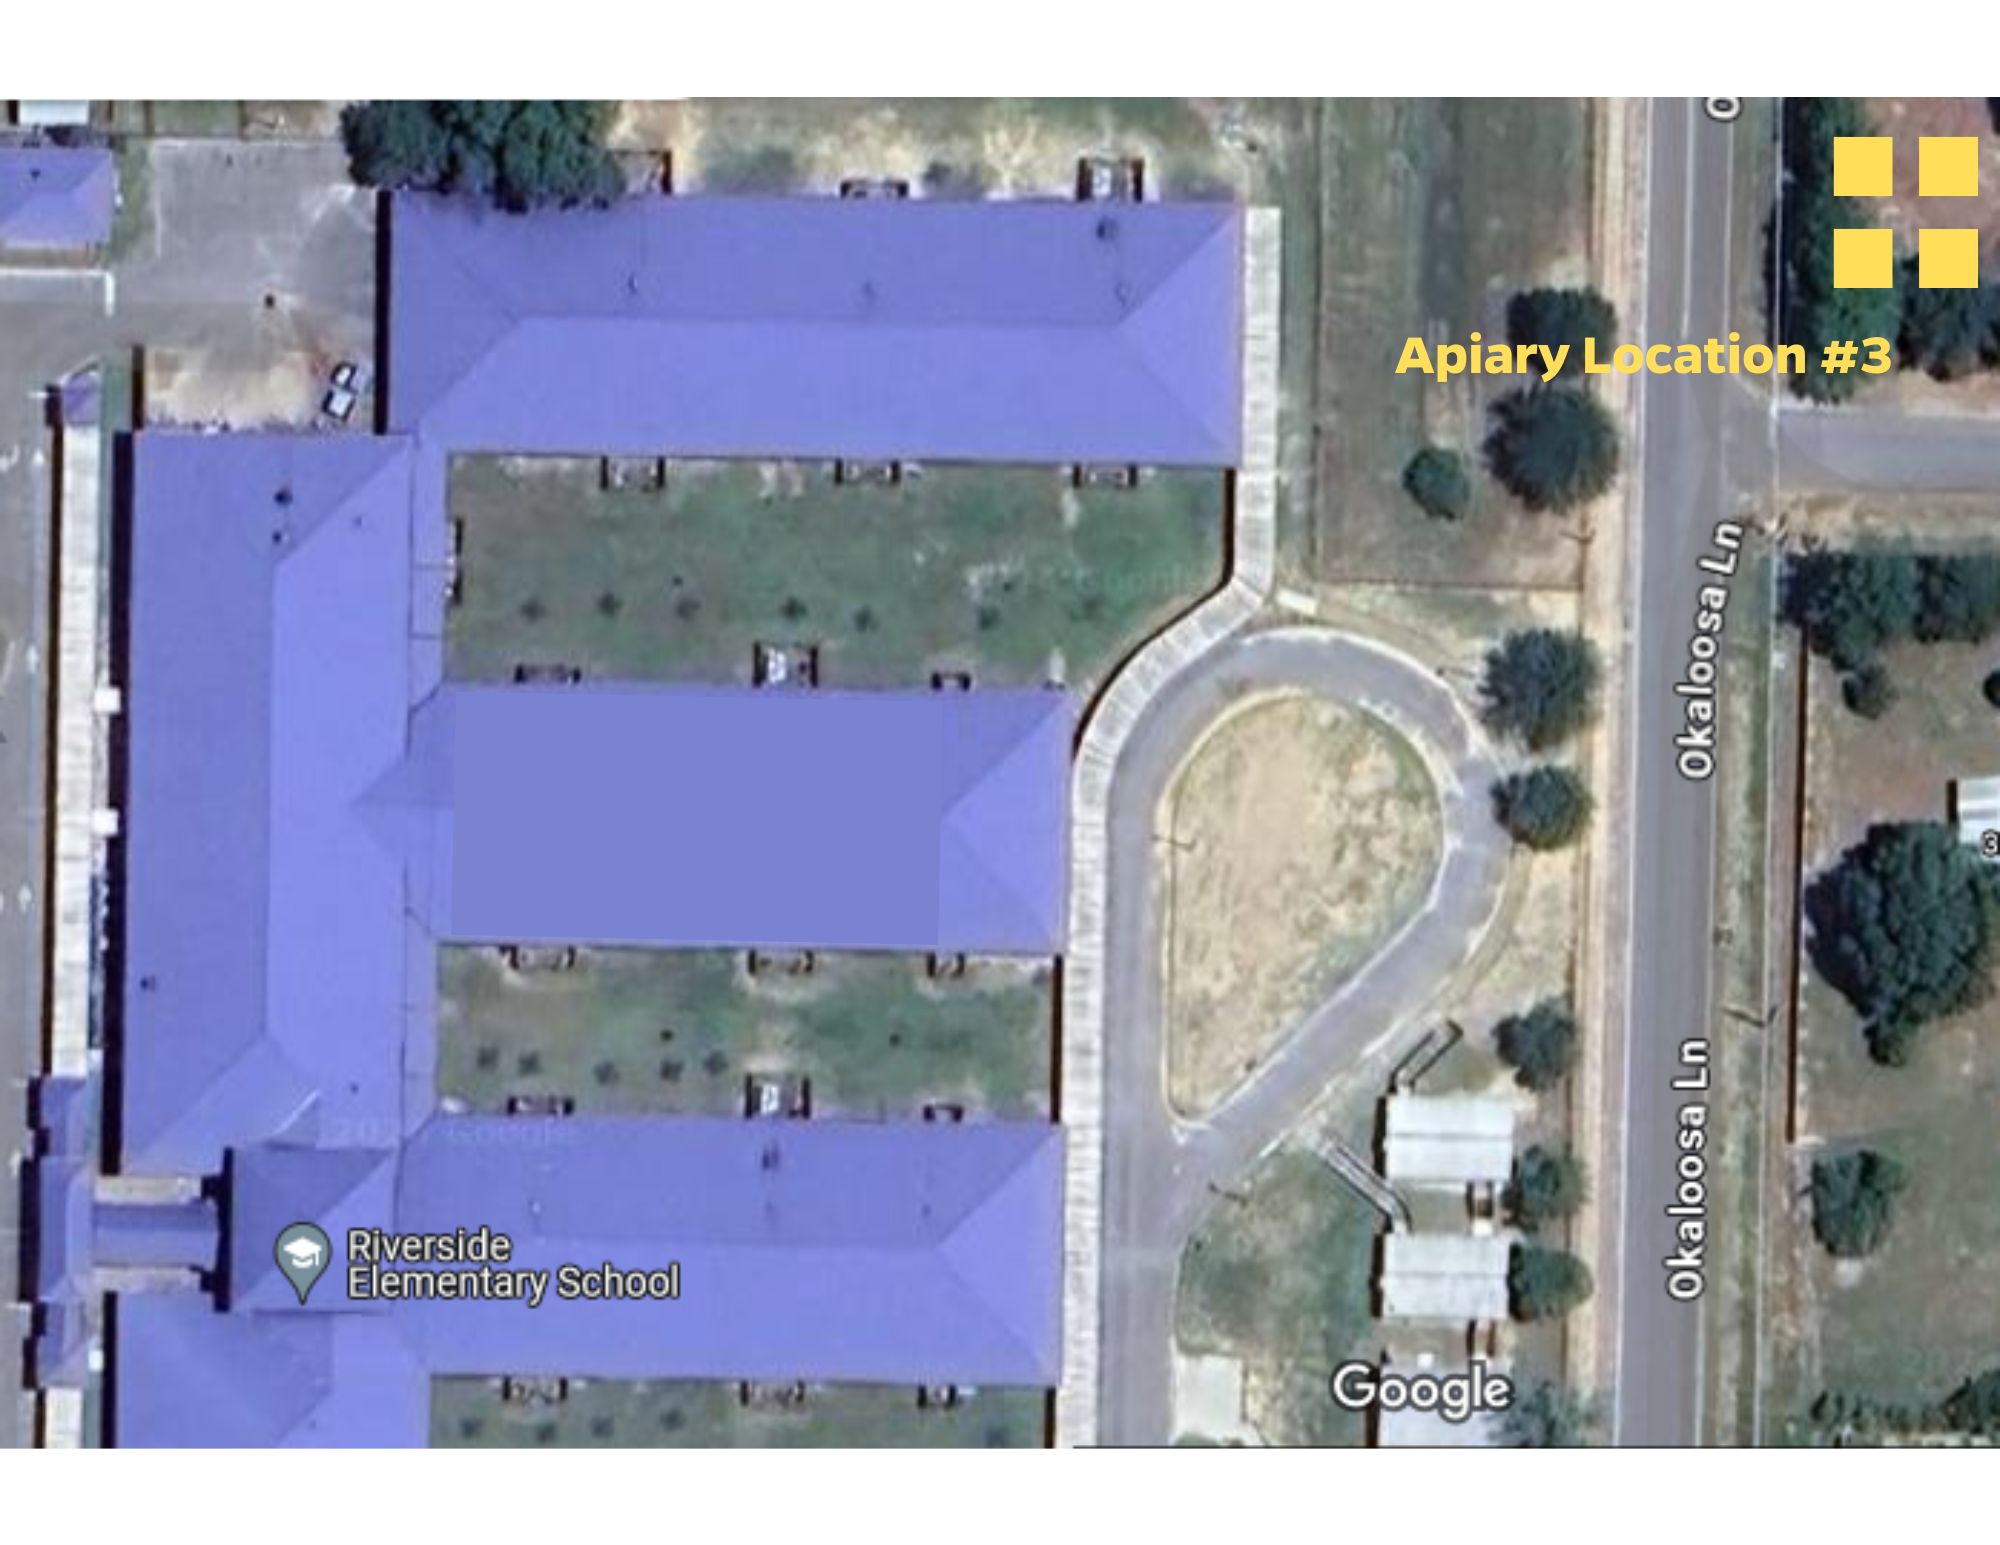
Credit: Google Earth; copyright Airbus, CNES/Airbus, Maxar Technologies. Map Data copyright 2024.
What could be unsafe about this location?
What are some ways the beekeeper could make the site safer?
Apiary Location #4 (Figure 37)
This beekeeper did not realize his neighborhood prohibits keeping honey bees. He places his apiary in the side yard on the edge of his property. There is no fence between his apiary and his neighbor’s property.
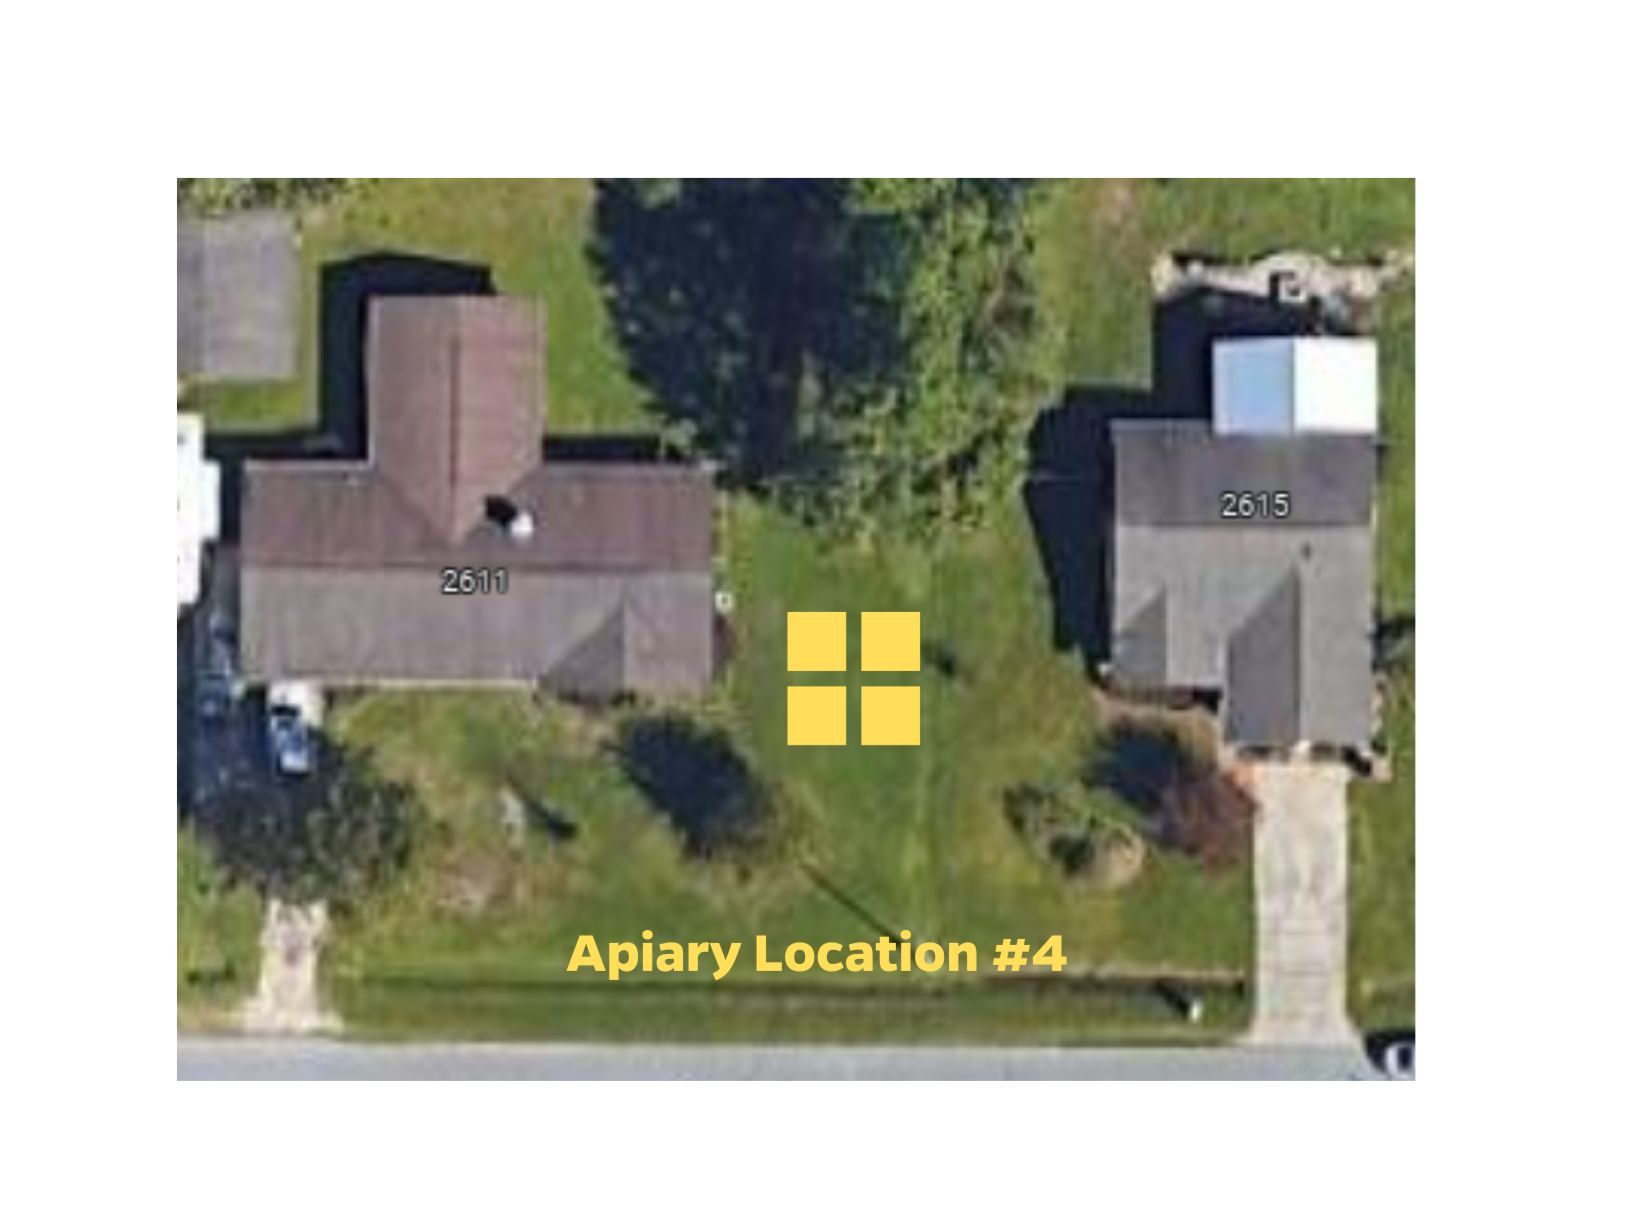
Credit: Google Earth; copyright 2024 Airbus, Maxar Technologies. Map Data copyright 2024.
What could be unsafe about this location?
What are some ways the beekeeper could make the site safer?
Activity # 2 Personal Protective Equipment Relay Race

Credit: Tyler Jones, UF/IFAS Communications
Wearing personal protective equipment is especially important for your safety when working with honey bees (Figure 38). It allows you to enjoy the experience and not worry about getting stung. You will get familiar with the parts of PPE for beekeepers in this relay race. To race, you will need at least two teams, or more if you have a larger group. Keep in mind you will need a set of PPE for each team. If you do not have access to beekeeper PPE, use other articles of clothing to represent each piece of the PPE. A simple cardboard box and egg cartons could also be used to represent the hive and frames, if necessary.
Step 1. Collect the following materials for each team:
- A bee veil
- A full body bee suit/jacket
- One pair of bee gloves
- One pair of boots (these should be oversized so they will fit everyone in the group)
- One empty hive with a lid and six to eight frames each (less frames will make it easier to remove)
Step 2. Divide your group into equal teams for the relay race.
Step 3. Set up the relay race. Put a complete set of beekeeper PPE at the start line for each team. Put an empty hive at the turn-around point for each team. See Figure 39 for an example using two teams.
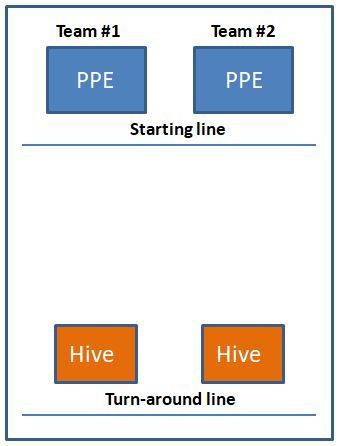
Credit: Megan Hammond, formerly of UF/IFAS Honey Bee Research and Extension Laboratory
Step 4. Race! The first person in line for each team puts on each piece of PPE correctly and then runs down to the hive at the turn-around line.
Step 5. The person removes the lid and each frame from the hive, one at a time, and then puts the hive back together.
Step 6. The person then runs back down to their team, removes the PPE, and gives it to the next person in line.
Step 7. Repeat for each person on the team. The first team with every player to complete their turn wins the race.
Return to the Hive
Credit: Tyler Jones, UF/IFAS Communications
1. What is PPE? List and describe what protection it provides for beekeepers. (You may refer to Figure 40 for a few ideas.)
2. Explain the difference between a normal non-allergic and a true allergic reaction to a bee sting.
3. Name one important guideline beekeepers must consider when choosing a site for an apiary.
Taste the Honey

Credit: Tyler Jones, UF/IFAS Communications
1. Do you play a sport or participate in another activity that requires you to wear any type of PPE? Describe the PPE required for your activity.
2. What are some jobs that you know require workers to wear PPE? Describe the PPE that workers wear and what protection it offers the wearer. (See Figure 41 for an example.)
Pollen Patties
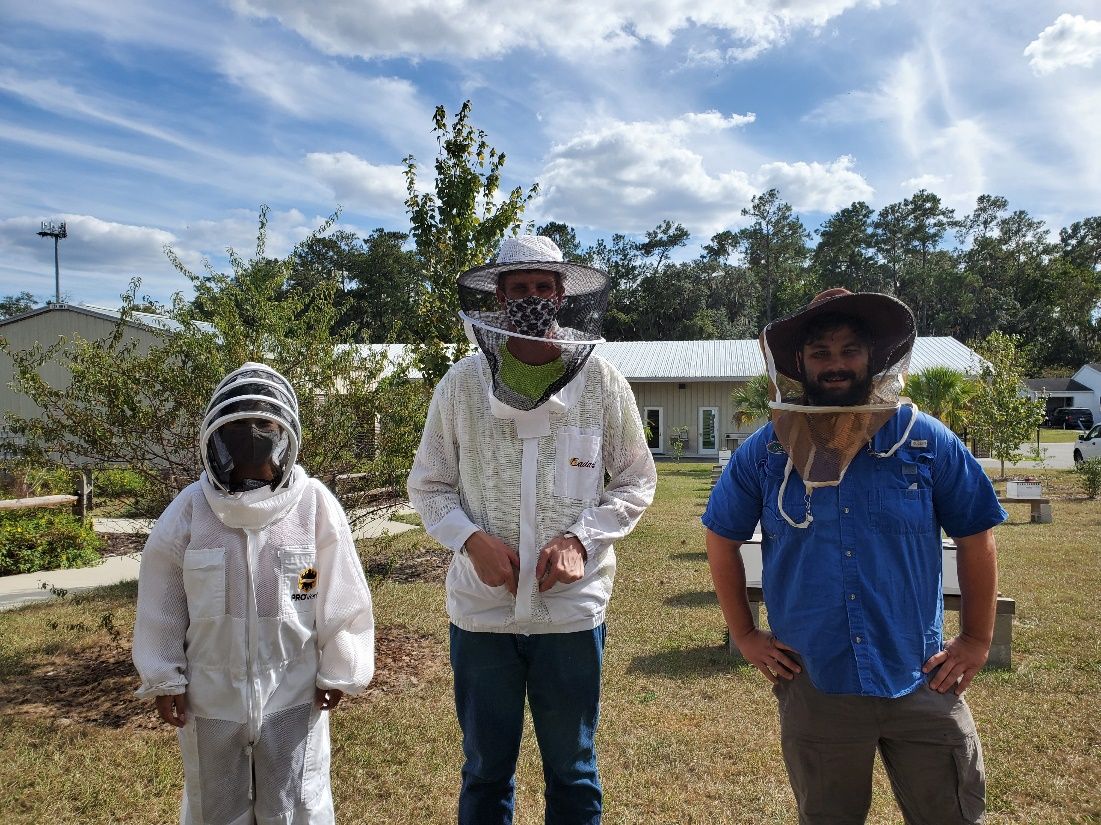
Credit: Rebecca Knox-Kenney, formerly of UF/IFAS Honey Bee Research and Extension Laboratory
Beekeepers have many different options when it comes to choosing the appropriate PPE, as shown in Figure 43. Some beekeepers prefer full suits, while others just wear a jacket. Other beekeepers prefer a pullover veil, while some like a folding veil. With the help of a responsible adult, obtain a beekeeping supply catalog or visit a retailer online. Determine what PPE is right for you! Keep in mind each item’s size, material, and exposure amount.
Chapter 2.3 Beekeeping Equipment
What’s the Buzz?
Credit: UF/IFAS Honey Bee Research and Extension Laboratory
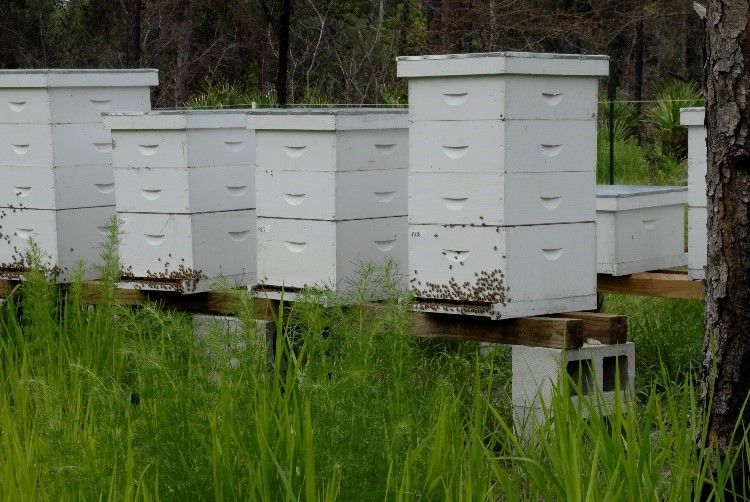
With every hobby or business, there is going to be equipment involved. Becoming a beekeeper requires a lot of equipment and preparation before honey bees can even be purchased. Let’s explore the various parts of a beehive and the tools that are used by every beekeeper.
Components of a Beehive
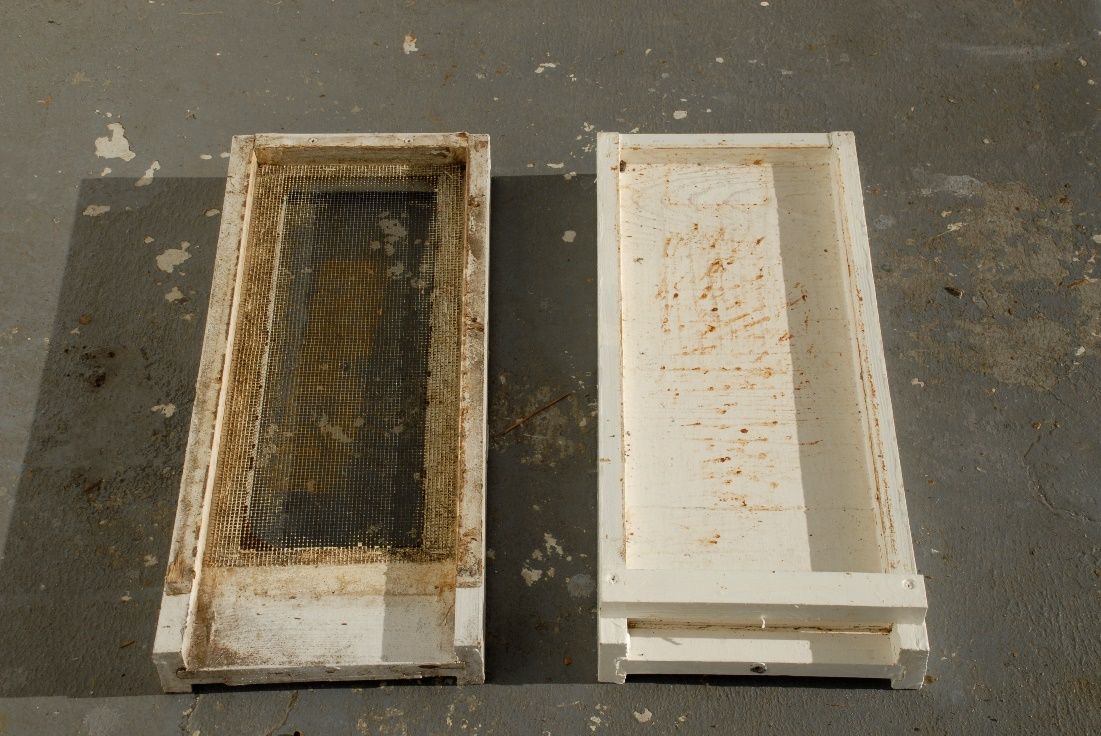
On the outside, a beehive looks like a plain box. However, there are many pieces that fit together to make it the perfect home for honey bees (Figure 44). Starting from the bottom is the bottom board. The bottom board is the floor or base which supports the rest of the hive. There are two types of bottom boards: screened and solid. Solid bottom boards are constructed completely of wood while the screened bottom board has a wooden frame with a screened center for better airflow in the warmer months (see Figure 45).
Credit: UF/IFAS Honey Bee Research and Extension Laboratory
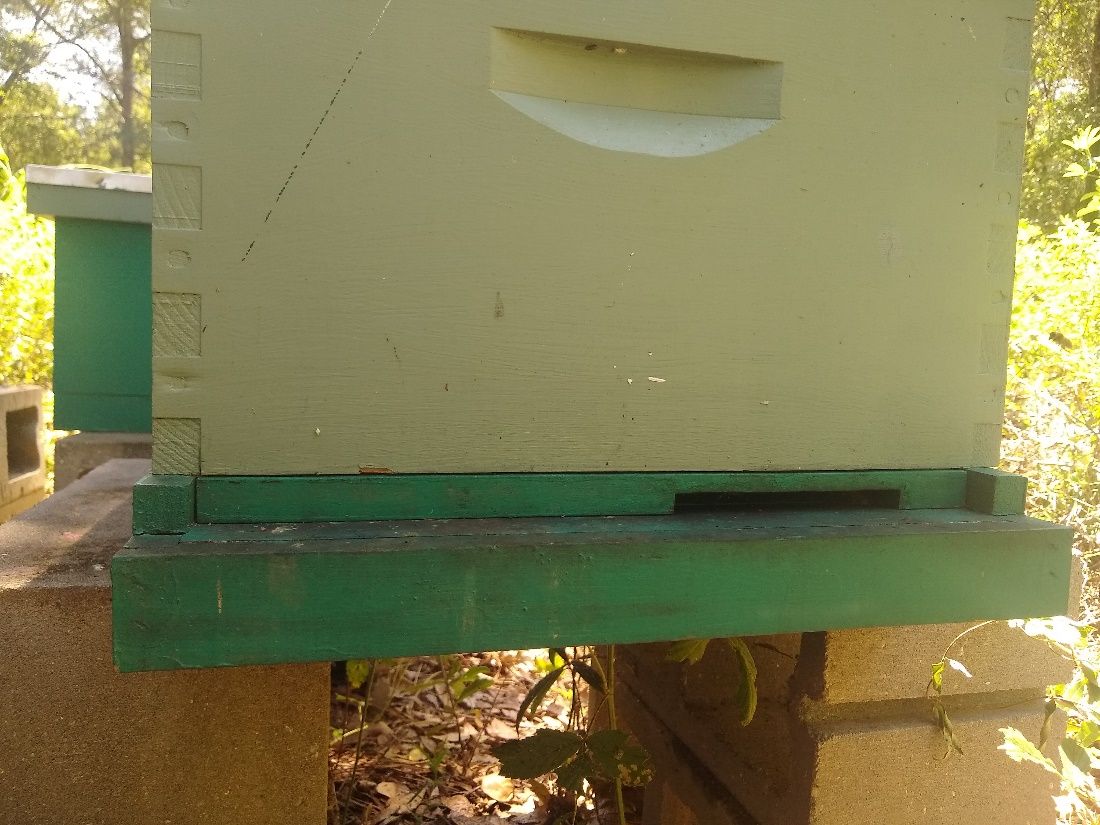
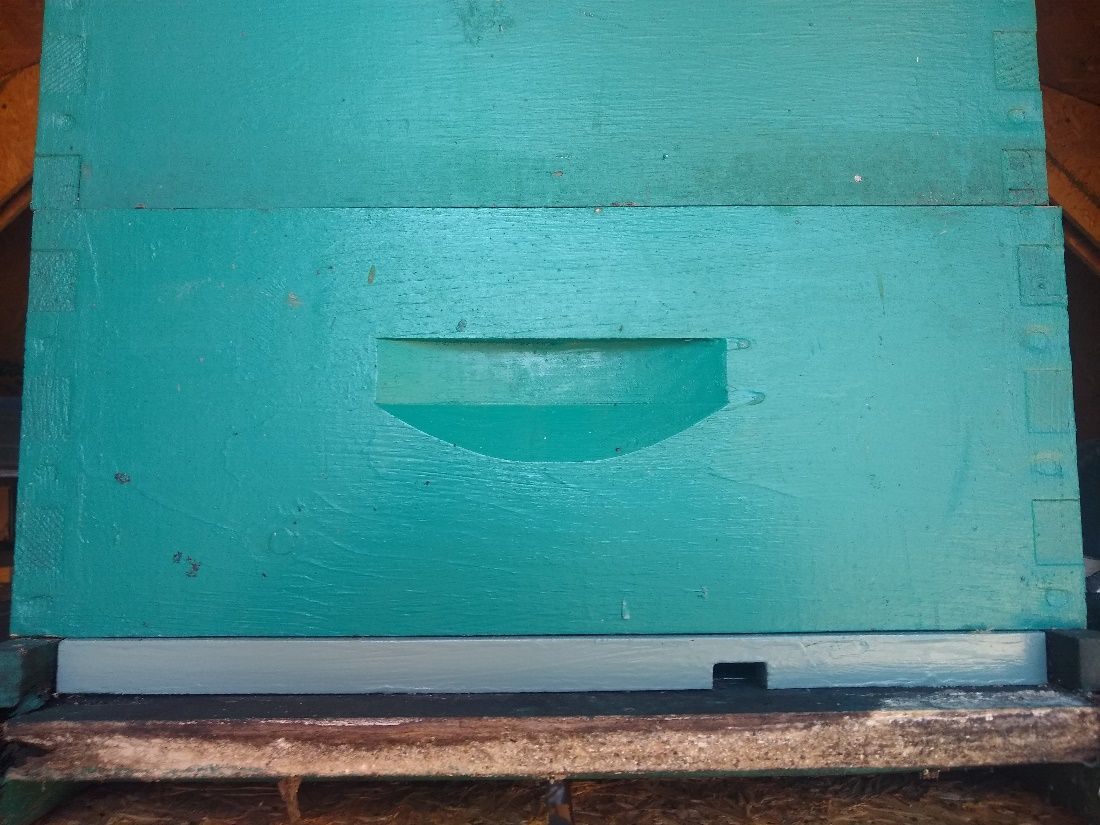
Entrance reducers are long, thin, wooden blocks with different sized notches cut out (Figures 46 and 47). These pieces cover the hive entrance and make the opening smaller. The reduced size of the entrance makes it easier for weaker colonies to guard and defend their nest. They can also be used in colder climates to help keep cold air out of the hive while keeping the warm air inside.
Credit: Megan Hammond, formerly of UF/IFAS Honey Bee Research and Extension Laboratory
Credit: Megan Hammond, formerly of UF/IFAS Honey Bee Research and Extension Laboratory
Next are the hive supers. These stackable boxes may go by a few names: supers, bodies, or chambers. The name of the box depends on what they hold inside. There are brood chambers (usually found on the bottom of the stack) where the queen lays her eggs. Then there are honey supers where bees make and store honey. Hive boxes come in three different depths or heights: shallow (5 ¾ inches), medium (6 5/8 inches), and deep (9 5/8 inches) (Figure 48). However, all boxes are around 16 ¼ inches wide and 19 7/8 inches long. The different depths allow for different amounts of honey to be stored in the supers. Honey can get quite heavy. A deep super that is full can weigh up to 80 pounds! There are smaller sizes to allow for lighter supers, which make it easier for some beekeepers who may not be able to lift heavier boxes.

Credit: UF/IFAS Honey Bee Research and Extension Laboratory
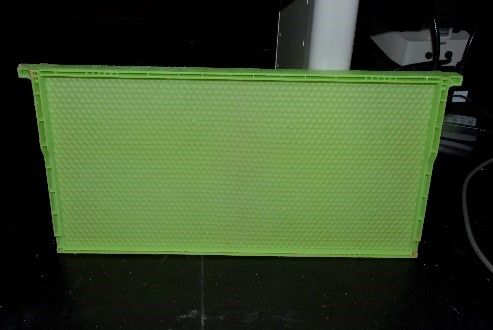
Each super can hold eight to ten frames, and sizes will vary according to the size of the hive supers. Frames are the structures that hold the honeycomb. They are usually made of four small pieces of wood forming a rectangle, but frames can also be made from plastic (Figure 49). The frames may also have a plastic foundation in the center with a hexagon pattern imprinted on them (Figure 50). That foundation helps the worker honey bees make comb by giving them a base on which to build. Frames can be removed from the supers easily by the beekeeper without destroying the hive.

Credit: UF/IFAS Honey Bee Research and Extension Laboratory
Credit: UF/IFAS Honey Bee Research and Extension Laboratory
Queen excluders have a very specific purpose. As the name suggests, they prevent the queen from being in certain parts of the hive. An excluder is a flat screen with openings large enough for workers to pass through, but small enough to prevent the queen from passing through. Queen excluders are placed on top of the brood super to prevent the queen from laying eggs in the honey super directly above it (Figure 51). This can be helpful for making honey since it prevents brood from being mixed in with honey on a frame. Queen excluders are made from either metal or plastic.

Credit: Geena Hill, formerly of UF/IFAS Honey Bee Research and Extension Laboratory
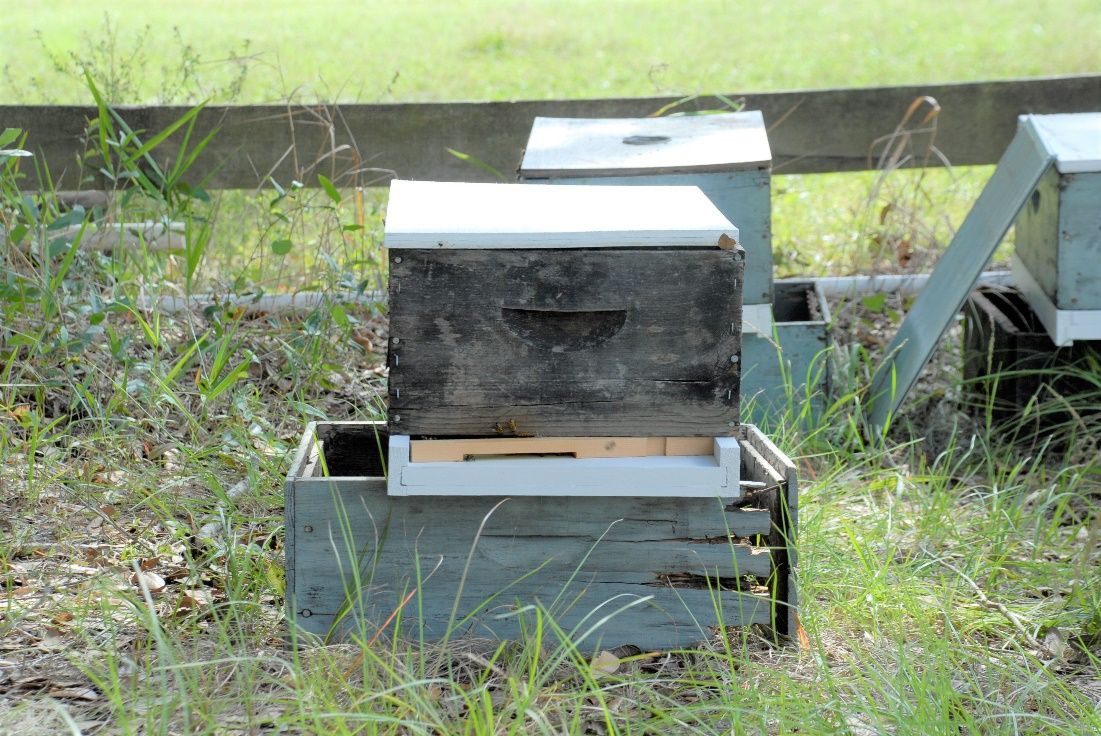
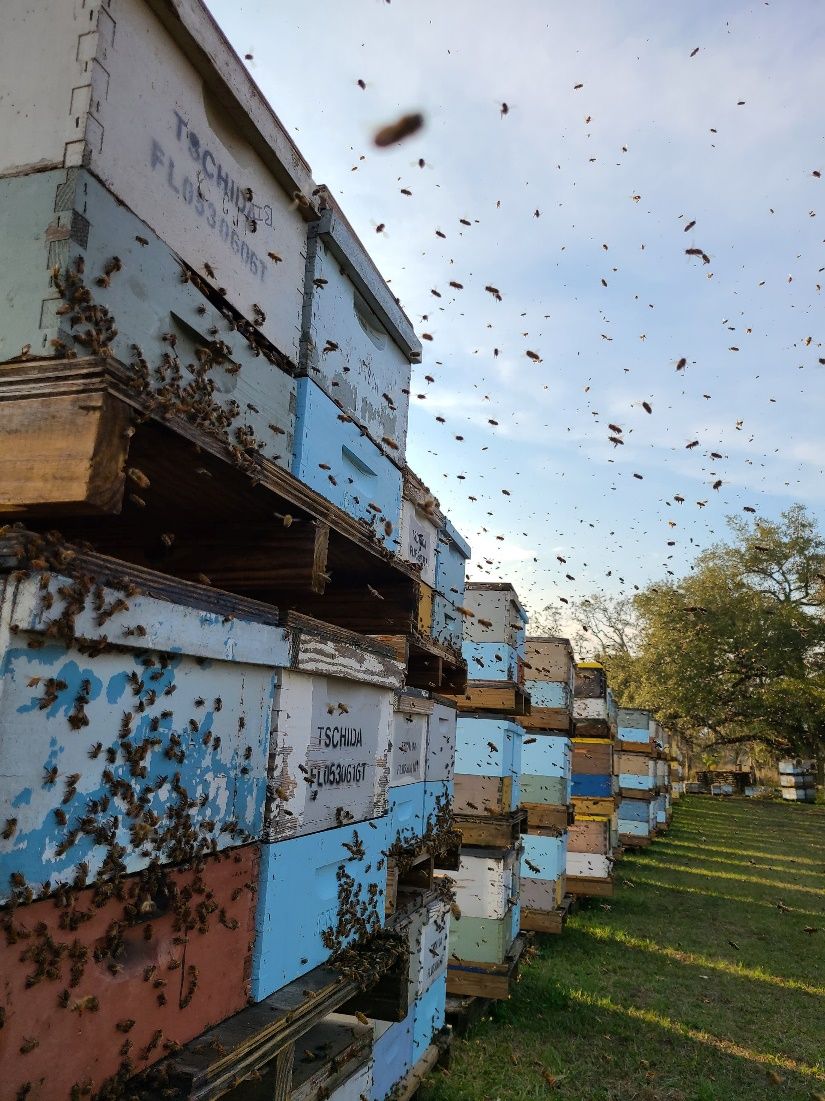
The last pieces of a honey bee hive are the lids or covers. Lids keep the hive covered from rain, snow, wind, and so forth. The two types of lids are known as the migratory lid and the telescoping outer lid with an inner cover. A migratory lid is specially shaped with no overhang on at least two sides, which allows hives to be stacked closely side-by-side and neatly on top of each other (Figure 52). Migratory lids are used on hives of colonies that are moved around a lot for their pollination services, as shown in Figure 53.
Credit: UF/IFAS Honey Bee Research and Extension Laboratory

Credit: Jason Deeringer, Bee Serious, LLC, used by permission
Telescoping lids are wooden lids with overhang on all four sides, often with a thin piece of metal covering the top. An inner cover, placed on the uppermost super, is often used with the telescoping outer lid (Figure 54). Its purpose is to prevent the bees from using propolis to glue the frames and telescoping lid together. There are also notches in the inner cover to allow for air flow in and out of the colony.

Credit: UF/IFAS Honey Bee Research and Extension Laboratory
Beekeeping Tools
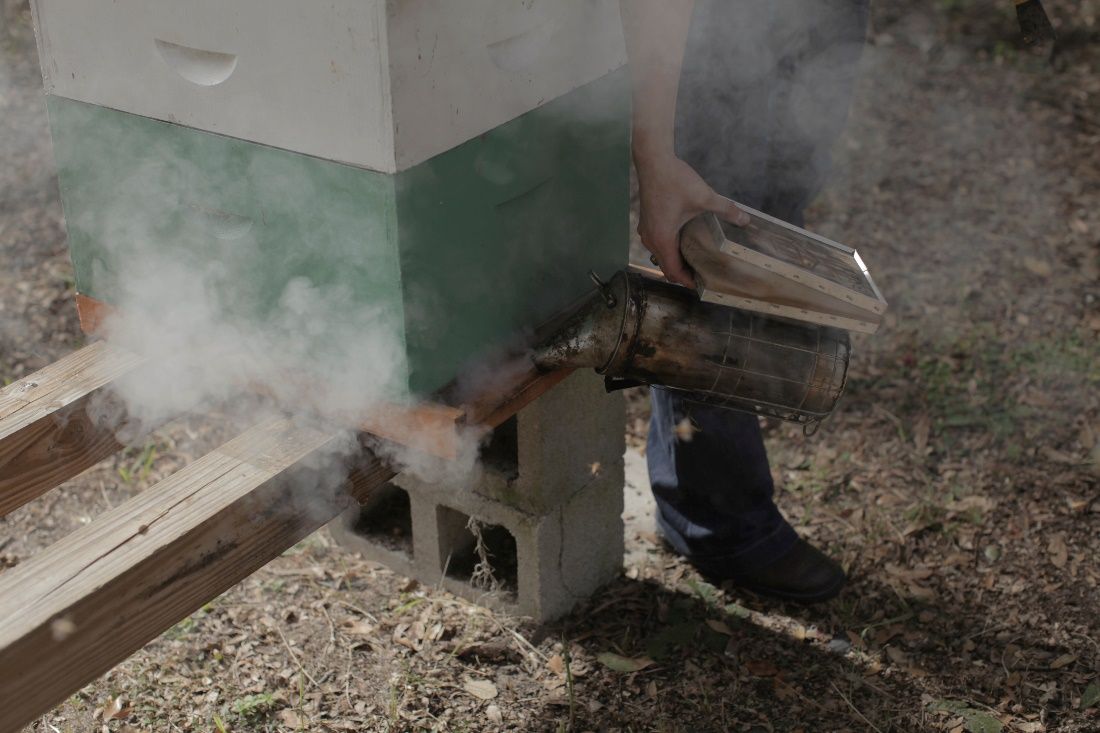
There are quite a few tools that a beekeeper uses when working colonies. One of the most important tools all beekeepers use is a smoker. The smoker, smartly named for its ability to create smoke, masks the pheromones bees use to communicate with one another (see Figure 55). Scientists believe the smoke masks the alarm pheromone that the workers give off when they feel threatened. It works like an air freshener in a smelly gym locker-room. The smoke covers the smell of the pheromone so the bees cannot smell the signal to start stinging. The smoker is a metal container with a funnel at the top that can direct the smoke when it is puffed. The smoke comes from the burning fuel inside of the container, and beekeepers must make sure the smoke is cool and not hot. Beekeepers use many resources to produce the smoke, from pine straw to wooden pellets, or any long burning, non-toxic material. Proper use of the smoker does not upset the honey bees.
Credit: James Hill, formerly of UF/IFAS Honey Bee Research and Extension Laboratory
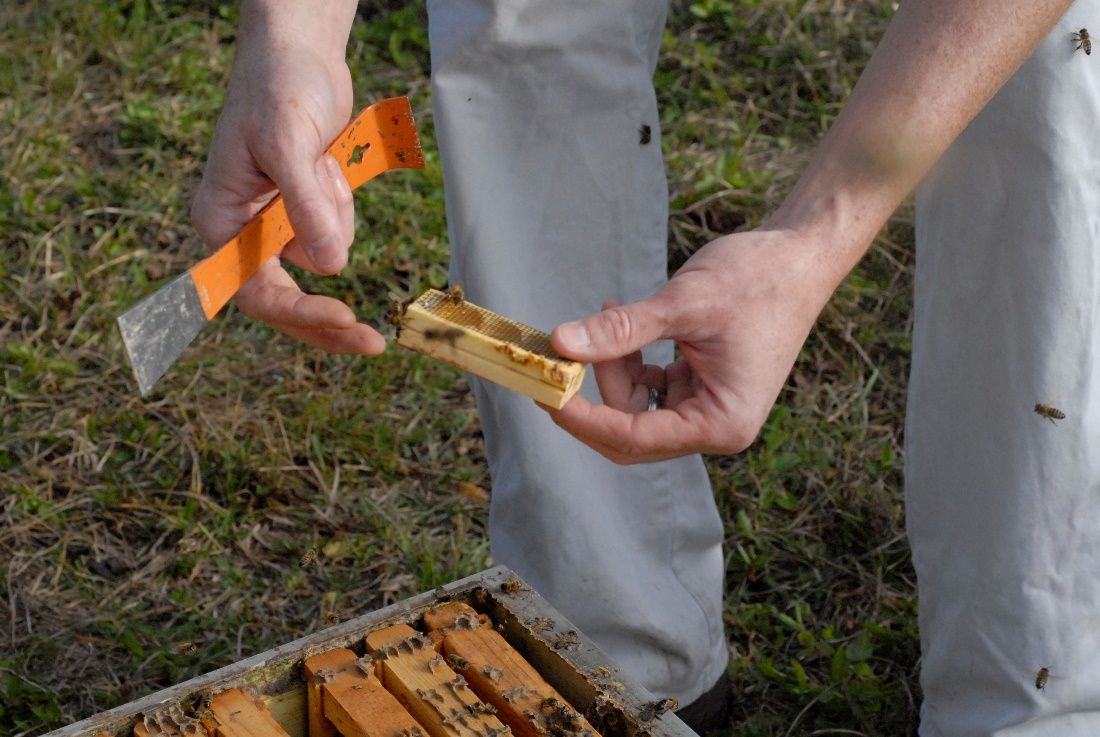
The second most useful tool for every beekeeper is the hive tool (Figure 56). Shaped like a small crowbar, it is used to open the hive, separate supers, and move frames. This is necessary because honey bees produce the extremely sticky substance called propolis, which they use to fill in small gaps and glue pieces of the hive together. The hive tool can easily pry the pieces apart without disturbing the bees too much, allowing for a gentler inspection. It is also useful for cutting away excess comb and scraping off debris on the frames and in the hive.
Credit: UF/IFAS Honey Bee Research and Extension Laboratory
Feeders are important when nectar sources start to dwindle, when beekeepers are trying to grow a colony, or to provide bees a convenient water source. They distribute food such as sugar water or corn syrup. Some beekeepers use entrance feeders or hive-top feeders (Figures 57 & 58), which both require an upside-down glass jar holding the food or water outside of the hive. Others may choose to use an in-hive feeder which looks like a large plastic frame inside the colony that holds the food.
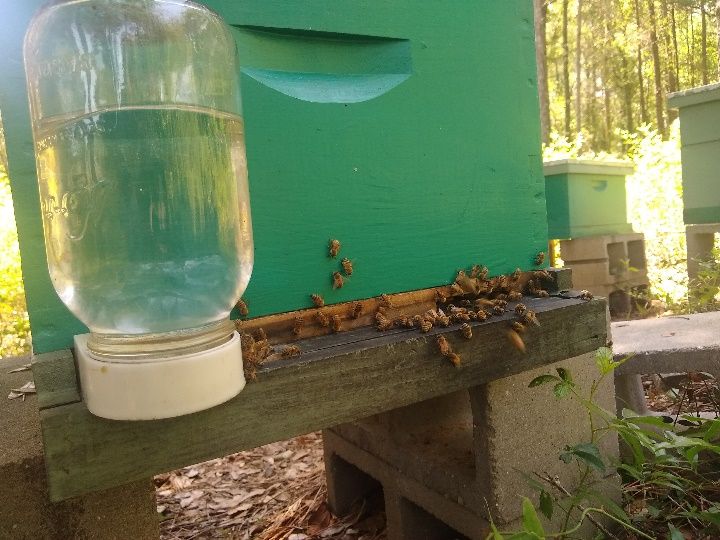
Credit: Megan Hammond, formerly of UF/IFAS Honey Bee Research and Extension Laboratory
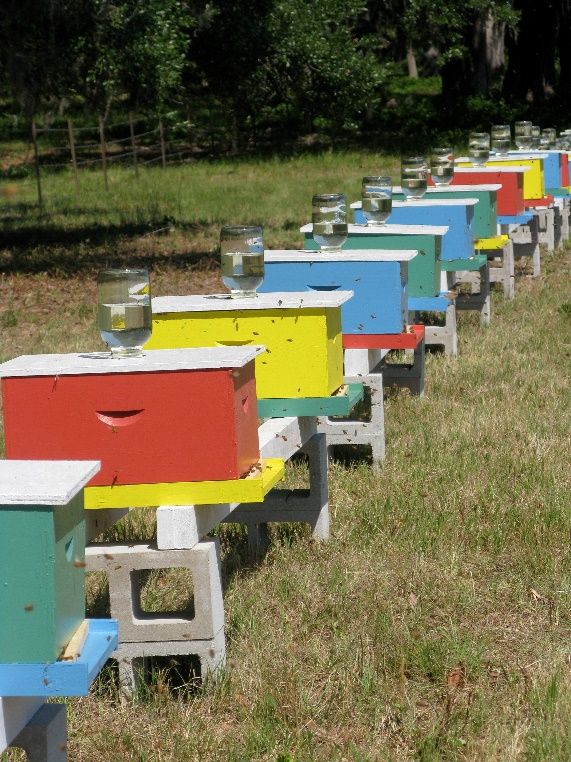
Credit: UF/IFAS Honey Bee Research and Extension Laboratory
The Bees’ Knees
Some beekeepers use other special equipment that is not essential but can make beekeeping much easier. One such piece of special equipment is just for the queen bee. The queen can have a wing clipped and her thorax (middle body segment) marked with paint to help the beekeeper easily find her and keep her from flying too far away. A beekeeper may use a queen cage for holding the queen while they are marking her (Figure 59), so she is not accidentally crushed. In addition to the queen marking cage, there are cages that simply hold the queen for her protection while the beekeeper is working in the colony.
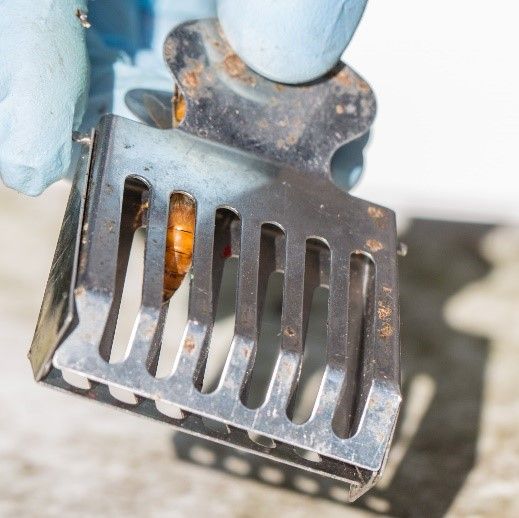
Credit: UF/IFAS Honey Bee Research and Extension Laboratory
A few other helpful tools a beekeeper may choose to use are a frame spacer (Figure 60) and a bee brush. A frame spacer is used after a hive inspection when placing all the frames into the super. It helps to space frames evenly apart from each other. A bee brush has soft bristles and gently moves honey bees off a frame without hurting them during a hive inspection (Figure 61).
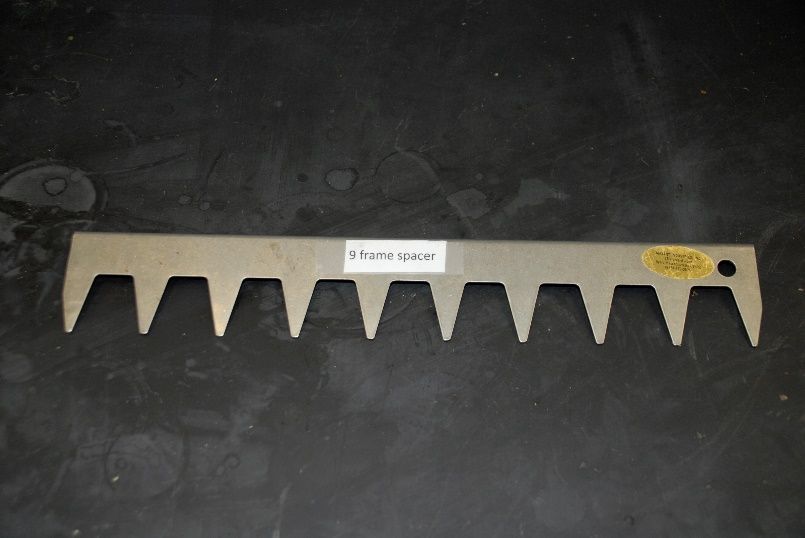
Credit: UF/IFAS Honey Bee Research and Extension Laboratory
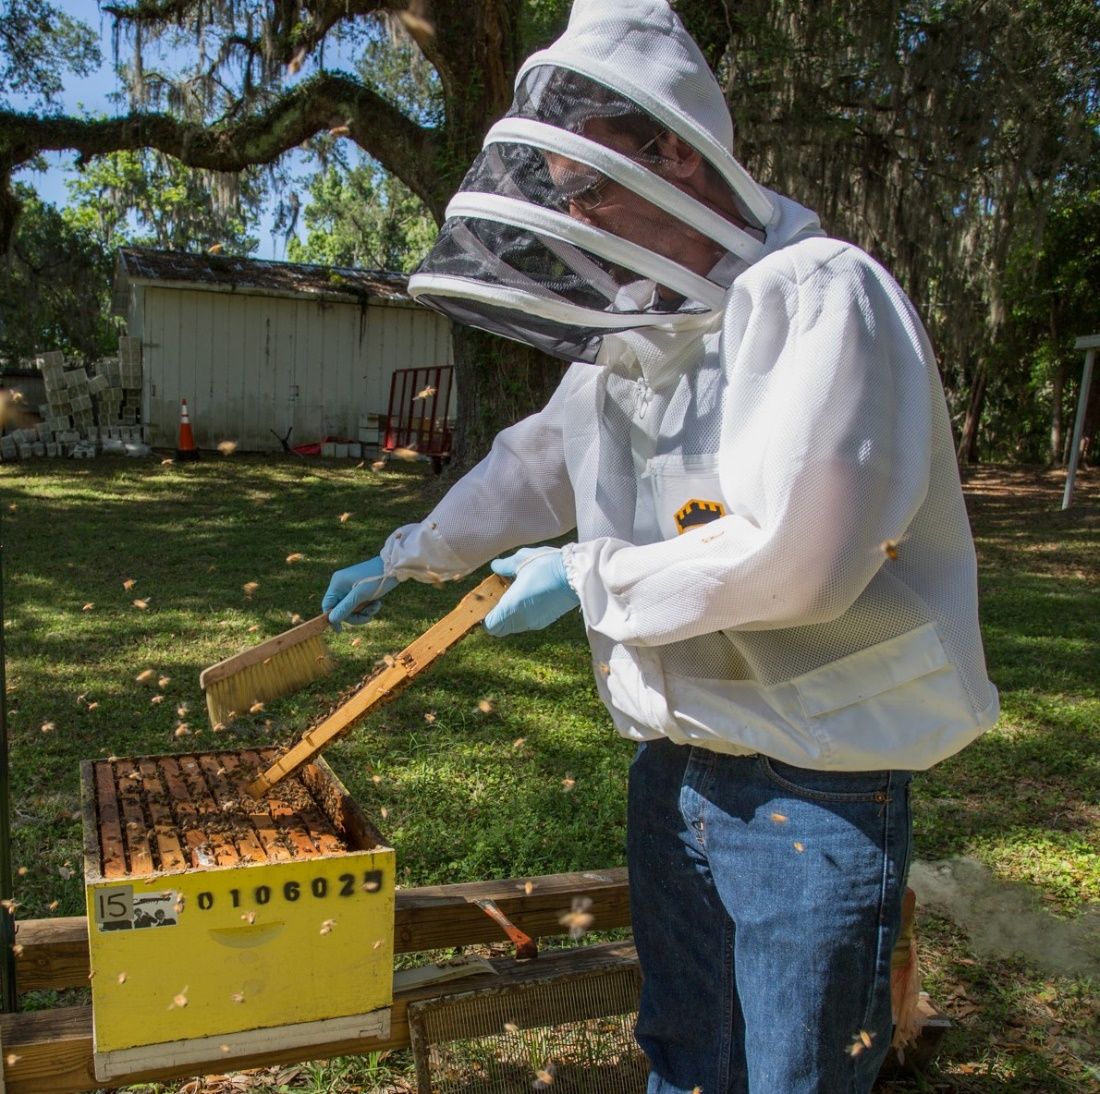
Credit: Geena Hill, formerly of UF/IFAS Honey Bee Research and Extension Laboratory
Foraging for Nectar
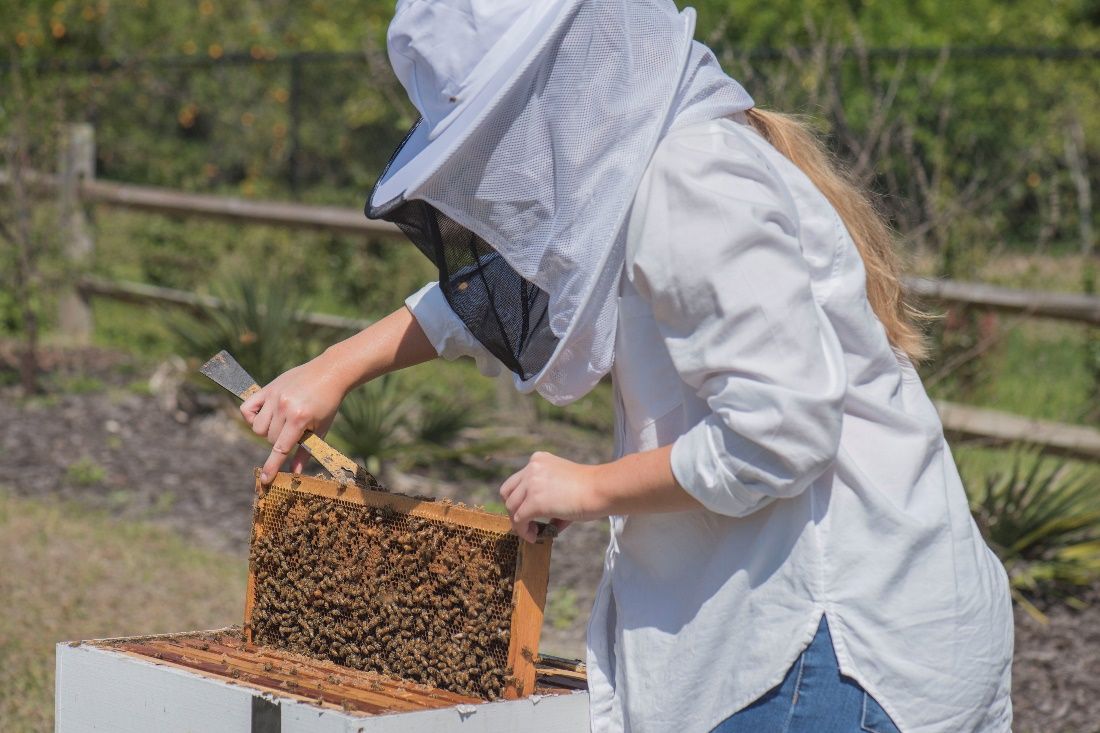
Credit: Bori Bennett, formerly of UF/IFAS Honey Bee Research and Extension Laboratory
Activity #1 Beekeeping Equipment Crossword Puzzle Activity
Now that you have learned about the essential equipment and tools for beekeeping (as in Figure 62), test your knowledge and solve this crossword puzzle. Use the highlighted vocabulary words from this section as your word bank.

Across
1. Often constructed from leather, this personal protective equipment protects your hands from stings.
2. Eight to ten of these can fit in the hive and is where honey bees will store their nectar, pollen, and brood.
3. (Fill in the blank.) A (blank) chamber holds the frames where the queen will lay the eggs.
4. (Fill in the blank.) The queen (blank) is a screen that prevents the queen from passing through to the upper honey supers.
5. This type of bottom board allows for better airflow during the warmer months.
6. (Fill in the blank.) A (blank) lid has overhang on all four sides and is often used with an inner cover.
7. This personal protective equipment is a hat with netting that covers and protects the head, face, and neck from stings.
Down
5. This tool is used to help calm the honey bees by masking the alarm pheromones.
8. (Fill in the blank.) A (blank) super has a depth of 5¾ inches and is lighter to lift.
9. Beekeepers use this type of lid on hives when many colonies will be transported together for pollination services.
10. (Fill in the blank.) Using an entrance (blank) makes the opening of a hive smaller and easier for weak colonies to guard and defend.
11. (Fill in the blank.) A convenient way to provide water for the honey bees is with a (blank), which may be located at the entrance or on top of a hive.
12. (Fill in the blank.) Beekeepers can wear a (blank) to completely cover their arms, legs, and torso from stings.
13. This type of bottom board is made completely from wood.
14. Beekeepers use this device to open the hive, separate supers, move frames, and remove excess comb.
Activity #2 Budget for a New Beekeeper

Credit: "budget" by 401(k) 2013 is licensed under CC BY-SA 2.0
You have learned about the equipment a new beekeeper would need. It would be wise to do some research and create a budget plan to know exactly what you need to start a beekeeping operation (Figure 64). It is likely a new beekeeper may spend hundreds of dollars just for the hive parts alone. With this activity, you will have the opportunity to do some research and create a plan of your own. Below is a table to get you started. With the help of a responsible adult, do an online search for “honey bee equipment suppliers.” Check out a few different sites and compare their prices for equipment, supplies, and tools. The wooden hive components, the supers and frames, can be purchased either fully assembled or unassembled. Assembled hives are more convenient; however, they are more expensive than if you buy the pieces and assemble them yourself. Once you’ve done your research, fill in the table below to get a realistic idea of what it would cost to start beekeeping.
Table 4. Sample Budget Plan for One Beehive.
Return to the Hive
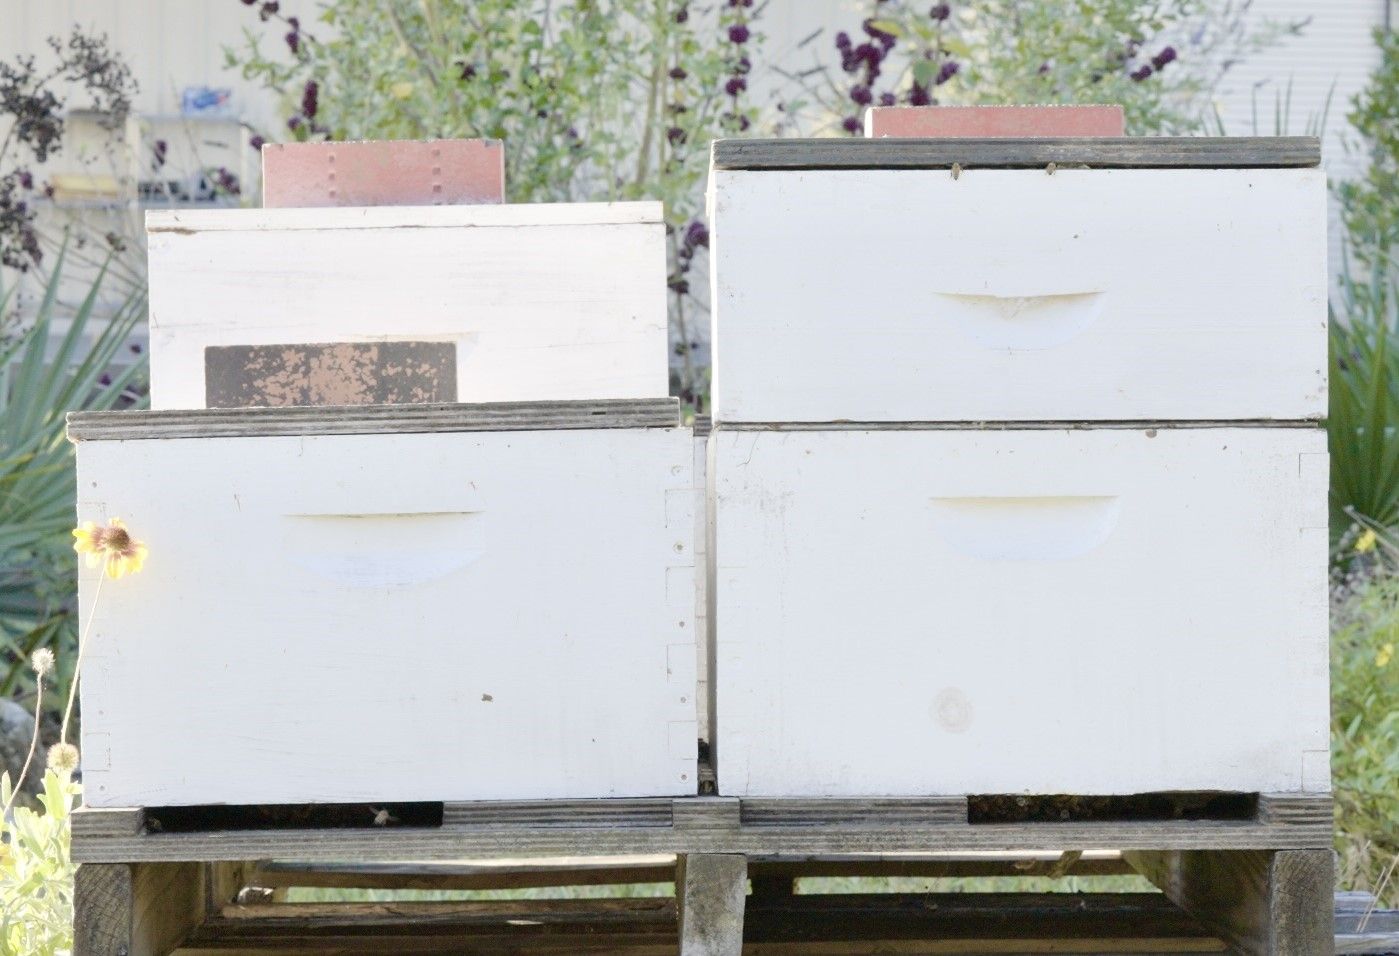
Credit: UF/IFAS Honey Bee Research and Extension Laboratory
1. Name the three sizes of supers used in beekeeping.
2. Name the two most important tools beekeepers use and explain how they are used.
3. What are the three types of hive feeders?
4. What are the benefits of using an entrance reducer (as shown in Figure 65)?
Taste the Honey

Credit: Tyler Jones, UF/IFAS Communications
1. Beekeepers need specific equipment to do their job. Think of another profession and list some of the specific equipment and tools they use (see Figure 66 for sample equipment a gardener may use).
2. Why would it be difficult to do that profession if you did not have the right tools or equipment?
3. What are some of your current jobs or chores that require specific tools or equipment?
4. Which of the tools that you use would you consider to be the most important? Why?
Pollen Patties
Credit: Kassidy Robinson, formerly of UF/IFAS Honey Bee Research and Extension Laboratory
Have you ever had a “light-bulb moment” (Figure 67)? It is when you have a great idea about a solution to a problem or a way to make a process better. Beekeepers have invented lots of tools and gadgets to improve the beekeeping experience and make it more enjoyable. Think of a task or process you do in your daily routine that you feel needs improvement. Can you think of a tool or new way that would improve and simplify that task or process so it would be less difficult and more pleasant to do? Write down your ideas and then try them out. If you don’t have success at first, change your idea until you find a solution that works!
Chapter 2.4 Getting Honey Bees
What’s the Buzz?
Credit: UF/IFAS Honey Bee Research and Extension Laboratory
It is important to know the secret to successful beekeeping is excellent preparation (Figure 68). An important step will be to find an experienced bee mentor from your local beekeepers’ association or club (see Activity #2). These final stages of preparation will ensure a strong start in your apiary, and your patience will soon be rewarded.
Prepare Your Location
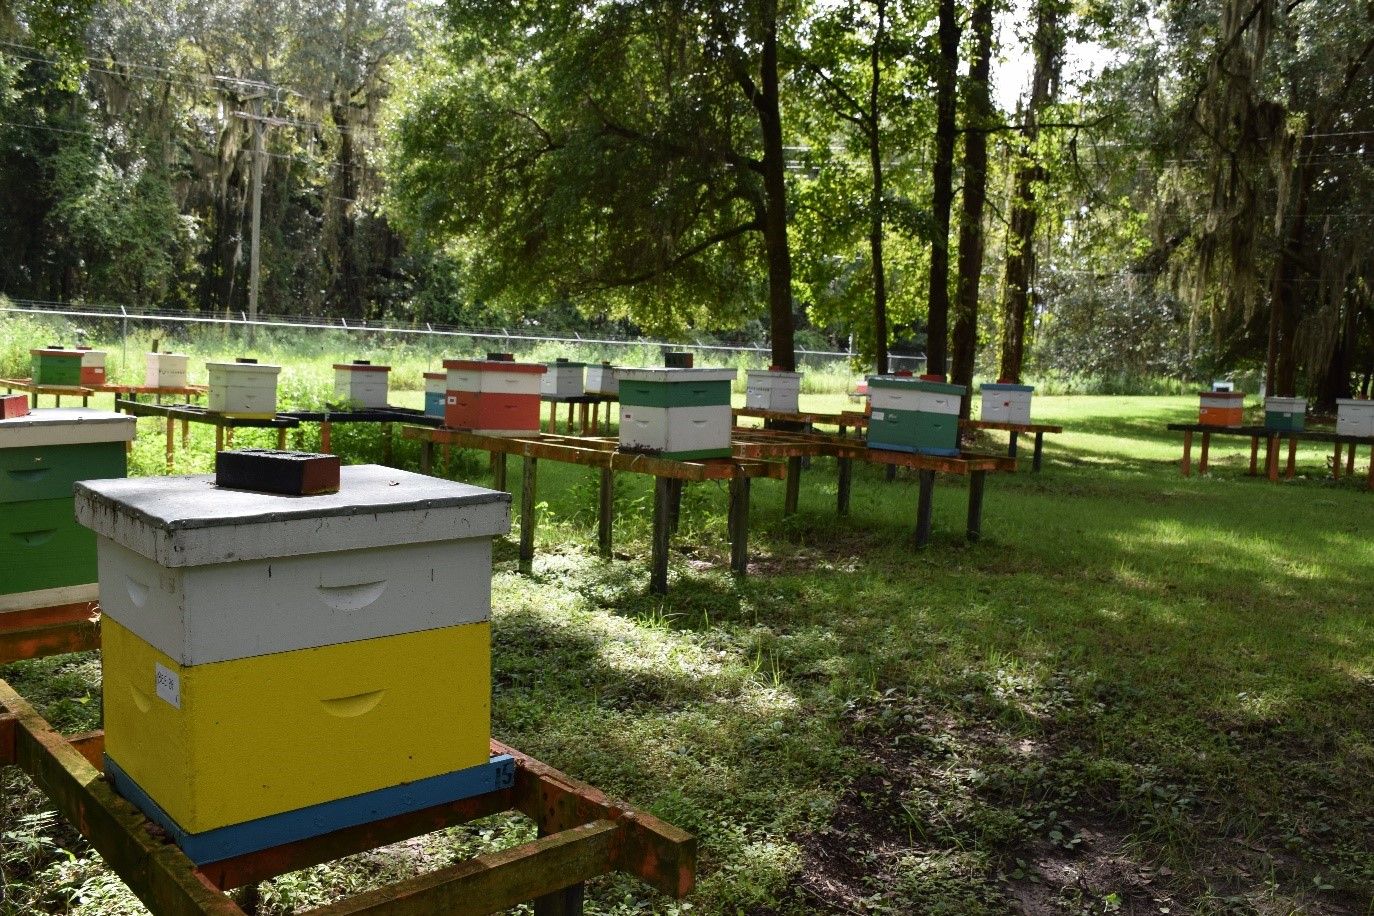
Let’s take a moment and review the features of a high-quality location for honey bee colonies (shown in Figure 69) with the table below.
Table 5. Features of a Good Apiary Location.
Credit: UF/IFAS Honey Bee Research and Extension Laboratory
Prepare Your Hives
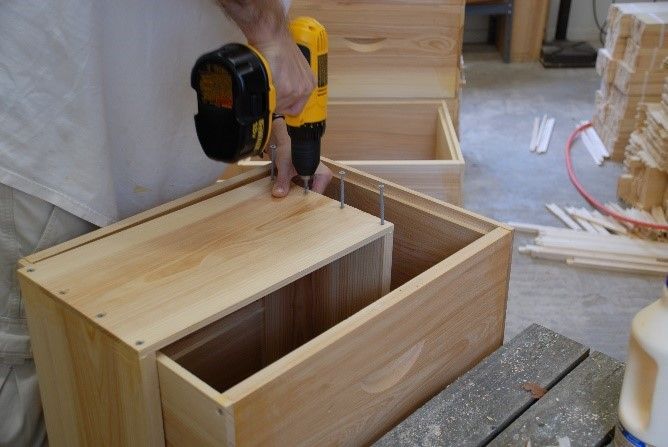
Check your apiary budget plan (refer to Activity #2 in Chapter 2.3) before purchasing your equipment so you will know exactly how many of each item you will need to buy. All the equipment should be purchased and assembled at least one week before installing your honey bees. Most parts of the hive will need to be put together, such as the supers and the frames (Figure 70). Be sure to follow the honey bee supplier’s instructions for the proper building process of the hive parts. Once you have assembled the pieces, paint the outside with outdoor latex paint. Never paint the inside of the hive box or the frames. Allow all paint to fully dry before installing your package of honey bees.
Credit: UF/IFAS Honey Bee Research and Extension Laboratory
The Bees’ Knees
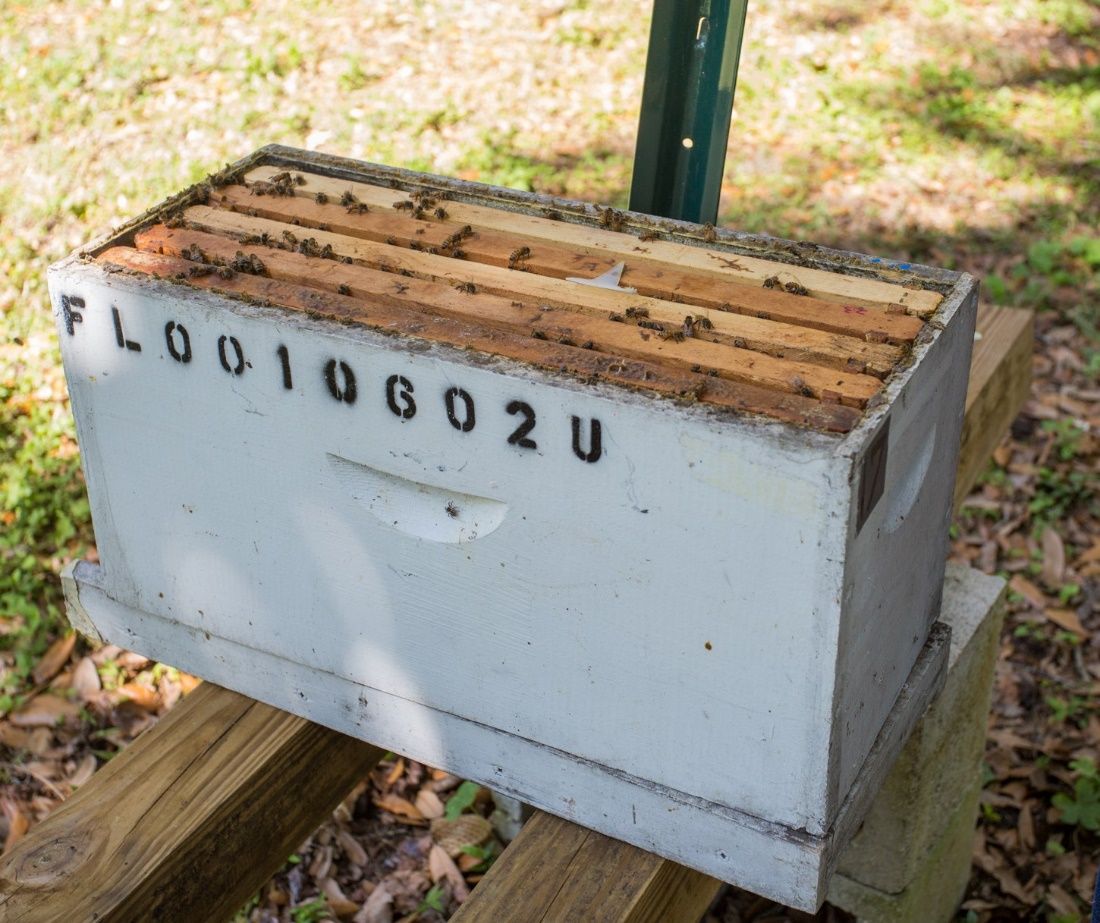
Many states require beekeepers to register their colonies every year so they can be inspected by apiary inspectors annually. Once registered as a new beekeeper, you will receive a firm number, which is used to identify your hives. It is often painted in the upper left-hand corner of the hive boxes with letters of at least a half inch in height (Figure 71). Your local apiary inspector will let you know specific rules for your area.
Credit: Geena Hill, formerly of UF/IFAS Honey Bee Research and Extension Laboratory
Prepare to Buy Your Bees
The two options for purchasing honey bees are nucleus colonies (called “nucs”) and packages of bees. A nucleus colony, or nuc, is a miniature colony in a small hive box (Figure 72). It comes with three to five frames of honey bees in all stages of development, as well as honey, pollen, and a laying queen. Most commonly, a nuc will have two frames of brood, two frames of honey, and one frame of pollen. Nucs tend to be more expensive than a package of bees and are usually purchased from a local bee supplier or other beekeeper. To transfer the nuc into a full-size colony you simply put the five frames from the nuc in the center of a full-size deep box and fill the rest of the space with four or five other frames.
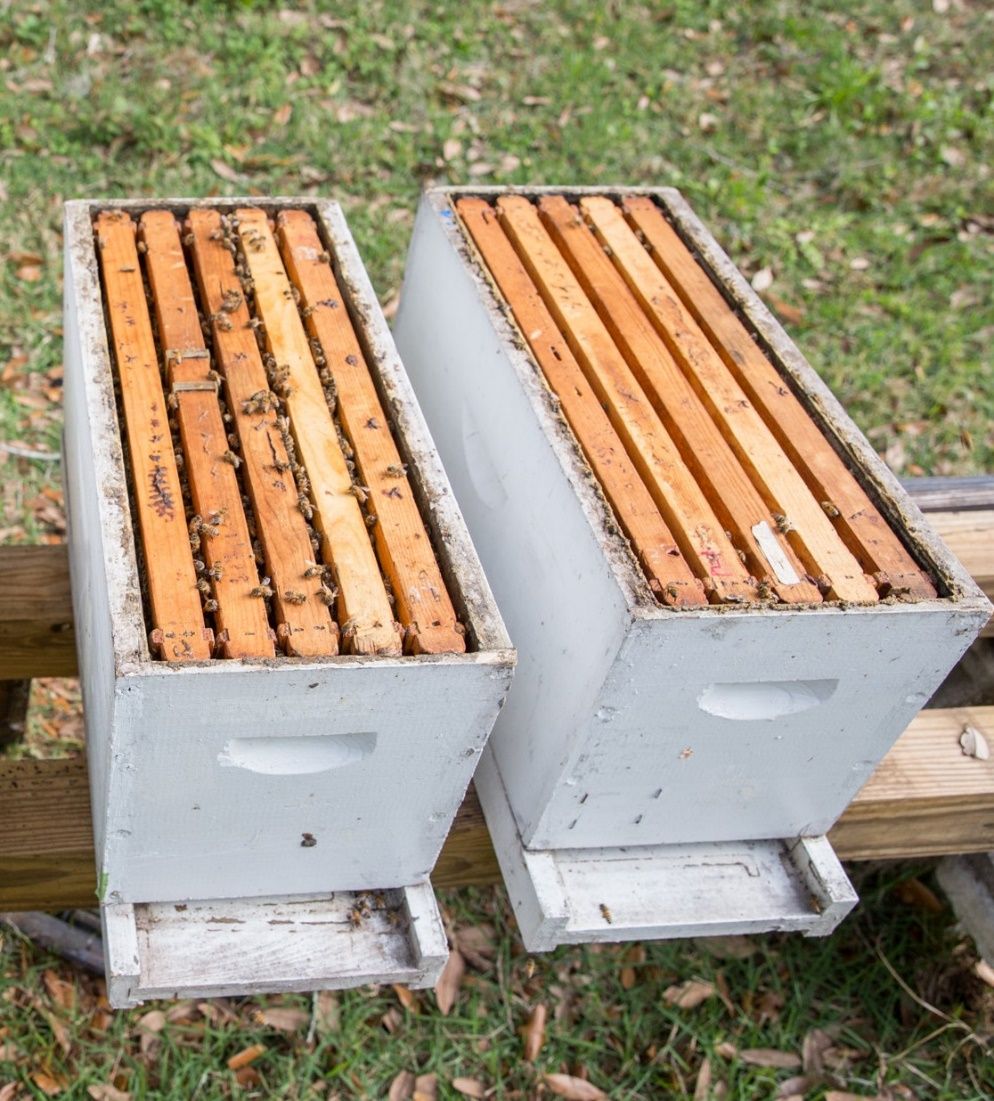
Credit: Geena Hill, formerly of UF/IFAS Honey Bee Research and Extension Laboratory
A package of bees comes in either a plastic or wooden box that contains 3 pounds or about 10,000 honey bees (shown in Figure 73). The package can be purchased with or without a queen and will have a feeding can with a syrup mixture to feed the colony during shipment. While packaged bees are usually easier to get and are sometimes less expensive, there is also an added process of installation, or putting the bees into the hive.
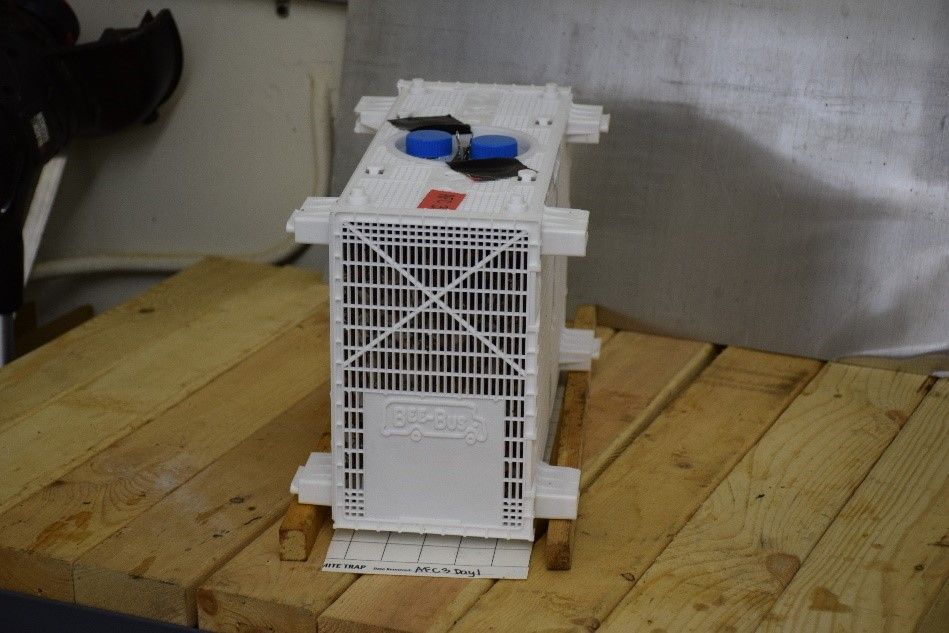
Credit: UF/IFAS Honey Bee Research and Extension Laboratory
Installation of a Package of Bees
Now that you have picked the best apiary location, built all your equipment, and your bee packages are ready to go, it is time to learn how to install your package into your hives. Since a package is not a full colony of bees, you will want to use an entrance reducer. With the addition of this part, the bees will have less space to defend, allowing them to focus on building up numbers. Let’s get beekeeping!
First off, you will need to gather a few supplies:
- Spray bottle filled with water
- Hive tool
- Sugar water (2 to 1 mixture, or two parts water to one part sugar by volume; for example, two cups of water may be mixed with one cup of sugar for the right formula)
- Hive feeder
- Staple gun
- String
- Entrance reducer
- Duct tape
Step 1. To easily transfer the bees from the package to the hive, gently spray the bees with water through the screen of the package (Figure 76). Honey bees cannot fly when they are wet.
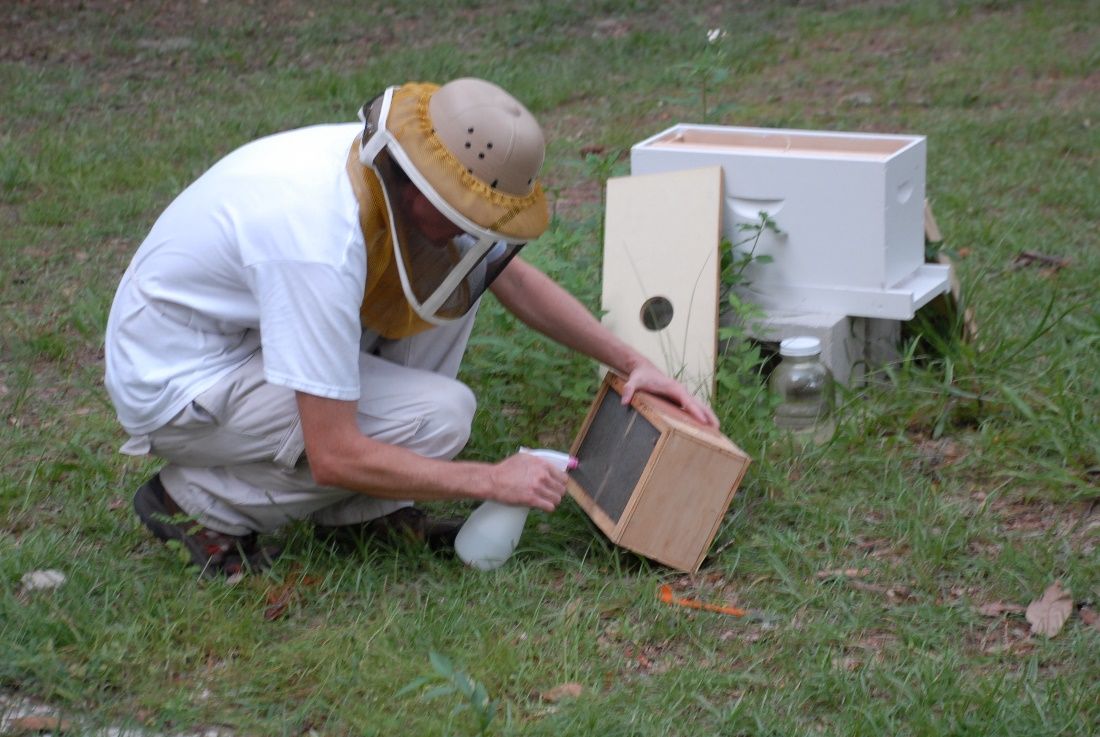
Credit: UF/IFAS Honey Bee Research and Extension Laboratory
Step 2. There is a wooden lid on top of the package that can be removed using the hive tool. After taking the lid off, the feeder jar and the queen cage can be removed. The lid can then be replaced until the package is installed.
Step 3. Time to install the queen! Attach a piece of wire or string to the queen cage. Attach the opposite end of the wire or string to the top bar of a frame that will be towards the edge of the colony (Figure 76). Do not release the queen on the day of installation. Either remove the cork on the candy end and allow the bees to eat through the candy to release her, or you can come back four days later to open the cage yourself. The workers need to get used to the scent of this new queen so they do not treat her like a stranger and kill her.
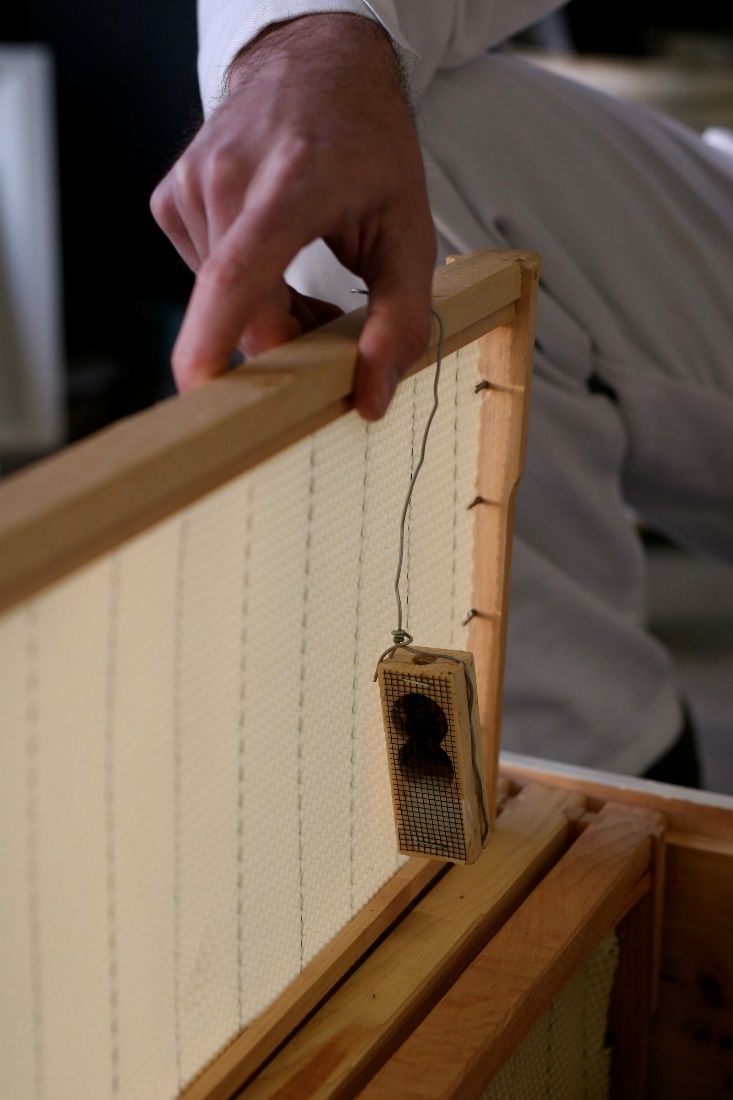
Credit: "Wiring the Queen Cage" by Chiot's Run is licensed under CC BY-NC 2.0
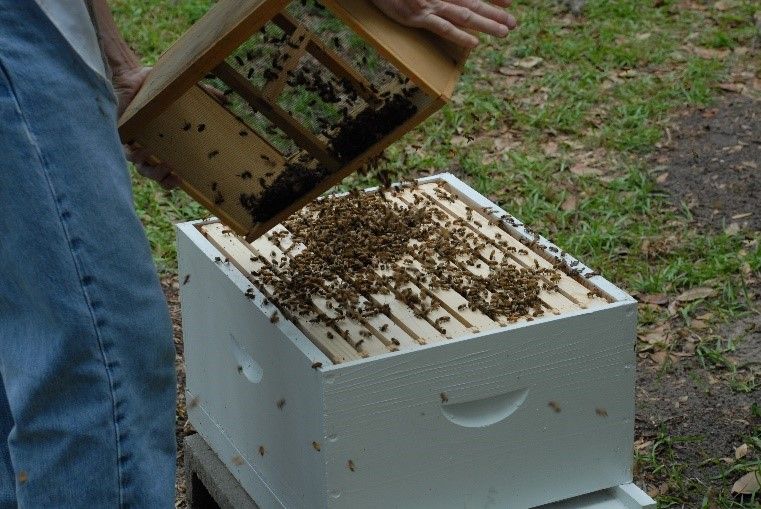
Step 4. Finally, add the bees! There are two ways to get the bees into the hive. First, you can simply remove the five center frames of the hive and place the entire open package (opening facing up) into the hive and allow the bees to crawl out on their own. The second way is to carefully shake the bees into the hive (Figure 78). Lastly, put the lid on the hive and add a full feeder jar to give them food in their new home.
Credit: UF/IFAS Honey Bee Research and Extension Laboratory
Hive Check-Up
After about a week, make sure the queen has emerged from the queen cage and is laying eggs (Figure 79). You can remove her cage from the hive if she is no longer in the cage. If you cannot locate the queen or have a difficult time seeing eggs, look for young brood. If you cannot seem to find any evidence of her presence, you may need to purchase a new queen. Be sure to keep the colony well fed using the feeder jar as the growing population needs plenty of food to get a strong start.

Credit: UF/IFAS Honey Bee Research and Extension Laboratory
Foraging for Nectar
Activity #1 Which Bees to Buy?
Credit: UF/IFAS Honey Bee Research and Extension Laboratory
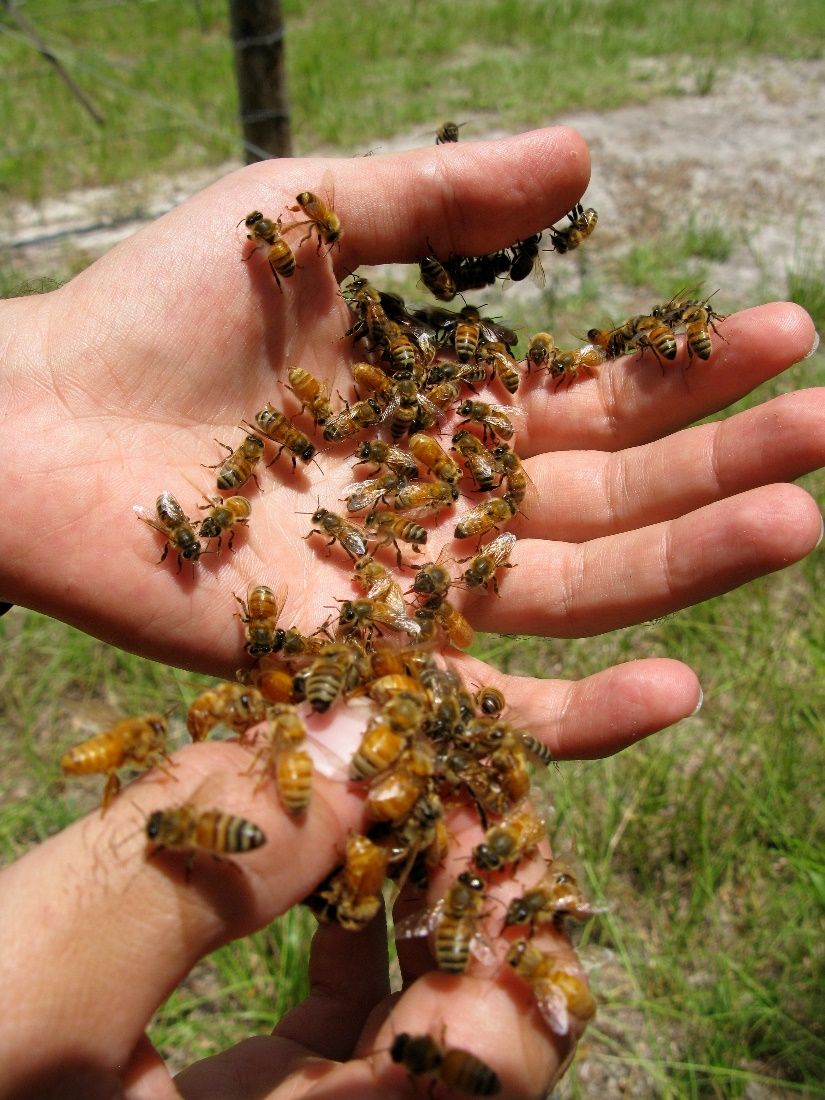
There are different honey bee stocks available in the United States for beekeepers to purchase. The varying stocks have many differences that include strengths and weaknesses (Figure 80). The stock a beekeeper chooses for honey production may differ from a stock chosen for pollination services. Beekeepers must research which stocks would best suit their choice of operation. Below is a table showing some of the more popular stocks available in the United States and how they differ from one another. In the following scenarios, read about the different beekeepers and their specific operations. Then decide which stock of honey bees would best meet their needs. Name one stock each that the beekeeper should and should not consider buying and what honey bee characteristics brought you to that decision.
Table 6. Honey Bee Stocks and Their Characteristics
* Information is not available in the literature related to the given trait.
Scenario #1
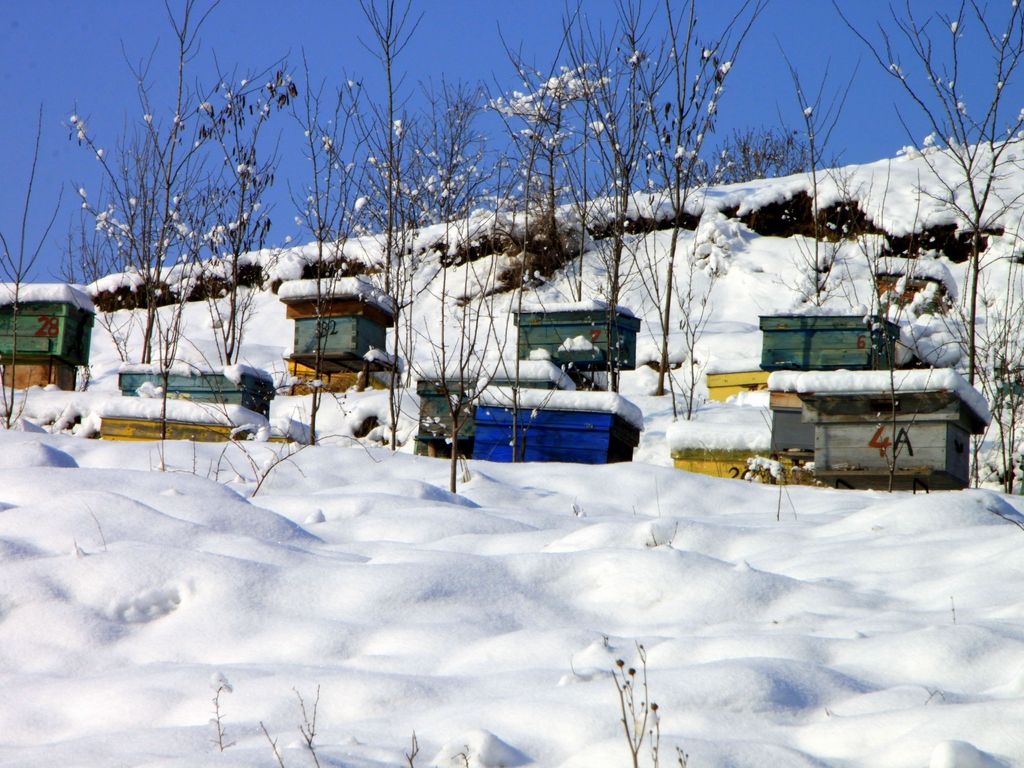
Beekeeper A lives in the northern region of the United States where winters are harsh and needs colonies that can deal with long periods of cold temperatures (Figure 78). This beekeeper also prefers working with honey bees that are less defensive.
Credit: "Winter-Apiary Bee-Hives-in-Winter 77108" by Public Domain Photos is licensed under CC BY 2.0
Stock They Should Buy:
Why:
Stock They Should Not Buy:
Why:
Scenario #2
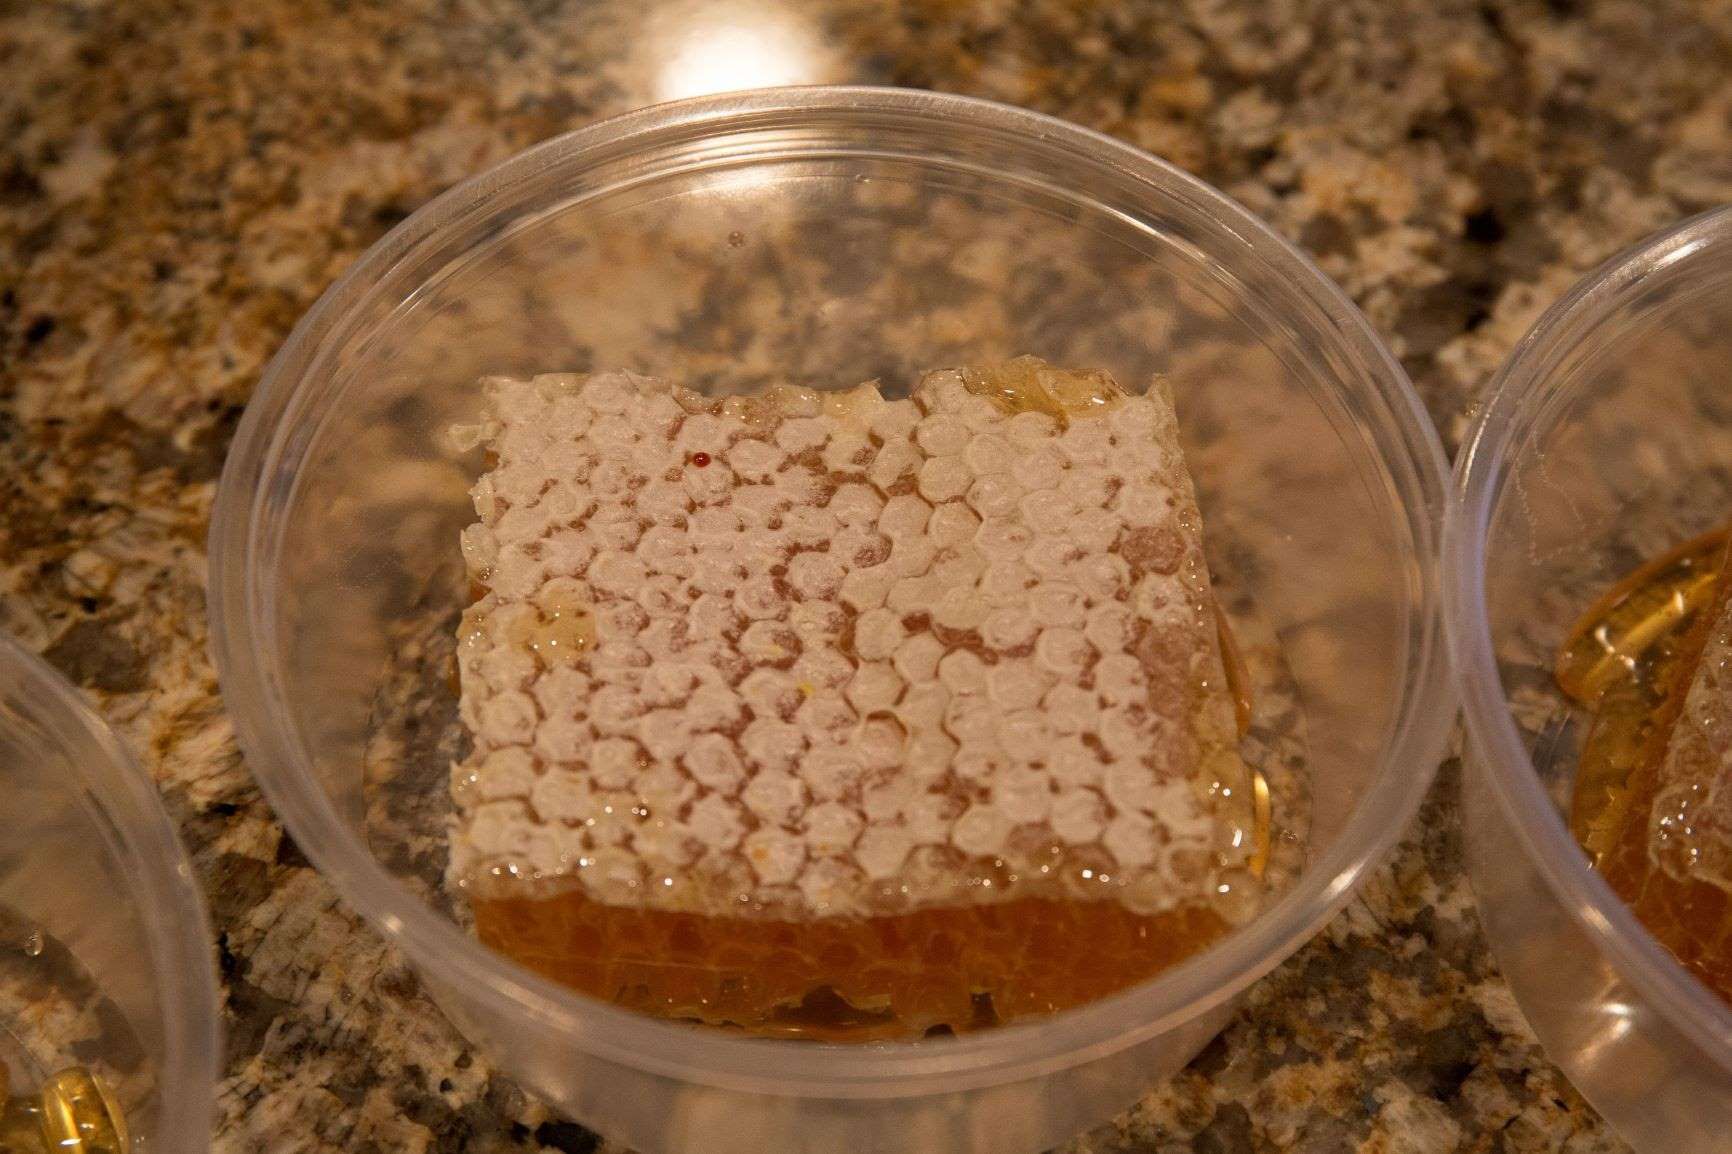
Beekeeper B has a sideline business to produce lots of honey and honeycomb (shown in Figure 82). This keeper has several large apiaries and prefers honey bees that are more disease resistant and less likely to rob from nearby colonies.
Credit: "One beautiful piece of comb honey" by gr8what is licensed under CC BY-SA 2.0
Stock They Should Buy:
Why:
Stock They Should Not Buy:
Why:
Scenario #3
Beekeeper C works in commercial pollination services (as in Figure 83). They need a stock that is less likely to swarm in the spring and that produce lots of brood, so they will have plenty of bees to pollinate crops throughout the summer.
Credit: Jason Deeringer, Bee Serious, LLC, used by permission
Stock They Should Buy:
Why:
Stock They Should Not Buy:
Why:
Scenario #4
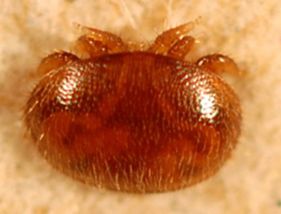
Beekeeper D is a hobby beekeeper that lives in a warm climate and is not concerned about cold winters or lots of honey production. However, due to an outbreak of Varroa (Figure 84) last year, they lost several colonies. They plan to replace the lost colonies with a more resistant stock.
Credit: UF/IFAS Honey Bee Research and Extension Laboratory
Stock They Should Buy:
Why:
Stock They Should Not Buy:
Why:
Activity #2 Find Your Local Beekeepers Association
Credit: Mary Bammer, UF/IFAS Honey Bee Research and Extension Laboratory
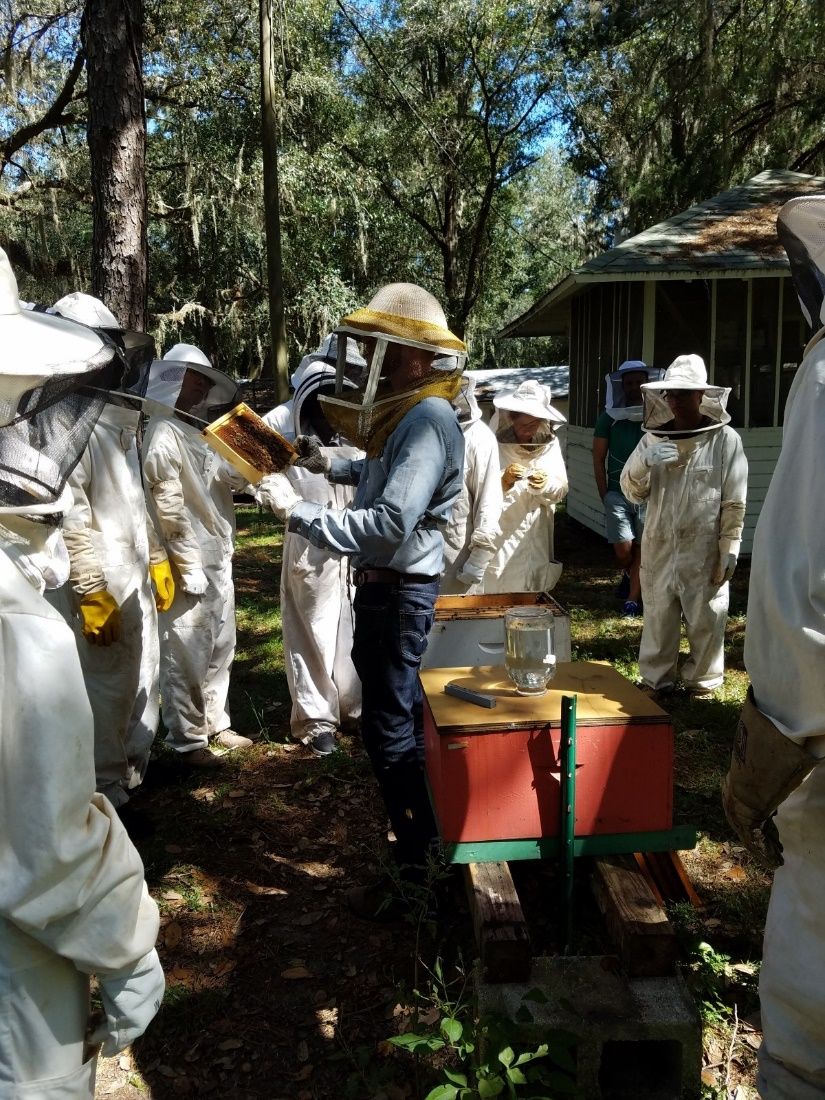
Do an online search to find a local beekeepers' association in your area. With your group, arrange to attend a monthly club meeting, or ask someone from the association to give your group a demonstration of basic hive and beekeeping equipment (Figure 85). During the presentation be sure to ask about the benefits and services the club offers beekeeper members. Then answer the questions below.
1. What is the contact information for my local beekeeping association?
2. How often does the local beekeeping association meet?
3. How much does it cost to be a member of the beekeeping association?
4. What benefits and services does the beekeeping association offer to its beekeeper members?
5. Who from the beekeeping association is willing to mentor new beekeepers? What is their contact information?
Return to the Hive
Credit: Geena Hill, formerly of UF/IFAS Honey Bee Research and Extension Laboratory
1. List four characteristics of a good apiary site.
2. What are the two common methods of acquiring new bees? Which one is considered easier?
3. What should you do to a package of bees before installing them?
4. Name the two ways you can release the queen into the colony.
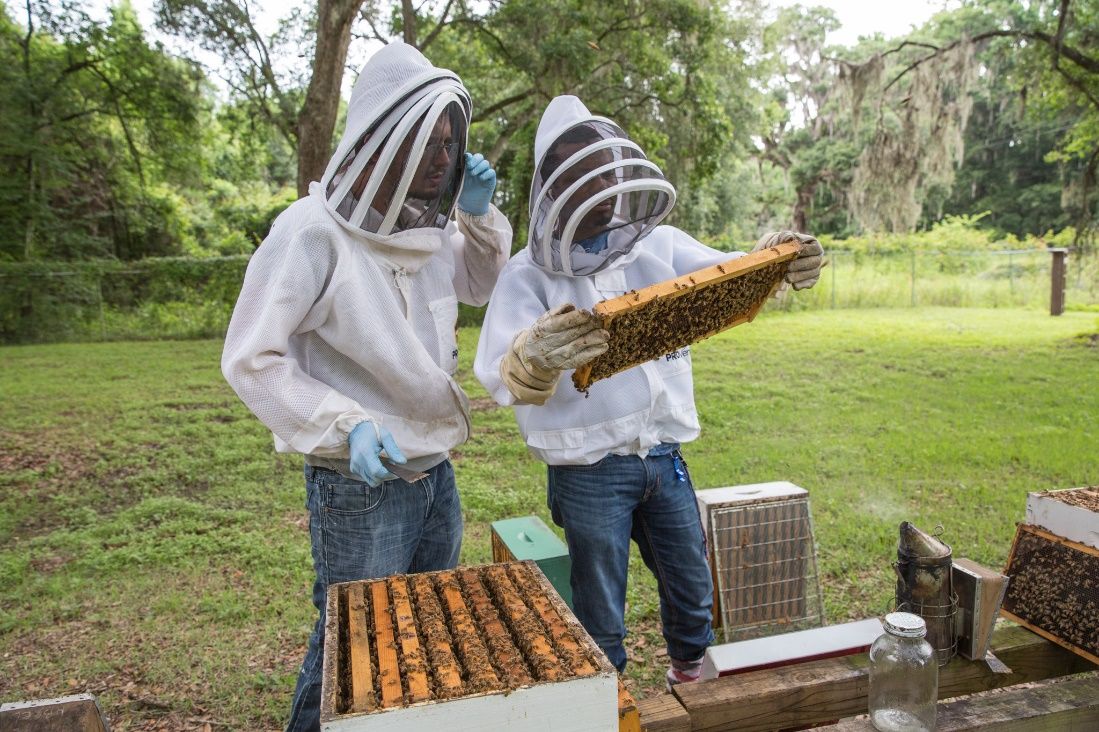
5. How soon should you check on the bees after installation (as in Figure 86)?
Taste the Honey

Credit: Megan Hammond, formerly of UF/IFAS Honey Bee Research and Extension Laboratory
1. When people choose a location for an apiary, they select sites that also make good locations for other things, like a campfire, a baseball field, a park, or a school building. Choose one of these other site types and describe what safety concerns people need to consider for building it.
2. Just as there are specific steps to installing a package of bees, there are many other processes that require us to carefully follow steps. Can you think of other things you like to do where you need to follow a process (as in Figure 87)?
3. Why is carefully following the steps so important?
Pollen Patties
Make it great! Have your group leader choose two to three potential apiary sites in your area. With permission from the landowners, visit these sites as a group. Look them over and discuss the strengths and weaknesses of each location. What aspects of the location make it a good apiary site? Do you see anything that could become a problem in the future? Write your responses below.
Chapter 2.5 Colony Inspection
What’s the Buzz?
Credit: UF/IFAS Honey Bee Research and Extension Laboratory
Your preparation and patience have rewarded you with your own honey bee colony. But now, what do you need to know to keep the colony happy, healthy, and productive (Figure 88)? How do you know the queen is doing her job? Are you feeding them enough? These are a few questions that can be answered when inspecting your hives. New colonies should be checked every two weeks for the first few months and then as needed after that.
Preparing for Inspection
Remember, beekeeping can be dangerous, so exercise safety first. Put on your veil and your closed-toe shoes before going out to your apiary. Make sure you have enough smoker fuel. Using a lighter or a match, light a handful of fuel (pine straw, newspaper, etc.) and carefully put it into the chamber of the smoker (see Figure 89). Puff the bellow until it gives off a thick cloud of smoke. Add more unlit fuel as needed. Grab your hive tool and your checklist with a pen and head out to the apiary.

Credit: Kassidy Robinson, formerly of UF/IFAS Honey Bee Research and Extension Laboratory
External Observations
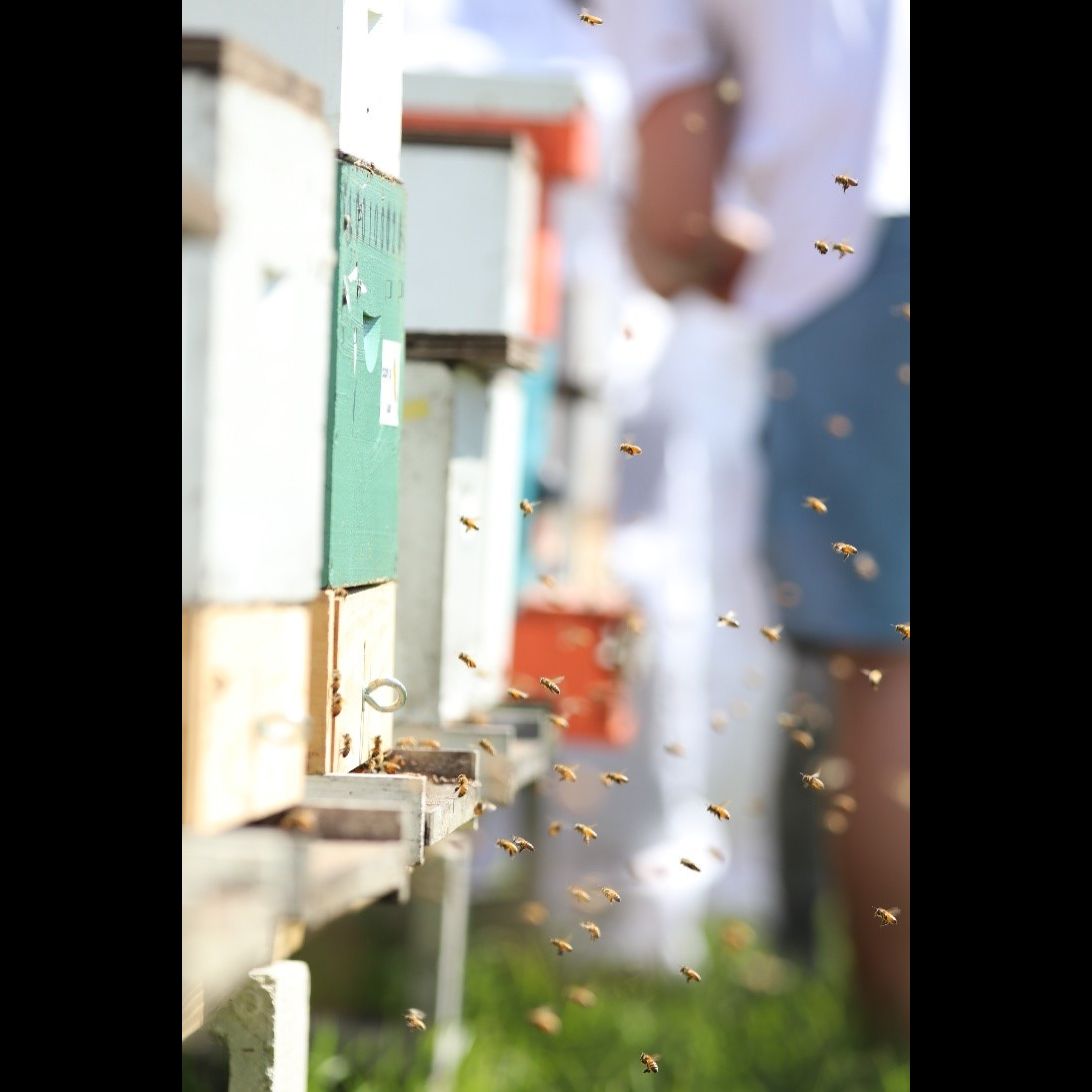
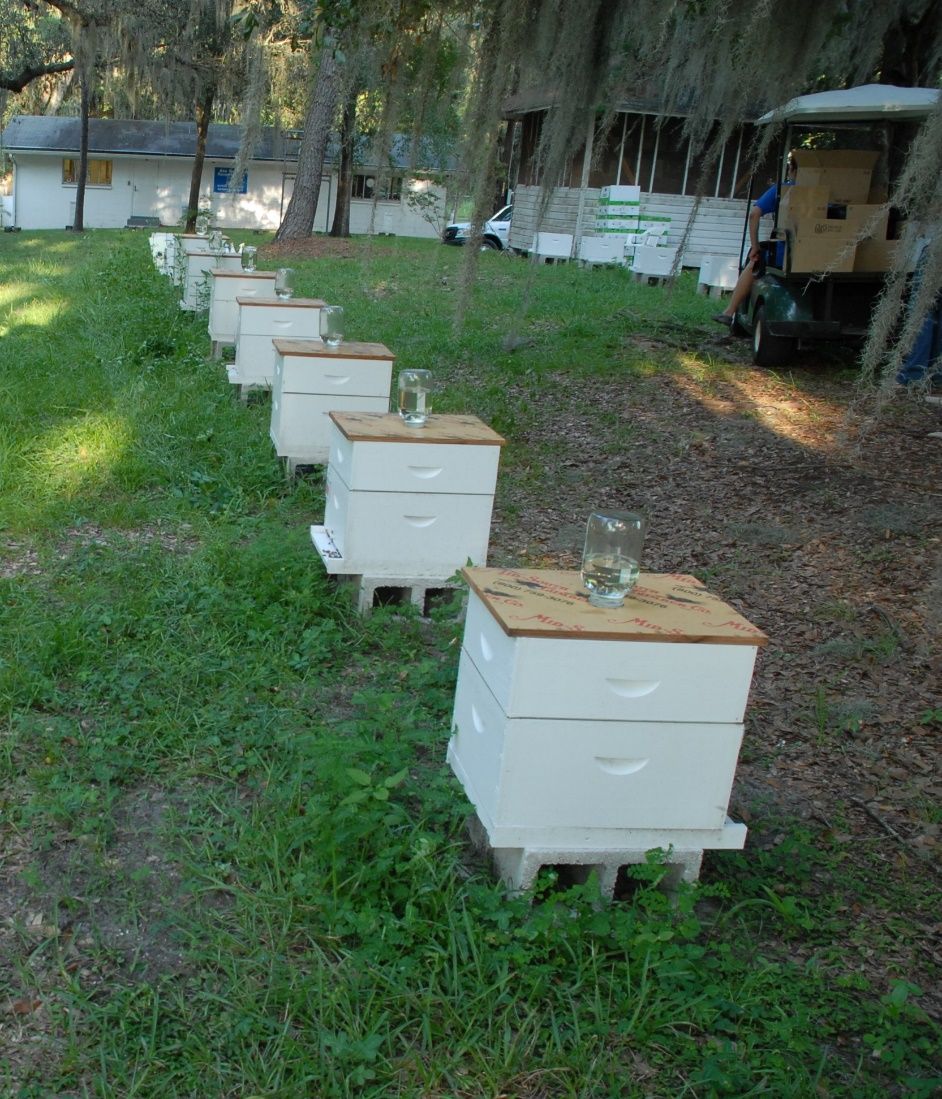
There are a few things that can be noted before even cracking the lid of the hive. Look at the entrance. Workers should be entering and exiting the hive depending on what is appropriate for the season. There should be a lot of activity in the spring when the weather is warm and the foraging rate is high. However, the entrance activity will most likely decrease as temperatures begin to drop. If there is little to no activity at the entrance of your hive in the springtime, it can indicate a dwindling population or dead colony. Next, check for the opposite of activity. How many dead bees are there at the entrance or on the ground in front of the hive? Many dead bees (50 or more) could mean that they are struggling to survive in their current environment. External hive feeders can easily show you how much the colony is eating (Figure 90). Always check to see if the feeders need to be refilled.
Credit: UF/IFAS Honey Bee Research and Extension Laboratory
Watch for robbing behavior. Robbing happens when honey bees from stronger colonies steal resources from the hives of weaker colonies (Figure 91). If the nectar sources are low in the area, workers will do what it takes to keep their sisters fed. At a distance, you may see honey bees cluster around any opening of a bee hive such as the entrance, around the feeder, around the seams of the lid, and between supers. This indicates that they are doing all they can to reach the resources of this neighboring colony. A closer observation can show guard bees attacking the intruder bees at the entrance of the colony. If the colony is robbed of its resources, it will not be able to survive. Attempts to prevent this from happening can include reducing the entrance, cleaning up all excess syrup that may be on the surface of the hive, and minimizing your time in the hive itself.

Credit: Dr. Michael Bentley, used by permission
Internal Observations
Now it is time to see what is going on inside the hive. You should move around the hive with a slow, steady, and smooth technique (as in Figure 92). This may take time to develop, but it will decrease your chance of being stung. Try not to jolt the frames or drop parts of the hive. It is better to slow down or take a break than to move too quickly, causing the bees to become defensive.

Credit: UF/IFAS Honey Bee Research and Extension Laboratory
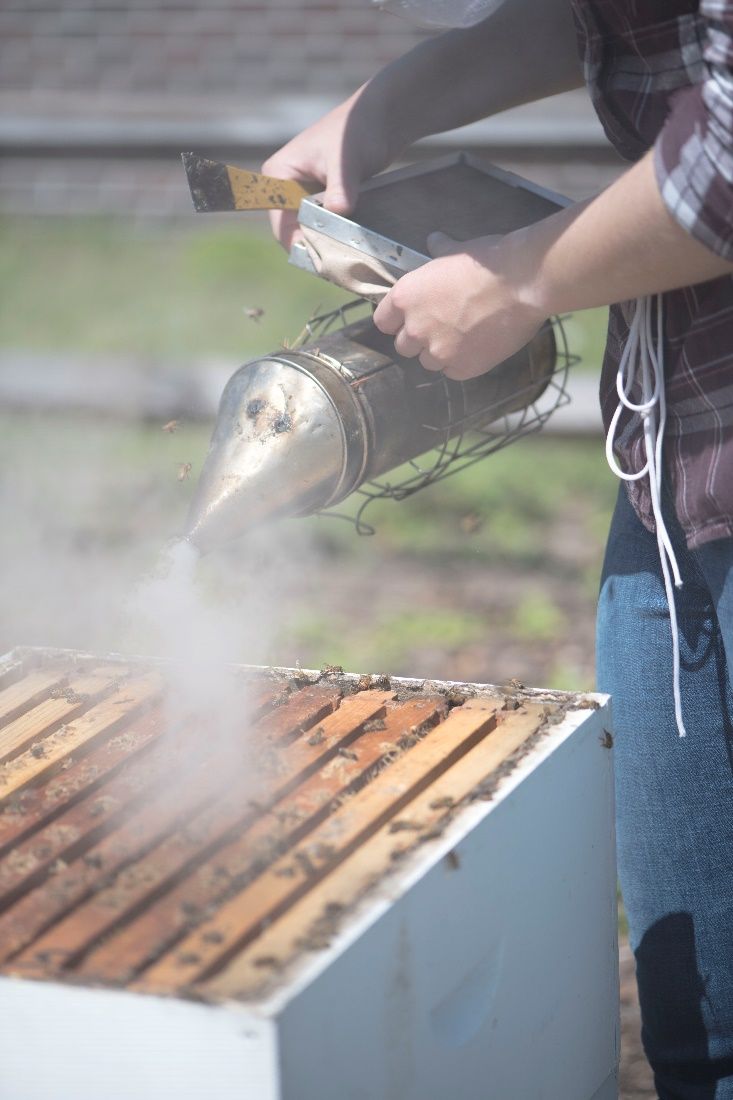
As you look at frames, you will be looking for food supplies, queen activity, pests, and diseases. Frames toward the center of the colony will usually have more bees on them. Brood rearing takes place primarily in the cells on central frames. Food storage areas occur in frames toward the edge of the colony. Using the smoker, puff smoke into the entrance of the colony to cover the worker bees’ sensitivity to alarm pheromone (Figure 93).
Credit: Bori Bennett, formerly of UF/IFAS Honey Bee Research and Extension Laboratory
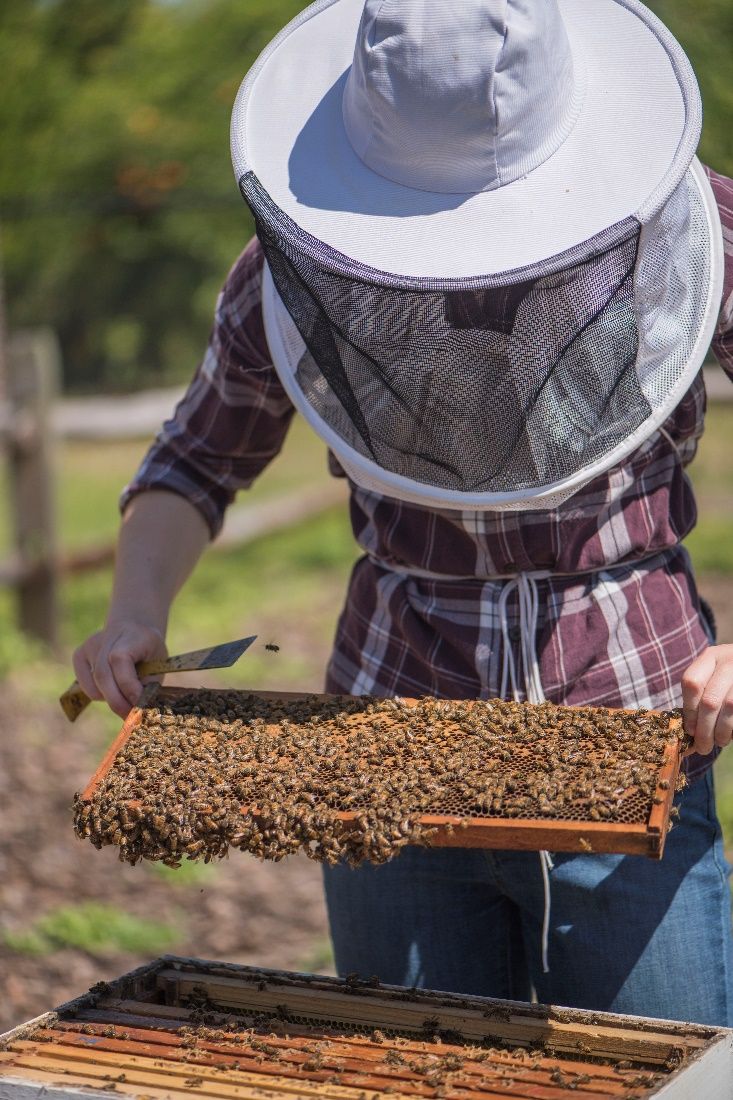
Next, use the hive tool to pry the lid from the top box. When you open the hive, there should be lots of bees on the tops of the frames—a sign of a healthy population. Add another puff or two of smoke to the opened hive just as an added precaution. Towards the center of the hive, gently wedge the hive tool in the space between two top bars of the frames (Figure 94). Slowly pry to loosen the propolis and lift the frame from the hive. Honey bees should almost completely cover both sides of the frame as another sign of a healthy population, as shown in Figure 95.

Credit: Bori Bennett, formerly of UF/IFAS Honey Bee Research and Extension Laboratory
Credit: Bori Bennett, formerly of UF/IFAS Honey Bee Research and Extension Laboratory
While there are honey bees covering the frames, you can lightly blow on them, and they will move out of the way so you may observe the contents of the cells. Locating the queen is a good habit to develop. If you cannot see her, there are a couple of signs that tell you she is present. Look in the open cells to see if there are eggs and larvae present. This means there is a healthy laying queen. Also, pay attention to the brood pattern. Is it solid and building outward from the center (Figure 96), or is it spotty and all over the place (Figure 97)? Healthy queens will lay a solid brood pattern.
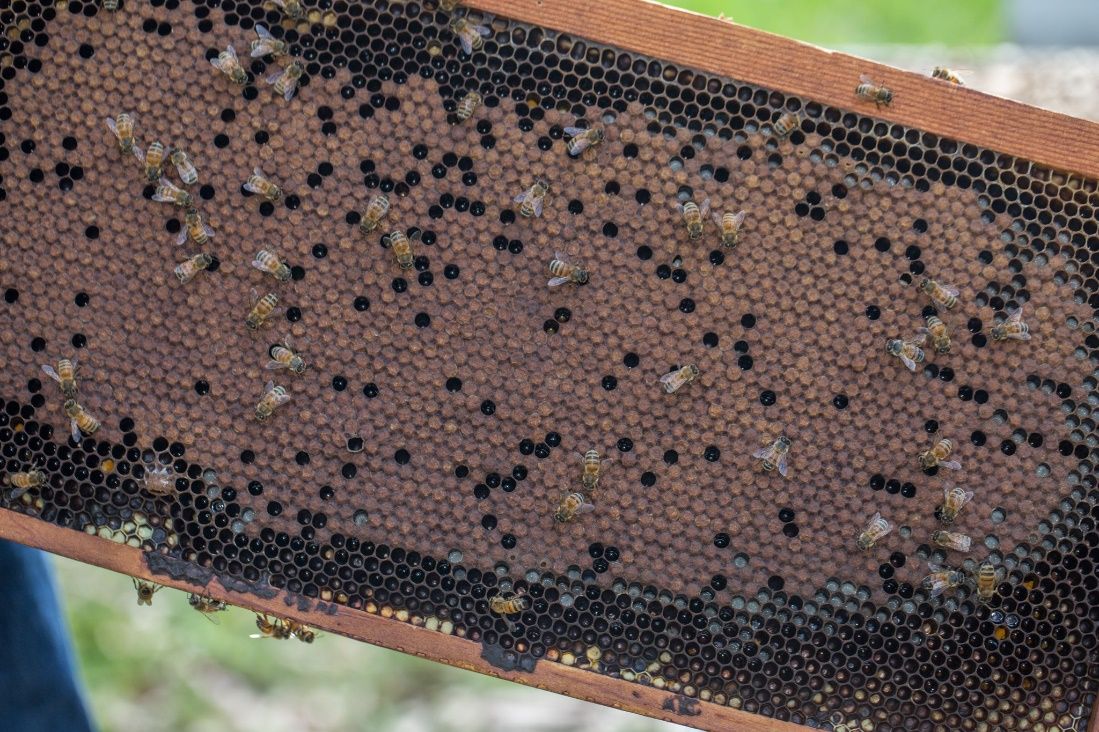
Credit: Geena Hill, formerly of UF/IFAS Honey Bee Research and Extension Laboratory

Credit: Brandi Simmons, UF/IFAS Honey Bee Research and Extension Laboratory
Alternately, there may be signs that the queen is no longer present. If you examine the brood cells and notice that there are multiple eggs laid in one cell, this means that workers have begun laying eggs (Figure 98). The worker bees will do this if the queen pheromone has grown weak in the hive, usually a result that the queen has left or died. Long, vertical queen cells will begin to appear protruding outwards from the frames to produce a new queen. If, for some reason, you are unable to spot the queen or see no queen cells built for her replacement, order a new queen immediately. Your colony cannot survive long without a queen.
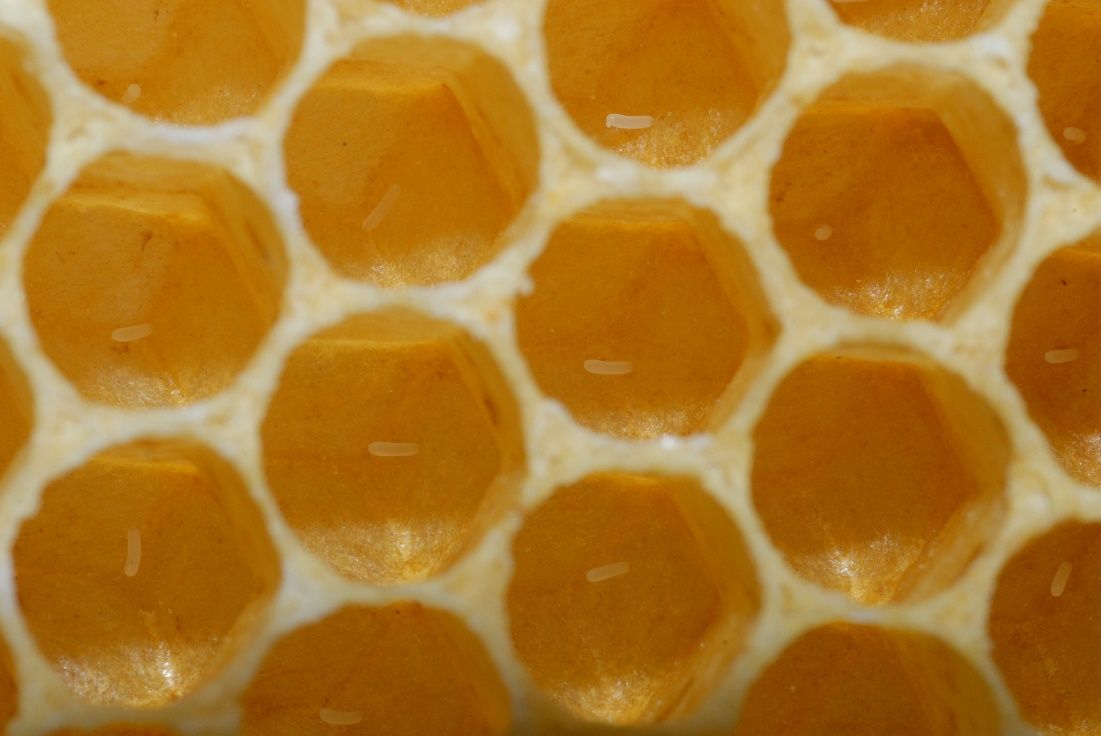
Credit: Brandi Simmons, UF/IFAS Honey Bee Research and Extension Laboratory
After you checked on the queen and the brood, move to the outer frames in the hive to look at the food stored there. The edges of the central brood frames will hold some nectar and pollen, but most of the stores will be in the outer frames (Figure 99). Check to be sure that the workers are filling their cells with enough material from their forage sources. If it seems a bit light, you may choose to supplement with a pollen patty product and continue refilling the feeder jars.
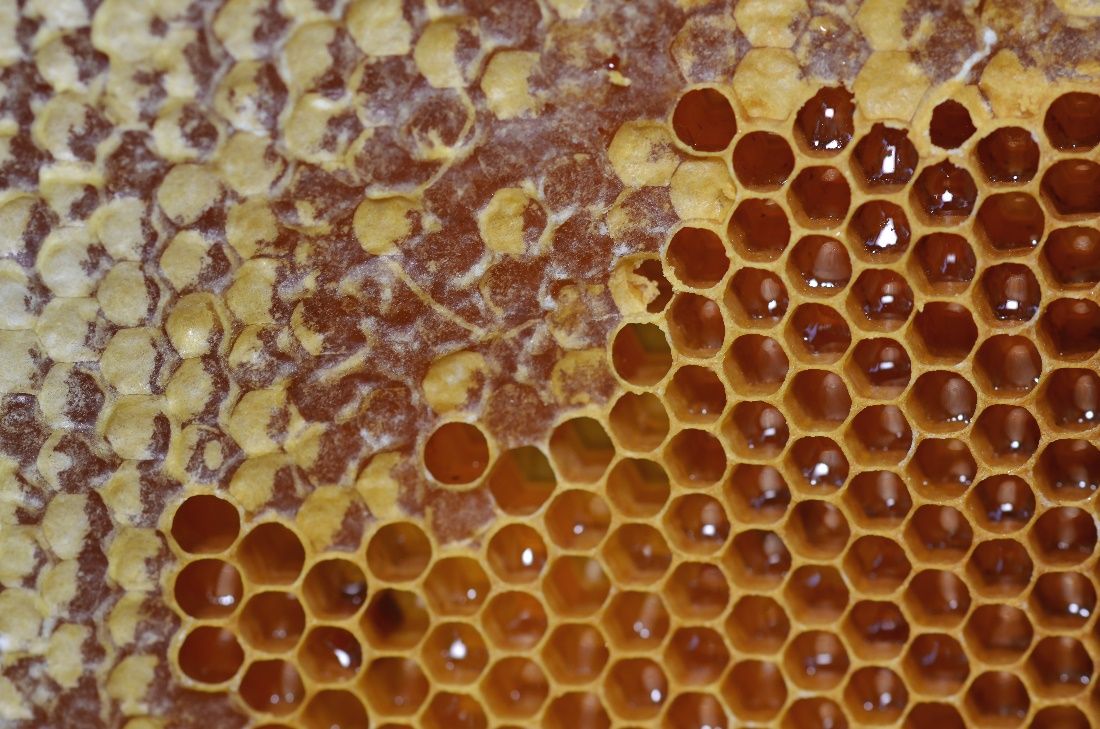
Credit: Dr. Michael Bentley, used by permission
Through the entire inspection process, you must keep an eye out for pests and signs of disease in the hive. We will discuss this in the next section.
After you have completed your inspection and are satisfied with the results, carefully replace the frames where they need to be, brood towards the center and food towards the outside. Puff a bit of smoke onto the top of the frames so any bees walking around on the edges will move into the hive or fly away. Gently replace the lid so as not to crush any of the workers. Be sure to gather all your equipment and put it away. You can remove your veil once you are safely away from your apiary. Make sure to safely extinguish your smoker and prevent further flames by putting out the fuel.
The Bees’ Knees
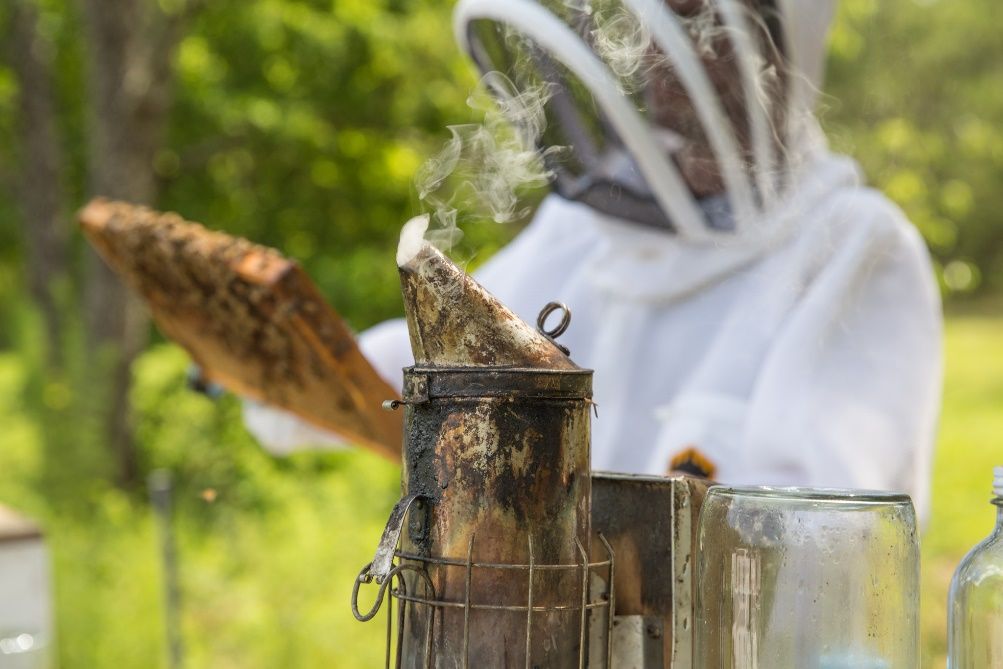
Credit: Geena Hill, formerly of UF/IFAS Honey Bee Research and Extension Laboratory
A smoker, as shown in Figure 100, is a simple device that does an excellent job of keeping your body safe from honey bee stings. Before experimenting with one, however, it is best practice to enlist the assistance of a responsible adult when lighting any flammable material. Knowing how to properly light a smoker is an important skill that beekeepers master over time. Many materials can be used as fuel to ignite your smoker. Common varieties include pine needles, wood pellets, unprocessed cotton fiber, burlap, or even newspaper. The list goes on! When selecting your fuel, it is important to select one that is free of chemicals, plastics, rubber, and paint. If used as a fuel, these could make a smoke that has toxic fumes which could harm or kill your bees! It is always a good idea to have a water bucket handy in case a fire gets out of control.
Foraging for Nectar
Activity #1 Find the Bee
Credit: Dr. Michael Bentley, used by permission
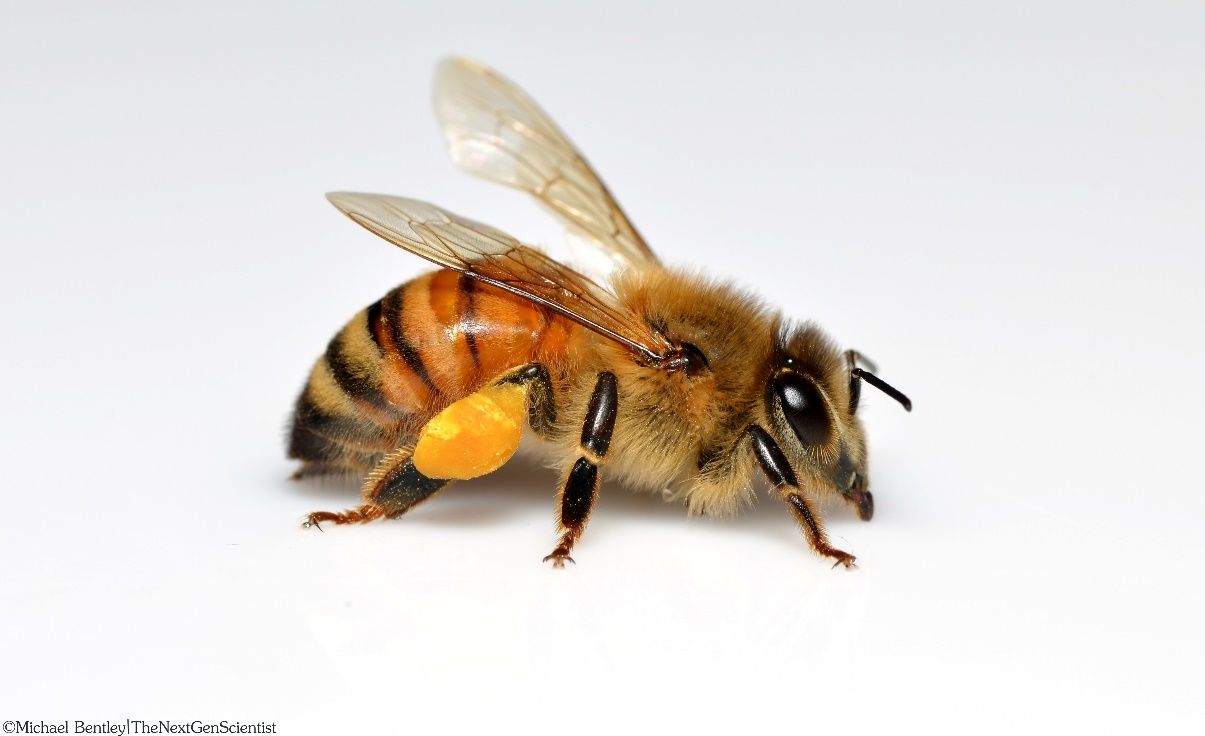
Honey bees have three different major roles within the colony. Most of the hive is made up of worker bees (Figure 101), which are female. These females are non-reproductive, and their bodies are specialized for pollen and nectar collection.
Credit: Dr. Michael Bentley, used by permission
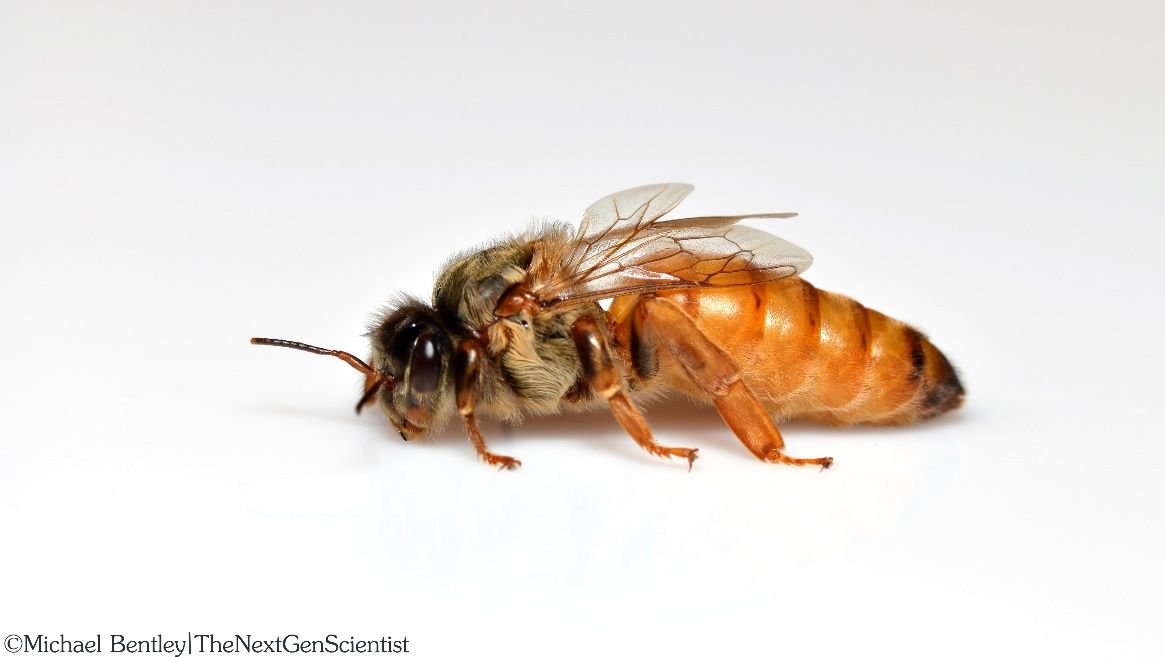
The queen is the only reproductive female in the colony (Figure 102). Her body is specialized to house her reproductive organs, as she is literally the mother of thousands over her lifetime. She is longer than the worker bees, specifically having an elongated abdomen.
Credit: Dr. Michael Bentley, used by permission
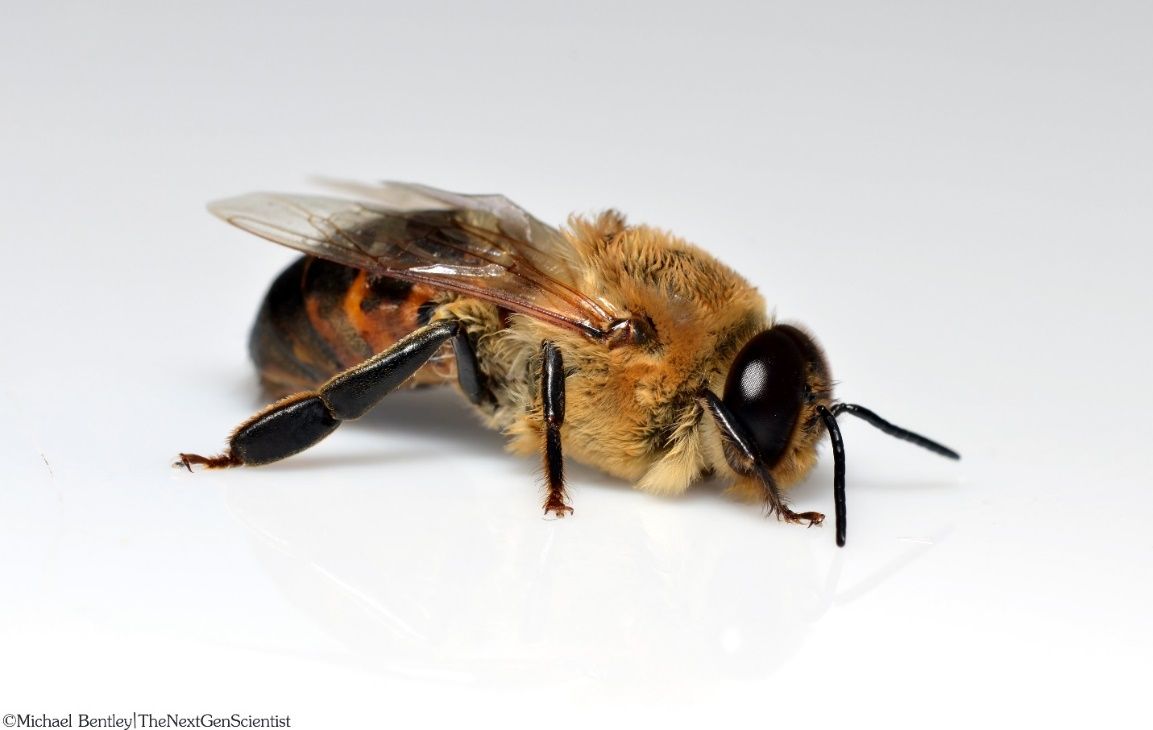
Drones have the third major role in a honey bee colony, and they are the males (Figure 103). The head and thorax are larger than those of the female. His eyes are larger, specialized for flight, and wrap around the top of his head. The drone’s job is not to contribute to the colony he came from, but to eventually leave on a mating flight and mate with queens from other colonies.
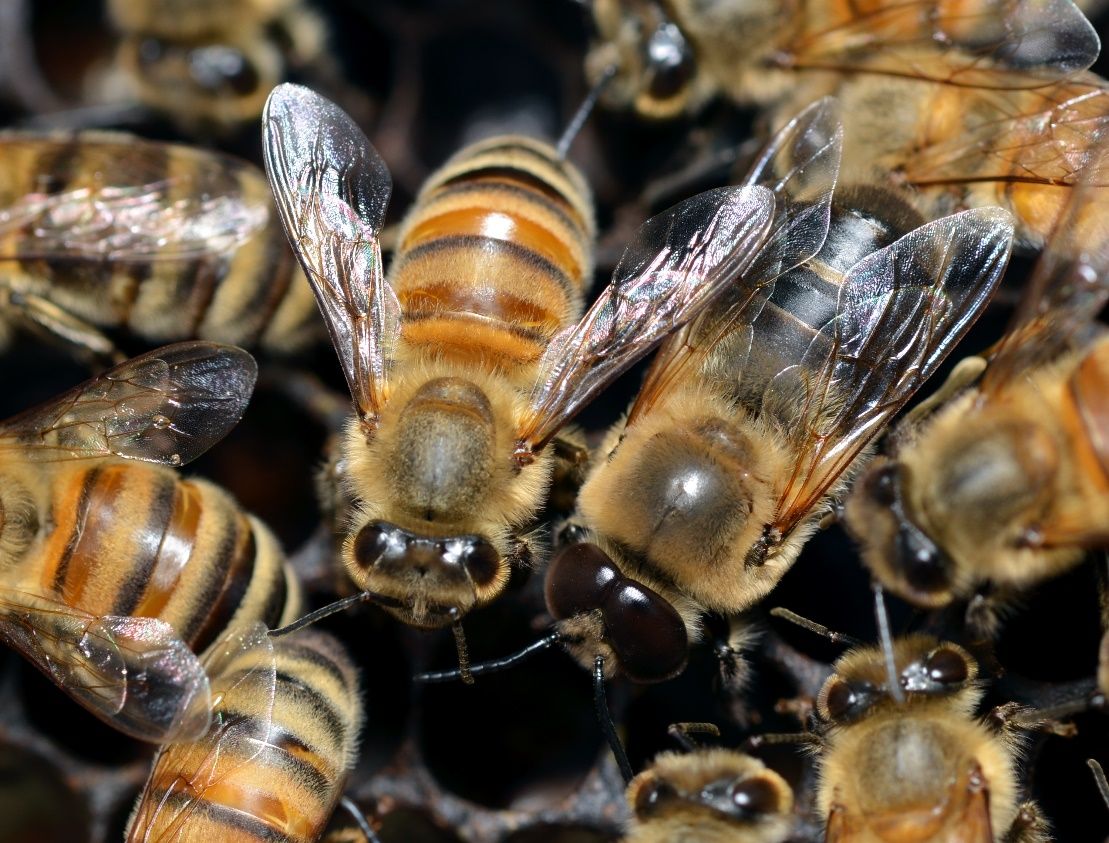
Now that we know a little bit more about the three types of bees in a colony, can you find the drones, workers, and queen in the following pictures?
Can you tell which is the worker bee and which is the drone in Figure 104? Circle the drone.
Credit: Dr. Michael Bentley, used by permission
Circle the queen bee in Figure 105.
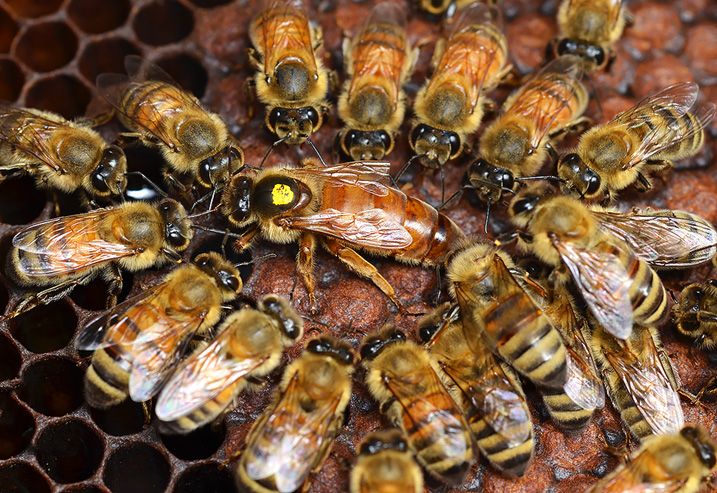
Credit: Dr. Michael Bentley, used by permission
Circle the queen bee in Figure 106.

Credit: Kassidy Robinson, formerly of UF/IFAS Honey Bee Research and Extension Laboratory
Circle the queen bee in Figure 107.
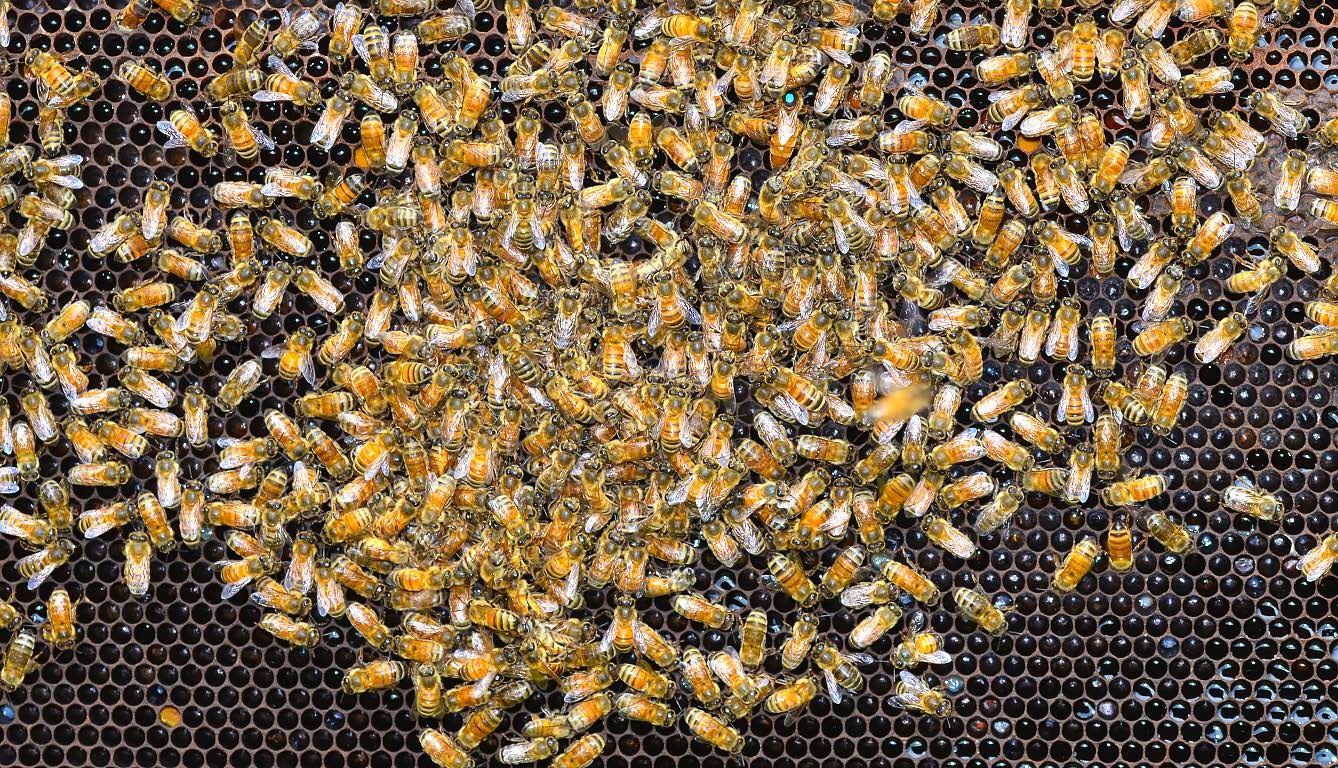
Credit: Dr. Michael Bentley, used by permission
Activity #2 Hive Inspection
When it is time for beekeepers to inspect their hive, they will keep records such as seen in the Table 7 chart. Depending on the beekeeper and the size of their operation, this can be a piece of paper, notebook, binder, or even an app on their phone. Since you know what to look for when you are completing a hive inspection, now it is your turn to complete one! Before we begin, review the hive inspection sheet guide. This will help you understand some of the terminology from the hive inspection sheet.
Hive Inspection Sheet Guide
Worker population: You can determine the worker population based on the percentage of worker bees on a brood frame.
Low: About 20 percent of brood frames covered with workers.

Moderate: About 40 percent of brood frames covered with workers.

High: About 80 percent of brood frames covered with workers.

Egg laying pattern: Laying pattern is an indicator of queen health and productivity.
Good: Solid and uniform. Brood frames are not always going to be perfectly filled. A small number of unfilled cells, as pictured below, would still be “good.”
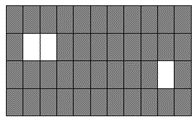
Okay: Irregular and random. More cells will be filled than not. The pattern is not solid like a “good” brood frame.
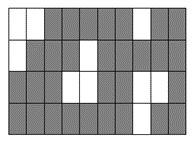
Bad: Spotty. Brood frames are mostly unfilled. Filled cells may be grouped together randomly or completely spaced out.
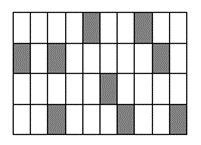
Small hive beetles present: We will learn more about small hive beetles in the next lesson.
Notes: Use this section to record all other observations during your inspection. This may include, but is not limited to, weather conditions, Varroa symptoms, equipment conditions, honey frames harvested, nuc installation, and so forth.
Table 7. Hive Inspection Sheet. For each condition in the left column, circle one of the three qualities or circle yes or no to record the status of the hive.
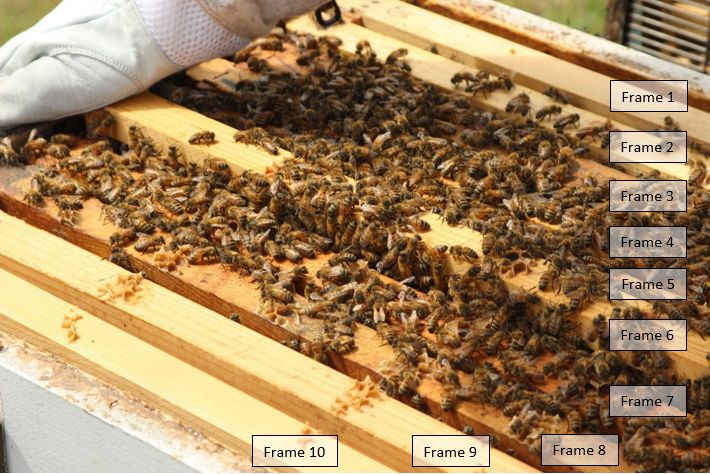
Opening the hive: When we open the hive, we can see right away some signs of overall hive health.
Based on Figure 108, is the worker population
Low, Moderate, or High? Circle your answer.
Credit: Kassidy Robinson, formerly of UF/IFAS Honey Bee Research and Extension Laboratory
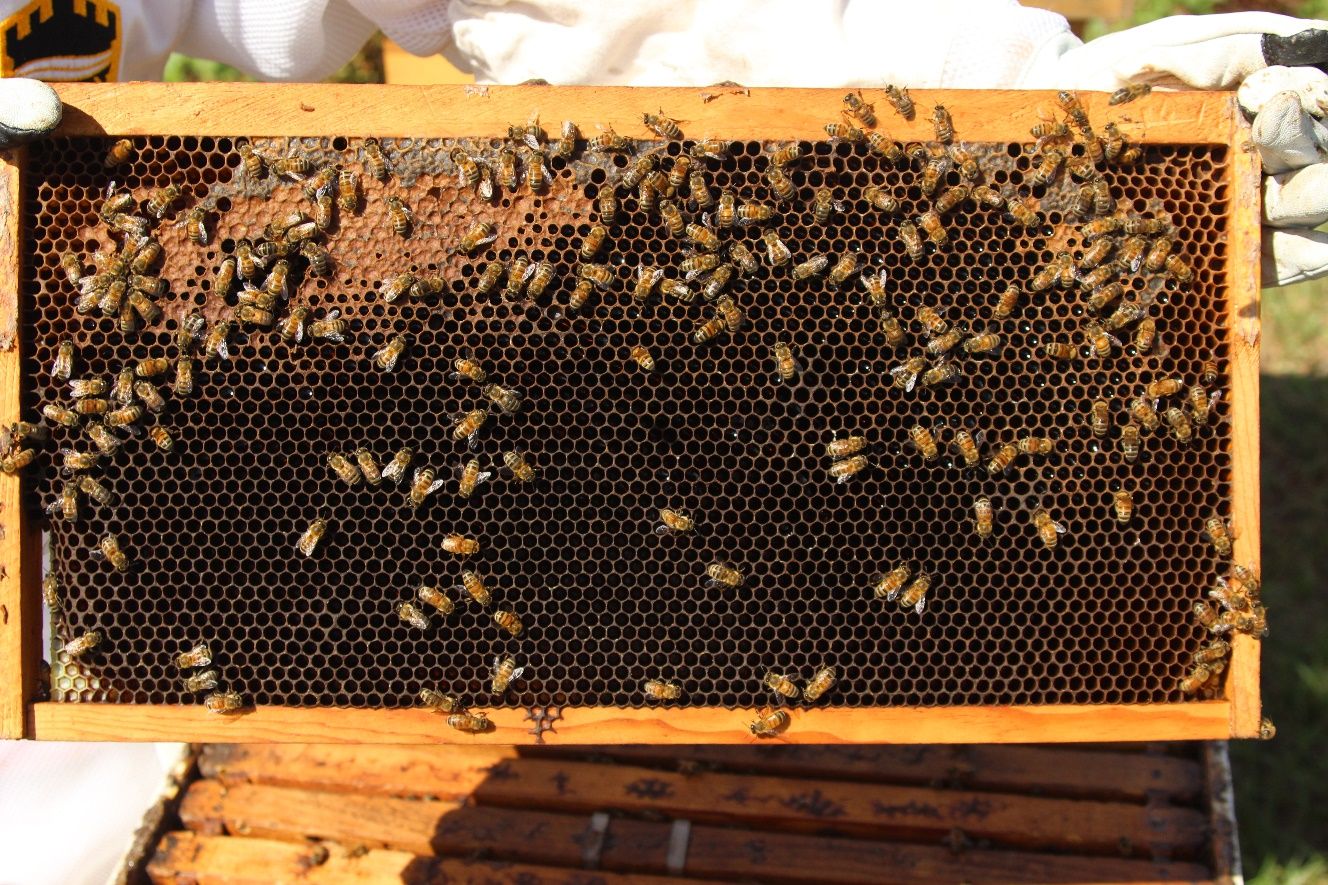
Frame #1 (Figure 109)
Frames towards the outside of the hive box will be used last by the colony, so they will have less activity.
What kind of cells do you see in this picture?
Capped Honey, Uncapped Honey, Bee Bread, and/or Brood
Circle each type of cell that you see in the picture and label it.
Credit: Kassidy Robinson, formerly of UF/IFAS Honey Bee Research and Extension Laboratory
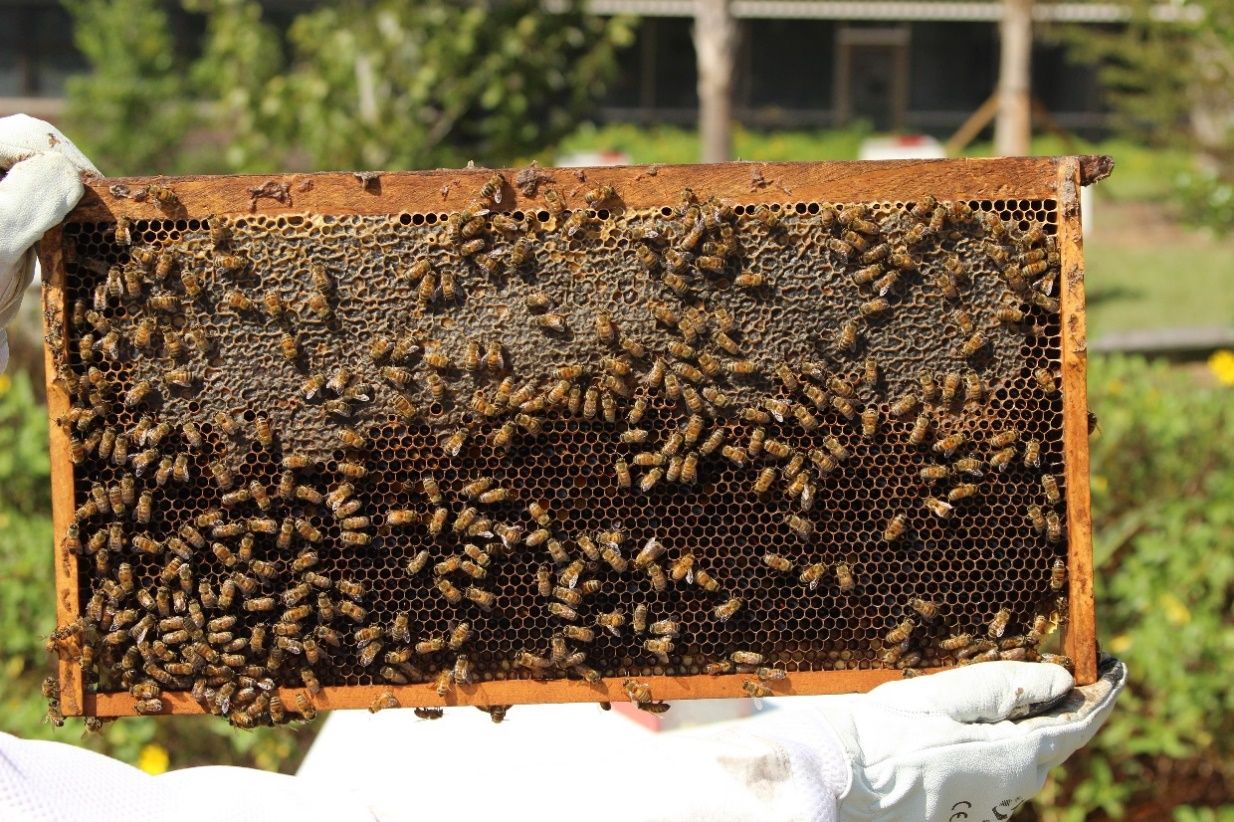
Frame #2 (Figure 110)
In this photo, we are starting to see more activity and more filled cells.
What kind of cells do you see in this picture?
Capped Honey, Uncapped Honey, Bee Bread, and/or Brood
Circle each type of cell that you see in the picture and label it.
Credit: Kassidy Robinson, formerly of UF/IFAS Honey Bee Research and Extension Laboratory
Frame #3 (Figure 111)
In our third frame, we can see some new type of cells.
What kind of cells do you see in this picture?
Capped Honey, Uncapped Honey, Bee Bread, and/or Brood
Circle each type of cell that you see in the picture and label it.
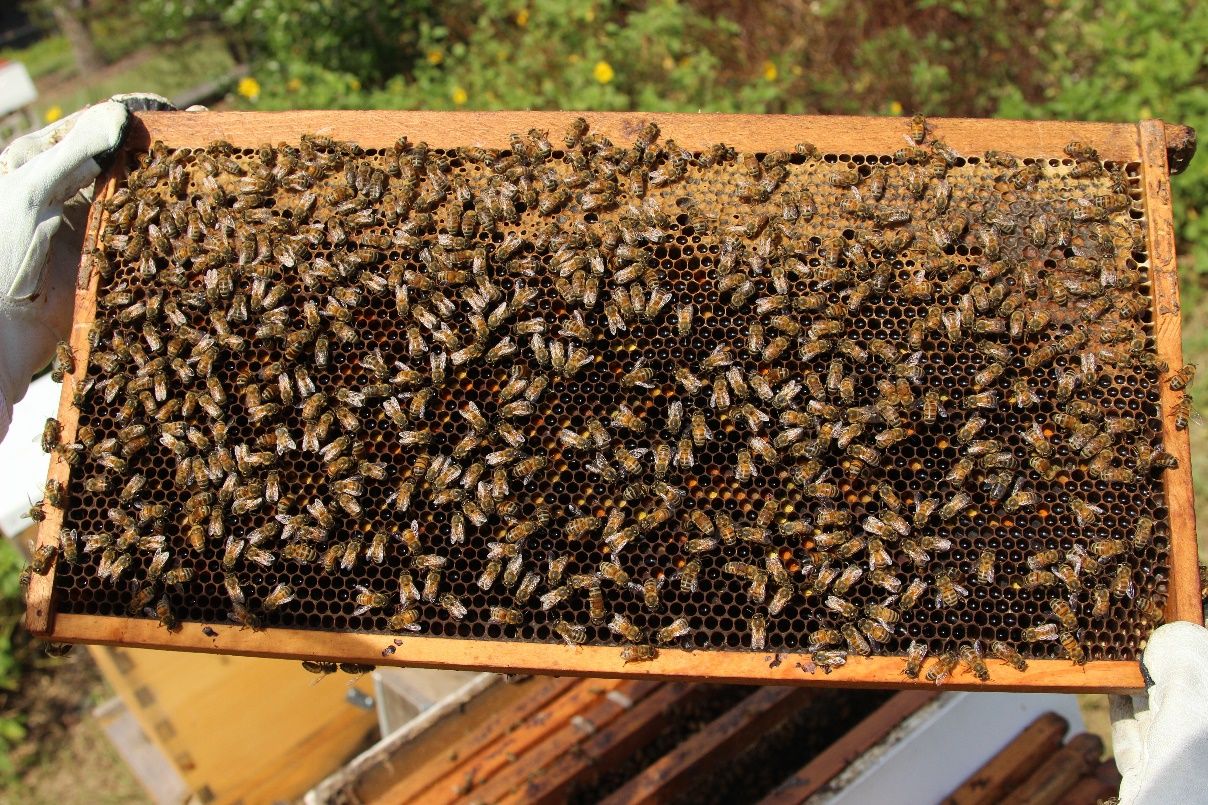
Credit: Kassidy Robinson, formerly of UF/IFAS Honey Bee Research and Extension Laboratory
Frame #4 (Figure 112)
We are starting to get closer to the middle of the hive. Remember, a typical Langstroth hive contains eight to ten frames total.
What kind of cells do you see in this picture?
Capped Honey, Uncapped Honey, Bee Bread, and/or Brood
Circle each type of cell that you see in the picture and label it.

Credit: Kassidy Robinson, formerly of UF/IFAS Honey Bee Research and Extension Laboratory
Frame #5 (Figure 113)
We have selected a frame from the middle of our hive. The queen has been very busy here.
What kind of cells do you see in this picture?
Capped Honey, Uncapped Honey, Bee Bread, and/or Brood
Circle each type of cell that you see in the picture and label it.
Can you spot the queen? Circle her when you find her!
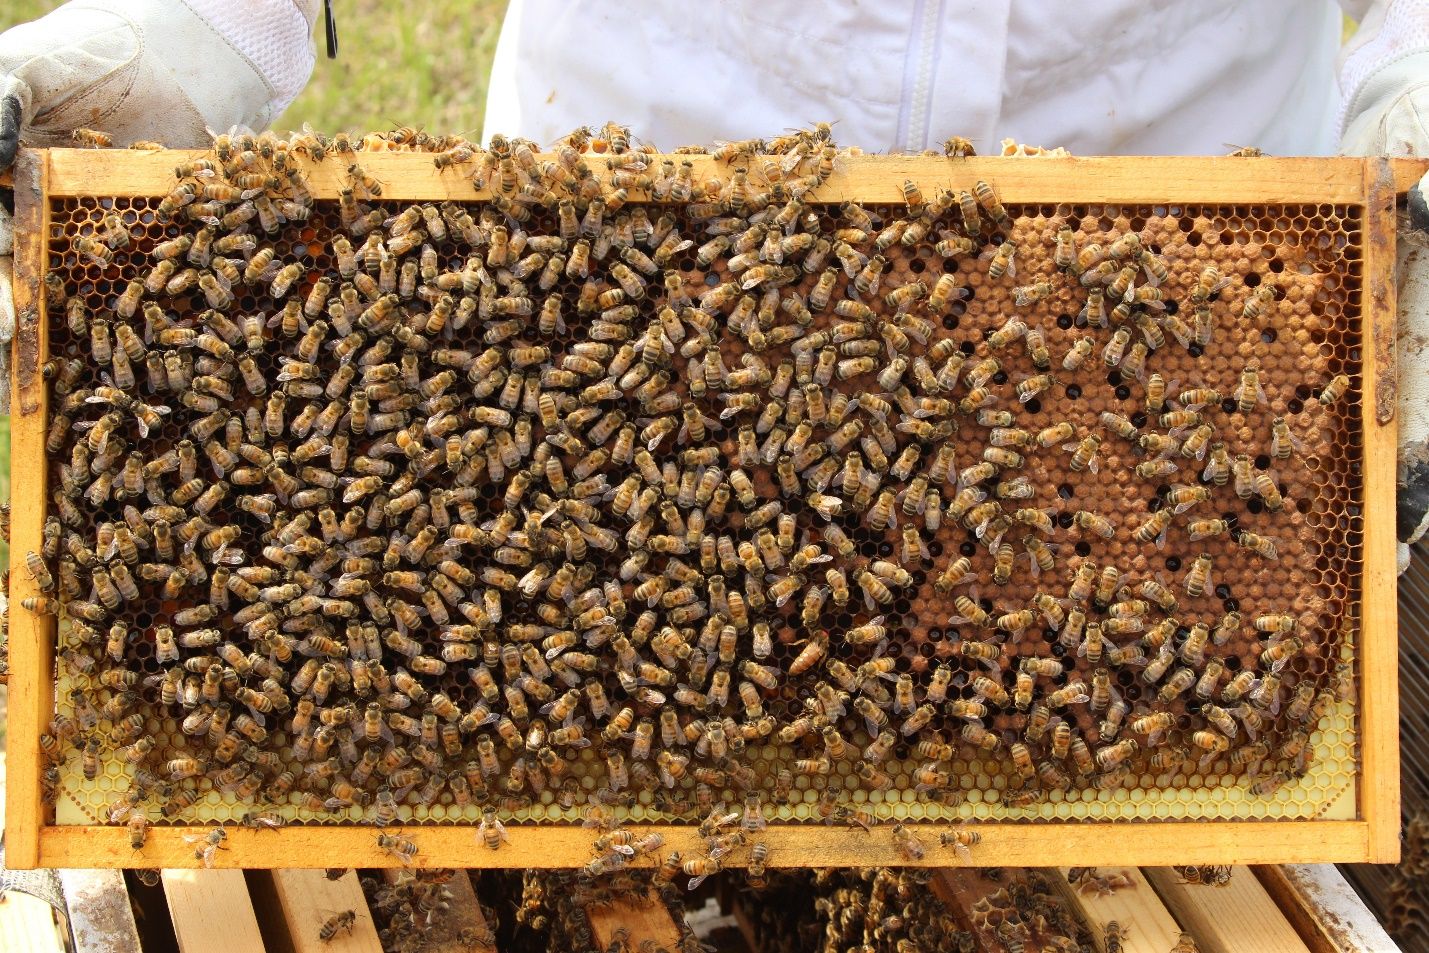
Credit: Kassidy Robinson, formerly of UF/IFAS Honey Bee Research and Extension Laboratory
The last five photographs show only half the frames from this sample hive. The opposite side of each frame would look very similar, with more bee activity in the center and less towards the outside of the hive. Now that we have completed our inspection, fill out the inspection sheet below.
Table 8. Hive Inspections Sheet for Frames. For each condition in the left column, circle one of the three qualities or circle yes or no to record the status of the hive.
Return to the Hive
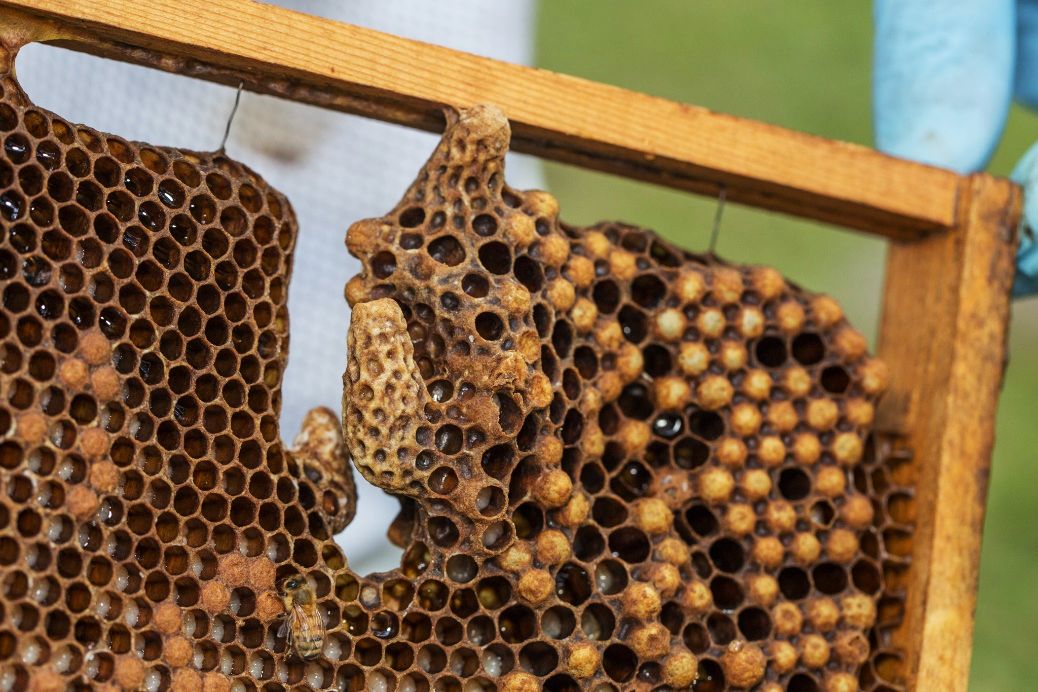
Credit: Geena Hill, formerly of UF/IFAS Honey Bee Research and Extension Laboratory
1. How can you begin to understand the colony’s health before even opening the hive?
2. What is robbing, and what can it indicate?
3. What is one way you can tell that the queen may be lost or gone (Figure 114)?
Taste the Honey
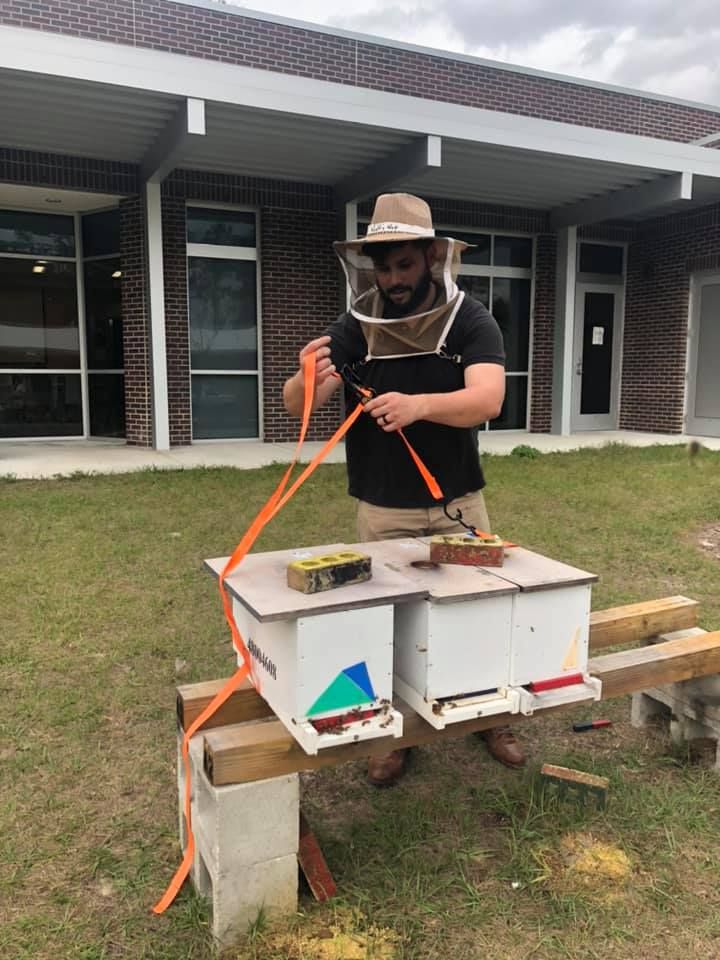
Credit: UF/IFAS Honey Bee Research and Extension Laboratory
1. Beekeepers spend a lot of time inspecting their hives looking for signs of a healthy or unhealthy colony. What are some signs in humans that would show someone is unhealthy or sick?
2. While inspecting their hives, beekeepers hope to see an adequate amount of honey (carbohydrates) and pollen (protein) supplies. What foods do you eat that contain carbohydrates? What foods contain protein?
3. Would climate influence hive health and productivity (see Figure 115)? Why or why not? How can climate influence human health and productivity?
Pollen Patties
Credit: Dr. Michael Bentley, used by permission
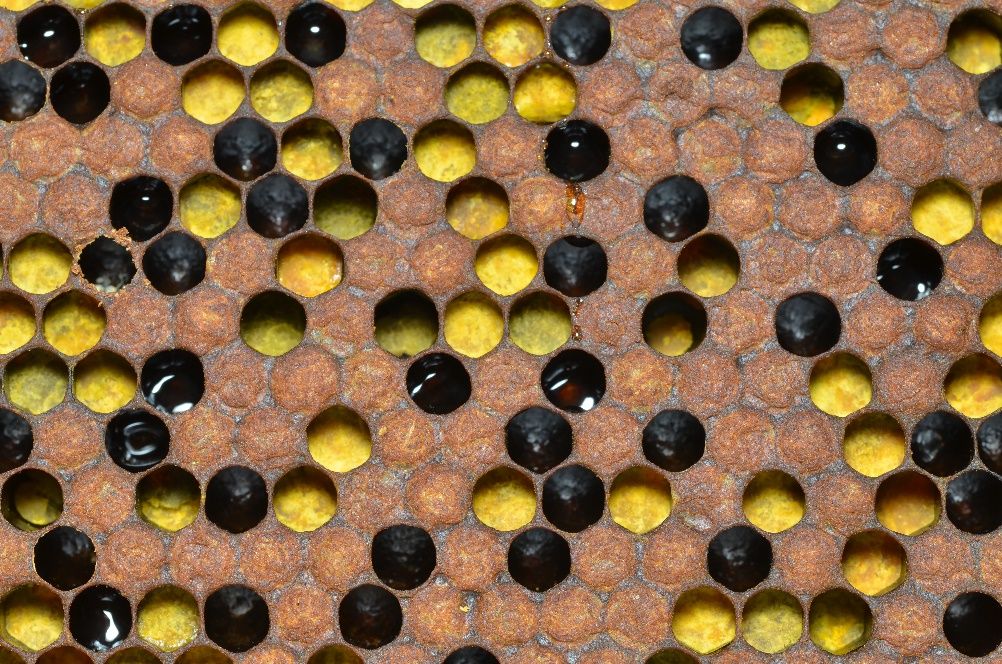
When we are looking at frames, we can tell what a cell is being used for just by looking at it! Much like when you enter someone’s house, if you see a room that has a fridge and oven, you know that you are in a kitchen. In a honey bee hive, you may see capped honey, uncapped honey, bee bread, capped worker brood (Figure 116), uncapped worker brood, capped drone brood, and queen cells. Each one looks different from the other and serves a different purpose. With a responsible adult, search the internet for photos of these different types of cells. What is their purpose? What do they look like?
Chapter 2.6 Pests and Diseases
What’s the Buzz?
Credit: UF/IFAS Honey Bee Research and Extension Laboratory
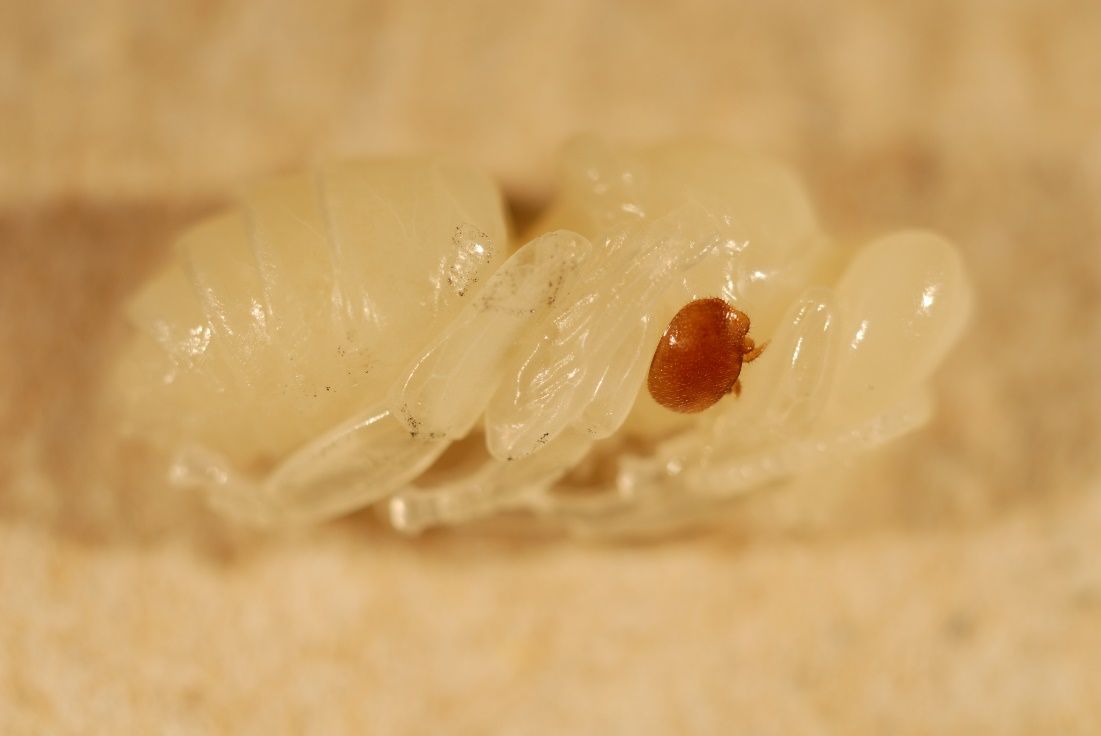
Now we will go into detail about pests and diseases that can be spotted during a hive inspection. Some pests can be seen with the naked eye such as mites (Figure 117), beetles, and ants. Sometimes the hive can give off a foul odor with certain types of diseases. It is important for beekeepers to know what to look for to keep your honey bees as healthy and productive as possible. Something overlooked by mistake could destroy an entire colony. It is rare to find a perfectly healthy population, so learning this information will help you identify, protect, manage, and treat your colonies.
Bacteria
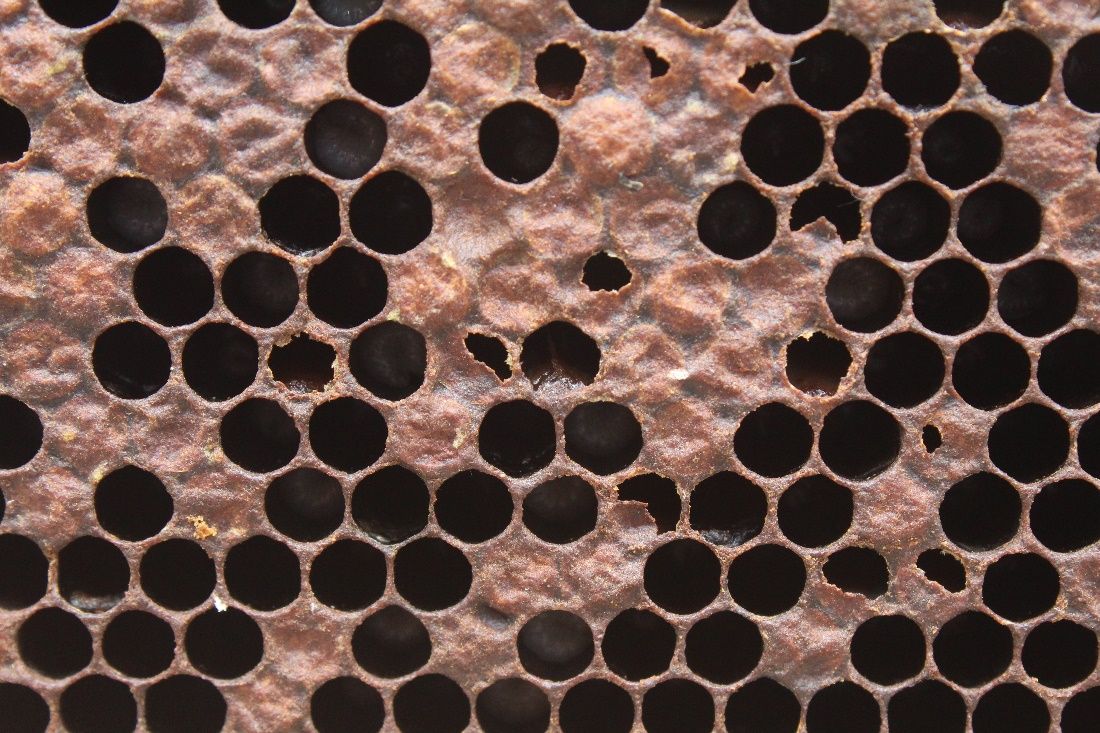
American Foulbrood (AFB) is a significant threat to your colonies. AFB is a bacterial disease that can infect bee larvae if they ingest the bacterial spore. It kills infected brood during their capped stage of development. Infected colonies will give off a foul odor, hence the name. If you pull a frame and notice that there are some brood caps that are sunken in with a small puncture hole in the cap, you may very well have AFB. Workers can sense diseased larvae and puncture the cells to abort the infected brood as an attempt to keep it from spreading (Figure 118).
Credit: Brandi Simmons, UF/IFAS Honey Bee Research and Extension Laboratory
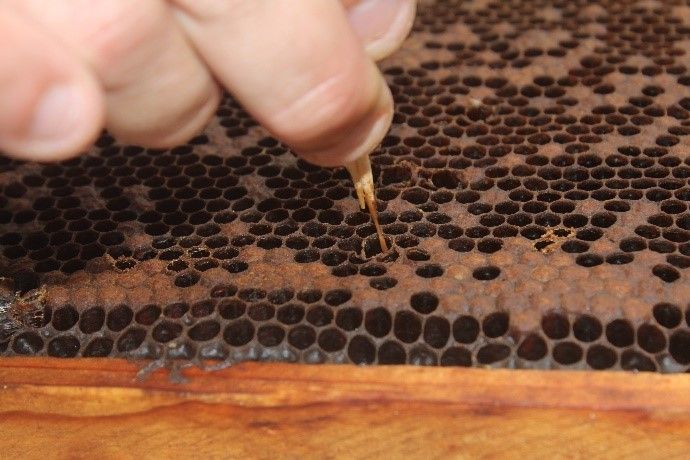
The “rope test” is another evaluation for AFB (Figure 119). Take a toothpick or similar item and stir the contents of a cell which you believe may be infected. If the contents stick to the toothpick creating a “rope” when you pull it out, the dead bee larva had an AFB infection.
Credit: UF/IFAS Honey Bee Research and Extension Laboratory
The AFB bacteria is extremely hard to eliminate, and a true diagnosis will need to be made by your apiary inspector. If you do in fact have American Foulbrood, you will not be able to cure the infection. Unfortunately, the only sure method of containing spread of AFB is to burn the hive and its contents. Burning the hive effectively stops the further spread of spores. Prevention of an outbreak is possible if you treat colonies with an antibiotic.
European Foulbrood (EFB) poses a moderate threat to colonies. It is like American Foulbrood in that it kills young brood after they have ingested the bacteria. These infected hives also give off a foul odor. Fortunately, the bacteria associated with EFB is non-spore forming, and colonies can recover from the infection. It can be controlled with an antibiotic or by requeening the colony. If you are unsure whether it is EFB or AFB, be sure to contact your local apiary inspector to address your concern.
Fungi
Nosema ceranae is caused by a group of single-celled fungi called microsporidia. These microbes infect the cells that line the honey bee’s midgut, causing dysentery and shorter life spans (Figure 120). Nosema can reduce the colony population quickly, especially in the winter. A sign of infection for Nosema is bee excrement on the entrance of the hive. This occurs because the infected bees have diarrhea, and they are unable to fly far enough away from the hive to defecate. Unfortunately, there are currently no treatments for Nosema. However, keeping your hives ventilated with screened bottom boards and placed in a dry location can help prevent Nosema.
Credit: UF/IFAS Honey Bee Research and Extension Laboratory
“Chalkbrood” is another disease of immature bees. The infected larvae die and become covered in a cotton-like mycelium that dries, creating a hard corpse like a mummy. Dehydrated “mummies” sitting at the entrance of a hive is a tell-tale sign of this disease (Figure 121). Shaking a frame and listening for the rattle of those mummies still in the capped cells provide a second method to diagnose chalkbrood. Chalkbrood can be controlled by using a resistant stock of honey bees and keeping ventilated hives out of cool, damp areas.
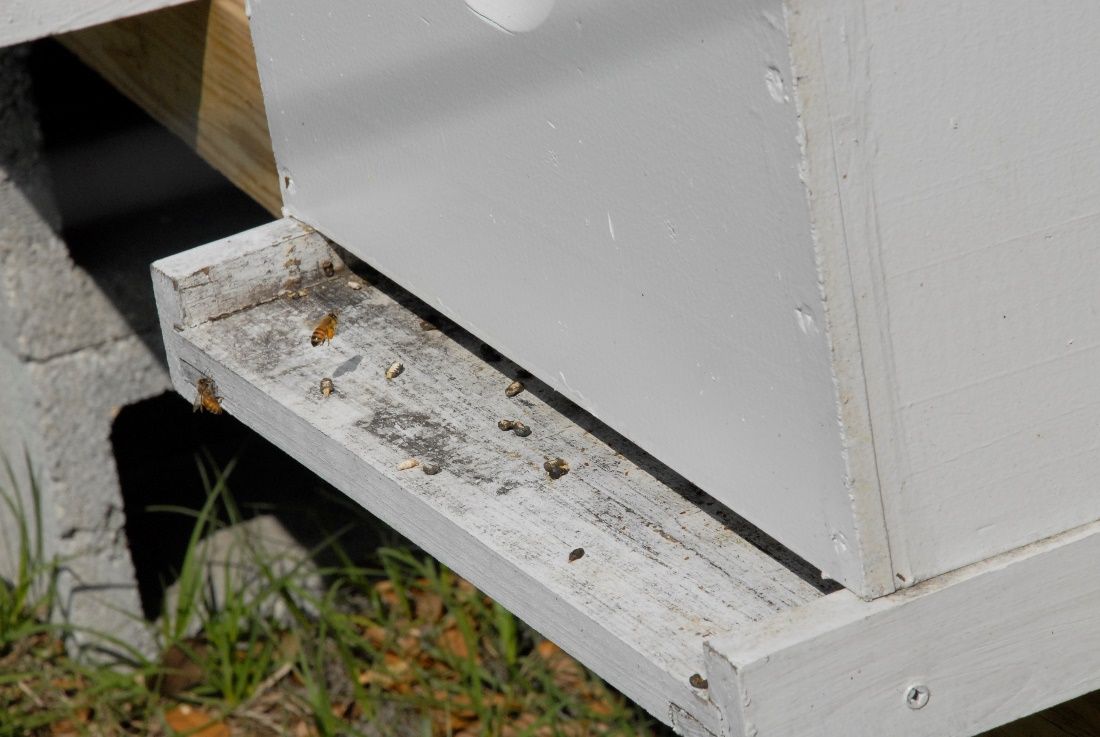
Credit: UF/IFAS Honey Bee Research and Extension Laboratory
Varroa destructor
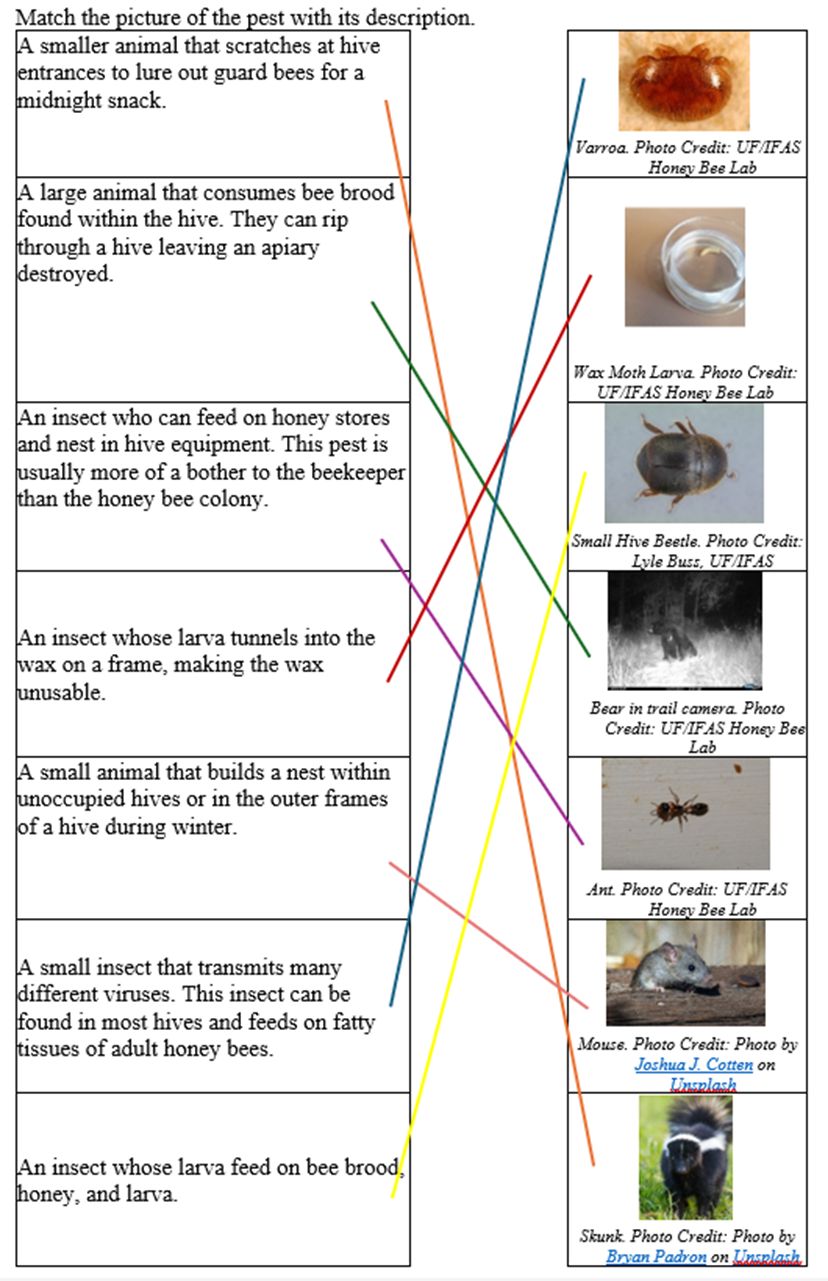
Tiny mites, Varroa, are considered the most significant threat to honey bee colonies. Varroa are ectoparasites (parasites on the outside of the body) that feed on adult honey bees’ fatty tissues. This process can cause shorter lifespans and transmit unwanted diseases. They are very widespread and reproduce inside the hive. You can see these reddish-brown mites without a magnifier (Figure 122), sometimes even loose in the colony.
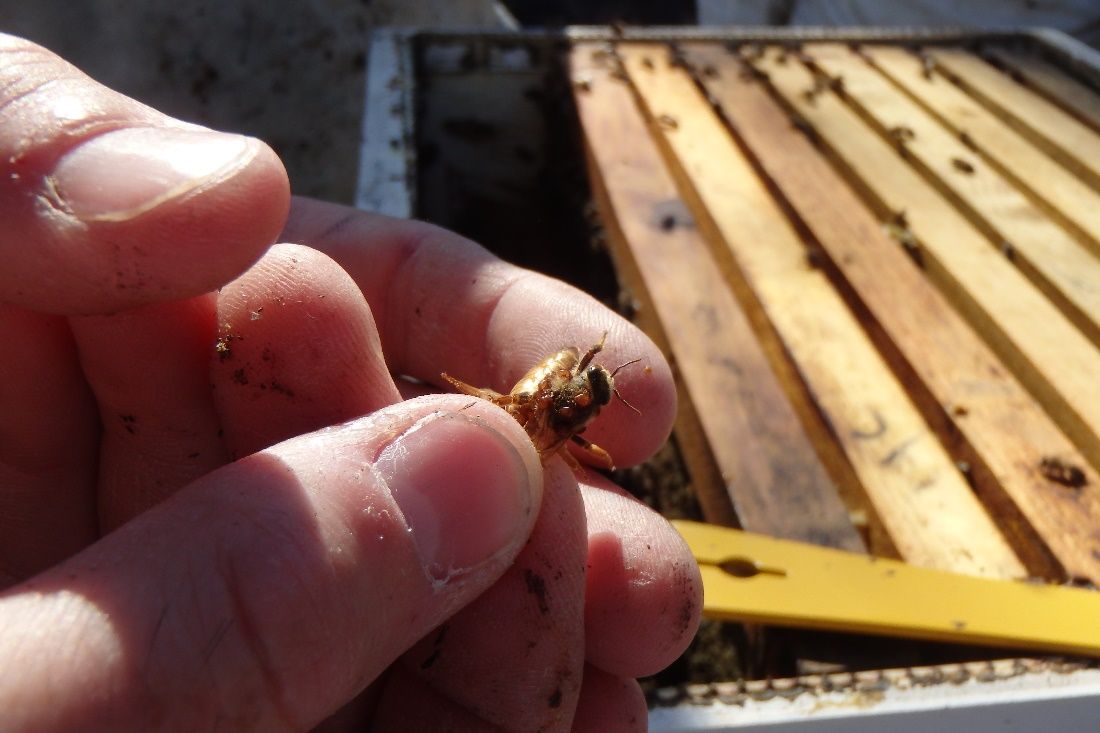
Credit: UF/IFAS Honey Bee Research and Extension Laboratory
One way to monitor the number of Varroa in your hive is to perform a sugar shake. (In the upcoming section, Foraging for Nectar, you will have a chance to perform a mock sugar shake for Activity #2 Candy Sugar Shake.) The process involves gathering approximately 1/2 cup of (about 300) honey bees and placing them into a pint-sized jar with a screen, mesh lid. Adding a spoonful of powdered sugar, the beekeeper will then roll the bees in the sugar until they are coated. (The sugar is harmless, and the bees will easily clean themselves off.) The next step is to shake out the sugar over a white surface through the mesh screen (Figure 123). The bees will stay inside the jar, but the sugar causes the Varroa to lose their grip on the bees’ bodies and fall off. After counting the number of mites that fall out, you can estimate the number of Varroa in your hive. Treatment is recommended if the results show three (or more) mites per 100 bees. After completing, the bees may be returned to the hive.
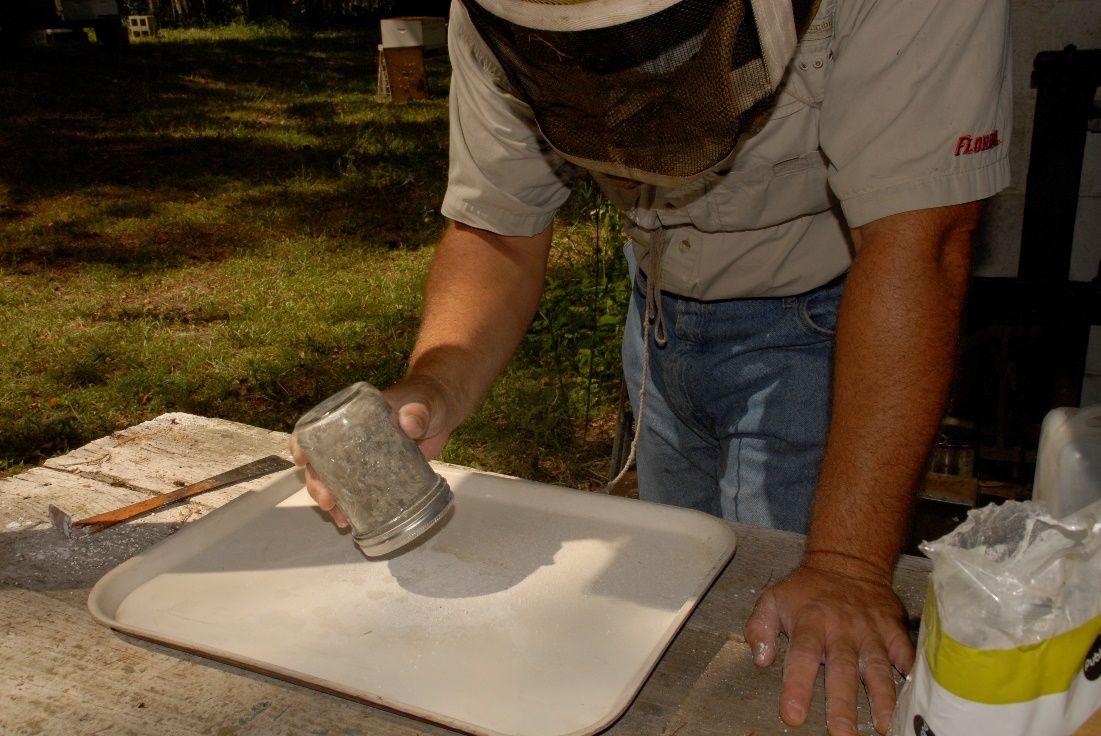
Credit: UF/IFAS Honey Bee Research and Extension Laboratory
There are options to control Varroa, such as screened bottom boards and the use of drone comb, but some beekeepers prefer to treat chemically. Varroa is an inevitable issue, so understanding the signs and appearances of this pest will be helpful in lessening the damage they can cause.
Viruses
Deformed wing virus (DWV) is a serious threat to honey bees and is transmitted by the Varroa destructor. Pupae infected with this virus while still in the developmental stages will become adult bees with malformed wings, unable to fly (Figure 124). DWV also reduces the lifespan and body size of the bee. There is no control for DWV. The only way to attempt to prevent it is to treat for Varroa.
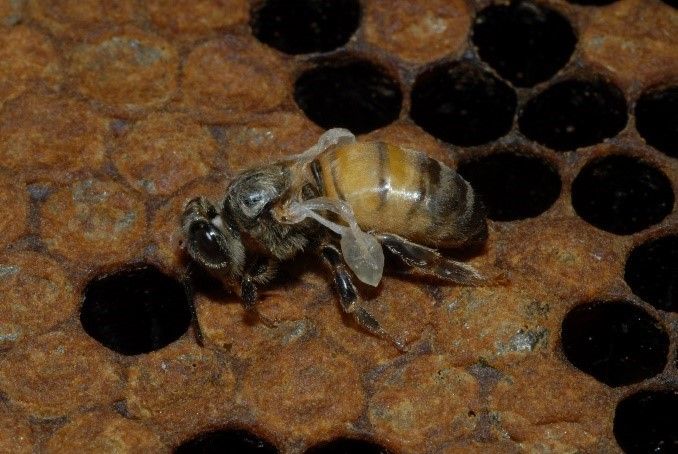
Credit: UF/IFAS Honey Bee Research and Extension Laboratory
Another virus transmitted by Varroa is Acute Bee Paralysis Virus (ABPV). It poses a moderate threat to a bee colony. Honey bees infected with this virus remain flightless, tremble, and appear shiny due to their lack of hair. Again, there is no control for this virus once it has occurred, but treating the colony for Varroa may be a preventative.
Insects
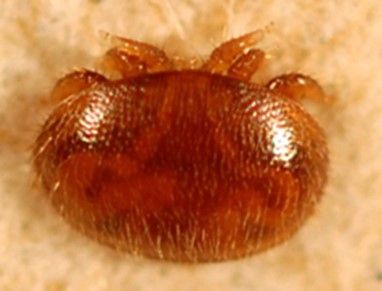
Wax moths can be a moderate threat to a honey bee colony. When they infest a hive, their larvae will tunnel through the wax combs forming a net of webs where it is no longer usable to the honey bees. The moths do not typically affect stronger colonies but can damage weaker colonies. Wax moths can infest equipment and wax frames that are sitting out in the open (Figure 125). To prevent this, some beekeepers will store spare equipment in a freezer.

Credit: UF/IFAS Honey Bee Research and Extension Laboratory
Small hive beetles are another moderate insect threat (significant in some areas) as seen in Figure 126. The danger to the honey bee colony comes when the beetle larvae feed on the bee brood, honey, and pollen. So, not only are they destroying the young, but they are also stealing resources. Traps and chemical treatments in the hive can control the beetle populations. Bees do take measures on their own to get rid of beetles, such as biting them and herding them out of the hive.
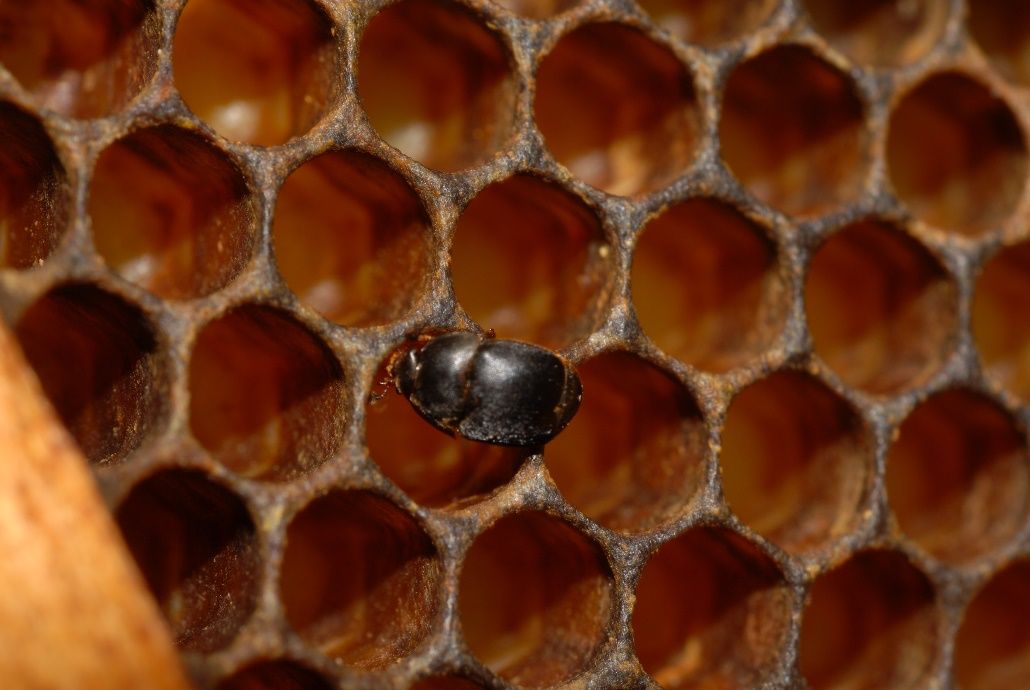
Credit: UF/IFAS Honey Bee Research and Extension Laboratory
Ants are other insects that can cause problems for a colony (Figure 127). They can make nests around apiaries, becoming a hazard to unaware beekeepers. On occasion, ants can live in equipment and feed on the honey within a hive or on the supplemental sugar that a beekeeper uses to feed the bees. To reduce the risk of ants finding a hive, beekeepers keep their hives off the ground, placing the hive on a stand. Ant prevention strategies include keeping the vegetation around your hive trimmed down and free of tall grass and weeds.
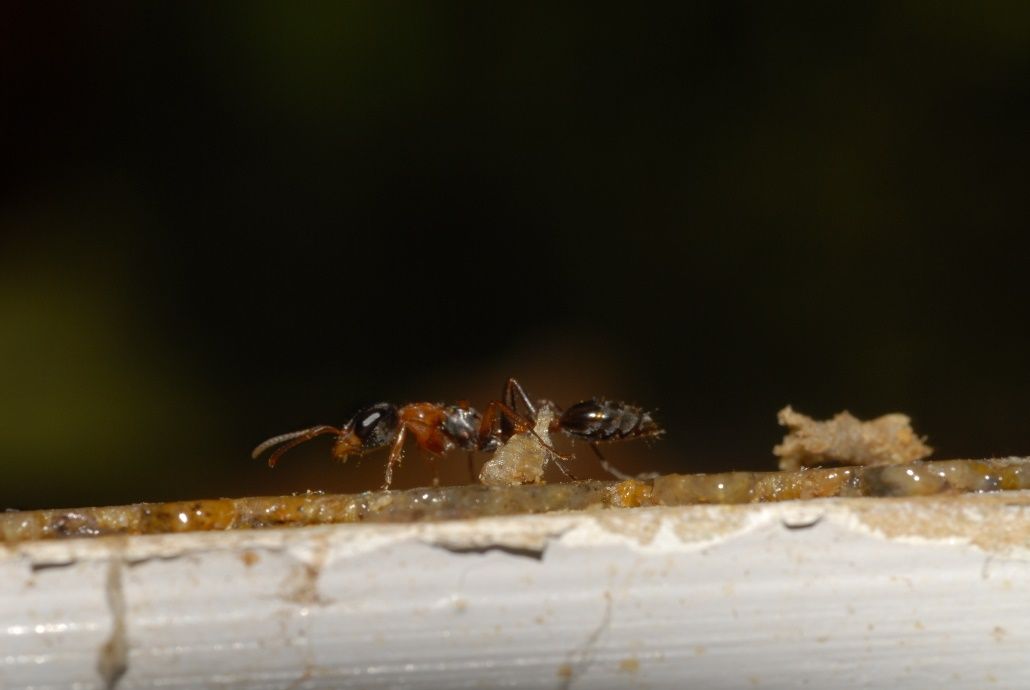
Credit: UF/IFAS Honey Bee Research and Extension Laboratory
Other Pests
Since we often think of insects when we think of pests, it is easy to forget that mammals can be pests, too. Bears, when present, do pose a moderate threat to honey bee colonies (Figure 128). It is a common misconception that bears invade hives in search of honey. Bears actually go for the meatier part of the colony: the brood. Bears search for high-protein food sources in preparation for their winter hibernation. They can rip an apiary apart and even take hives with them as a snack for later. If you live in an ecosystem that includes bears, it would be wise to surround your apiary with an electric fence.
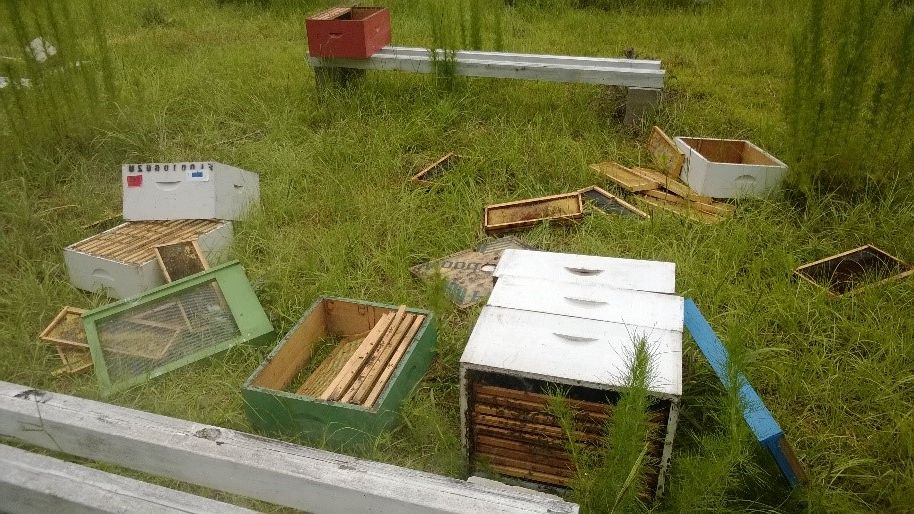
Credit: UF/IFAS Honey Bee Research and Extension Laboratory
Skunks can also become problematic for beekeepers (Figure 129), as they have been known to visit apiaries at night. They target weak hives, scratching at the hive entrance. A few guard bees then rush out of the hive in defense of the colony, only to be eaten by the awaiting skunk looking for a midnight snack. Skunks often come back to apiaries once they discover a hive as an ample food source. When skunks become a problem, beekeepers may place barriers across the hive entrances, preventing the skunks from entering. As with ants, keeping your hives on stands can also reduce the risk of a small animal bothering your hive.
Credit: Bryan Padron on Unsplash
Mice are another minor pest to beekeepers. Mice can nest in unoccupied hive equipment, destroying the wax comb and leaving debris. In colder climates, mice can also form nests in the occupied hives during the winter months. When temperatures drop to 18°C (64°F) or below, honey bees will cluster within the nest. Since the bees move towards the center of the hive, tightly compacting themselves to keep warm, this leaves the outside frames free for guests, like mice, to build a nest (Figure 130). Beekeepers located in cooler climates can install mouse guards when temperatures begin to drop to prevent these pests from entering.
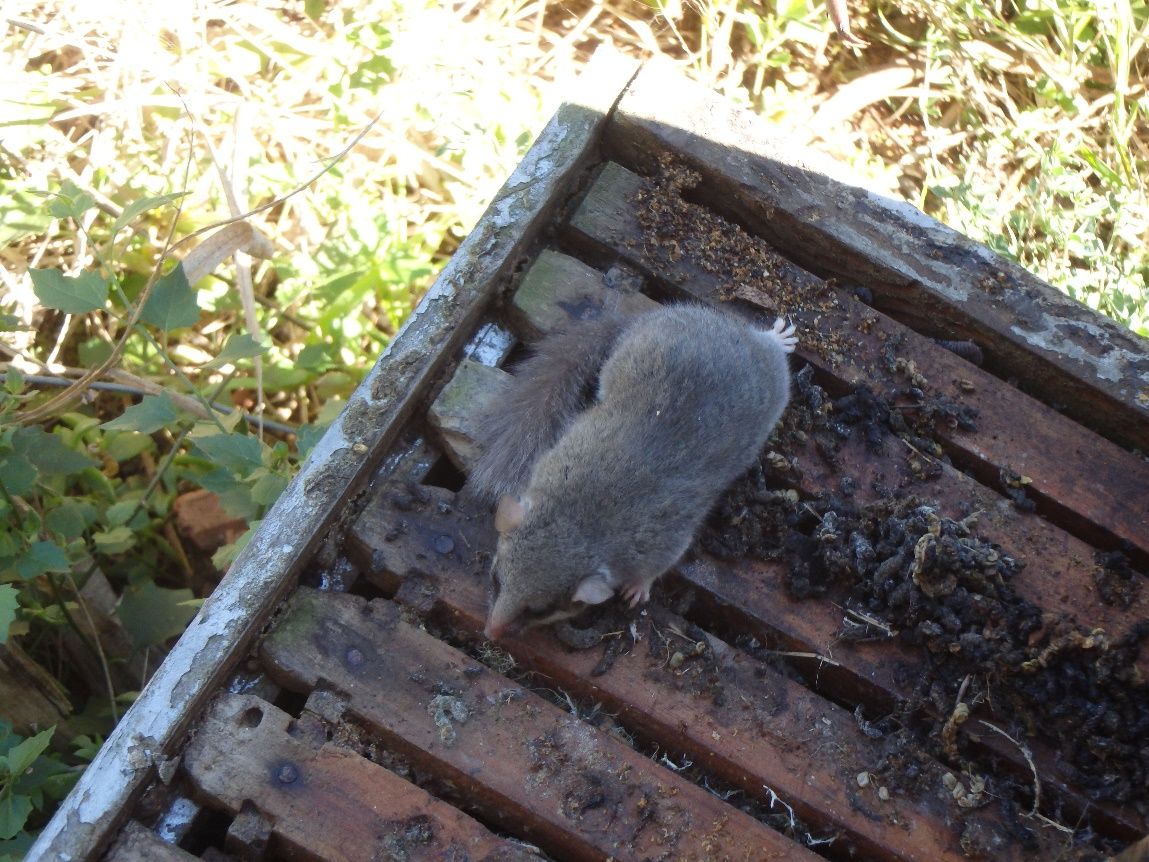
Credit: UF/IFAS Honey Bee Research and Extension Laboratory
The Bees’ Knees
When someone says, “honey bee,” you probably are thinking of Apis mellifera, the most typical honey bee kept within our hives. Did you know there are seven to eleven species of honey bees around the world and even more subspecies? Most of these species live throughout southeast Asia. Apis mellifera, and its subspecies, are spread throughout nearly the entire world wherever humans live (Figure 131), being naturalized in every continent except for Antarctica. We breed these subspecies to select for specific traits such as temperament, climate adaptability, Varroa resistance, honey production, and hygiene.

Credit: UF/IFAS Honey Bee Research and Extension Laboratory
Foraging for Nectar
Activity #1 Connect the Pest
Match the picture of the pest with its description in Table 9.
Table 9. Pest matching.
Write how you can prevent or reduce the risk of each pest.
- Varroa destructor
- Wax Moth
- Small Hive Beetle
- Bears
- Ants
- Mice
- Skunks
Activity #2 Candy Sugar Shake
In “What’s the Buzz?” we discussed the purpose of a sugar shake and how we perform this as beekeepers. Now it is time for you to do a candy version of it!
Before we start our Candy Sugar Shake, we need to know what each candy represents. Honey bees are typically 15 millimeters (about 0.59 inches) in length. For this activity, select an oblong candy (fruit chew or licorice) to represent your bees, about 20 millimeters (about 0.79 inches) in length (such as Mike and Ike or Good and Plenty). The Varroa destructor are much smaller than the honey bees. When we do the sugar shake, we are typically seeing the female Varroa, which are 1.5 to 1.99 millimeters (about 0.08 inches) long. The nonpareil rainbow sprinkles are going to represent Varroa.
Follow along with the instructions as you complete the shake test.
Step 1. Gather your materials. For this activity, you will need
- a mason jar with a lid,
- ½ cup of oblong candies,
- nonpareil sprinkles,
- one colander or strainer (make sure the holes are small enough that the candies won’t fall through but the nonpareil sprinkles will),
- 2 tablespoons of powdered sugar,
- ¼ teaspoon of water,
- one sheet of white paper,
- ½ cup measuring cup,
- 1 tablespoon measuring spoon,
- ¼ teaspoon measuring spoon,
- a pencil,
- and a calculator.
Step 2. Add your bees. Add a ½ cup of the “bee” candies into the mason jar.
Step 3. Add your Varroa. Add a pinch of sprinkles into your jar. If you would like to measure it out, use your ¼ teaspoon and fill it halfway, then add it into the mason jar.
Step 4. Add the powdered sugar. Add 2 tablespoons of powdered sugar into your mason jar (Figure 132). Shake your jar gently for 3 seconds to distribute the powdered sugar.

Credit: Rebecca Knox-Kenney, formerly of UF/IFAS Honey Bee Research and Extension Laboratory
Step 5. Add water. Add ¼ teaspoon of water into your jar. In a real-world sugar shake, we do not add water. The water will allow the powdered sugar to stick to your candy “bees.” Real honey bees have hair covering their body that allows the powdered sugar to stick to them.
Step 6. Shake/Roll. Gently shake/roll your jar for 2 minutes until your “bees” are covered in powdered sugar (Figure 133). Don’t shake too hard or fast—you could injure your bees!
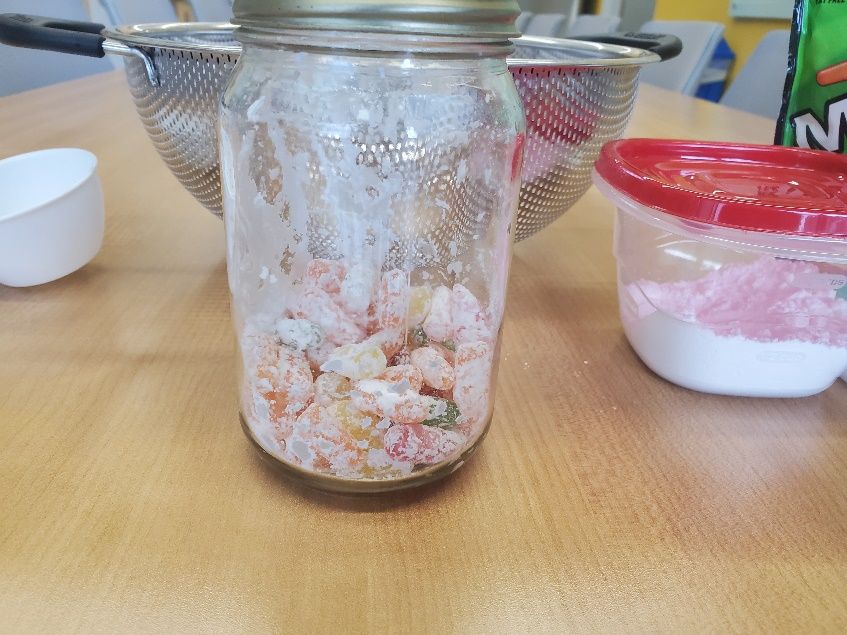
Credit: Rebecca Knox-Kenney, formerly of UF/IFAS Honey Bee Research and Extension Laboratory
Step 7. Allow jar to sit for 2 minutes. This step is not required in our candy sugar shake test. In a real-world sugar shake, this pause gives the bees time to groom themselves, trying to rid their bodies of the powdered sugar. As the bees groom, the Varroa lose their grip and fall off them. Now would be a good time to set up your strainer and paper. Place your strainer on top of your white sheet of paper to prepare for the “bees.”
Step 8. Pour out your bees. If you have not placed your strainer onto your white sheet of paper, do that now. Pour out the contents of your jar into your strainer. Slowly sift your bees, trying to keep all the powdered sugar on your piece of paper. In a real sugar shake, we would gently hold the jar upside down and shake the powdered sugar out that way. The jar’s lid would have holes like your strainer to allow the sugar and Varroa to pass through but not the bees.
Step 9. Count your mites. Use a pencil to group all the Varroa/sprinkles on your paper (Figure 134). Count how many you had. Record in the space provided on Step 11.

Credit: Rebecca Knox-Kenney, formerly of UF/IFAS Honey Bee Research and Extension Laboratory
Step 10. Determine your mite rate. To do this, divide the number of mites you captured by 300. Multiply that number by 100, converting your number to a percent, to get your mite infestation rate. Record your answer in the space provided on Step 11. In a real sugar shake, we cannot count how many bees are in our jar. Beekeepers estimate that there are about 300 bees in a half cup of bees, so we always use 300 when determining our Varroa mite rate.
Step 11. Record. It is always important that beekeepers keep a record of how many mites they found. When Varroa level exceeds nine mites from a jar of around 300 bees (3% or greater), we know it is time to treat for the pest. It is also important to test after treatment, so we know if our treatment worked or not. Grab your calculator and record your results below.
1. How many Varroa, or sprinkles, did you count?
2. Determine your mite rate.
(Fill in the blank.) Number of Varroa/sprinkles counted (blank) divided by 300 equals (blank).
(Fill in the blank.) Multiply that result (blank) by 100 equals (blank) percent (%).
3. Based on your Varroa mite infestation rate (greater than 3%?), should you apply a mite treatment? Y / N
Step 12. Return your bees. Beekeepers will return their bees to the hive by dumping them out on top of the frames. We do not need to return our candy bees. Instead, we can eat them!
Return to the Hive
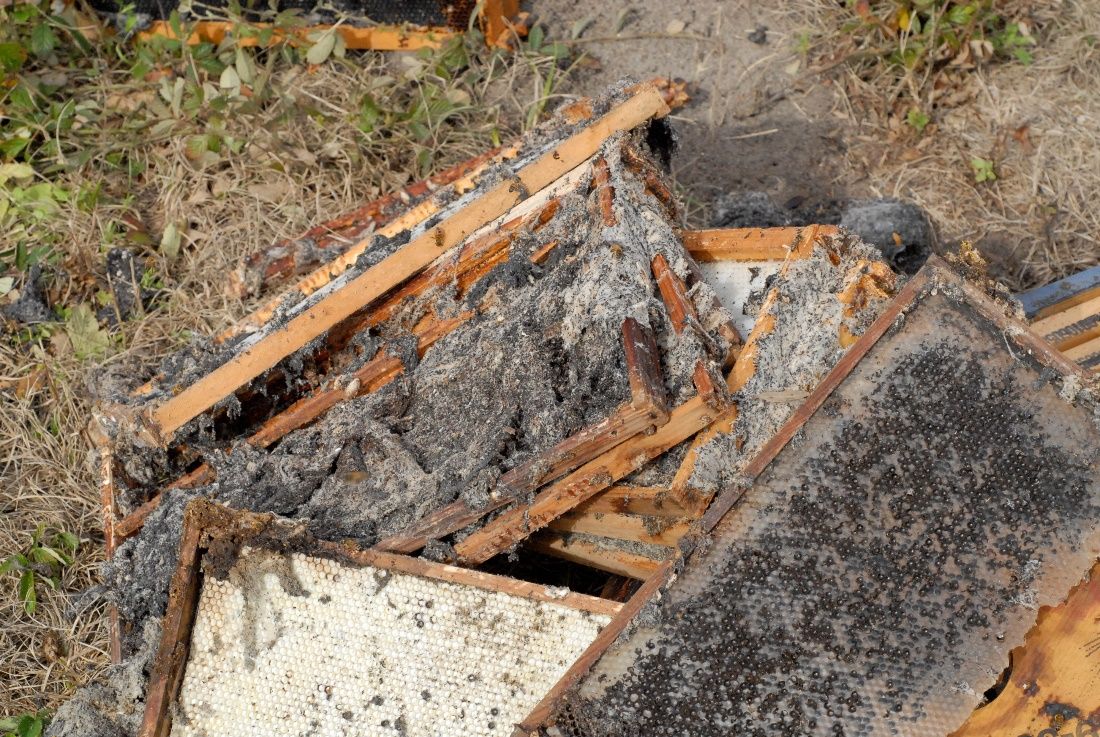
Credit: M. K. O’Malley, formerly of UF/IFAS Honey Bee Research and Extension Laboratory
1. Explain the difference between American and European Foulbrood and how to treat both.
2. What telltale sign of Nosema is visible from outside the hive?
3. Varroa feed on what part of the bee’s body?
4. How can you prevent bears from invading your colonies?
Taste the Honey
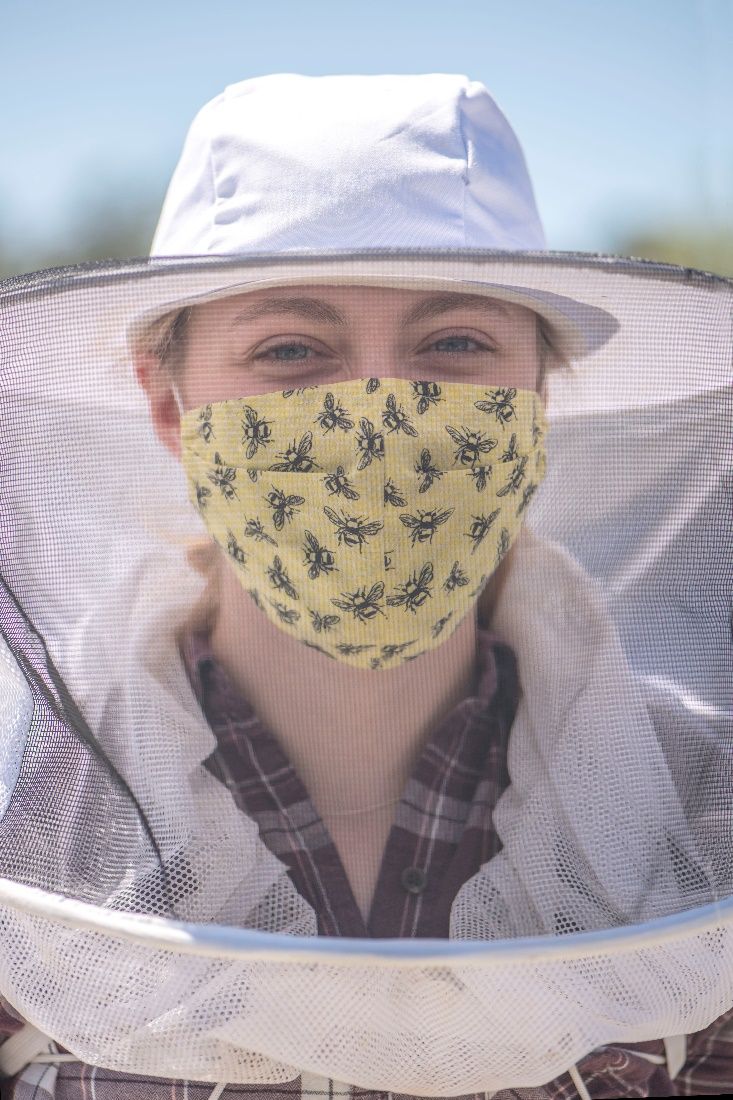
Credit: Bori Bennett, formerly of UF/IFAS Honey Bee Research and Extension Laboratory
1. What is the difference between preventing disease and illness and treating the symptoms?
2. What are some ways that humans can prevent the spread of viruses like the cold or flu (Figure 136)?
3. What are some ways humans treat the symptoms from viruses like the cold and flu?
Pollen Patties
We have talked about how pests can come in all shapes and sizes. With a buddy, brainstorm three human pests. They can be an insect, a large or small mammal, or even a plant! With your partner, write down three pests in the space below. Describe what they look like, how they are a pest, and practical solutions to either remove them or reduce the amount of that pest.
Chapter 2 Beekeeping Glossary
American Foulbrood (or AFB): A bacterial disease that infects bee larvae. Once the bacterial spore is ingested, death results during the capped pupae stage of development.
Antihistamine: A common medicine taken by mouth that reduces or stops the effects of an allergic reaction.
Apiary: A location where honey bees are kept.
Apiary inspector: A person designated by the state to inspect honey bee colonies for presence of pests or other diseases and to enforce apiary rules and regulations.
Association: A group of people organized into a club that shares a common interest or purpose.
Bee brush: A soft-bristled brush used to gently remove honey bees from frames or other surfaces.
Bee jacket: Jacket made of white, tightly woven cloth worn by beekeepers to protect the arms and torso from stings.
Beekeeper: One who keeps or manages one or more colonies of honey bees.
Bee suit: Jumpsuit made of white, tightly woven cloth worn by beekeepers to protect the arms, legs, and torso from stings.
Beeswax: The wax produced by honey bees to make honeycomb inside the hive.
Bottom board: The floor of a beehive that all the other components build upon. They can have a solid or screened bottom.
Brood chamber: The bottom hive box that contains the bee frames where the queen lays the eggs.
Closed-toe shoe: Any shoe that completely covers the toes, usually required for safety reasons in the workplace.
Cluster: A ball of bees. It can occur during winter as the entire colony comes together to conserve heat or when defending the colony.
Commercial beekeeper: One who makes a full time living by keeping large numbers of honey bee colonies for pollination services or honey bee production.
Cutaneous: Something that deals with or affects the skin on the human body.
Deep super: A hive box that is 9 5/8 inches deep.
Ecosystem: A community of living organisms and their physical environment.
Entrance feeder: Small feeding trays with a reservoir to hold syrup placed at the entrance of a hive as a food supplement for honey bees.
Entrance reducer: A wooden or plastic barrier placed at the entrance to a beehive that reduces the size of the opening.
European Foulbrood (or EFB): A bacterial disease like American Foulbrood. Bee larvae that consume the bacteria die during the capped pupae stage. May be treated with antibiotics or by requeening.
Fertilization: Takes place in a flower’s ovary when male sperm cells inside the pollen are deposited and joined with the ovule.
Firm number: The number assigned to a beekeeper that has registered their hives with the state. This number must be clearly painted onto the beekeeper's hives for identification.
Flyway barrier: A barricade or fence placed around a hive to direct the honey bees’ flight path upward, reducing the chance of interference with people.
Frame spacer: A rectangular tool with notches used to equally separate the frames inside of the super.
Frames: Structures in a hive where bees can draw out comb to store their honey, pollen, and brood. They are removable so that honey and other hive products can be harvested without destroying the hive.
Gloves: Typically made with leather on the hands and heavy canvas for sleeves, worn by beekeepers to protect the hands, wrists, and forearms from stings.
Hive supers: “Super” is short for superstructure. These are hive boxes that come in different depths and can be added or removed from the hive as the colony grows or shrinks.
Hive tool: A handheld, multipurpose tool used in maintaining and inspecting beehives.
Hive-top feeder: Located on top of the upper box of a hive, this large capacity feeding reservoir aligns with a hole in the inner cover.
Hobbyist beekeeper: One who keeps 40 or fewer honey bee colonies for the enjoyment of it and not for financial profit.
Honey bee stock: A combination of traits and features that identify a certain subspecies of honey bee.
Honey super(s): Honey is made and stored in this upper hive box.
Hydrocortisone: A cream applied to the skin to help calm the body's response to an allergic reaction and lessen the pain, itching, and swelling.
In-hive feeder: A reservoir container for feeding honey bees placed inside the hive, replacing one of the frames in the super.
Inner cover: A lid used to provide the correct bee space on the top hive body and provide good airflow within the hive.
Installation: The act of putting a package of honey bees into the prepared hive body.
Langstroth hive: Stacking rectangular hive boxes with eight to ten vertically hanging frames in each box. Each hive has a bottom board with a bee entrance and an outer lid for weather protection.
Larva(e): A stage in some insects’ development that occurs between hatching and the adult stage.
Medium super: A hive box that is 6 5/8 inches deep.
Migratory lid: A hive lid with no overhang on the sides. This allows many hives used for pollination services to be stacked close together and transported.
Mutual symbiotic relationship: A close relationship between two organisms where the actions of each benefit the other.
Mycelium: A symptom of Chalkbrood disease, it is a white fungal thread that encases the honey bee.
Naturalized: When a species has become established in a region where it did not originate.
Nucleus colony (nuc): A small box with three to five frames of bees in all stages of development, as well as honey, pollen, and a laying queen.
Ovary: Produces and contains the egg or seeds of a plant.
Ovule: The egg or seed inside the ovary of a flower.
Package of bees: A plastic or wooden box with screens on at least two sides used to ship honey bees.
Personal protective equipment (PPE): Clothing and other equipment worn to protect the wearer’s body from injury or illness.
Pistil: The name for the collection of female parts of a flower, including the stigma, style, and ovary.
Pollen: Fine powdery substance (usually yellow) produced by certain plants when they reproduce.
Pollination: The movement of pollen from the anther of one flower to the stigma of the same or another flower. This can be done by wind, water, animal, or insect.
Pollination services: Honey bees transported around the country for pollination of agricultural crops.
Pollinator: An animal, insect, or human that aids in the movement of pollen from the stamen of one flower to the pistil of the same or another flower.
Propolis: A sticky, glue-like substance that comes from the resin or sap of trees and plants. Honey bees collect and use it to seal cracks and crevices in the hive, regulate temperature, and mummify dead pests. Propolis has antimicrobial properties and helps to keep the colony healthy.
Queen cage: A small container that safely holds the queen while she is being marked or while the beekeeper is working the hive.
Queen excluder: A flat screen made from plastic or metal that prevents the queen from going into upper hive boxes while allowing the workers to pass through.
Robbing: When bees from a colony raid a weaker colony to take the honey back to their own hive.
Royal jelly: A milky secretion made by worker honey bees as food for developing queen bees. It is rich in carbohydrates, proteins, vitamins, and minerals.
Shallow super: A hive box that is 5 ¾ inches deep.
Sideliner beekeeper: One who keeps between 41 and 100 honey bee colonies with the intention of making extra income, in addition to working another job.
Smoker: A tool for blowing smoke into a hive to calm the honey bees before working about the hive.
Smoker fuel: Pine straw, cotton, wood pellets, or other material that is non-toxic and, when ignited, produces a thick, white cloud of smoke.
Sperm cells: Male sex cells needed for reproduction in living organisms.
Stamen: The name for the collection of male parts of a flower, including anthers and filaments.
Static electricity: The buildup of electrical charges on the surface of an object created by friction that causes an imbalance between positive and negative charges.
Sting: A small but painful injury caused when an insect or animal makes a small hole in the skin of its victim.
Sugar shake: A non-lethal test to determine Varroa destructor (mite) population in a honey bee colony.
Telescoping lid: A hive lid with overhang on all four sides and a thin metal outer covering that protects the colony from wind, rain, and snow.
Veil: A hat with netting that covers and protects the head, face, and neck from stings.
Chalk Pollination Flower

Credit: Megan Hammond, formerly UF/IFAS Honey Bee Research and Extension Laboratory
Chapter 2 Beekeeping Answer Key
Chapter 2.2 Activity #1 What is Wrong with this Apiary Location?
Apiary Location 1:
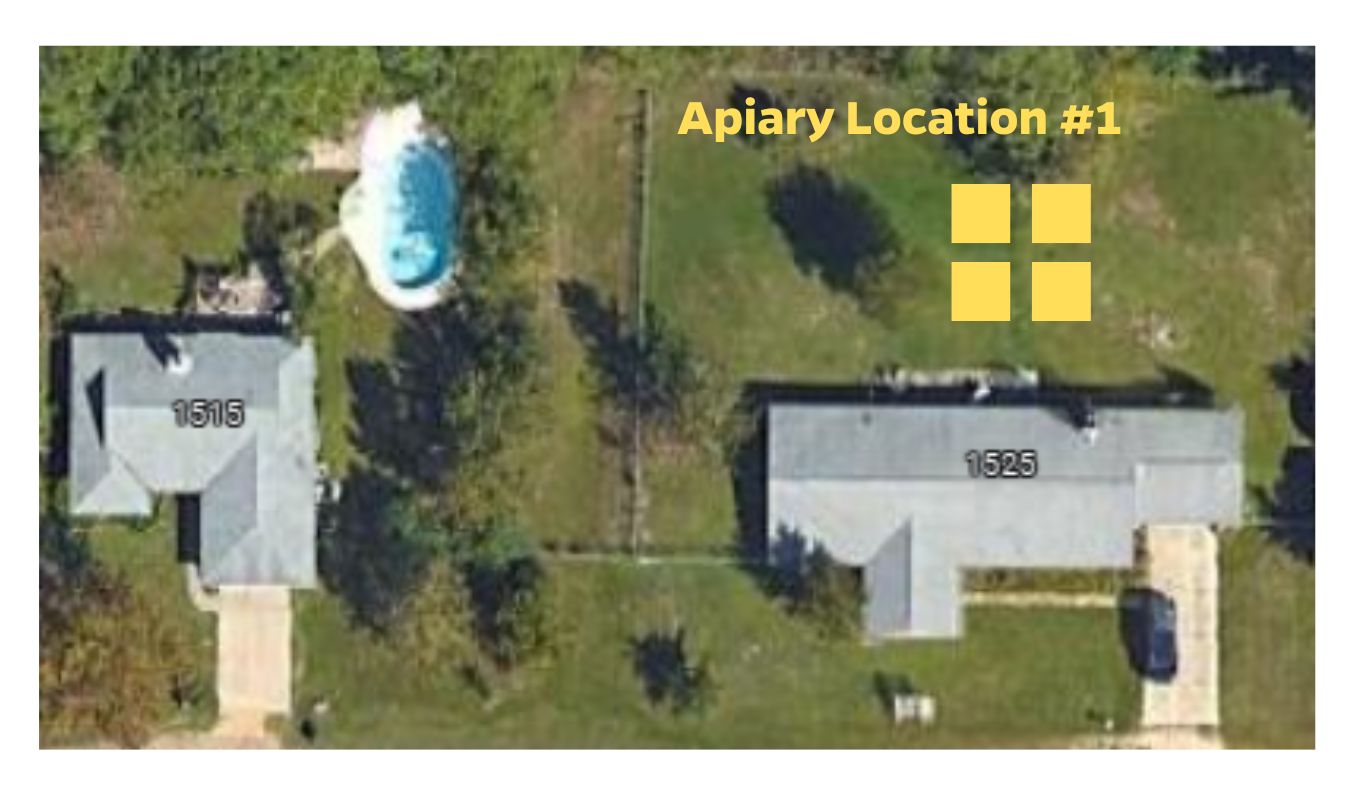
Credit: Google Earth; copyright Airbus, Maxar Technologies. Map Data copyright 2024.
What could be unsafe about this location? While there is a flyway barrier made by the trees and shrubs, if there is no water source provided by the beekeeper, the honey bees will go to the neighboring pool for water. The neighbor may become upset with the increased risk of getting stung when they swim in their pool.
What are some ways the beekeeper could make the site safer? The beekeeper must provide a safe source of water such as tubs of water with wood floats, dripping faucets, or hive-top or front-entrance feeders.
Apiary Location 2:
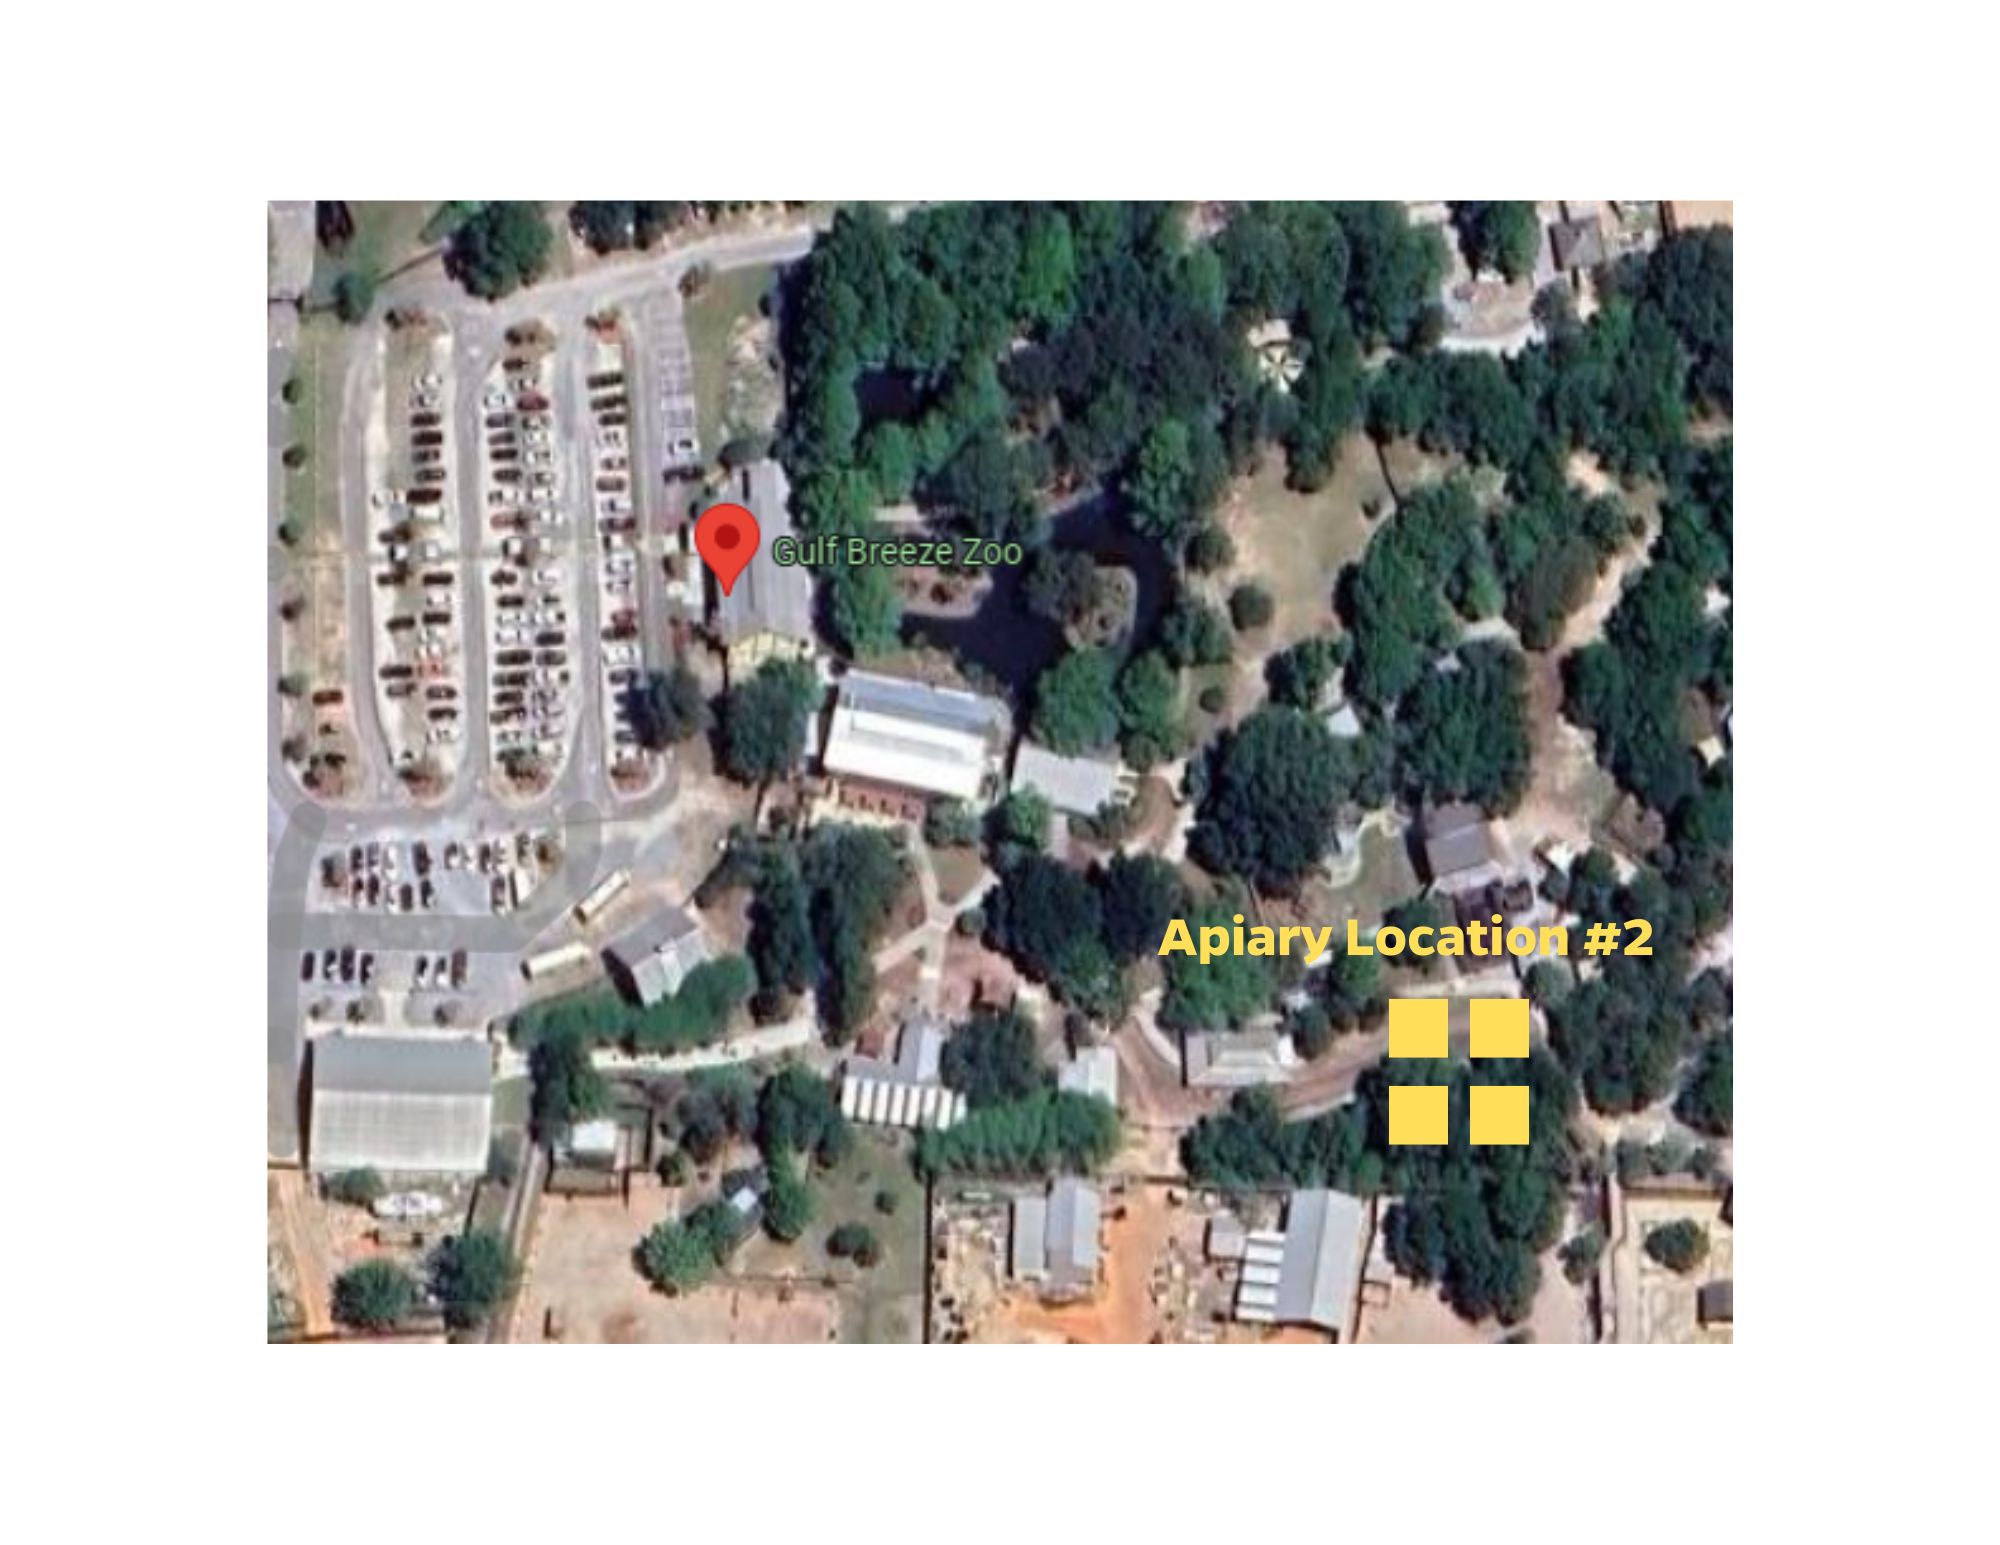
Credit: Google Earth; copyright Airbus, Maxar Technologies. Map Data copyright 2024.
What could be unsafe about this location? This location is too close to animals in confined spaces and their water sources. The honey bees could also interfere with and be a nuisance to people visiting the zoo.
What are some ways the beekeeper could make the site safer? It would be best to find a completely different location further away from the zoo animals and guests.
Apiary Location 3:
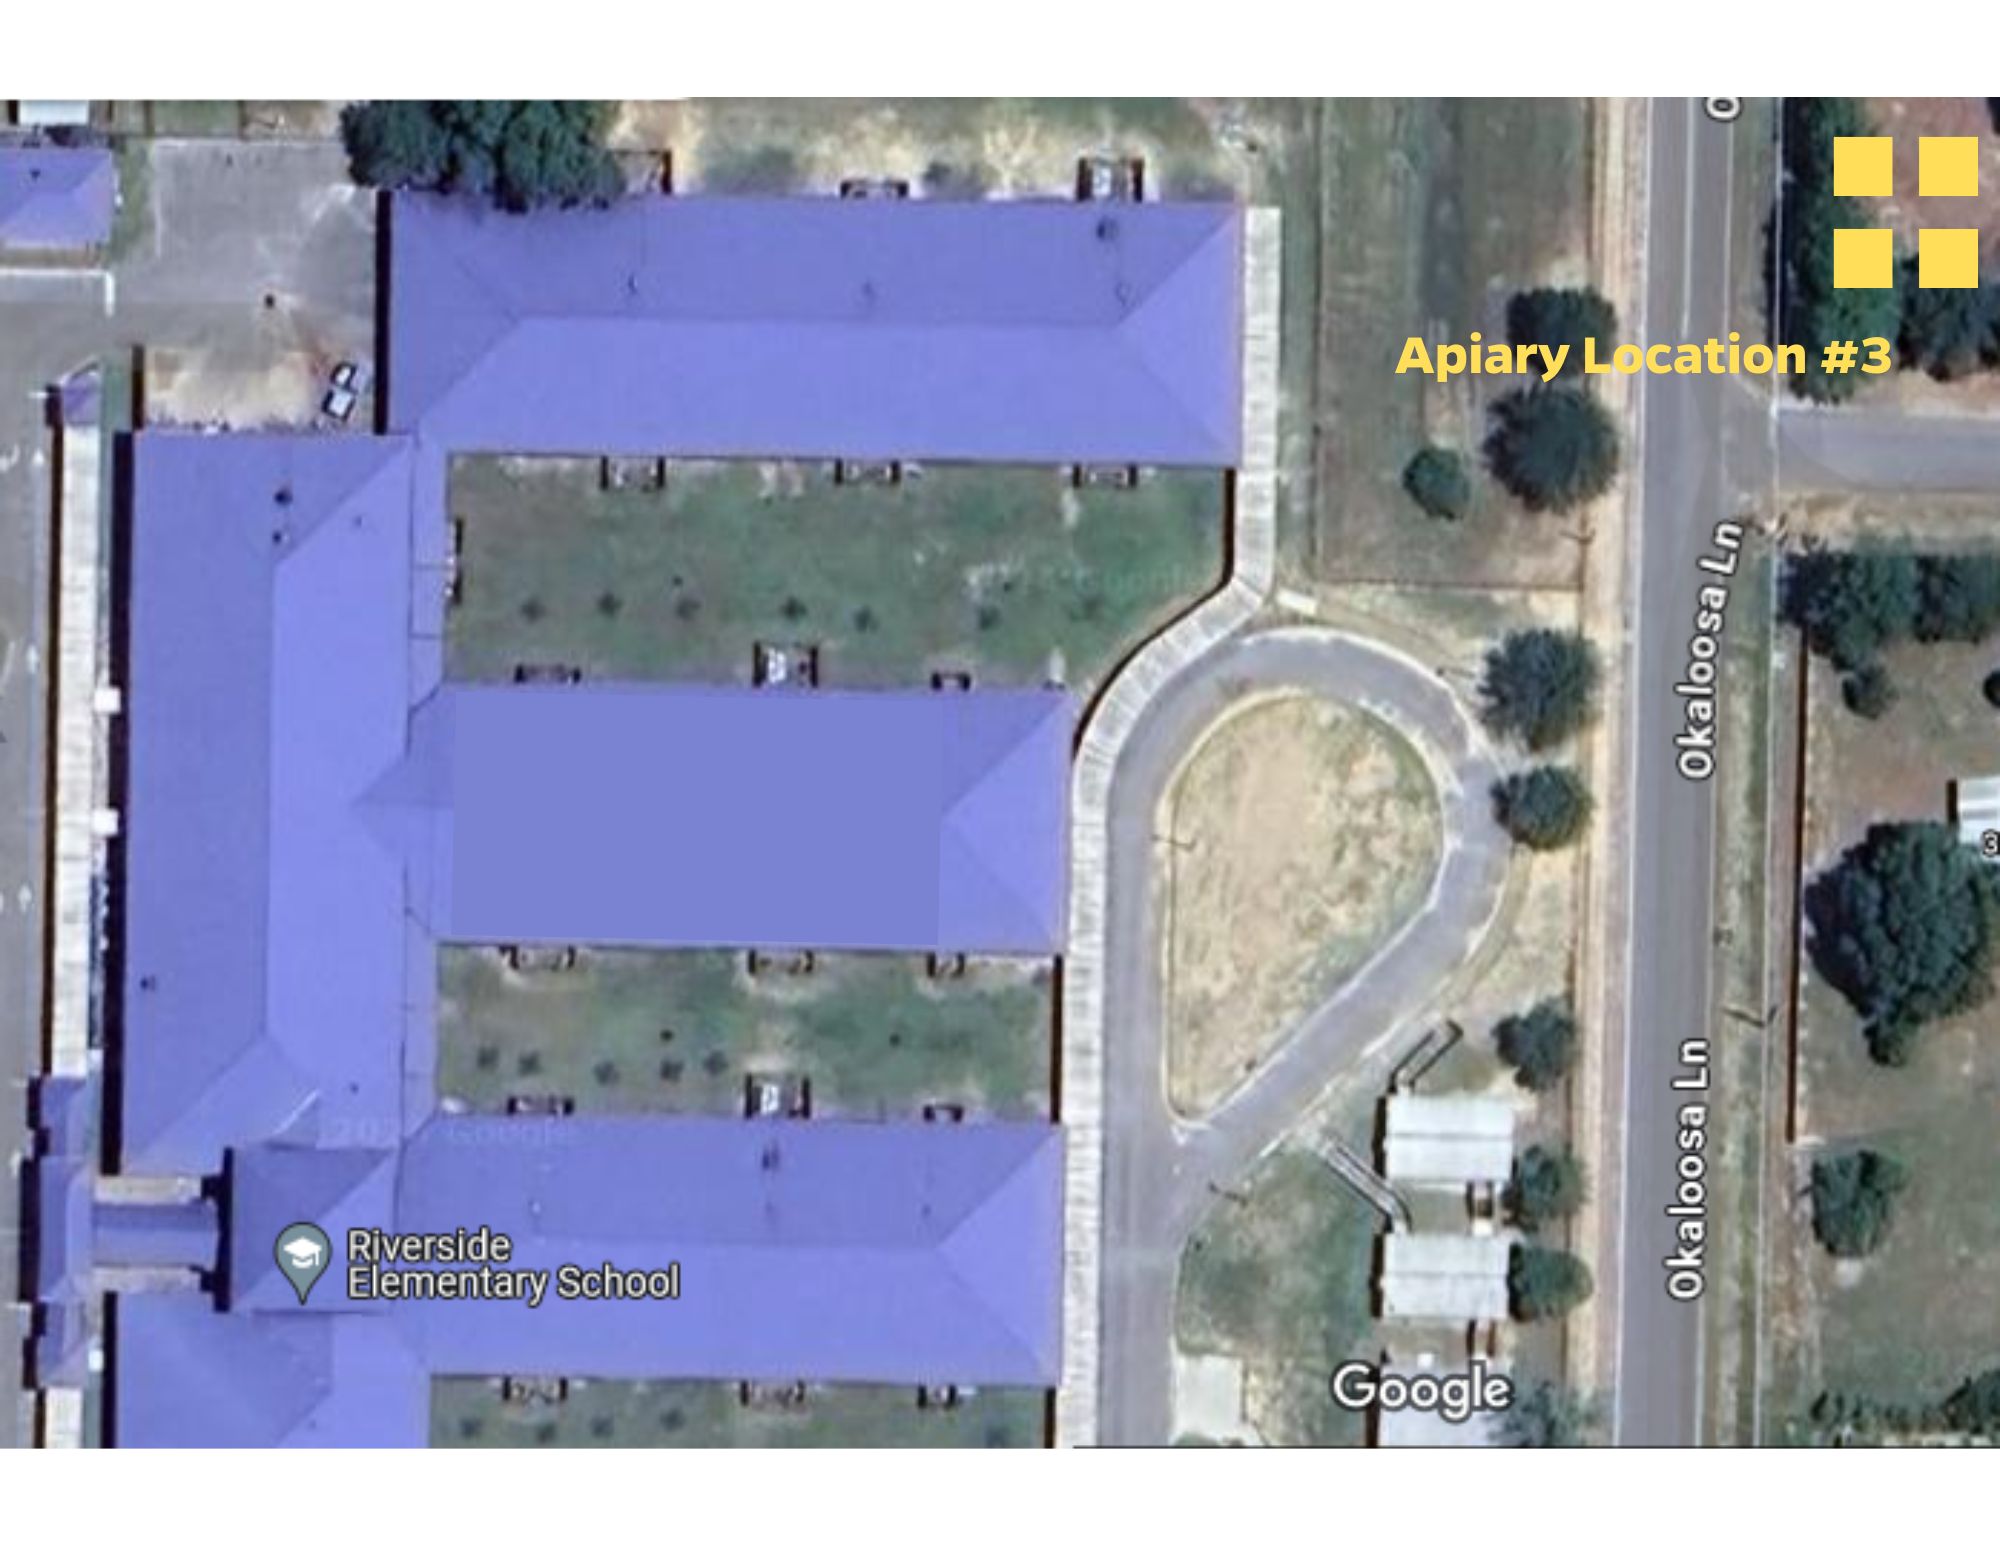
Credit: Google Earth; copyright Airbus, CNES/Airbus, Maxar Technologies. Map Data copyright 2024.
What could be unsafe about this location? This location is too close to the sidewalk where elementary school children would be outside playing and walking and may get stung. There is no flyway barrier tall enough to direct the honey bees away from the children and other people at the school.
What are some ways the beekeeper could make the site safer? The hives could be moved to another location on the property further from the sidewalk, and a flyway barrier could be built to direct the honey bees away from people.
Apiary Location #4

Credit: Google Earth; copyright 2024 Airbus, Maxar Technologies. Map Data copyright 2024.
What could be unsafe about this location? Not only is the apiary too close to the property line and lacking a flyway barrier but the homeowner is breaking neighborhood rules. This increases the risk of one of the neighbors getting stung and the beekeeper getting in trouble over the neighborhood rules.
What are some ways the beekeeper could make the site safer? Before ever purchasing their bees or equipment, the beekeeper should investigate the rules and regulations of their neighborhood for beekeeping. If beekeeping is allowed, the hives could be moved further from the property line and a flyway barrier could be built to direct the bees up and away from the neighbor's yard.
Chapter 2.3 Activity #1 Beekeeping Equipment Crossword Puzzle

Chapter 2.4 Activity #1 Which Bees to Buy?
(Answers may vary according to which characteristics you choose to focus on.)
Scenario #1
Stock They Should Buy: Carniolan
Why: High overwintering ability and low defensiveness
Stock They Should Not Buy: Caucasian
Why: While they do have low defensiveness, they are less likely to survive winter due to low overwintering ability.
Scenario #2
Stock They Should Buy: Carniolan
Why: They rank high in honey production, have good disease resistance, and low robbing tendencies.
Stock They Should Not Buy: German
Why: They have low to average honey production and have low disease resistance.
Scenario #3
Stock They Should Buy: Italian or Buckfast
Why: They produce a lot of brood and have only an average tendency to swarm.
Stock They Should Not Buy: Carniolan
Why: While they have rapid growth in the spring, they have a high tendency to swarm and then only average brood production.
Scenario #4
Stock They Should Buy: Russian
Why: They have the highest tolerance to Varroa.
Stock They Should Not Buy: German
Why: Not only is their resistance to Varroa variable, but they have a low tolerance to other diseases.
Chapter 2.5 Activity #1 Find the Bee
Photo 1: Can you tell which is the worker bee and which is the drone? Circle the drone.
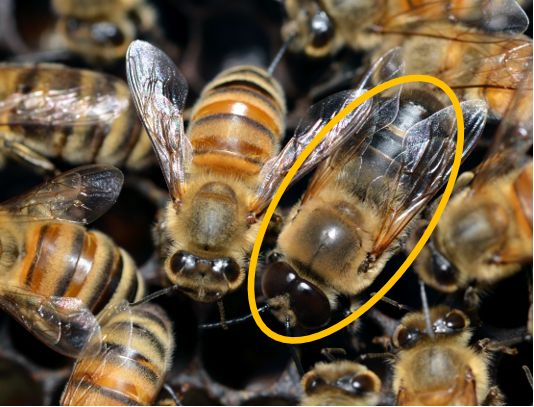
Credit: Dr. Michael Bentley, used by permission
Photo 2: Circle the queen bee.
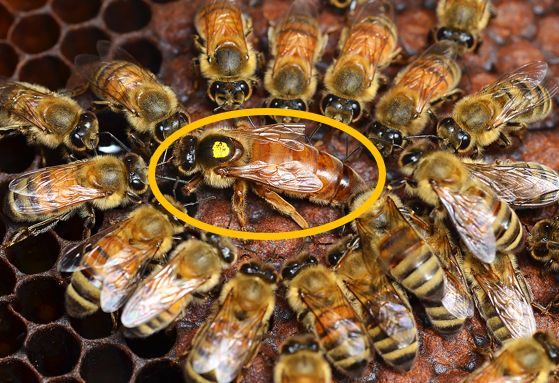
Credit: Dr. Michael Bentley, used by permission
Photo 3: Circle the queen bee.
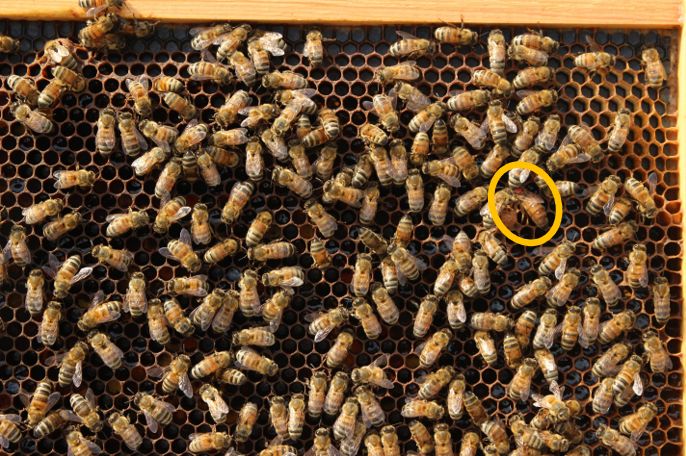
Credit: Kassidy Robinson, formerly of UF/IFAS Honey Bee Research and Extension Laboratory
Photo 4: Circle the queen bee.
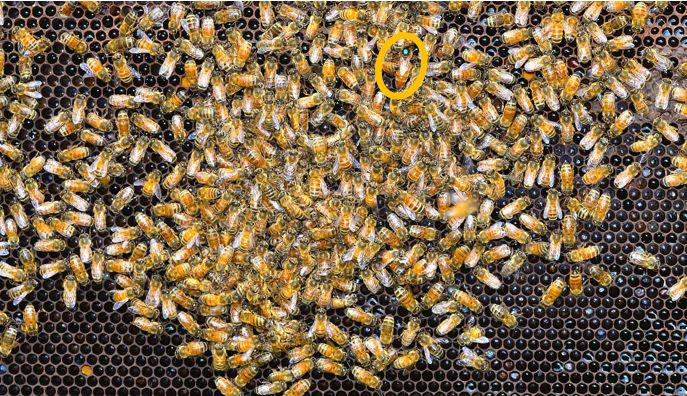
Credit: Dr. Michael Bentley, used by permission
Chapter 2.5 Activity #2 Hive Inspection
Opening the hive:
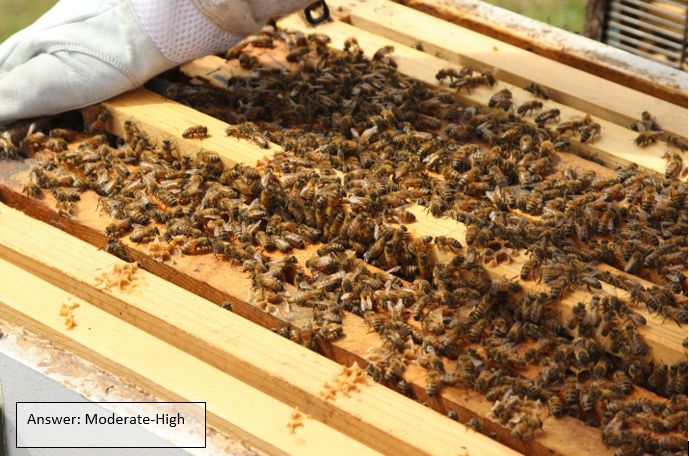
Credit: Kassidy Robinson, formerly of UF/IFAS Honey Bee Research and Extension Laboratory
Frame #1:
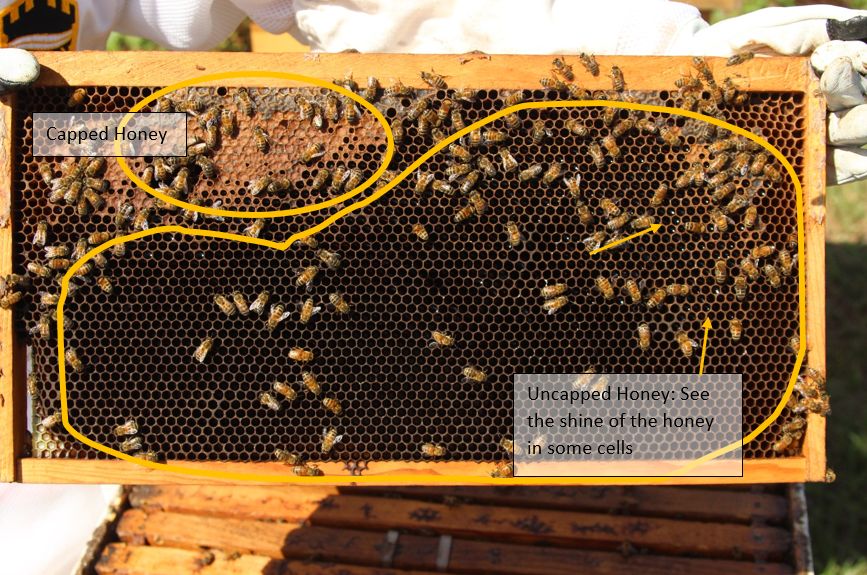
Credit: Kassidy Robinson, formerly of UF/IFAS Honey Bee Research and Extension Laboratory
Frame #2:

Credit: Kassidy Robinson, formerly of UF/IFAS Honey Bee Research and Extension Laboratory
Frame #3:
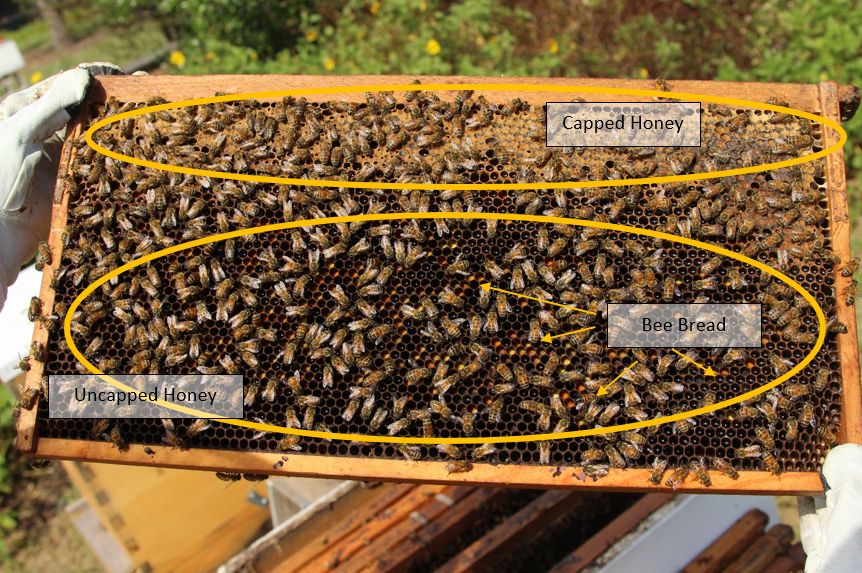
Credit: Kassidy Robinson, formerly of UF/IFAS Honey Bee Research and Extension Laboratory
Frame #4:
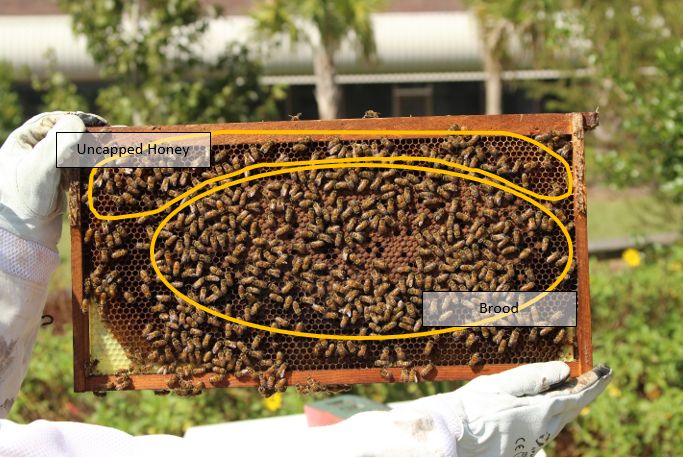
Credit: Kassidy Robinson, formerly of UF/IFAS Honey Bee Research and Extension Laboratory
Frame #5:
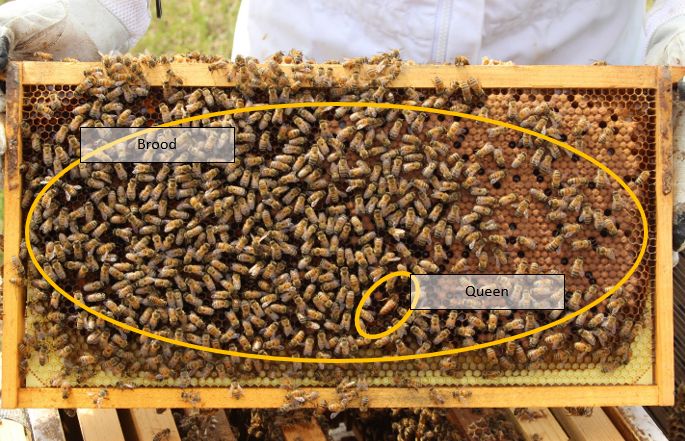
Credit: Kassidy Robinson, formerly of UF/IFAS Honey Bee Research and Extension Laboratory
Chapter 2.6 Activity #1 Connect the Pest
