Background
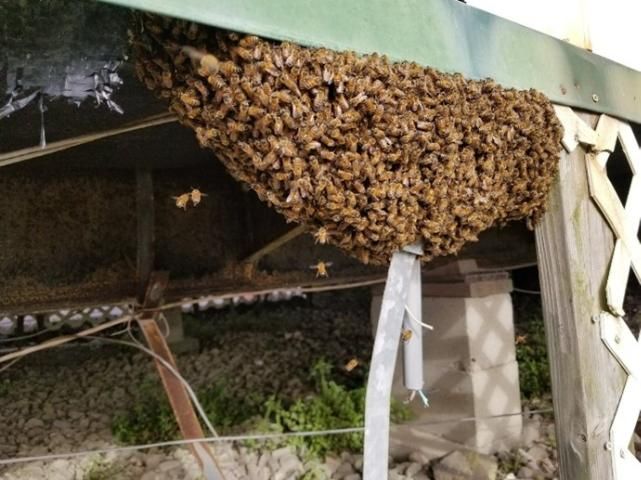
Feral colonies of honey bees can be found across the state of Florida. When these colonies nest in close proximity to humans or domestic animals, they can pose a stinging threat and may be considered a nuisance and possibly a threat to animal or public health. A property owner or authorized agent who finds a nuisance colony of honey bees must decide whether to deal with it through removal (keeping the bees alive) or eradication (killing the bees). This decision to remove or eradicate feral colonies lies entirely with the owner/authorized agent of the property on which the bees are found. It is important to note, however, that some municipalities and homeowner associations have specific formal codes related to the removal of honey bees in natural settings and in structures. Moreover, honey bees may need to be removed or eradicated when they are found nesting in close proximity to places where humans or domestic animals frequent.
Credit: Jason Deeringer, Bee Serious Bee Removal, LLC
Credit: Jason Deeringer, Bee Serious Bee Removal, LLC
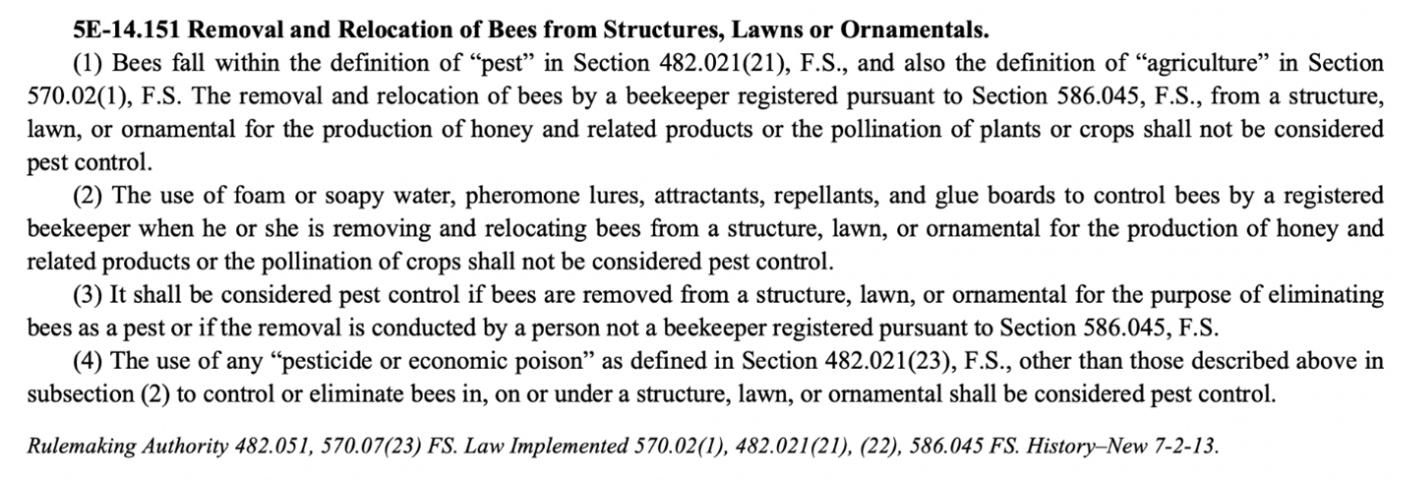
In 2013, Rule 5E-14.151 of the Florida Administrative Code was created to allow registered Florida beekeepers to perform live removals (typically for compensation) of nuisance honey bee colonies and swarms "for the production of honey and related products or the pollination of plants or crops" without the need for a pest control operator license. To operate legally in this capacity, a beekeeper must be registered with the Florida Department of Agriculture and Consumer Services pursuant to Chapter 586 of the Florida Statutes. Furthermore, beekeepers must maintain their honey bee colonies. Beekeepers are only allowed to eradicate nuisance honey bee colonies if they are also employed by a licensed pest control company in the categories of General Household Pest (GHP) or Lawn and Ornamental (L&O). Eradicating honey bee colonies is considered pest control; it is illegal to perform pest control without a license (Chapter 482.165, Florida Statutes). As such, property owners can deal with nuisance honey bees via live removal (via a registered beekeeper) or eradication (only by a licensed PCO). Clients or untrained personnel should not attempt to remove a honey bee colony themselves because the job may pose a risk to the individual as well as the community and surrounding areas if the bees are not handled properly.
Purpose
The purpose of this publication is to serve as a reference for beekeepers who choose to perform live bee removal services in Florida. Best Management Practices for live bee removals by Florida beekeepers are detailed herein.
Types of Removals
There are three main ways in which a beekeeper may remove honey bee colonies. All three ways concern the removal of the entire colony of bees and are referred to as "live bee removal" or "bee removal" in this publication.
- Swarm trapping
- Swarm removal/capture
- Colony removal
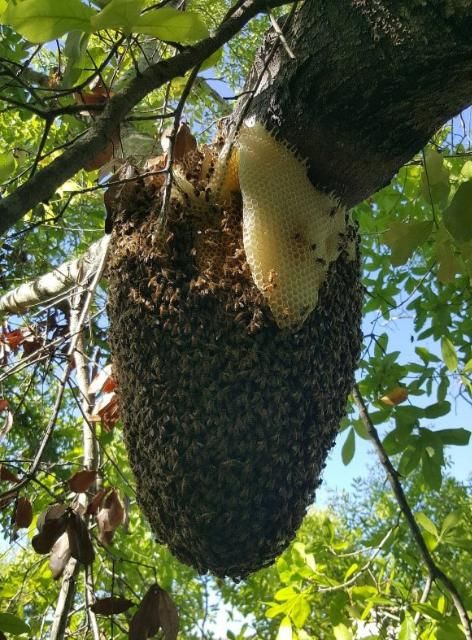
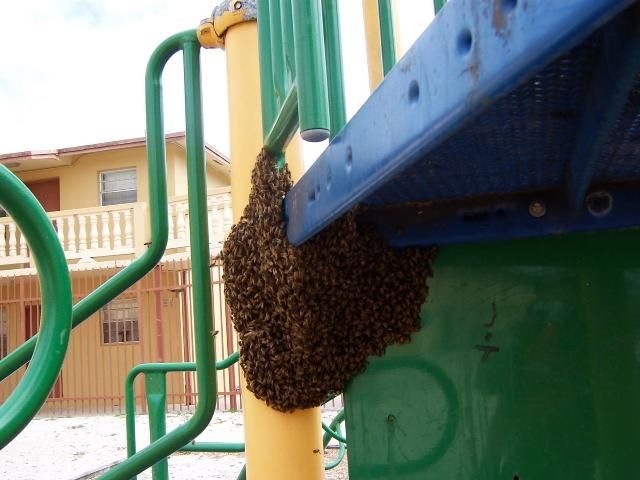
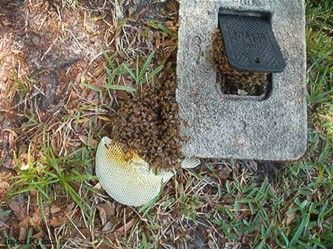
Swarm trapping is a preventative measure used to keep honey bee colonies from becoming a nuisance. It is much easier and more cost effective to capture a swarm than it is to remove an established colony from an enclosed area such as inside a wall. The removal and capture of swarms is usually a simple procedure when a swarm lands in a tree or on a structure. The removal of established colonies becomes relevant after the honey bee colony is already considered a nuisance, usually when it has established on a client's property. For information on swarming and nesting behaviors of European honey bees, see Swarm Control for Managed Beehives (https://edis.ifas.ufl.edu/in970) and European Honey Bee Apis mellifera Linnaeus and subspecies (Insecta: Hymenoptera: Apidae) (https://edis.ifas.ufl.edu/in1005).
Credit: UF/IFAS Honey Bee Lab
Credit: Willie the Bee Man, Williethebeeman.com
Credit: AllFloridaBeeRemoval.com
Notes of Caution
This publication cannot replace proper training in live bee removals. All beekeepers who choose to offer bee removal services, either privately or as a business, are recommended to 1) familiarize themselves with the contents of this publication, and 2) receive bee removal training. Training can be formal (take an in-depth course, participate in a workshop, etc.) or non-formal (find a mentor, work under a bee removal specialist, etc.), but it should always include hands-on practice under expert guidance. Working with honey bees can be dangerous, especially for inexperienced individuals, and working with feral colonies of unknown temperament and genetics in less-than-ideal conditions adds additional levels of risk. As you enter into this field, exercise caution, gain experience from an expert, and always be prepared. Finally, if you have a known allergy to honey bee stings, you should never attempt to perform live bee removals.
African(ized) Honey Bees
Africanized honey bees (AHBs), a hybridization of an African (A. mellifera scutellata) and various European-derived honey bee subspecies, are established in southern Florida. Generally, African honey bees are more defensive than European-derived honey bees, and this heightened defensiveness is expressed often, but not always, in the Africanized hybrid. All honey bee colonies (African, European, and Africanized) are defensive when they have resources (honey, brood, pollen, etc.) and a colony to protect and defend, but they are considerably less defensive when they are in a swarm state. In fact, honey bee swarms are often considered comparatively docile, though even they can exhibit heightened defensive responses. All honey bees, whether in a swarm or an established colony, European- or African-derived, should be approached with caution. More information about Africanized bees can be found in the UF/IFAS Electronic Data Information Source (EDIS) subtopic, Africanized Honey Bee (https://edis.ifas.ufl.edu/entity/topic/africanized_honey_bee), particularly in the following publications: African Honey Bee, Africanized Honey Bee, Killer Bee, Apis mellifera scutellata Lepeletier (Insecta: Hymenopter: Apidae) (https://edis.ifas.ufl.edu/in790) and Living with the African Honey Bee (https://edis.ifas.ufl.edu/in1205).
Best Management Practices
Before Removals
Receive Training
Bee Removal Training
Before performing a live bee removal, you should receive training under the direct guidance of someone with significant bee removal experience. There is no substitute for hands-on training and practice.
General Safety Training
Anyone performing live bee removals should receive training approved by the Occupational Safety and Health Administration (OSHA), particularly if you will be using power tools, power lifts, or ladders, or if you will be working on roofs or other precarious places where fall prevention training will be essential. Conducting routine training with your employees is mandatory, and you must keep records of the training you provide or obtain in employees' personnel files and available for an OSHA inspector's review. Visit the OSHA Training website (https://www.osha.gov/training) for information on OSHA certification and training options. OSHA Outreach Training Programs provide basic and advanced training and provide 10-hour or 30-hour course completion cards at the end of the training.
Set up Your Business for Success
The removal of honey bee colonies comes with inherent risks. Consequently, certain precautions need to be considered to mitigate these risks effectively. Beekeepers should take the following steps before performing removal services.
Register as a Beekeeper
According to Rule 5E-14.151, F.A.C., anyone conducting live bee removals without a pest control license must be registered as a beekeeper with the Florida Department of Agriculture and Consumer Services. This applies to any individual removing nuisance honey bee colonies, including employees removing honey bee colonies within a larger bee removal operation (i.e., anyone performing bee removals in that operation must be registered as a beekeeper). For more information on registering as a beekeeper, visit the FDACS Beekeeper Registration website (https://www.fdacs.gov/Agriculture-Industry/Bees-Apiary/Beekeeper-Registration).
Register Your Business
If you do business in Florida, you must maintain a Florida business license regardless of the size of your bee removal operation (you may operate alone or manage a large team). You may also need a local (city or county) business license. For information on registering your business, visit the Florida Department of State, Get a Business License (https://dos.myflorida.com/library-archives/research/florida-information/business/starting-a-business-in-florida/small-business/license/) and the Florida Department of State, Division of Corporations (https://dos.myflorida.com/sunbiz/start-business/) web pages. You may also decide to consult with a business expert, lawyer, and/or accountant to determine the licenses and registrations you will need.
Insurance Coverage
If you are operating a bee removal business, large or small, you should carry general liability insurance. Liability insurance can pay for the costs of injuries or property damage that occurs while on the job. General liability insurance should be considered a must for every bee removal operation, especially given bee removal is a high-risk profession dealing with live colonies of stinging insects located in and around people's homes and property. You may also consider other insurance outside of general liability (e.g., commercial auto insurance, property insurance, etc.), depending on the size and structure of your operation.
Additionally, if you hire employees to work within your live bee removal business, you must provide workers' compensation insurance for those employees, or provide a Certificate of Election to be Exempt from Florida's Workers' Compensation Law. For details on workers' compensation and exemptions in Florida, visit the Florida Division of Workers' Compensation website (https://www.myfloridacfo.com/division/wc/Employer/default.htm).
Proper understanding of your insurance is crucial to being able to operate your business properly. Consultation with an insurance expert is highly recommended.
Establish a Safe Work Environment
You should always work to create a safe environment in which to operate. If you perform bee removals alone, you should leave your plan with someone who knows where you are going and when you plan to return. You can reduce risk and increase your likelihood of success through proper planning and open communication with your clients.
Protective Gear
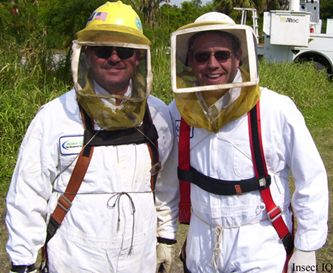
The first step toward establishing a safe work environment is to make sure that you have the right tools for the job. Regardless of the type of bee removal you will be doing, you should always have personal protective equipment (PPE) on hand, including:
- Bee veil
- Bee suit and/or jacket
- Beekeeping (or other protective) gloves
- Full-coverage clothes (pants, long-sleeved shirt, closed-toe shoes)
- Sun protection (unscented sunscreen, sunglasses, etc.)
- Water (always bring more than you think you'll need and remember to take regular breaks to stay hydrated and avoid heat exhaustion)
- Smoker with fuel and lighter
- First aid supplies
For further lists of tools and supplies that you may need for various live bee removal procedures, see "Removal BMPS" in this publication. A complete supply list can be found in Appendix A.
Credit: AllFloridaBeeRemoval.com
Gather Information
Before beginning a bee removal, talk to the property owner/authorized agent about what, if any, previous work has been done to remove or eradicate the nuisance colony. This may provide you with valuable information about the temperament and condition of the colony, which can better prepare you for the job. Previous attempts at eradication are a particular concern because bees and comb may still contain pesticides that you as a beekeeper should not handle unless you have personal protective equipment and have been properly trained. Consider asking clients to sign a contract stating that chemical controls have not been used on the bees/colony, to the best of their knowledge.
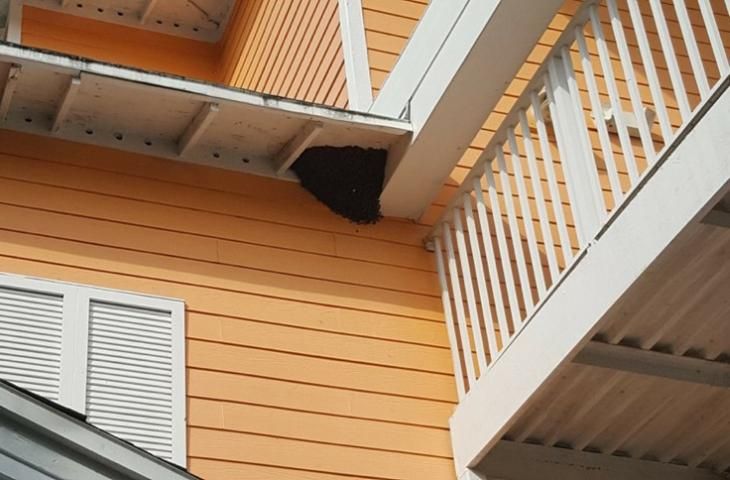
Before starting the removal, survey the removal site to determine the equipment that you will need and so that you can estimate the time it will take to complete the removal properly. It is best to survey during daylight hours and in weather conditions that will allow you to see any obstructions that may pose a complication to the removal. Consider height, access points, multiple entrances, bushes, conduit, etc. It may help to have the client describe where they have noticed bees or actually show you. At this point, you should know whether you are dealing with a swarm or an established colony. If it is an established colony, look for flight patterns to and from the hive site. In particular, look for bees bringing in pollen. Established colonies may be collecting pollen, while swarms will not.
Credit: Jason Deeringer, Bee Serious Bee Removal, LLC
At this point, it is also a good idea to check with the local municipality, property association, or other regulatory groups in the area to confirm that no additional permits or approvals are required to remove bees in/on certain structures (consider historical buildings, protected tree species, etc.).
Control the Surrounding Area
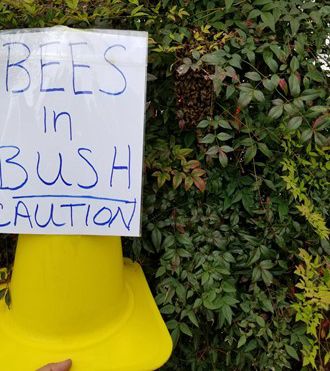
When performing a bee removal, you will be purposefully disrupting a live honey bee colony. It is your responsibility to ensure that property owners, other passersby, etc. do not enter the worksite during and immediately after the removal. The size of the area that you need to control will depend on where the removal is happening, the time of day it is being conducted, and the size of the colony. In highly trafficked areas, for example, you may consider roping off a larger area around the honey bee nest and posting signs and/or employees around the perimeter to warn passersby. In more contained environments, you may simply need to alert those present to clear the area. When dealing with bees in public places, it is always safest to be overly cautious to ensure that bystanders are not stung.
Credit: Jason Deeringer, Bee Serious Bee Removal, LLC
Set Expectations with the Client
Before beginning work, it is important to communicate with the client about expectations. In a written or verbal agreement, you should discuss your recommended course of action and the scope of the work to be performed. It is strongly recommended that you execute a written contract with the client before beginning work.
The possibility of property damage associated with opening a cavity for easier access to the colony should be clear to the client before work begins. Furthermore, unless you are a licensed and insured contractor, you cannot attempt to repair structures yourself after a bee removal. It is crucial that this be made clear to the client before commencing any work. It is equally important that your client understands that if the remaining cavity is not filled or properly repaired, another honey bee colony may soon take up residence in it, resulting in the need for subsequent bee removal(s). This is especially pertinent if you issue a warranty with the removal. It is crucial to note in the contract that client failure to follow up with repairs/close the original nest site will void the contract/warranty.
The client must have clear expectations about the number of bees that may remain after the work is completed. It is not realistic to expect that all bees will be removed in a live bee removal, because some forager/scout bees may return to their nest after the removal is complete. There are ways of reducing these "straggler" bees as discussed in "Bee Removal" in this publication; however, the possibility of bees being left behind should be made clear to the client before work begins. Encourage the client to allow a few days after the removal for returned stragglers who may be lingering to desert the nest before scheduling maintenance or repairs.
Document Before and After
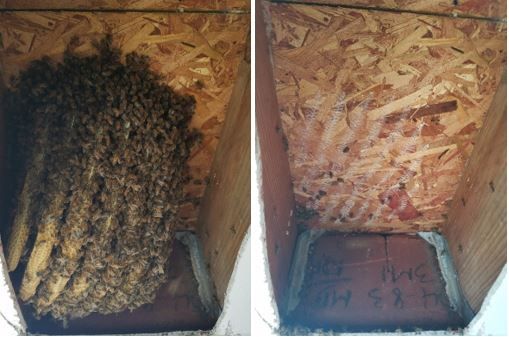
When doing live bee removals, it is important to keep detailed records of the work that you have performed and that which may have been done before you arrived. You should meticulously document conditions. Note damage to the house/property that was present before you arrived, the location of the nest, the condition of the bees, etc. The easiest way to document this type of information is by gathering photographic evidence, either through still images or videos. Capture pictures and videos of the situation before you start your work, while you work, and after your work is completed. Consider including a photo release in the contract that you and your client agree on before work begins.
Credit: Jason Deeringer, Bee Serious Bee Removal, LLC
Removal BMPs
Live bee removal can involve removing swarms, removing established colonies, and/or trapping swarms, as detailed below.
Removal of Honey Bee Swarms
Equipment Needed for Swarm Removals
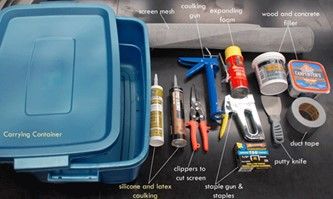
In addition to the items listed above in the section on establishing a safe work environment, the following list details the equipment that beekeepers should have on hand when collecting a clustered honey bee swarm. Not all items below may be necessary for every swarm removal; however, by having them on hand, you can be prepared for a variety of circumstances. A complete supply list can be found in Appendix A.
- Blanket/tarp/drop cloth
- Queen cage/catcher
- Empty hive box, bottom board, and lid
- Frames
- Bee brush
- Bee vacuum (*see Appendix A for requirements surrounding bee vacuums)
- #8 hardware cloth (?-inch mesh), crafting foam, insulation, or other materials appropriate for closing the hive entrance
- Spray bottle full of water
Credit: UF/IFAS Honey Bee Lab
Swarm Removal Protocol
Once you have all the supplies that you will need, follow these steps for swarm removal.
- Consider laying out a tarp, drop cloth, or blanket underneath the swarm if needed.
This provides a soft "landing pad" for falling bees and it will aid in the search for the queen.
2. Gently mist the swarm with water or smoke.
Misting the bees lightly with water or smoking them can help to keep the swarm calm and coalesced. They respond to the water spray the same way they would to rain, i.e., coalescing into a tighter cluster. Smoke will mask the alarm pheromones honey bees produce when they are agitated and defensive. Be judicious with your use of smoke. It may cause a swarm cluster to disperse rather than consolidate. If you use smoke, puff it very gently from more than a foot away from the bees, then observe the effects for a few moments before continuing to use smoke.
3. Shake, brush, or vacuum* the bees into the hive box.
Move the bees into the new hive box. This can be done by shaking or brushing the bees into the box or by using a bee vacuum. Misting the swarm with water using a spray bottle before moving it can help to keep the cluster contained while it is being relocated. *See Appendix A for requirements associated with using bee vacuums.
4. Secure the bees in the box.
Close the entrance of the box. Appropriate items for entrance closure include, but are not limited to, #8 hardware cloth (?-inch mesh), crafting foam, and insulation. Do not completely seal the box; make sure that the bees cannot escape, but that they still have airflow. Using a screen bottom board may help supply this airflow.
Removal of Established Colonies
Removal of established colonies should be done in the early morning or late evening as long as you have visibility. It is best to remove the colony before the foragers have left the hive for the day or after they have returned, but you still need to be able to see what you are working with and to be aware of your surroundings. This will not always be feasible, depending on the job at hand, but is considered best practice.
Equipment Needed for Colony Removals
In addition to the items listed above in the section on equipment needed for swarm removals, the following list details the equipment that beekeepers should have on hand when performing a removal of an established honey bee colony. The items below may not be necessary for every colony removal; however, by having them on hand, you can be prepared for a variety of circumstances. A complete supply list can be found in Appendix A.
- 5-gallon buckets or other containers with lids
- Bee brush/feather duster
- Honey bee repellent (repellents used in the apiculture industry for repelling bees from honey supers)
- Bee vacuum (see Appendix A for requirements associated with using bee vacuums)
- Borescope/snake camera or thermal imaging camera
- Broom and dustpan
- Camera (for documentation)
- Comb cutting tool (e.g., box cutter, knife, hive tool)
- Duct tape
- Extension cords
- Flexible plastic sheeting
- Hand tools (hammer, screwdrivers, pry bar, paint scraper, etc.)
- Hive box(es) with bottom board(s), lid(s), and frames
- Ladder
- Large rubber bands/string
- Non-spray insulation
- Portable generator
- Power tools (hole saw, circular saw, keyhole saw, angle grinder, reciprocating saw, drill, etc.) with proper attachments (bits, blades, etc.). Check OSHA guidelines related to drilling/cutting into concrete, cement, brick, plaster, or stucco.
- Queen catcher/queen cage
- Rags
- Red-light flashlight
- Safety goggles/face mask
- Scissors for cutting other materials to size
- Serrated knife
- Spray bottle with water
- Staple gun, staples
- Straps (e.g., ratchet, tie down, plumbing hanger with screws)
- Wet wipes
- Window screening or hardware cloth
Colony Removal Protocol for Cut-Outs
Once you have the needed supplies, follow these steps for colony removal via a "cut-out" (i.e., the colony is "cut out" of the nest site).
- Locate the colony.
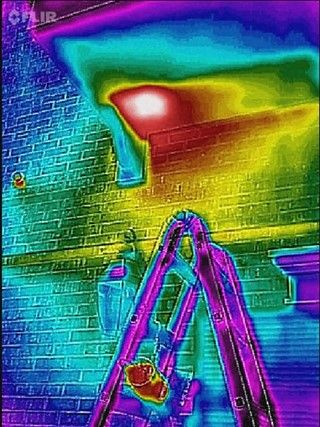
Clients should show you where they have noticed the bees. Look for flight patterns to and from the hive site to find the hive entrance (there may be more than one). If the colony is located inside a structure, you can further locate the nest by using a borescope, a thermal imaging camera, or a red-light flashlight. If the bee colony is inside a tree, you may need to seek assistance from a trained arborist. You may also need a ladder or heavy machinery to access the bees. If the colony is in a structure found along a property line, make sure to verify who owns the structure (your client, a neighbor). Remember to document the colony and/or nest entrance photographically before starting the removal.
Credit: Jason Deeringer, Bee Serious Bee Removal, LLC
2. Smoke the entrance(s) to the colony.
Smoking the bees can help to keep the colony calm. The smoke masks the alarm pheromones that honey bees produce when they are agitated and defensive.
3. Create access to the colony.
The location and size of the colony that you are removing will dictate how you are able to access the colony. You may need to cut open a wall or roof, enter a crawl space, open a container, or move equipment, among other actions. Make sure that you have all the tools that you will need for a given removal before beginning. Tools that you may need include power tools with the proper attachments, extension cords, a generator, hand tools, goggles, a face mask, etc. Do not make excessive openings, and be mindful of structural supports as well as electrical conduits and gas and water lines. Remember to document your work with photographs of the process.
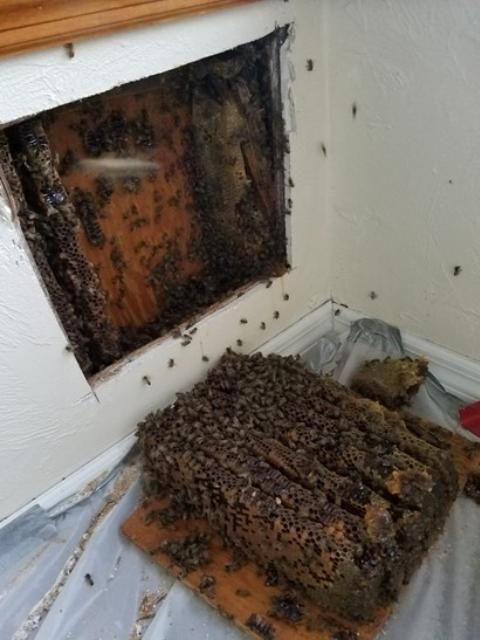
Credit: Jason Deeringer, Bee Serious Bee Removal, LLC
4. Locate and cage the queen.
Look for the queen as you move through the colony. If you find her, gently place her in a queen catcher or cage and put her in the empty hive box. This will keep the queen from flying away and will encourage the worker bees to stay in their new nest.
5. Smoke the comb.
You will need to smoke the bees and combs diligently throughout the following steps.
6. Remove the comb from the nest and hive the bees.
Cut the combs from the cavity and secure them to an empty frame with rubber bands or string, making sure to maintain the combs in their original orientation (top side up), and place the frames in an empty hive box. If the history of the comb is unknown (i.e., if you do not know whether pesticides have been used on the colony in the past), it is best to discard the combs rather than reuse them (when in doubt, throw it out). Brush or vacuum* any remaining adult bees into the hive box. Misting the bees with water/sugar water from a spray bottle can help to keep the bees contained. Having multiple buckets or other containers on hand is useful in this step to sort combs and keep the workspace organized. *See Appendix A for requirements associated with using bee vacuums.
7. Remove all nest contents from the cavity.
After removing the bees and combs, make sure to remove any remaining parts of the nest. Scrape the entire area to clean it of all comb and propolis. If you leave behind comb in a client's structure, secondary pests such as beetles, ants, cockroaches, and flies may move into the structure. The remaining contents may rot, ferment, and even leak into your client's home or property. The remaining cavity will also be attractive to other honey bee swarms.
8. Patch any damage.
You should always create a temporary patch over the hive cavity or entrance to prevent any remaining bees or a new swarm from reentering the nest area. An appropriate patch may be to fill the void with insulation (not spray insulation because the bees will chew through it) and provide a temporary seal with flexible plastic sheeting (such as Visqueen), staples, and/or duct tape. Pursuant to Chapter 489, Florida Statutes, unless you are a licensed and insured contractor, you should not attempt to repair the structure yourself. Always discuss your plan with the client before you perform a live bee removal, and include in the contract the client reads and signs a statement that you cannot be responsible for permanent repairs.
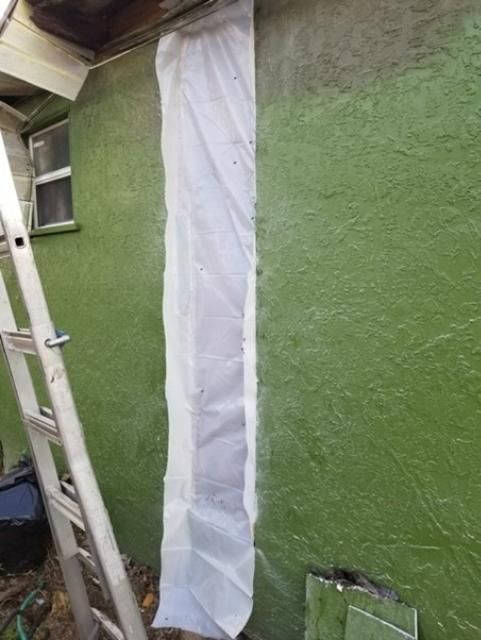
Credit: Jason Deeringer, Bee Serious Bee Removal, LLC
9. Collect loose foragers.
Leave the hive box with the relocated bees and comb at the removal site until nightfall. This will allow time and opportunity for any foraging bees that are away from the nest during the day to return to their colony before it is transported off-site. After nightfall, you can return to the removal site, close the hive box entrance with #8 hardware cloth, crafting foam, or insulation, and secure the hive for transport. Do not completely seal the box; make sure that the bees cannot escape, but that they still have airflow.
It is important that your client knows before work begins that loose foragers may continue to return to the site for many days but will eventually dissipate. This will also be something to keep in mind when you and/or the client coordinate with contractors to make repairs.
Colony Removal via a Trap-out (i.e., the colony is "trapped" out of its nest)
Trap-outs are one way to remove a colony out of a structure, tree, or wall. Trap-outs are a good option for bee removal in situations where a cut-out is not suitable, such as when colonies are found in a live tree or cinder block wall. When using this method, trap boxes should be marked with proper identification, such as personal/business contact information, the date the box was installed, and the apiary firm number. Be sure to add trap-out specifications (such as the extended amount of time the process takes to complete) in the initial agreement with the landowner. Follow these steps for colony removal via a trap-out.
- Locate all the hive entrances/exits.
- Seal off all access points to the colony except the principal entrance. (Do not use foam because bees can chew through it.)
- Set a trap box near the principal entrance of the colony. It is recommended that the trap box include at least one frame of brood to encourage establishment.
- Use an escape cone to connect the trap box to the entrance of the nest the colony is currently using (i.e., the one from which it will be trapped).
- Monitor the trap-out weekly.
- Remove the box when migration is complete (i.e., when the colony has relocated from its original nest site to the trap box).
The process for a trap-out can take weeks, so it is important to mitigate the possibility that the colony will become problematic during or after the trap-out. You will need to schedule regular check-ups on the colony throughout the process, during which you will look for secondary nest entrances that the bees may be using in the tree or structure. Whenever the trap-out method is used, it is important to seal the hive entrance once the removal is complete. This will discourage honey bee swarms from taking over the newly vacant cavity.
Swarm Trapping
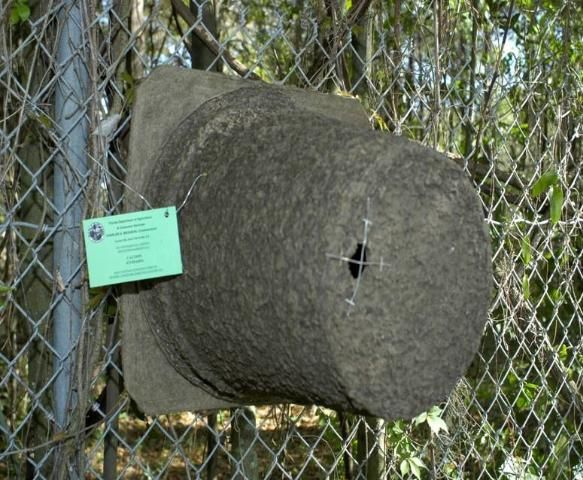
Swarm traps are a precautionary measure through which one captures swarms before they occupy a nesting site from which they may be difficult to remove. Swarm trapping is done by setting out traps in strategic locations. These locations attract cavity-searching scout bees with a lure.
If a client has had a recurring problem with nuisance honey bee colonies on their property, you may recommend that they have swarm traps installed. Swarm trapping may be a service that you as a beekeeper choose to offer to clients.
Equipment Needed for Swarm Trapping
In addition to the items listed above in the section on establishing a safe work environment, the following list details the equipment beekeepers should have on hand when trapping honey bee swarms. All the items below may not be always be necessary; however, by having them on hand you can be prepared for any possible circumstance.
- Swarm trap: There are many trap options that beekeepers can use to collect honey bee swarms. Any swarm traps that you use should be marked with your apiary firm number (see your Florida Beekeeping Certificate of Registration) as well as your contact information (name, phone number, email).
- Lure/attractant: Lures attract scout bees to the swarm trap. There are multiple lure options from which to choose. Many are commercially available, while others can be produced at home. A suitable pheromone attractant can be made by mixing 1 part geraniol with 2 parts citral by volume.
- Attachment/hanging devices: L brackets, concrete and wood screws, racthet straps, wire, duct tape, etc.
- Power tool(s): The type of power tool(s) that you need will depend on the substrate into which you are drilling. Examples of tools that you may use include a drill, screw gun, hammer drill, masonry bit, etc.
- #8 hardware cloth, crafting foam, or insulation
- Hive box
- Bee vacuum (see Appendix A for requirements associated with using bee vacuums)
- Ladder
Installation
You can install your swarm trap once you have the supplies that you will need. Generally, swarm traps should be placed along the perimeter of a client's property or near a location from which a honey bee colony has already been removed. Good trap placement allows for the bees to find the box easily but does not inhibit public access to any facility or structure. Attach the swarm trap in a secure location using the appropriate hardware (i.e., screws, L brackets, wires, ratchet straps, etc.). The substrate onto which you are installing a swarm trap will determine what type of tools you will need to use.
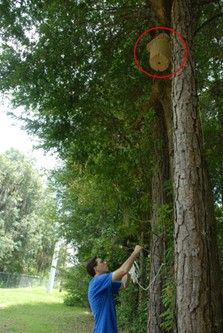
Credit: UF/IFAS Honey Bee Lab
Servicing Traps
Swarm traps should be checked at least once a month during swarm season. Outside of swarm season, they should be checked about every 90 days. The colony should be monitored for up to two weeks to allow time for the entire colony to move into the trap once bee activity is noticed in or around the trap. Occupied traps should be collected after sunset when the foraging bees have returned to the hive. When collected, temporarily seal the trap entrance with #8 hardware cloth, crafting foam, or insulation. Carefully remove the trap from the L brackets and, if desired, replace with a new, empty swarm trap.
After Removals
Your work is not finished even after you have removed honey bees from a structure. You must clean up the site, try to collect any loose bees, and transport the new hive to an apiary where it can be managed, all before a job can be considered complete. Before you begin a removal, let the clients know what will happen after the removal so that their expectations are accurate.
Clean Up
After you have removed the colony and patched any cavities, clean up the work area. Keep rags, wet wipes, a broom, and a dust pan on hand for clean up after bee removals.
Communication
Your clients should always have a way of contacting you after you have performed a bee removal on their property. Make sure to leave your phone number and/or email address at the removal location.
Transportation
Equipment Needed for Hive Transportation
- Securing device (e.g., ratchet strap, tie-down strap, hive staples, plumbing hanger straps with screws)
- Window screening or hardware cloth
- Enclosed truck bed/trailer
- Hive net
- Red-light flashlight
- Hive body or bodies marked with your beekeeper firm number
After a live bee removal, the new hive must be properly secured for transportation. This can be done by strapping the hive parts (lid, hive body, bottom board) together with a ratchet strap or other tie-down strap, hive staples, or plumbing hanger straps with screws. You can seal the entrance to the colony by covering it with hardware cloth or window screening. The relocated colony should be transported in an enclosed truck bed or trailer or covered with a hive net. At night most forager bees will be back in the colony, so moving colonies at night will leave fewer of them behind. A red-light flashlight can help facilitate moving colonies at night.
Removed colonies should be relocated into boxes that have been marked with the FDACS firm number of the beekeeper to whom the relocated colony now belongs. The only time that a managed honey bee hive in Florida does not need to be marked with a beekeeper's firm number is when the colony was produced (or removed) to be sold by a registered stock dealer. For more information on beekeeper registration, firm numbers, and Florida stock dealers, see the FDACS Apiary Inspection website (https://www.fdacs.gov/Agriculture-Industry/Bees-Apiary/Apiary-Inspection).
Establishing New Hives
Once the colony has been transported away from the removal site, it should be transferred into beekeeping equipment with movable frames (Rule 5B-54.011(4), Florida Administrative Code). It may be prudent to keep the relocated colony in a "quarantine apiary" for some time to prevent the spread of honey bee pests and diseases into your beekeeping operation. You may move the new hive into your established bee yard once you have controlled any pest and disease threats in the hive.
Open the entrance once the new hive is moved to its new apiary. One to three days later, the queen can be released from her cage. Colonies that have been removed in Florida should be requeened with a mated queen of known, European-derived genetic stock.
Nuisance colonies that are removed by beekeepers must be put back into production, producing honey or other hive products and/or being used for crop pollination (Rule 5E-14.151, F.A.C). Keep detailed records of the state and location of any removed and relocated colonies to ensure that you comply with this rule.
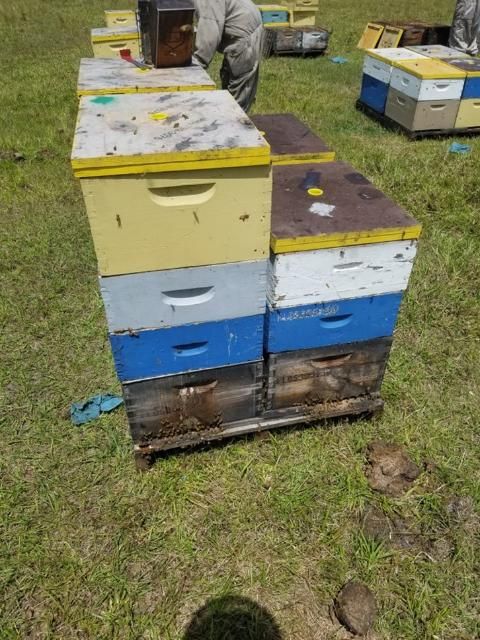
Credit: Jason Deeringer, Bee Serious Bee Removal, LLC
Conclusion
Beekeepers and live bee removal experts play an important role in the maintenance of public safety and the continued growth of the beekeeping industry in Florida. The live removal of honey bee colonies itself is an essential and thriving industry. To maintain the integrity and effectiveness of this trade, standards of practice need to be widespread among beekeepers. The purpose of this publication is to offer Florida beekeepers a set of Best Management Practices to use when performing live bee removals around the state. Beekeepers providing such services are encouraged to follow these practices before, during, and after the live removal of honey bee colonies to ensure the safety of the owner or authorized agent, themselves, other beekeepers, and members of the public, as well as for the safety of bees that are removed and relocated.
Selected Resources
Division of Workers' Compensation: https://www.myfloridacfo.com/Division/wc/
Florida Department of Agriculture and Consumer Services Apiary Inspection Section
Apiary Inspection: https://www.fdacs.gov/Agriculture-Industry/Bees-Apiary/Apiary-Inspection
Beekeeper Registration: https://www.fdacs.gov/Agriculture-Industry/Bees-Apiary/Beekeeper-Registration
Bee Removal and Eradication in Florida: https://www.fdacs.gov/Consumer-Resources/Consumer-Rights-and-Responsibilities/Pest-Control/Honey-Bee-Removal-or-Eradication-in-Florida
Florida Department of State, Get a Business License: https://dos.myflorida.com/library-archives/research/florida-information/business/starting-a-business-in-florida/small-business/license/
Occupational Safety and Health Administration: https://www.osha.gov/
UF/IFAS Extension Documents
Africanized Honey Bees, EDIS Subtopic: https://edis.ifas.ufl.edu/entity/topic/africanized_honey_bee
Bee-Proofing for Florida Citizens: https://edis.ifas.ufl.edu/in741
Choosing the Right Pest Control Operator for Honey Bee Removal: A Consumer Guide: https://edis.ifas.ufl.edu/in771
Living with the African Honey Bee: https://edis.ifas.ufl.edu/in1205
Removal of Swarms and Colonies for Pest Control Operators: https://edis.ifas.ufl.edu/in778
Swarm Trapping for Pest Control Operators: https://edis.ifas.ufl.edu/in785
APPENDIX A. Tool and Equipment List for Live Bee Removals
Protective Gear
- Bee veil
- Bee suit and/or jacket
- Beekeeping gloves or other protective gloves
- Full coverage clothes (pants, long shirt, closed-toe shoes)
- Sun protection (unscented sunscreen, sunglasses, etc.)
- Smoker with fuel and lighter
- First aid supplies
- Water
Additional Swarm Removal Supplies
- Blanket/tarp/drop cloth
- Queen cage/catcher
- Empty hive box, bottom board, lid
- Frames
- Bee brush
- Bee vacuum (See requirements below this list.)
- #8 hardware cloth (?-inch mesh), crafting foam, insulation, or other materials appropriate for closing the hive entrance
Additional Established Colony Removal Supplies
- 5-gallon buckets or other containers with lids
- Bee brush/feather duster
- Honey bee repellent (Beekeepers use this repellent to repel bees from honey supers. It can be purchased from beekeeping equipment supply companies.)
- Bee vacuum (See requirements below this list.)
- Borescope/snake camera or thermal imaging camera
- Broom and dustpan
- Camera (for documentation)
- Comb cutting tool (e.g., box cutter, knife, hive tool)
- Duct tape
- Extension cord
- Flexible plastic sheeting
- Hand tools (hammer, screwdrivers, pry bar, paint scraper, etc.)
- Hive box(es) with bottom board(s), lid(s), and frames
- Ladder
- Large rubber bands/string
- Non-spray insulation
- Portable generator
- Power tools (hole saw, circular saw, keyhole saw, angle grinder, reciprocating saw, drill, etc.) with proper attachments (bits, blades, etc.) (Check OSHA guidelines related to drilling/cutting into concrete, cement, brick, plaster, or stucco.)
- Queen catcher/queen cage
- Rags
- Red-light flashlight
- Safety goggles/face mask
- Scissors for cutting other materials to size
- Serrated knife
- Spray bottle with water
- Staple gun and staples
- Wet wipes
- Window screening or hardware cloth
Additional Swarm Trapping Supplies
- Trap box
- Lure/bait
- L brackets
- Screws (wood and concrete assortment)
- Power tool(s)
- Examples of tools that you may use include a drill, screw gun, hammer drill, masonry bit, etc.
- #8 hardware cloth, crafting foam, or insulation
- Hive box
- Bee vacuum (See requirements below this list.)
- Ladder
Colony Transportation Supplies
- Securing device (e.g., ratchet strap, tie-down strap, hive staples, plumbing hanger strap with screws)
- Enclosed truck bed/trailer
- Hive net
- Red-light flashlight
- Hive body(ies) marked with beekeeper firm number
An unmodified shop vacuum is classified as a pest control device if it is used to remove bees. Even if you use a vacuum solely for cleanup after a live bee removal, it must be a vacuum specialized to bee removal to prevent unintended harm to bees and to make it abundantly clear to observers that you are not performing pest control without a license. If you use a vacuum, you must either purchase a vacuum specified for that purpose or make the following modifications to a non-bee-specific vacuum. The vacuum must have:
- a removable holding container,
- an adjustable suction/regulator, and
- a short hose with a smooth (not ridged) interior surface.