Introduction
This publication is intended to educate homeowners on environmentally friendly ways to enhance soil fertility for vegetables, herbs, and fruits in the home landscape. It discusses strategies for recycling nutrients in place or via composting systems to create productive edible landscapes with less waste. Adopting these methods into your landscape maintenance routine will build organic matter and add nutrients to the soil naturally.
Nutrient-Cycling
When edible plants are grown and consumed, some nutrients are transferred to the consumer and lost from the garden ecosystem. The same net loss of nutrients happens when you rake, bag, and haul away yard waste to be composted at the landfill. Over time, this can result in a net loss of nutrients, which can result in a decrease in soil fertility, unless these nutrients are replenished in some way. Therefore, soils need to be managed and nutrients need to be replenished to sustain fertility. Nutrient cycling is an integral part of a sustainable landscape. Florida-Friendly Landscaping™ principle number seven, "Recycle Yard Waste," encourages strategies that keep nutrient-containing organic wastes on site and that minimize the export and import of organic materials, such as mulch, compost, and fertilizer (for more information, visit https://ffl.ifas.ufl.edu/handbook/Recycle_Yard_Waste_vSept09.pdf).
Grass-Cycling
Grass-cycling is a strategy to cycle nutrients in place while adding organic matter to the landscape. Grass clippings contain water and nutrients, which can be returned to the lawn by decomposition (the process by which materials chemically break down) and have potential to benefit edibles in your landscape. Root systems from fruit and other trees reach far beyond their canopy and benefit from nutrients in the surrounding lawn, which can be provided via grass-cycling. Simply use the mulch setting on your mower and leave grass clippings on the lawn to increase organic matter and return nutrients to the soil over time. If extra grass clippings result in clumping, rake the clippings for more even distribution. For more information, Herbicide-Contaminated Compost and Soil Mix: What You Should Know—and What You Can Do About It: https://extension.oregonstate.edu/catalog/pub/em-9307-herbicide-contaminated-compost-soil-mix-what-you-should-know-what-you-can-do.
Tree-Cycling
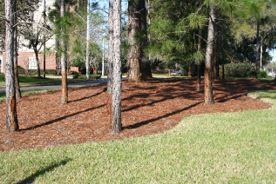
Tree leaves can be an important source of organic matter in the edible garden or the compost pile. Fallen leaves can be raked around fruit trees and into vegetable garden beds, where they will act as mulch to protect the soil. Leaves decompose, slowly adding organic matter and improving soil health. Branches and other pruned woody materials can be broken down or chipped for mulch. Do not leave fallen fruit, because it can attract pests, nor diseased leaves, because they can harbor diseases. For more information on tree-cycling, visit Tree-cycling: https://blogs.ifas.ufl.edu/orangeco/2020/09/23/tree-cycle-recycle-your-fall-leaves/.
Credit: UF/IFAS
Compost
Composting is an integral part of creating a sustainable Florida-Friendly edible landscape. Some Florida soils are naturally low in organic matter, often less than 1.5%. Amending soil with compost will gradually improve the soil's quality and structure, including fertility, water-holding capacity, aeration, buffering capacity (soil's resistance to sudden changes in pH), and suppressing nematodes. Florida's soils, whether sand, silt, clay, or loam, can benefit from the addition of organic matter provided by compost. See Soils and Fertilizers for Master Gardeners: Soil Organic Matter and Organic Matter Amendments (https://edis.ifas.ufl.edu/mg454).
By following a few simple steps, you can easily create compost for your Florida-Friendly edible garden while diverting waste from the landfill. Composting requires attention to material size and composition, moisture, aeration, and temperature. The degree of attention provided to these elements, along with your composting goals, will factor into which method of composting is right for you.
Three main methods of composting include slow/cold composting, fast/hot composting, and vermiculture/worm composting. Slow (or "cold") composting is the simplest method. It involves creating a pile of organic matter and letting it sit as long as it needs to decompose and turn into compost (from a few months to over a year). Slow composting is ideal for those who do not have the time or resources to practice the fast (or "hot") composting methods. If your goal is to create compost quickly and efficiently, practice the fast (hot) method as detailed in this publication.
Hot Composting
Requirements for efficient hot composting include the following:
- Appropriate material
- Moisture
- Aeration
- Temperature
- Microorganisms
Materials
Compost requires the right balance of two types of materials: greens (nitrogen source) and browns (carbon source).
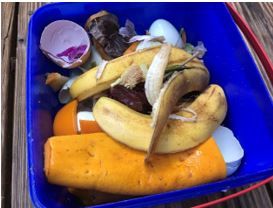
- Greens have a high moisture content, decompose quickly, and provide microorganisms with nitrogen, which is a fundamental component of proteins and nucleic acids required for growth and reproduction. Examples include grass clippings, plant trimmings, vegetable scraps, coffee grounds, and seaweed.
- Browns decompose more slowly and serve as an energy source for the microorganisms. Examples include leaves, pine needles, peanut shells, paper towels, wood chips, and shredded newspaper.
Materials have various carbon to nitrogen ratios. A 2:1 ratio of browns to greens by volume, such as two parts shredded leaves to one part vegetable scraps, will create a balanced compost pile. Smaller particles will decompose faster than larger ones, so it helps to chip twigs and shred leaves to 6" or smaller before adding to the pile.
Credit: Tiare Silvasy, UF/IFAS
Do not compost the following:
- Meat, bones, fatty food waste, or dairy products (attracts pests and emits bad odor)
- Invasive exotic plants (seeds may not breakdown thoroughly)
- Human or pet waste (possibility of disease that is transmittable to humans)
- Chemically treated products (could affect plants)
- Diseased plants or weed seeds (possibility of transmitting disease or weed seeds to new garden)
- Plants that have been treated with pesticides (potentially toxic to humans, plants, or the environment).
For more information, see Herbicide Residues in Manure, Compost, or Hay: https://edis.ifas.ufl.edu/publication/ag416.
Moisture
Microbes, which are responsible for breaking down organic matter into compost, require moisture to thrive. Therefore, it is helpful to locate your compost pile near a water source or allow it to receive natural rainfall. Compost should be moist, but not soggy, with an ideal moisture level of 40% to 60%—about as moist as a wrung-out sponge.
Aeration
Aeration is another essential component of converting organic matter into compost because it helps microbes work efficiently and reduces unpleasant odors. Aeration is the process of allowing air to combine with composting materials. If the compost pile has a foul odor, it is likely too wet or has too many "greens," signifying a need for turning and/or additional "brown" materials. How frequently the pile is turned largely determines how fast finished compost is made. Turning the pile once a week with a pitchfork will facilitate faster decomposition by bringing oxygen to microbes in the center of the pile. A properly aerated compost pile will speed up decomposition, and therefore turning the pile is recommended. If not mixed and watered as frequently, the pile will still decompose, just over a longer time frame.
Temperature
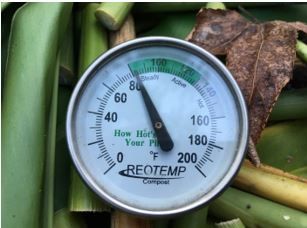
Temperature of the pile is another determining factor in how quickly decomposition will occur. Temperature will depend on the size of the compost pile, available oxygen, and moisture content. The most effective temperature range for creating compost is between 122°F and 131°F. Temperatures between 133°F and 140°F will destroy diseases and weed seeds, but it is difficult to maintain that heat for an extended period. Long-stemmed compost thermometers are available to monitor temperatures.
Credit: Tiare Silvasy, UF/IFAS
Microorganisms at Work
Different communities of beneficial microorganisms, such as fungi and bacteria, predominate during various composting phases. Different types of microbes thrive at low, moderate, and high temperatures. The low-temperature organisms start the composting process and raise the temperature above the surrounding environment. Next, the moderate-temperature organisms cause the temperature to rise rapidly. After the temperature reaches 100°F, a different set of organisms take over. Eventually, these high-temperature organisms will become exhausted, and the temperature will slowly decrease. As this happens, the moderate-temperature organisms take over again for the final "curing" phase of the organic matter. When the pile has reached the final stage of curing, let it sit for several months and start a new pile.
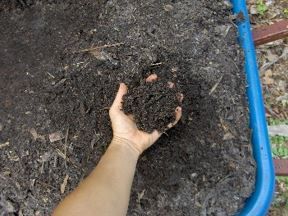
Finished compost, which is dark brown, crumbly in texture, and possesses a sweet, "earthy" smell, can be used as a soil amendment, mulch, or addition to potting mix for fruit trees, vegetables, and herbs. For a more uniform finished product, sifters, such as wire mesh attached to a frame, can be used to separate larger particles. These particles can be returned to the new compost pile to break down further. The Living Soil: https://cmg.extension.colostate.edu/Gardennotes/212.pdf.
Compost Bins
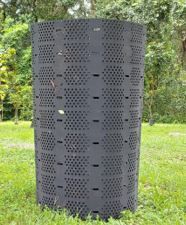
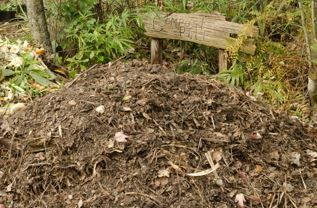
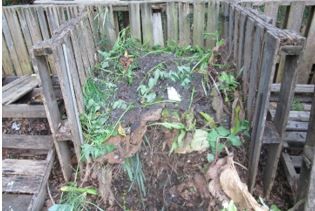
Many styles of receptacles are available to facilitate composting. The overall dimensions of the pile or receptacle need to be at least one cubic yard (3'×3'×3') to enable the mix to reach desired temperatures. The most important factors to consider are overall dimensions, ability to aerate or mix the materials, ability to add moisture, and accessibility to add materials or remove finished compost.
When adding new material to the compost pile, layer greens and browns in 3" to 4" layers, or mix greens and browns together before adding to the pile. Top with a brown or carbon layer to seal in potential odors.
Credit: Lynn Barber, UF/IFAS
Credit: Tiare Silvasy, UF/IFAS
Credit: Tiare Silvasy, UF/IFAS
Troubleshooting for Effective Composting
- If the pile has a foul odor, mix in more carbon sources, turn the pile to increase oxygen, or open the pile up to dry.
- If the pile is too cool, add more nitrogen sources, turn the pile to increase oxygen, or adjust the moisture level. For more information, visit Compost Tips for the Home Gardener: https://edis.ifas.ufl.edu/ep323.
Compost Use in the Edible Garden
Compost is a sustainable soil amendment that can make your edible garden more Florida-Friendly and can be produced by following a few easy guidelines. A two-inch layer of compost can be broadcast over the garden and incorporated six inches into the soil two to three weeks before planting. Compost can also be used to top-dress edibles in containers as well as in the ground to improve soil structure, increase moisture-holding capacity, and reduce irrigation needs.
Compost slowly releases major and minor elements necessary for plant growth and can suppress certain soilborne diseases. Nutrient content varies according to each batch of compost and is typically too low to supply the necessary nutrients for vegetables, so supplemental fertilizer may still be required. While pH can vary from batch to batch, finished compost typically has a pH of 6.5 to 7.0. The UF/IFAS Extension Soil Testing Laboratory offers a service to test the pH and nutrient content of container media, which is suitable for testing compost as well: https://edis.ifas.ufl.edu/ss185. Check with your local UF/IFAS Extension office because they may perform pH testing. To locate your local UF/IFAS Extension office, go to https://sfyl.ifas.ufl.edu/find-your-local-office/.
Credit: Tiare Silvasy, UF/IFAS
Vermiculture
Vermiculture is the practice of using worms to recycle organic waste and turn it into nutrient-rich compost composed of worm castings (worm manure). The castings resemble fine-textured soil and can be used similarly to regular compost. Vermiculture can be a preferable option for those who do not have an appropriate location outside for a larger composting system, or as an additional source of nutrient-dense solid compost or liquid/compost tea.
Composting with worms requires a few basic materials:
- Worms
- Bin
- Carbon/nitrogen sources
- Moisture
- Proper temperature
Worms
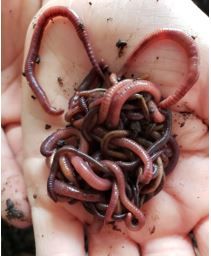
Composting worms are a different species of earthworm than live in the ground. Red wigglers, Eisenia fetida, are the most common type of worm used in vermiculture and naturally live aboveground in leaf litter. To simulate their natural leaf litter environment, use shredded paper, cardboard, or leaves for bedding and as a carbon source. The "bedding" is the base and top of each worm bin layer, and the fresh food/nitrogen source is in between.
Credit: Terra Freeman, UF/IFAS
Bin
Worm composting bins can have one or multiple layers. The single-layer method requires two shallow bins, between 8 and 12 inches deep, placed one inside the other. Drill holes in the lid of the top bin for aeration and its bottom for drainage. The top bin will house all the materials, including worms, bedding, food scraps, and worm castings. Place the second bin below to capture liquid that will drain out of the top bin.
To harvest the worm castings, simply dump the finished compost onto a tarp and separate the worms from the finished castings by hand. They will retreat from the light and gravitate towards the inner pile, leaving you with mostly worms and some starter castings to restart a fresh bin.
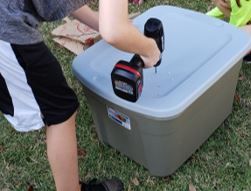
Credit: Terra Freeman, UF/IFAS
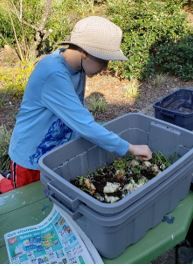
Credit: Terra Freeman, UF/IFAS
Worm bins with multiple layers are an option that enables easier harvesting of the finished castings. When using a bin with multiple layers, one layer can be used as the active feeding layer while the other layers are curing. The layers are rotated and allow the worms to crawl into the active feeding layer while leaving the finished worm castings for harvest.
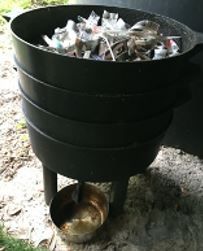
Credit: Tiare Silvasy, UF/IFAS
Carbon and Nitrogen Sources
As with other methods of composting, vermiculture requires a mixture of carbon (brown) and nitrogen (green) sources to keep a balanced bin that will supply nutrients to the worms while remaining odorless.
Line the bottom of the bin with bedding (dried leaves or untreated, shredded newspaper) and slightly dampen with water. Add the nitrogen source (food scraps, etc.), then top with the carbon source (shredded paper, etc.) layer to seal in odors and provide fresh bedding for the worms.
Red wiggler composting worms eat mostly fruit and vegetable scraps, along with tea bags, bread, and nutshells. They prefer smaller, chopped-up particles of food scraps, especially coffee grounds and the pulpy by-product from juicing. Some foods to avoid include oils, meat, and dairy, because they can create unpleasant odors and harbor pathogens, and citrus and onion, because they are difficult for the worms to break down. As you generate kitchen scraps, simply toss them into the worm bin and cover with a carbon source. They can be fed daily or weekly—the more food supplied, the more compost will be created. Ensure the lid is closed tightly each time to prevent worms from escaping.
Worms do not have teeth, and like a bird, they break down food in their gizzard. It is recommended to add "grit," such as rock dust, eggshells, or azomite, to aid in the digestive process in the worm's gizzard. These mineral-rich additives will also improve the nutrient quality of your finished compost, which will help your plants grow.
Moisture
Worms need moisture because they breathe through their skin; therefore, it is important to keep the bedding moist, but not wet. An easy way to provide moisture is with a spray water bottle. At times, the contents may become too wet, in which case you can add additional bedding to soak up the excess. Also, make sure that the bottom drainage holes are not clogged and the liquid is freely draining to the bottom bin.
Temperature
The most productive temperature for red wigglers is between 60°F to 80°F. Store bin in a dry, dark location protected from the elements.
Use
Worm castings are often much higher in nutrients than traditional garden compost. For a detailed analysis, visit https://aces.nmsu.edu/pubs/_h/H164/welcome.html. Add the nutrient-rich worm castings to potting soil, top-dress container plants, mix into vegetable garden soil, or use in any other way you would regular compost. "Compost tea" that drains into the bottom bin can be used similarly to a liquid fertilizer, but one that instead provides beneficial microorganisms to the environment. This tea can be diluted to a 1:1 or 1:5 tea:water solution.
Summary
There are many ways to recycle yard wastes in your Florida-Friendly edible landscape. Use some or all of these strategies to maintain a healthy edible landscape. Creating your own soil amendments and mulch will assist with feeding the soil and enhancing plant growth, as well as reduce labor costs and environmental impacts of bagging, hauling, and buying landscape materials, such as mulch, compost, and fertilizer.
Resources
Can I Compost It?: https://sfyl.ifas.ufl.edu/sarasota/natural-resources/waste-reduction/composting/what-is-composting/what-can-be-composted/can-i-compost-it/
Compost: https://sfyl.ifas.ufl.edu/sarasota/natural-resources/waste-reduction/composting/
Compost Microorganisms: http://compost.css.cornell.edu/microorg.html
Compost Tips for the Home Gardener: https://edis.ifas.ufl.edu/ep323
Composting and Mulching: https://extension.uga.edu/publications/detail.html?number=C816
Florida-Friendly Landscaping™ Recycle Yard Waste: https://ffl.ifas.ufl.edu/handbook/Recycle_Yard_Waste_vSept09.pdf
Grass-cycling: https://sfyl.ifas.ufl.edu/sarasota/natural-resources/waste-reduction/composting/what-is-composting/what-can-be-composted/grass-cycling/
Guidance for Amending Urban Soils with Organic Amendments: https://floridawaterstar.com/static/pdfs/Guidancc-for-Amending-Urban-Soils-with-Organic-Amendments_Final_20201012.pdf [updated 4/29/2022]
Herbicide-Contaminated Compost and Soil Mix: What You Should Know—and What You Can Do About It https://extension.oregonstate.edu/catalog/pub/em-9307-herbicide-contaminated-compost-soil-mix-what-you-should-know-what-you-can-do
Organic Vegetable Gardening in Florida: https://edis.ifas.ufl.edu/hs121
The Living Soil https://cmg.extension.colostate.edu/Gardennotes/212.pdf
Soils and Fertilizers for Master Gardeners: Soil Organic Matter and Organic Matter Amendments: https://edis.ifas.ufl.edu/mg454
Soil Sampling and Testing for the Home Landscape or Vegetable Garden: https://edis.ifas.ufl.edu/ss494
Tree-cycling: https://blogs.ifas.ufl.edu/orangeco/2020/09/23/tree-cycle-recycle-your-fall-leaves/
Vermicompost—Cheap and Easy Worm Bin: https://sfyl.ifas.ufl.edu/media/sfylifasufledu/orange/hort-res/docs/pdf/021-Vermicomposting---Cheap-and-Easy-Worm-Bin.pdf
Vermicomposting: https://aces.nmsu.edu/pubs/_h/H164/welcome.html